
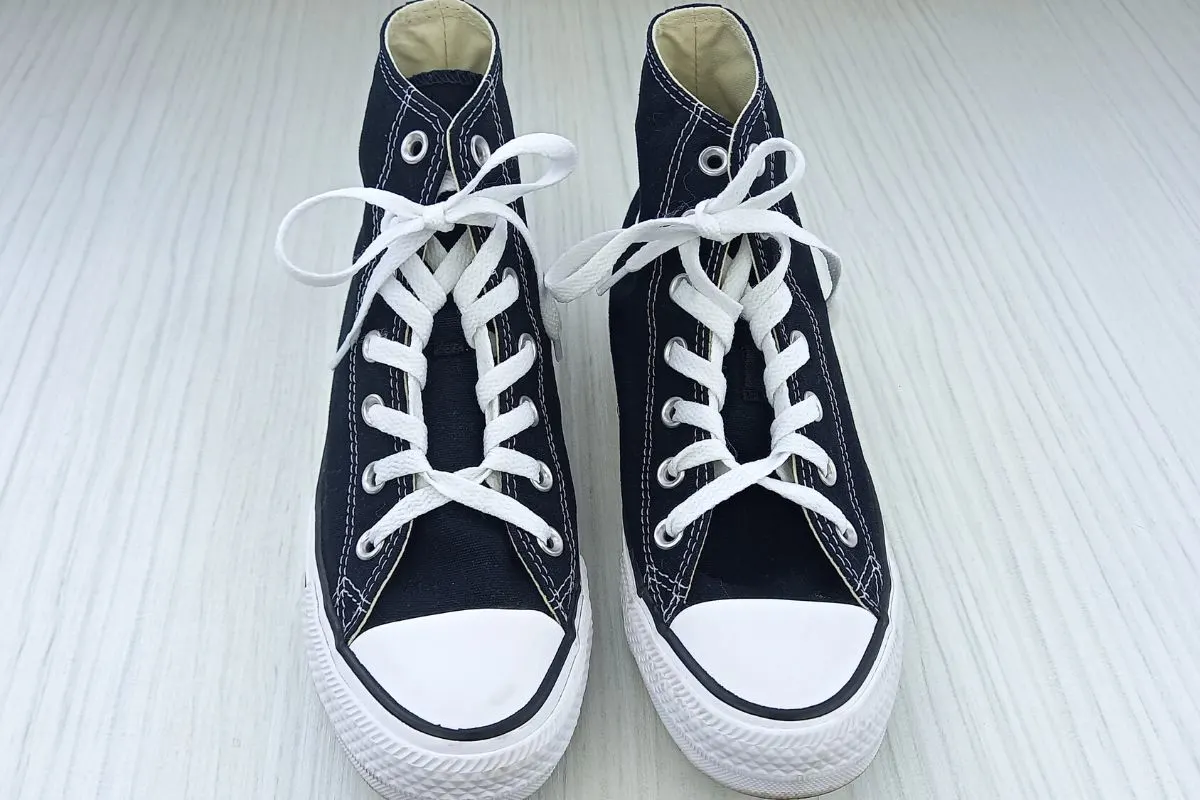
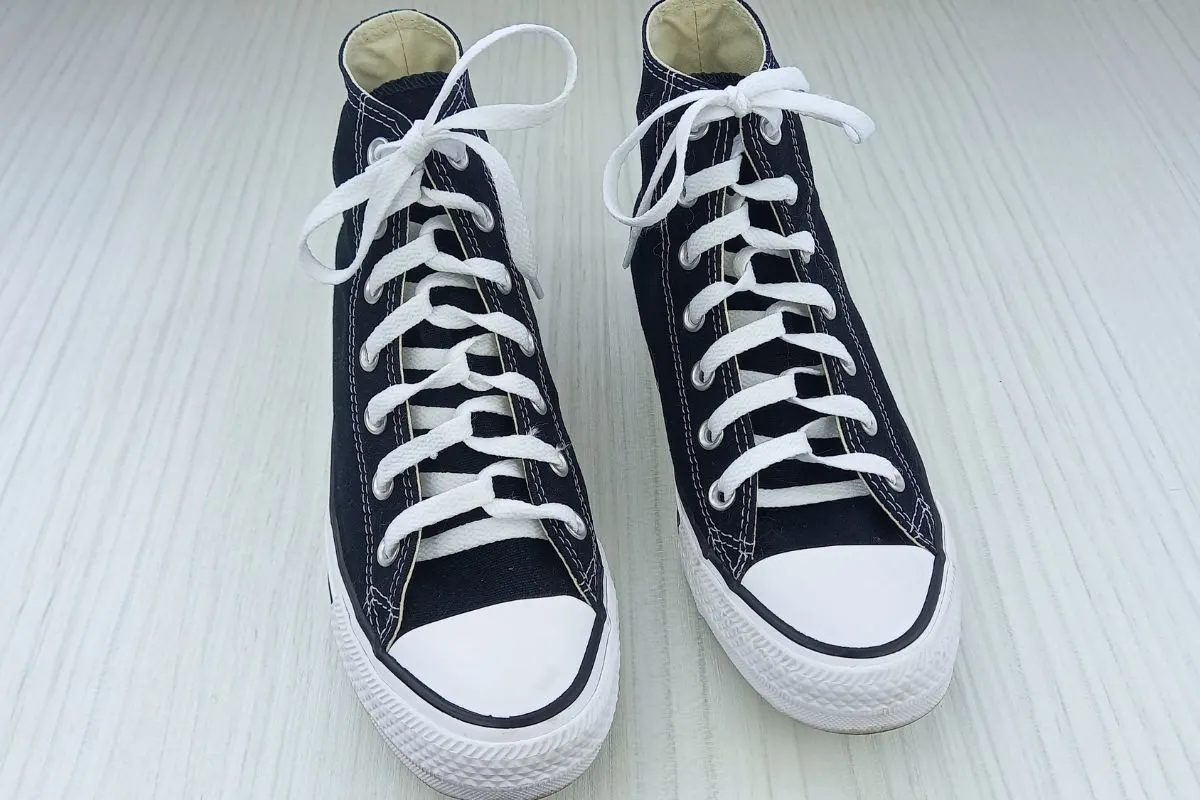
Trying out some cool new ways to lace your shoes is a quick and easy way to elevate your footwear game.
Take a boring old pair of shoes and give them a new look for free, by lacing them up in a fresh new way. In this guide I have provided 15 cool styles for you to try.
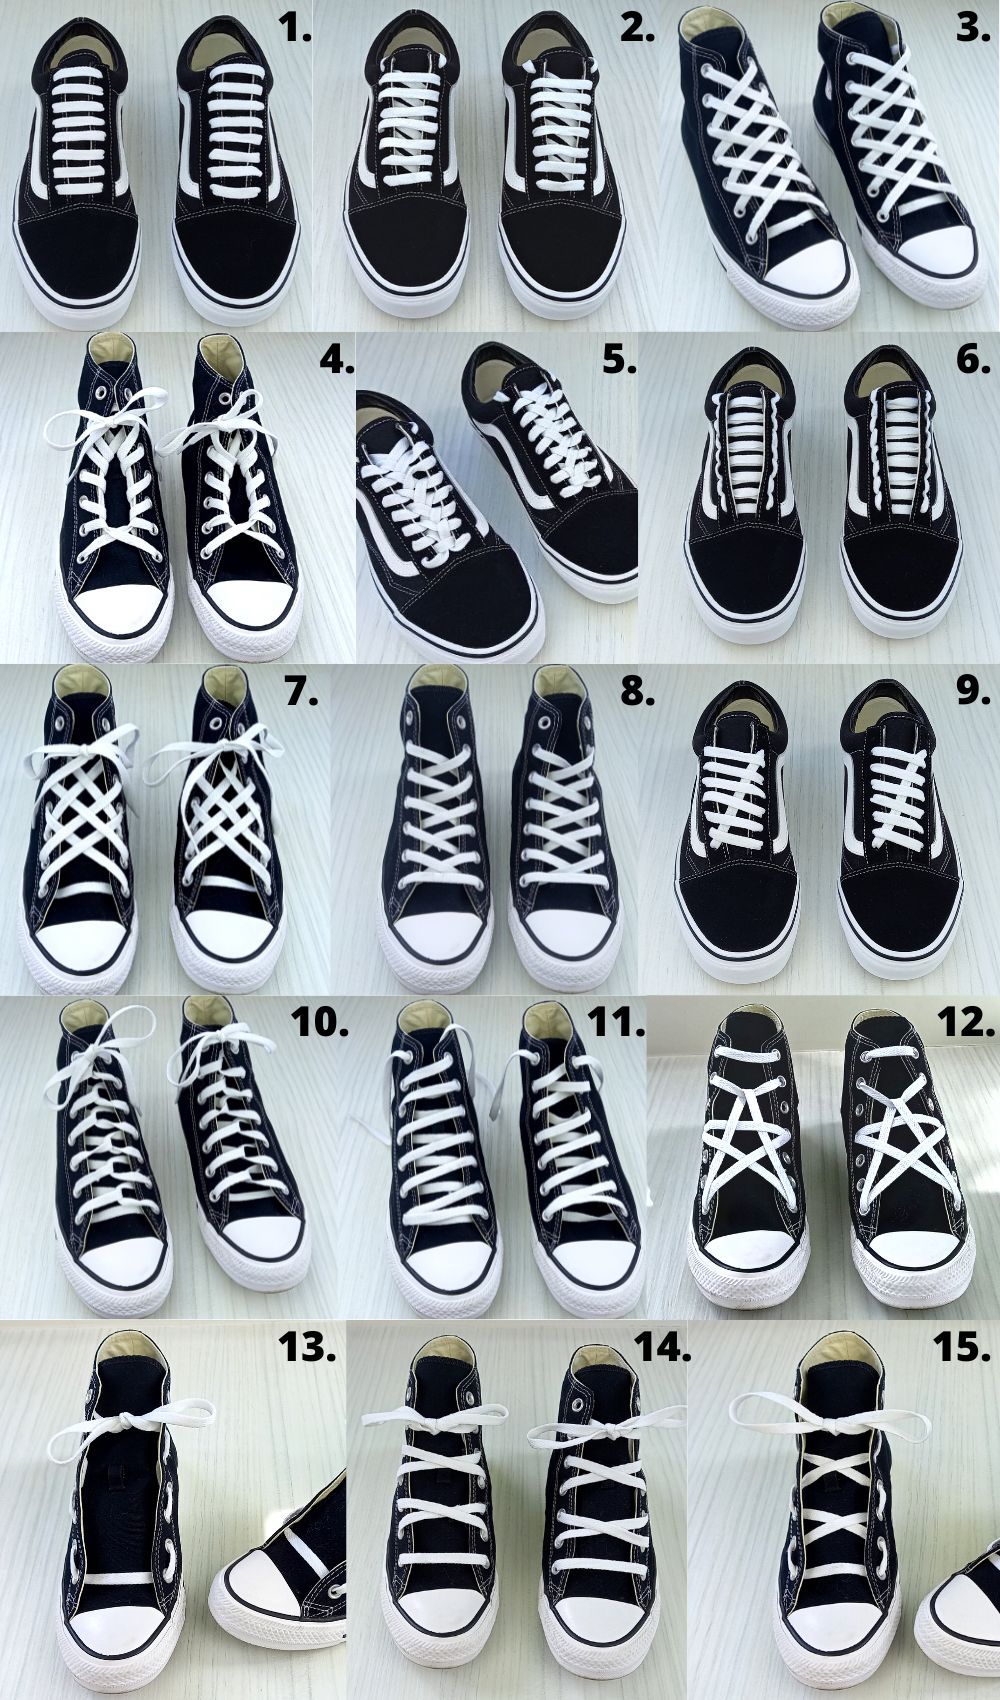
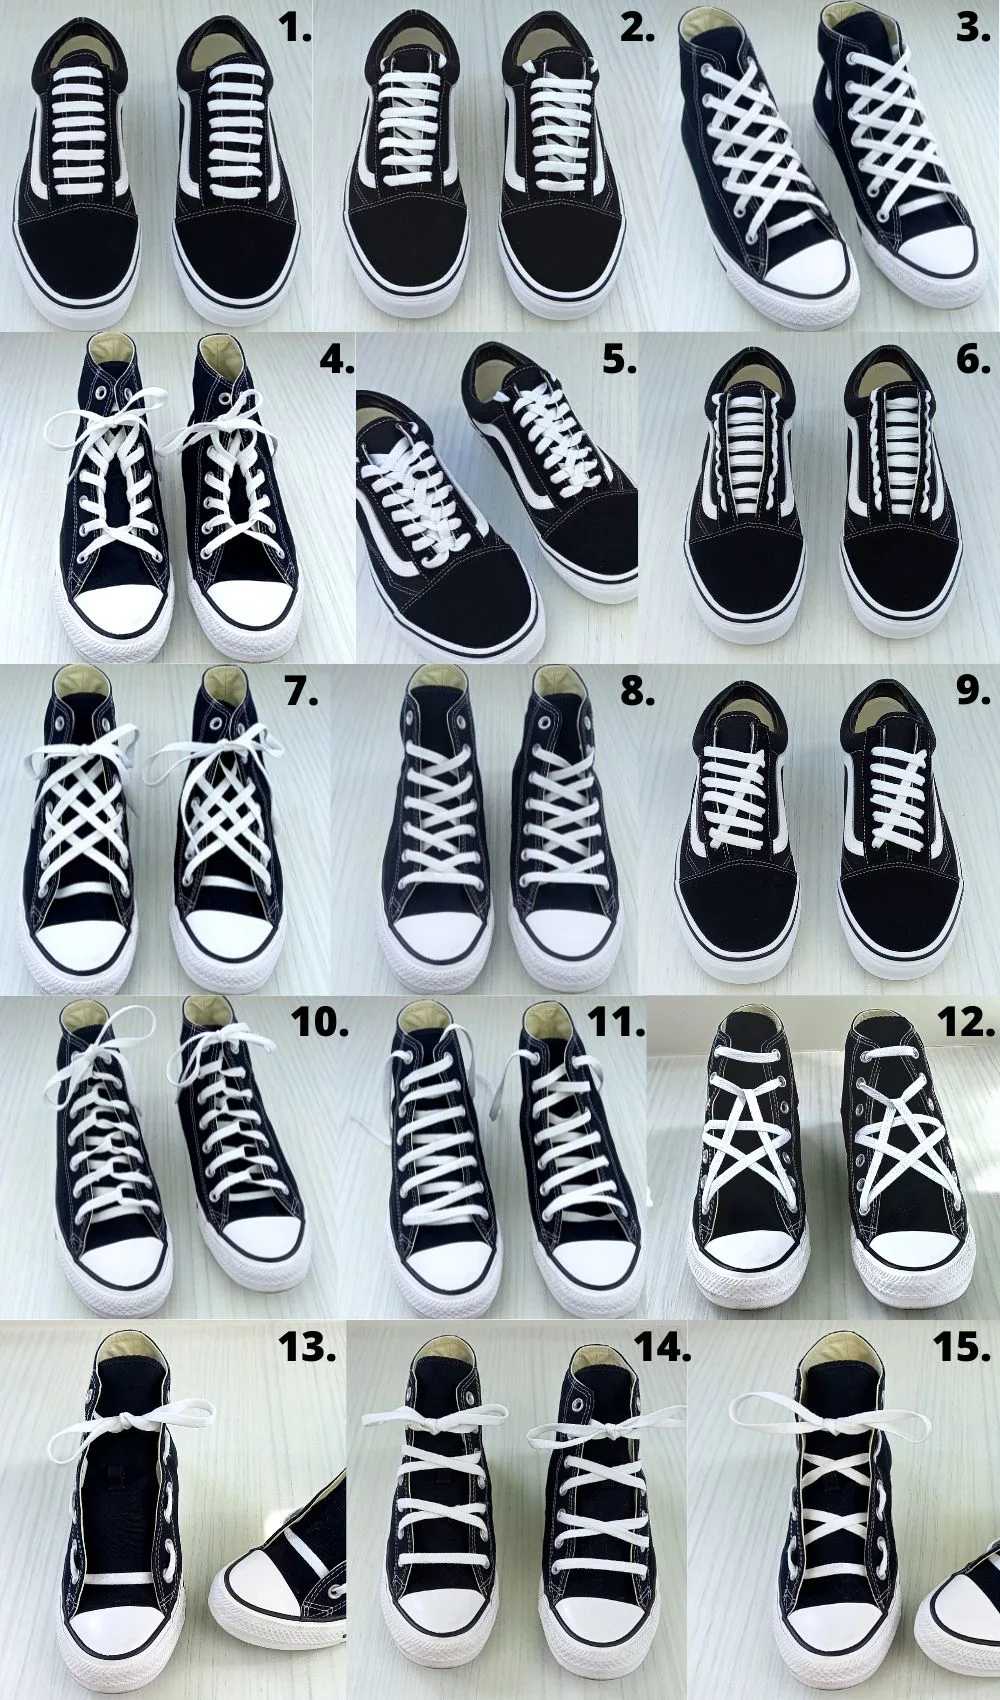
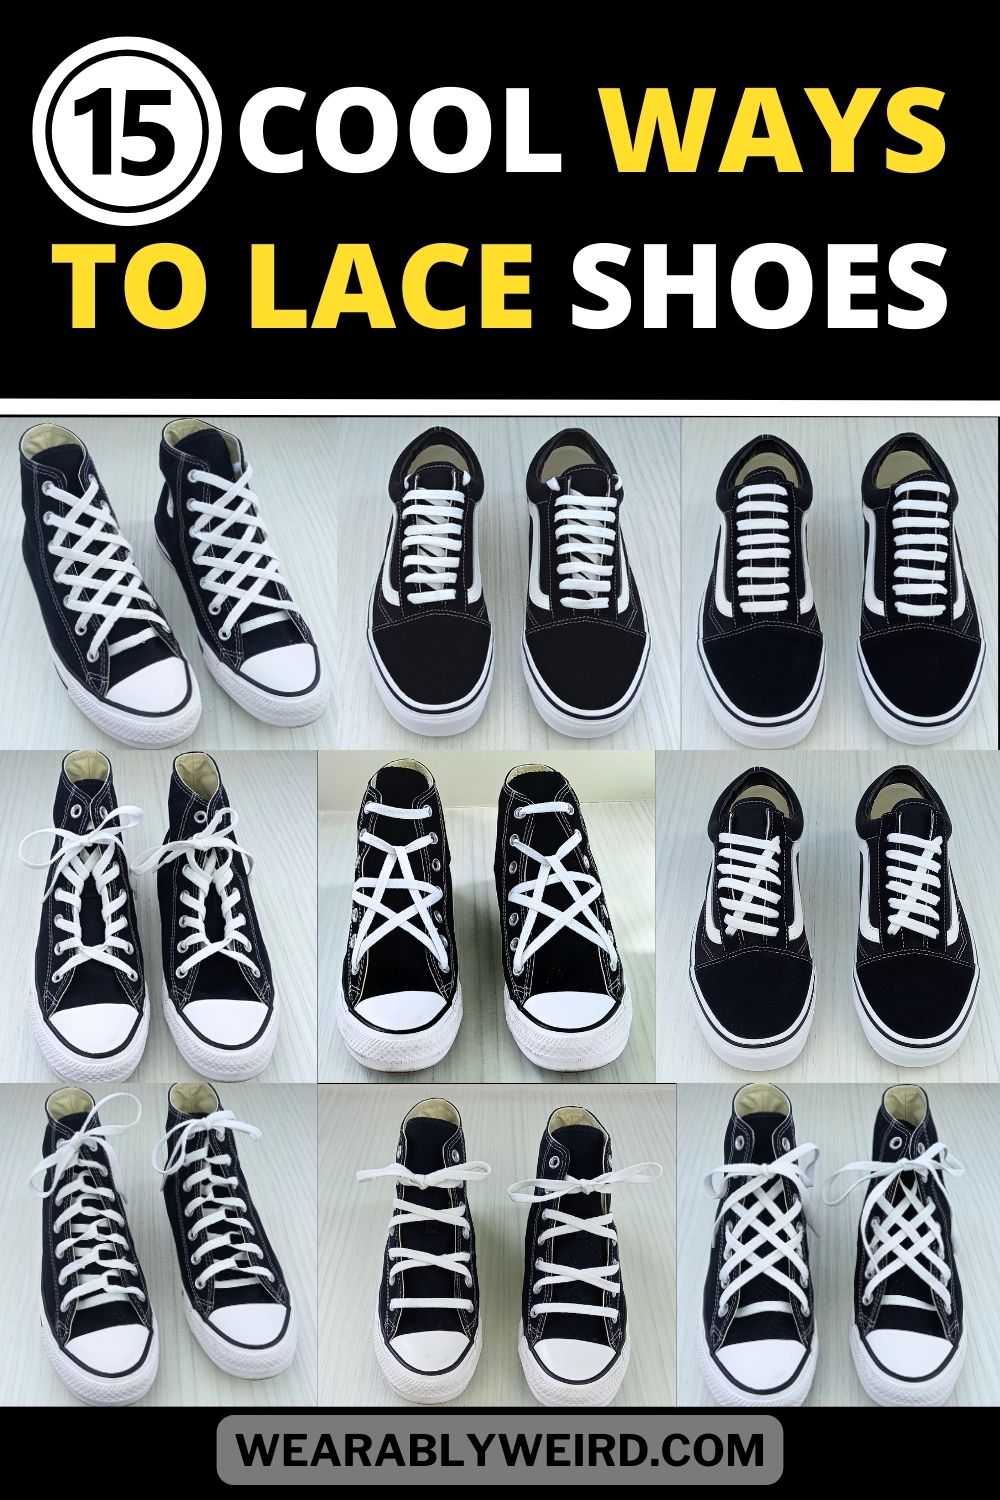
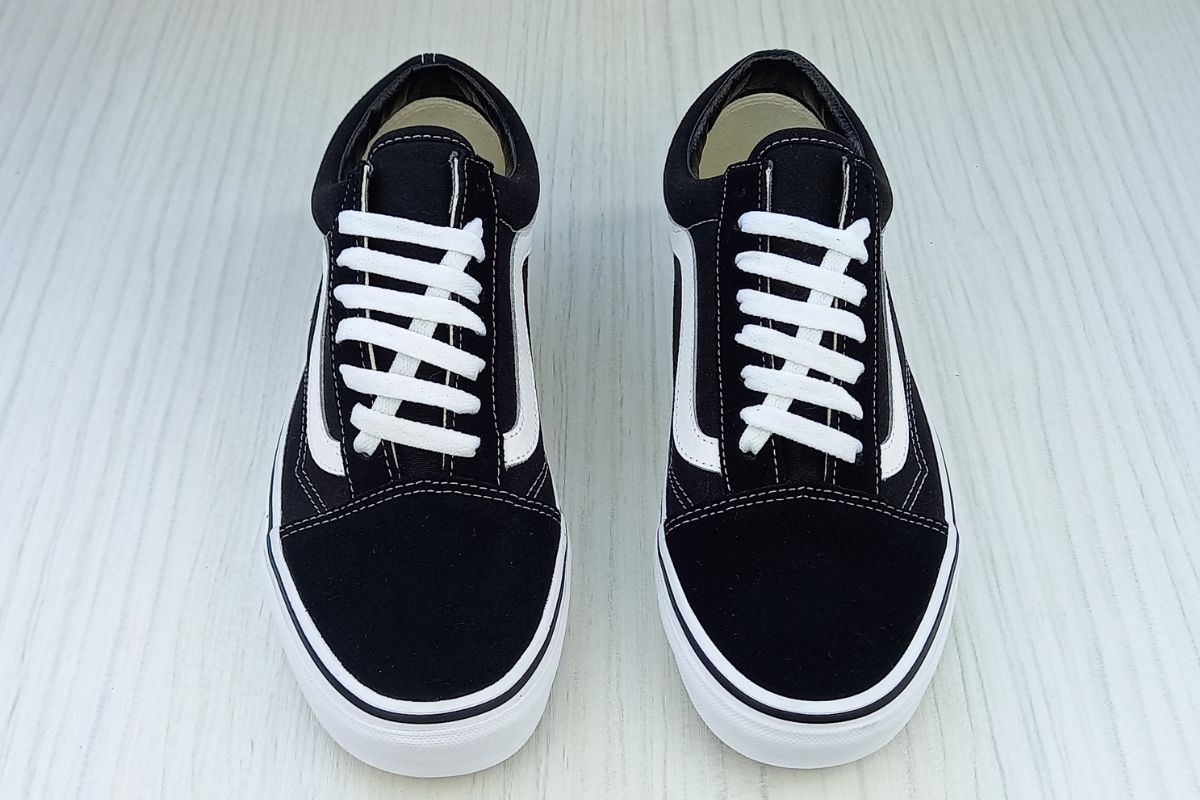
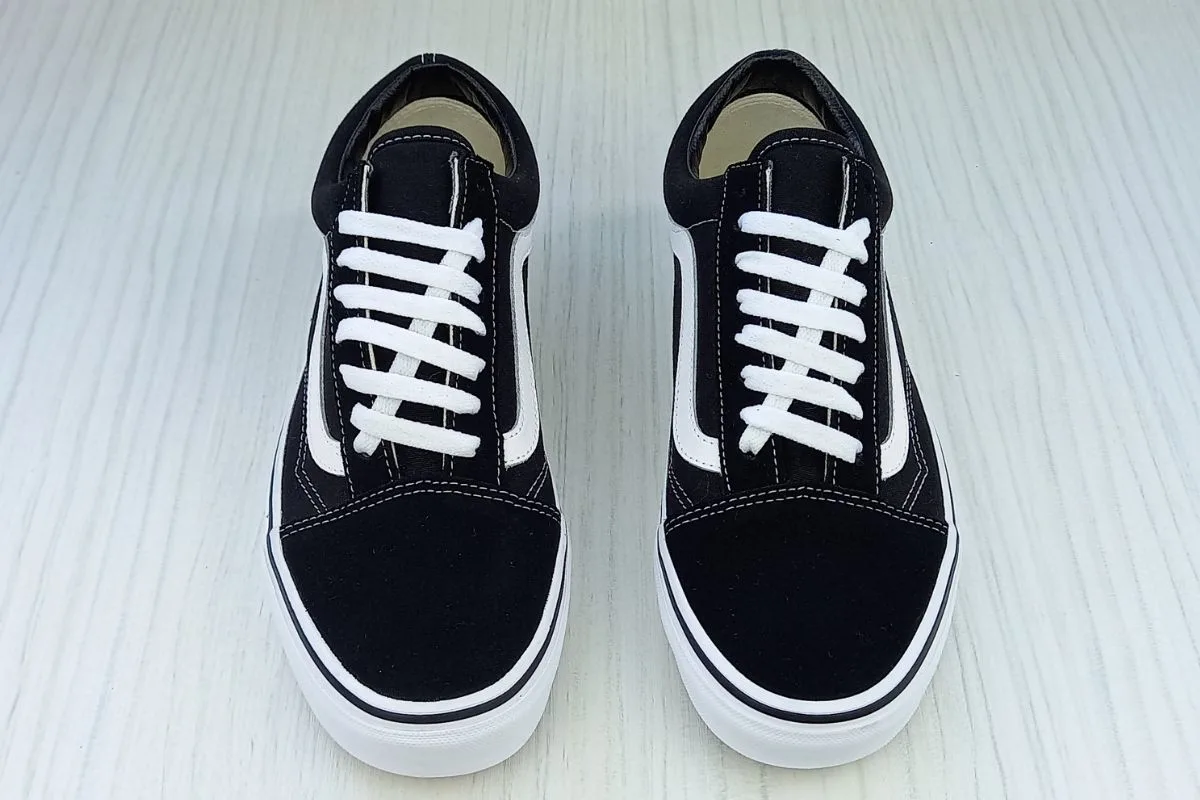
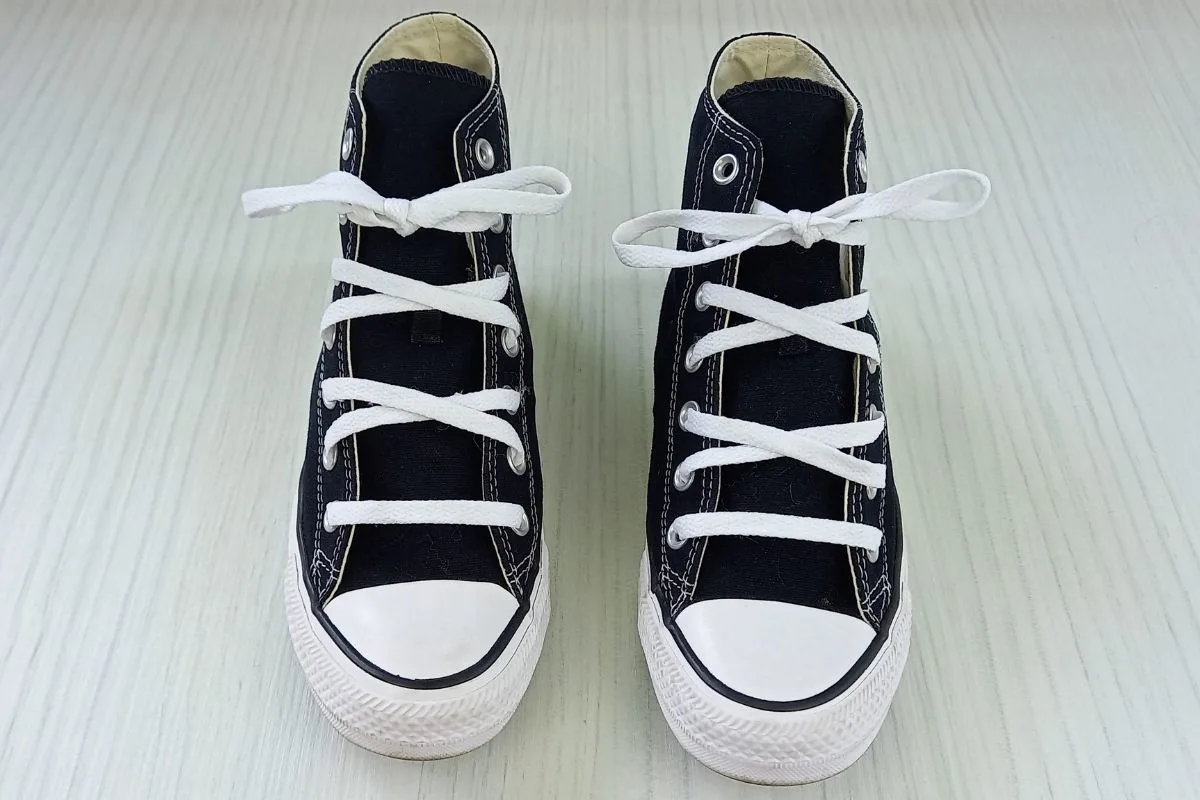
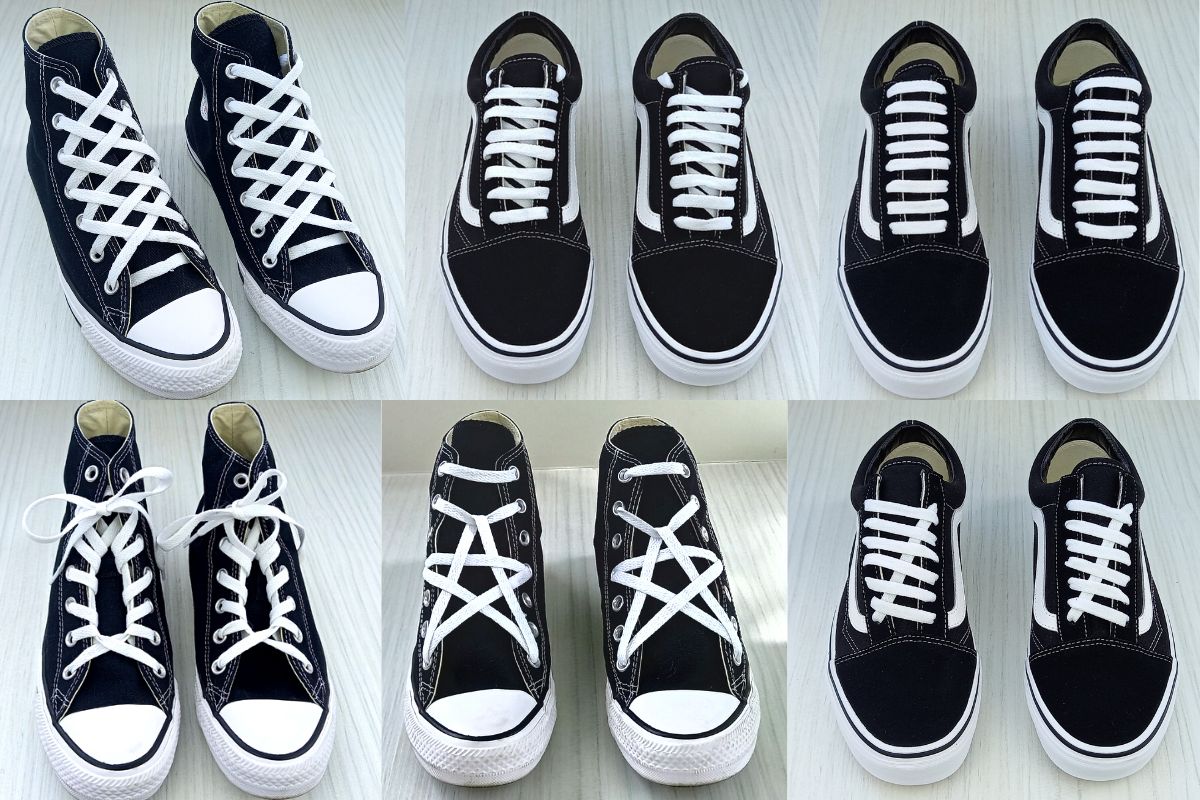
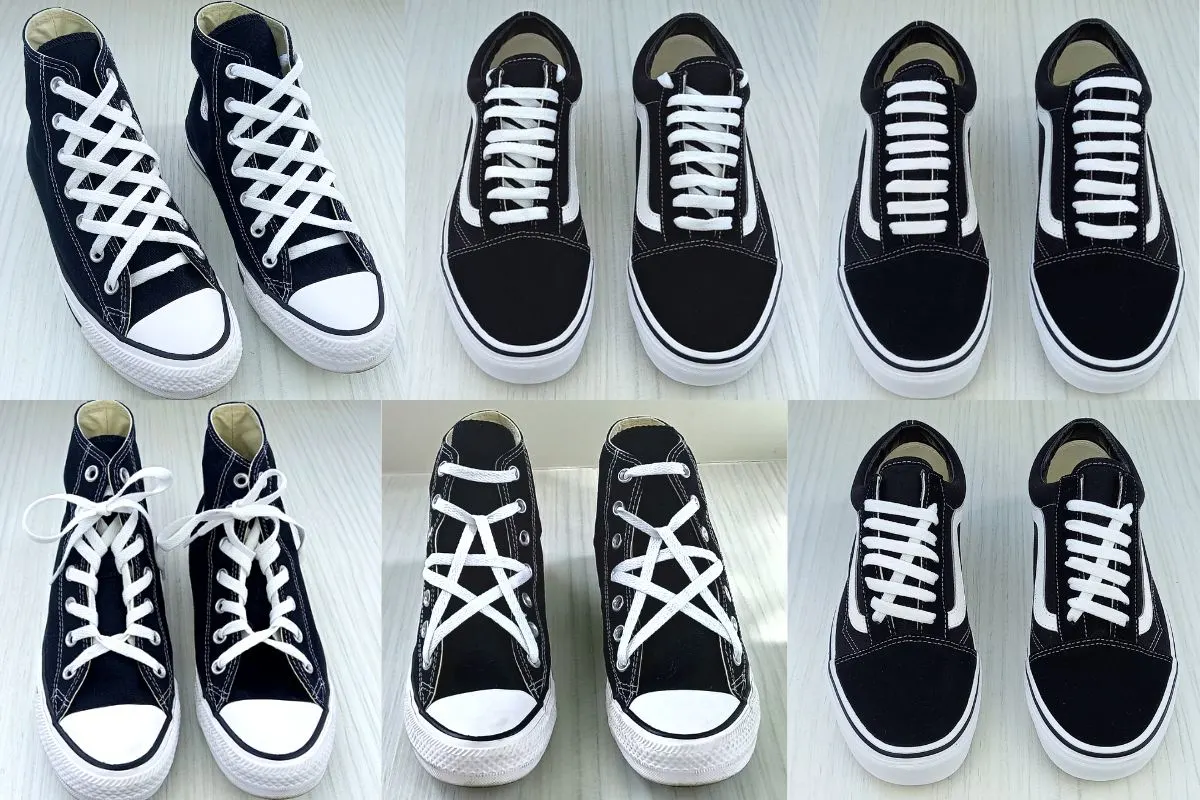
Here is an image of all of the styles I will be covering (numbered so you can skip ahead to the style you like most using the table of contents below!):
- 1. Bar Lace Shoe Lacing Style
- 2. Sawtooth Shoe Lacing Style
- 3. Diamond Shoe Lace Style
- 4. Circle Shoe Lace Style
- 5. Zipper Shoe Lacing Style
- 6. Ladder Shoe Lacing Style
- 7. Lattice Shoe Lacing Style
- 8. Standard Shoe Lacing Style (with a twist)
- 9. Lightning Shoe Lacing Style
- 10. Loop Cross Shoe Lace Technique
- 11. Zig Zag Shoe Lacing Style
- 12. Star Lace Shoe Tutorial
- 13. Blank Tongue Shoe Lace Style
- 14. Bow Tie Shoe Lace Style
- 15. Army Shoe Lacing Technique
- Related posts
Without further ado here are 15 cool ways to lace your shoes, with step by step photo and video instructions by me!
1. Bar Lace Shoe Lacing Style
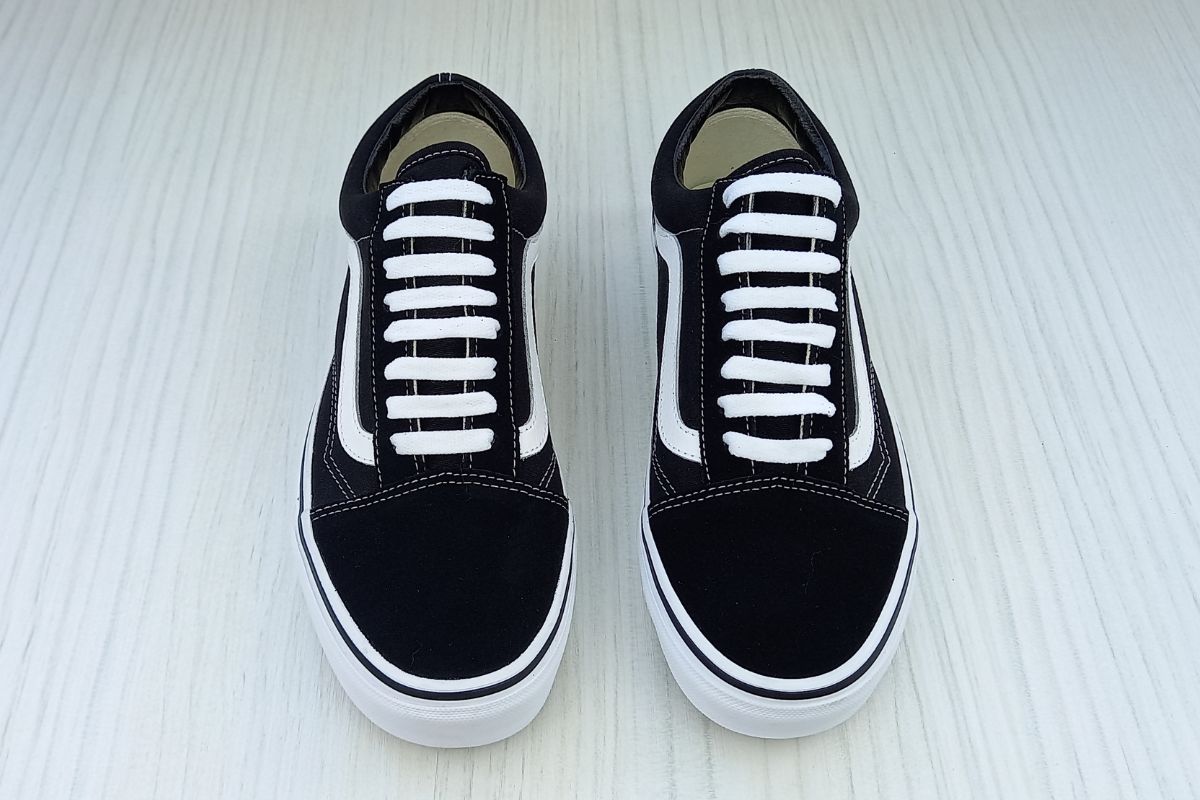
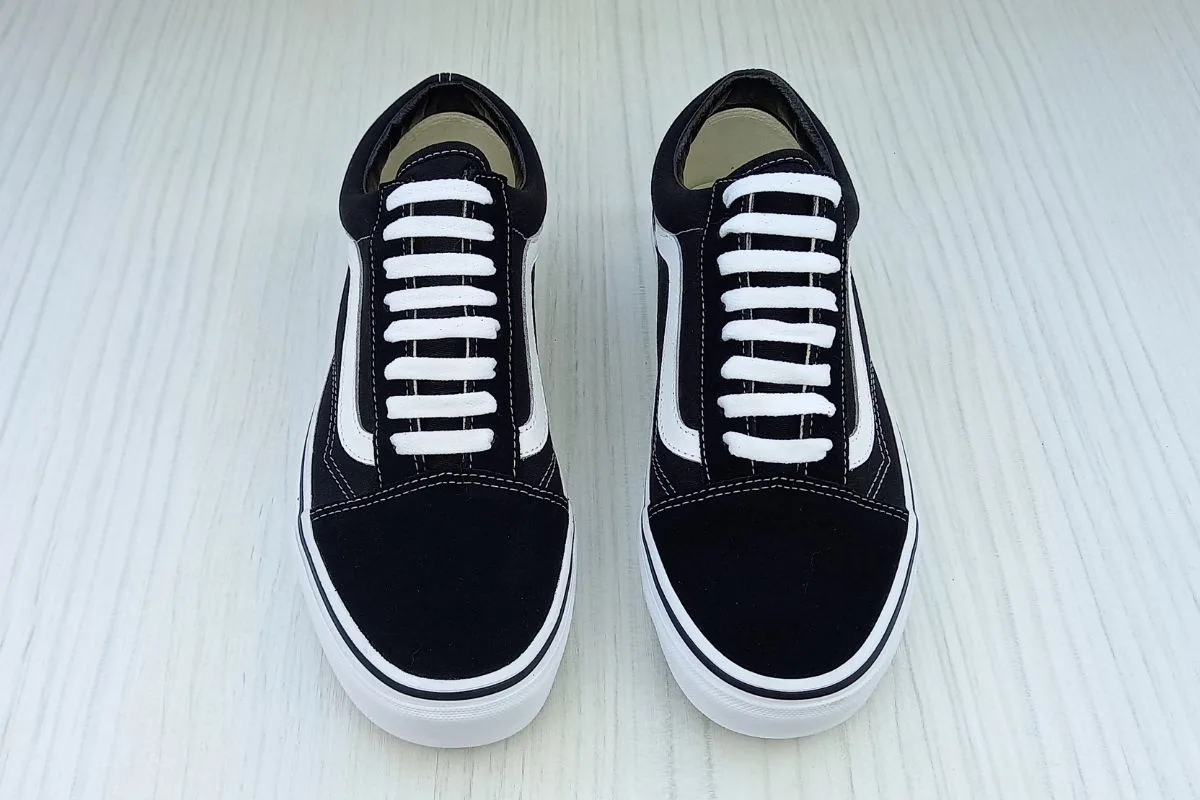
Bar lacing (or straight lacing as it’s also referred to) your shoes looks really crisp and neat. Give your shoes a twist and try it out for yourself!
It’s a great lacing technique for saving time too, as you can simply slip the shoes on and off with no need for tying.
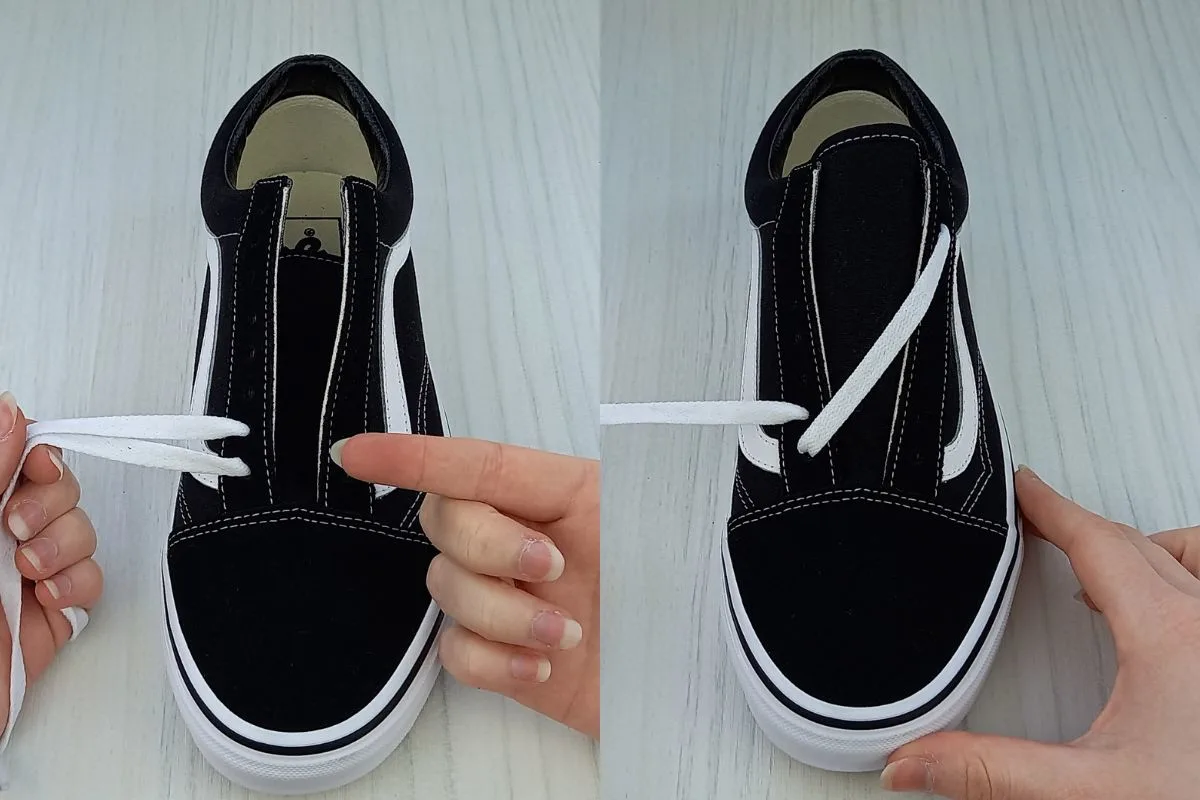
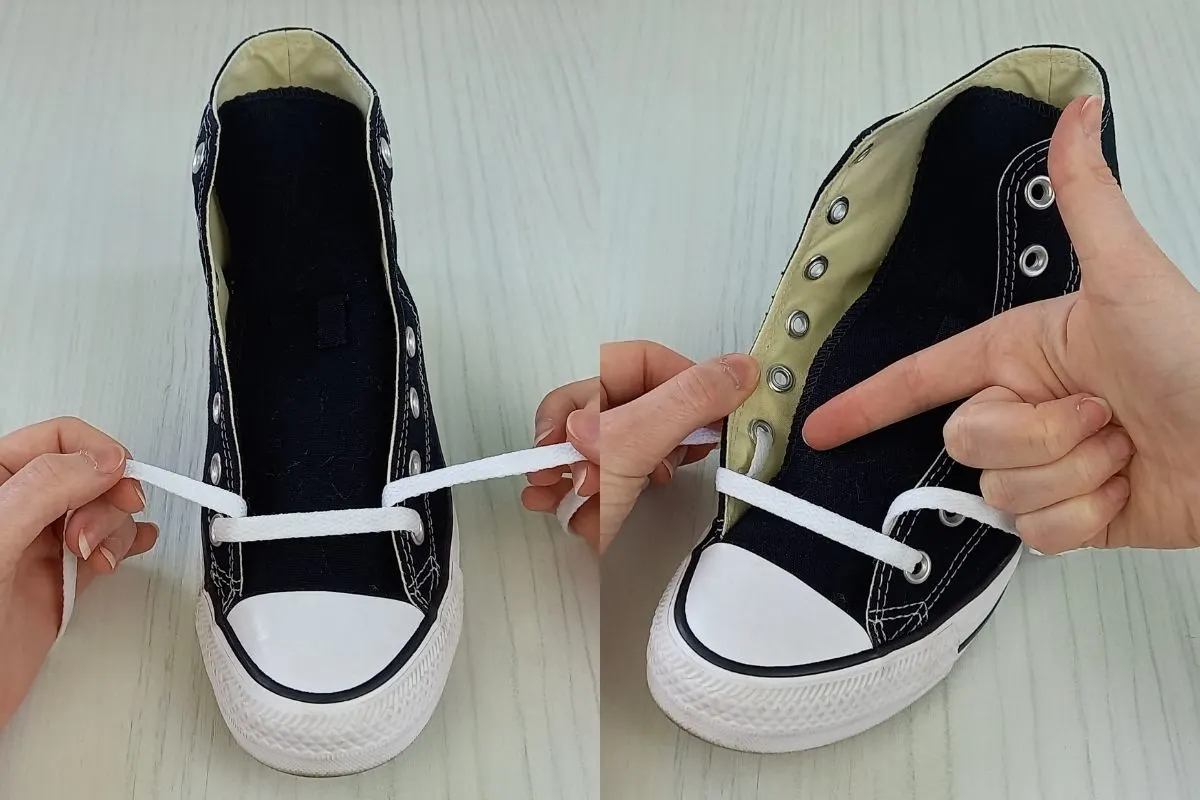
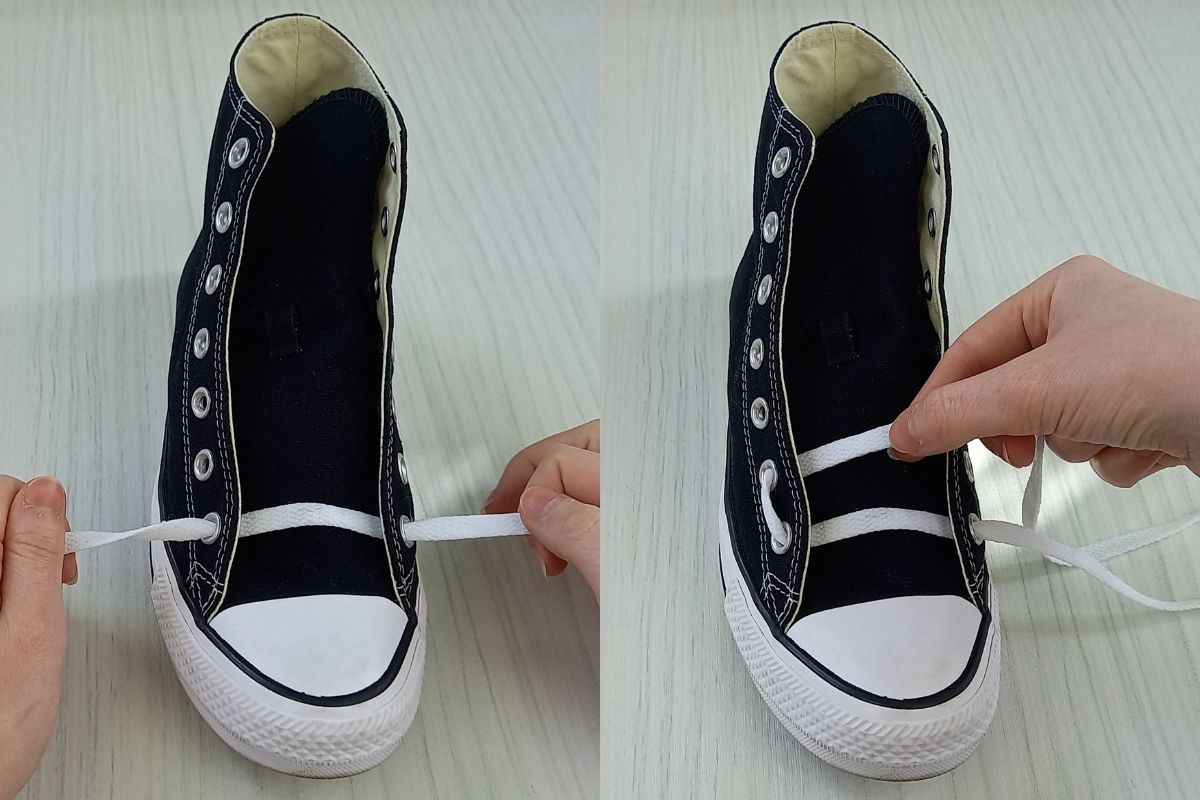
Step 1.


- Thread your lace ends through the two bottom eyelets, as I have done in the above picture. Make sure they are coming down into the eyelets from above not underneath.
- Next take the lace end on the right hand side and thread it up into the second eyelet from the bottom, from underneath this time (as pictured).
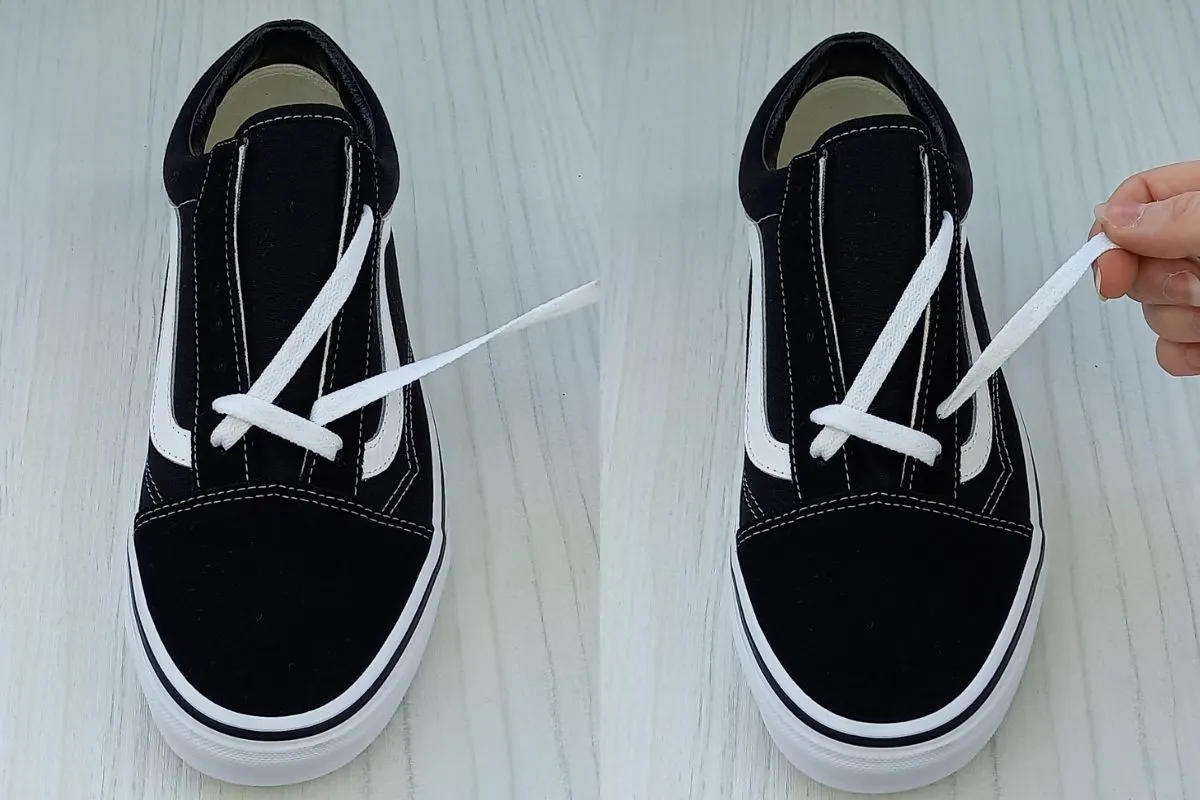
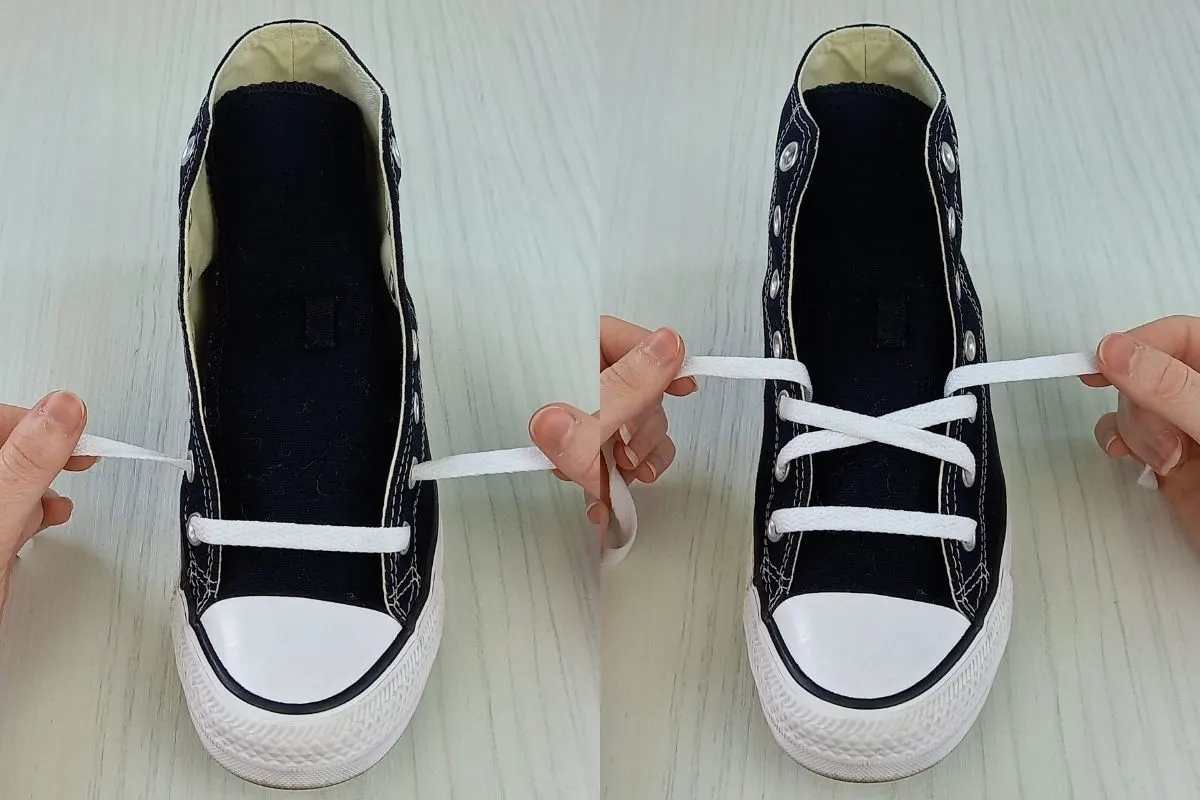
Step 2.

- Bring the lace over to the left hand side and feed it down into the second eyelet from above, to create your second ‘bar’.
- Then bring the other lace up into the third eyelet on the left side from underneath as pictured.
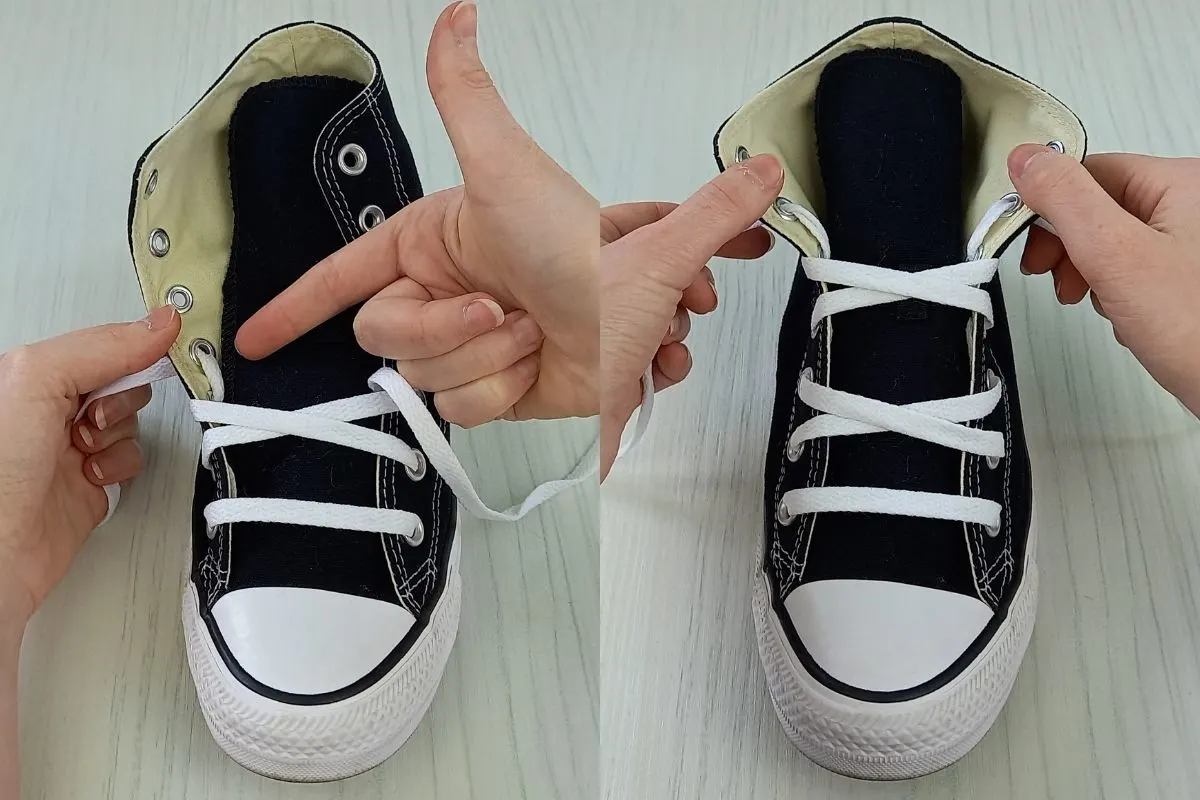
Step 3.

- Take the lace over to the right hand side and feed it down into the third eyelet, to create your third ‘bar’.
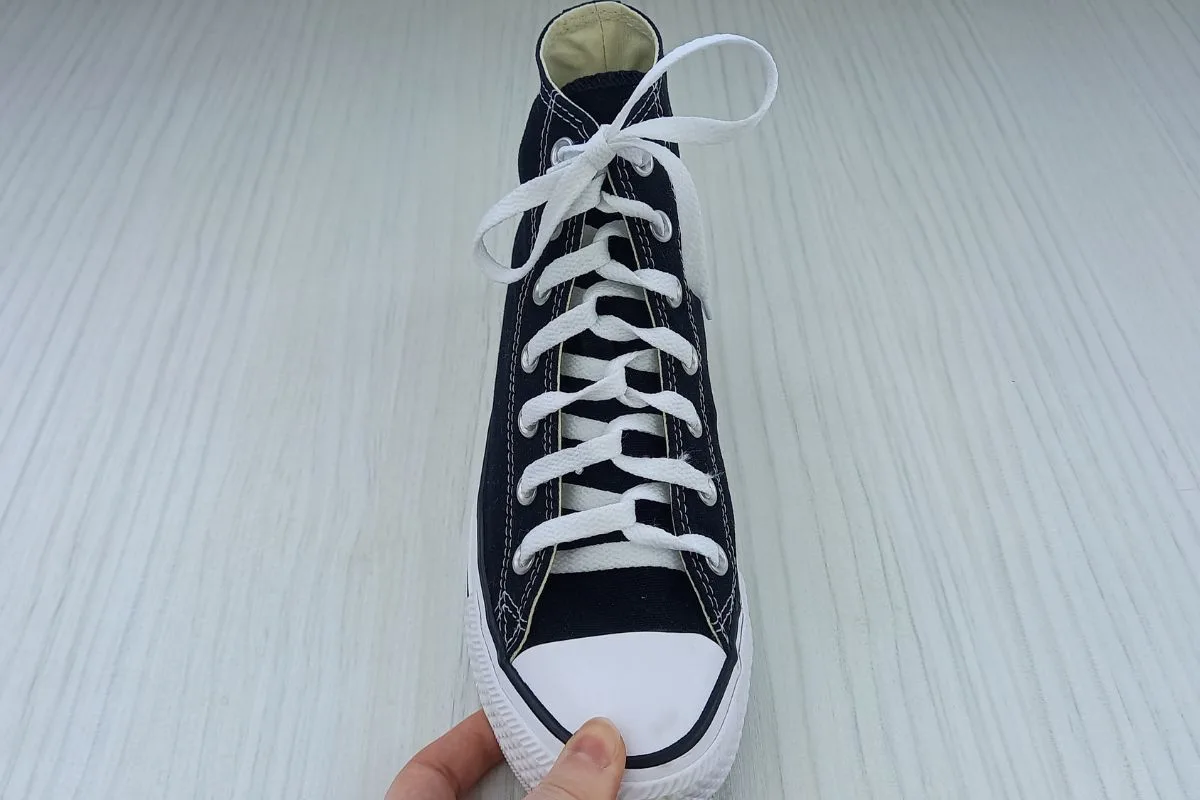
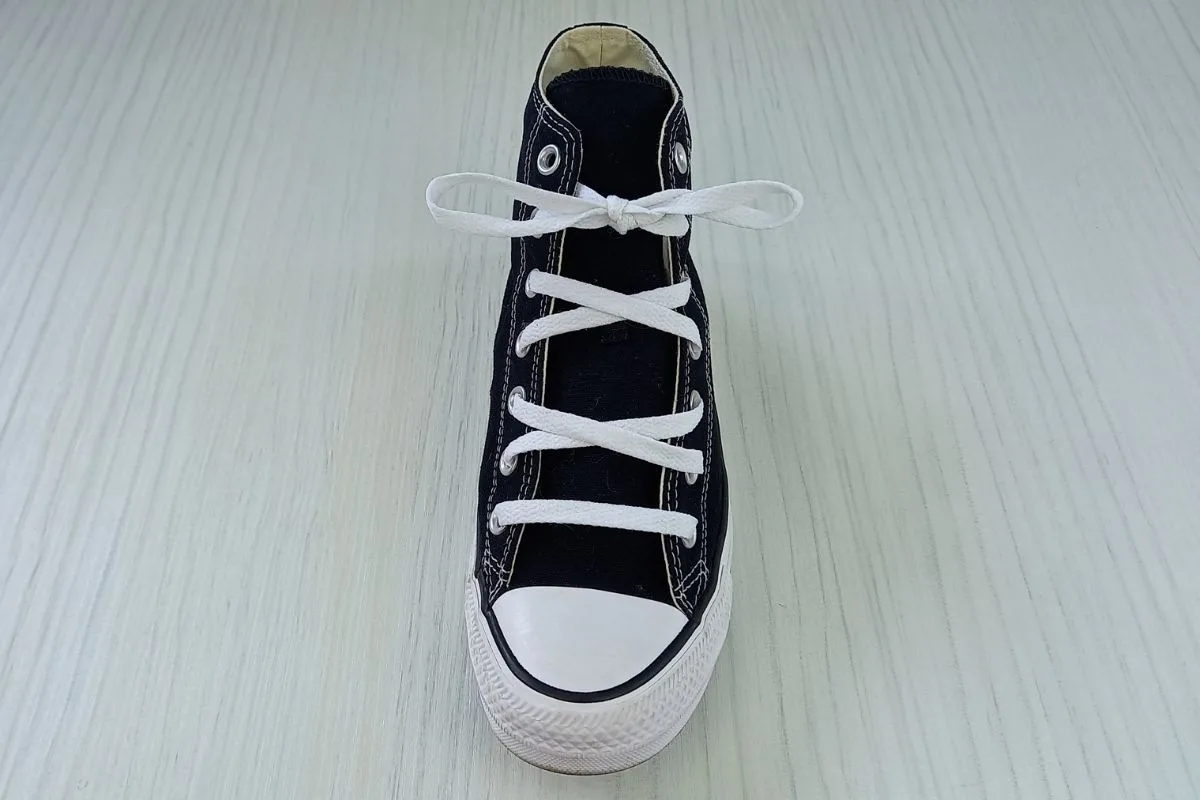
- Repeat this pattern all the way up the shoe, finishing the style by knotting the laces and slipping the excess down into the shoe, as I have done in the above image. If you need a more in-depth guide on this style, check out my post: Straight Lacing Tutorial: EASY Guide (With Photos).
Here’s a video of me demonstrating how to do this lacing style:
(If you like this article, share me to Pinterest to save for later) –

2. Sawtooth Shoe Lacing Style

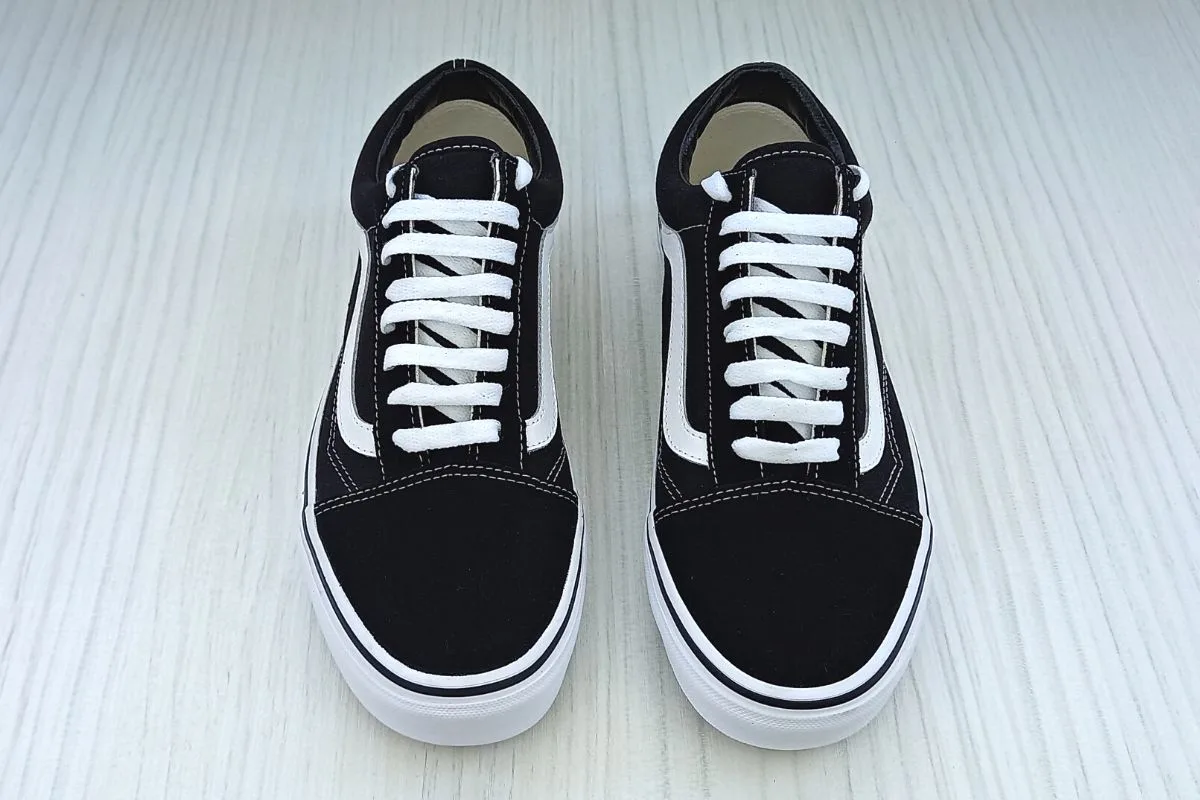
The sawtooth lacing style adds a creative spin to your shoes, with its interesting pattern. The pattern almost looks 3D and pops out at you. Whenever I sawtooth lace my shoes I get loads of compliments on how cool they look.
Here’s how to do it:
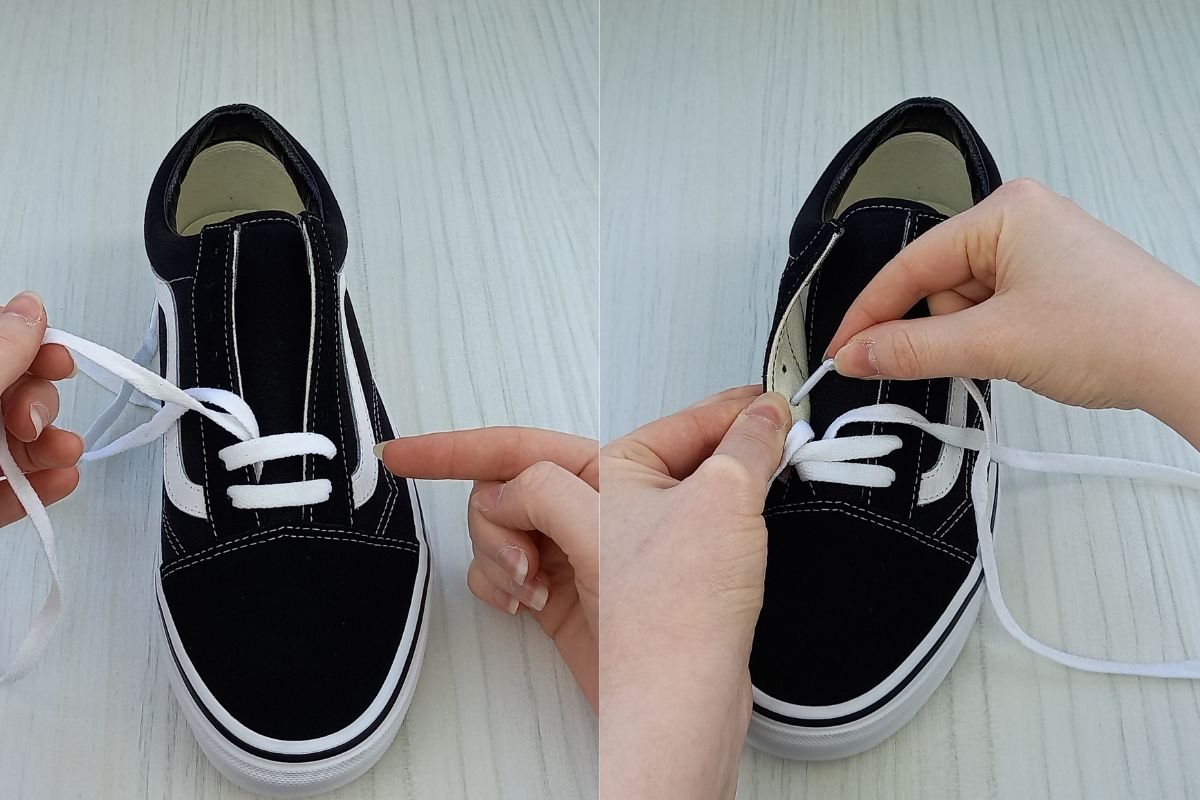
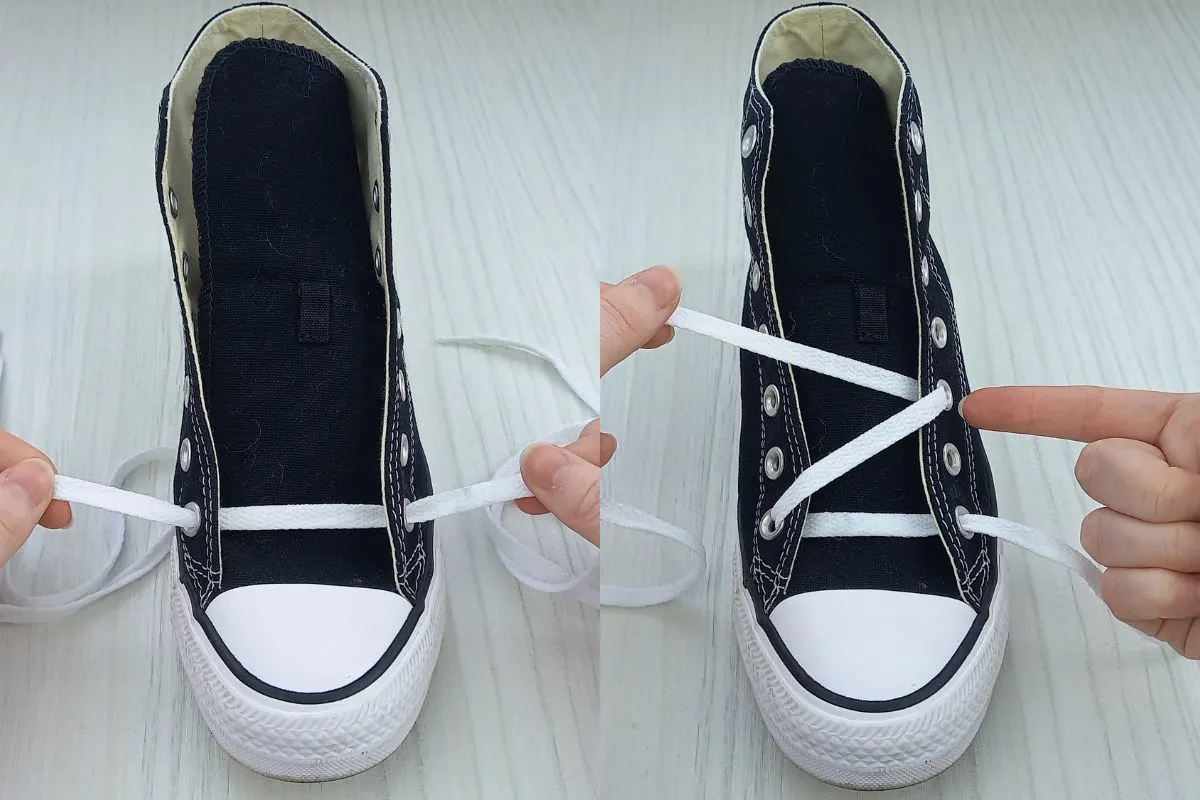
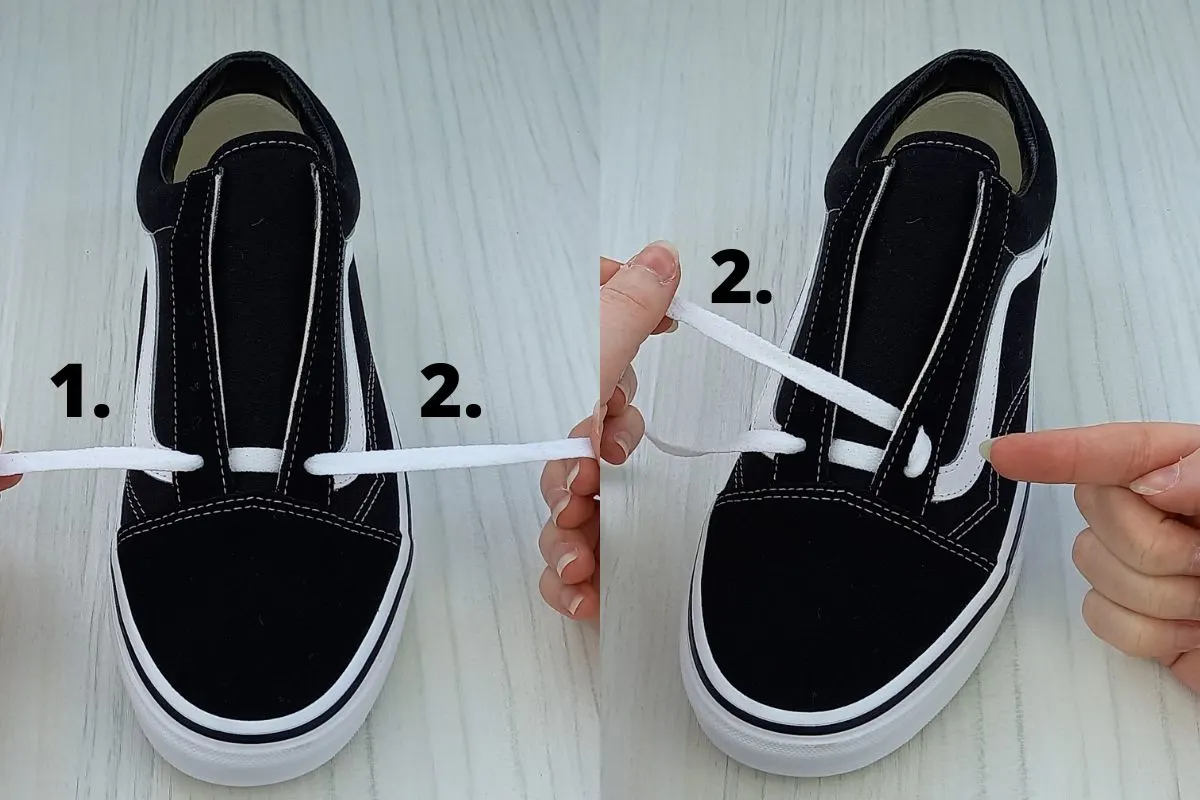
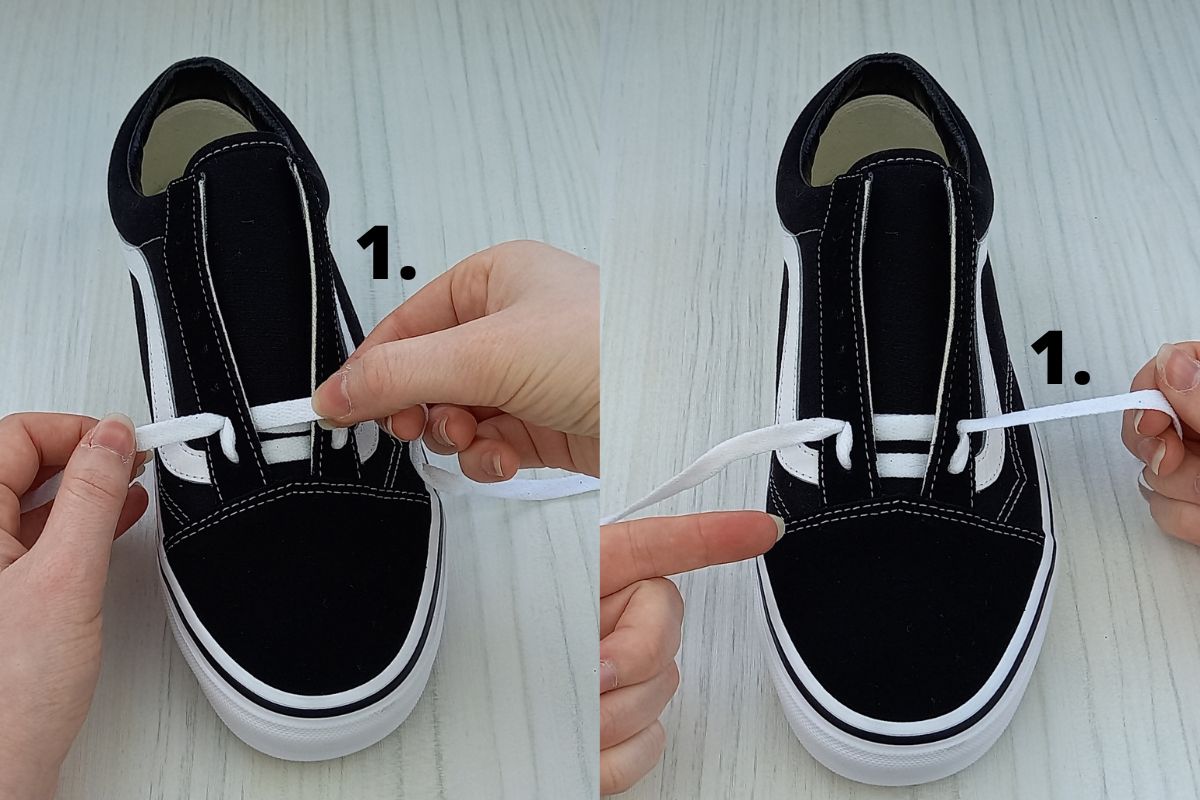
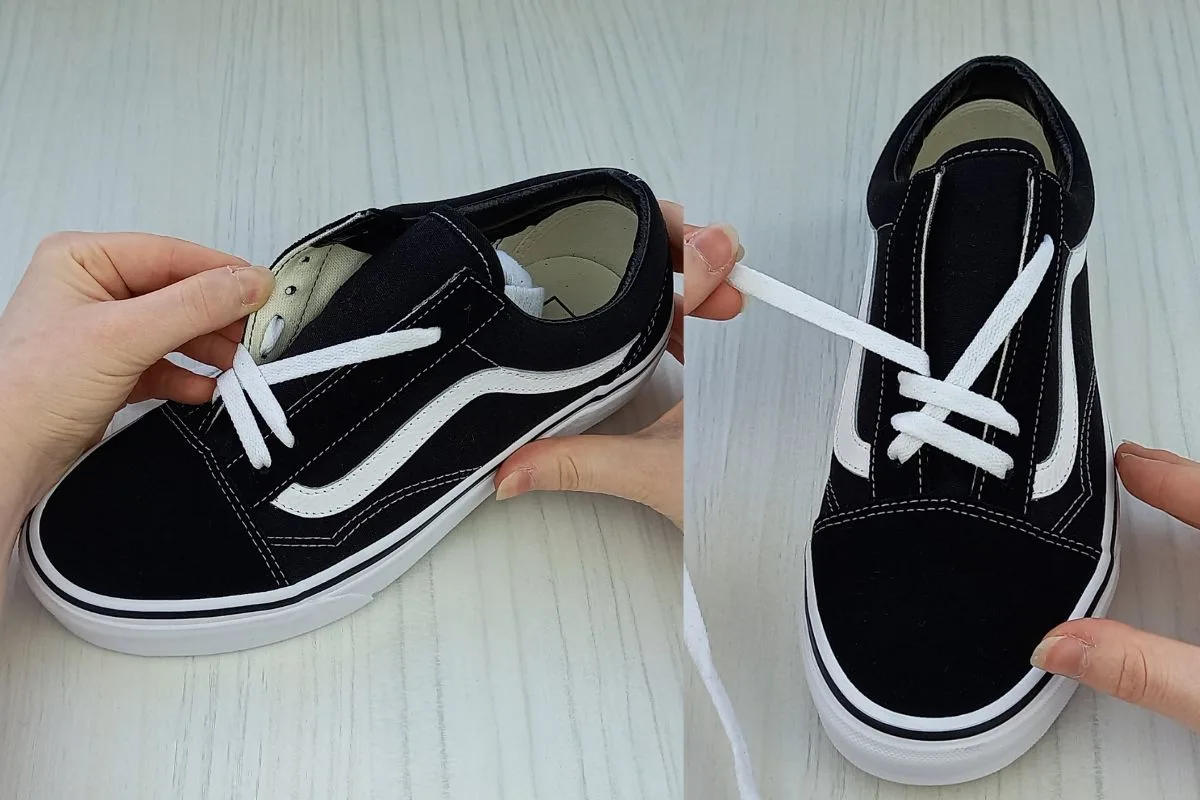
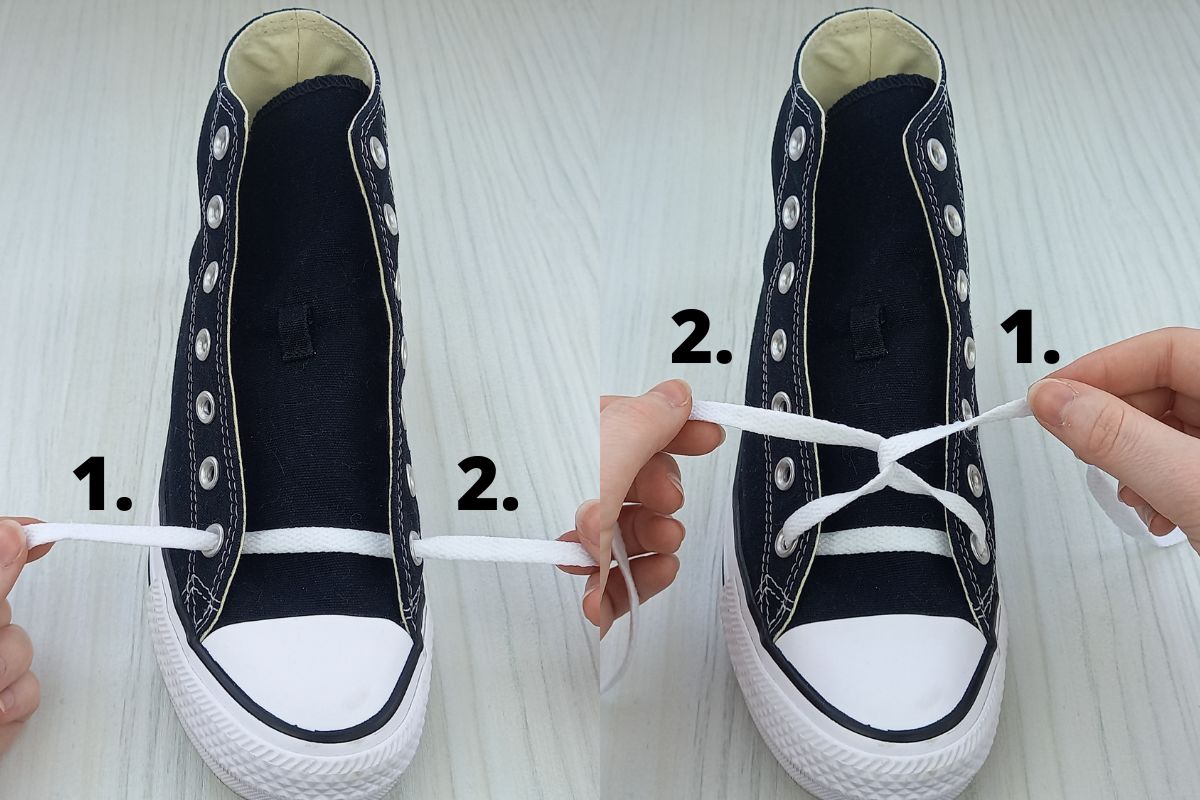
Step 1.
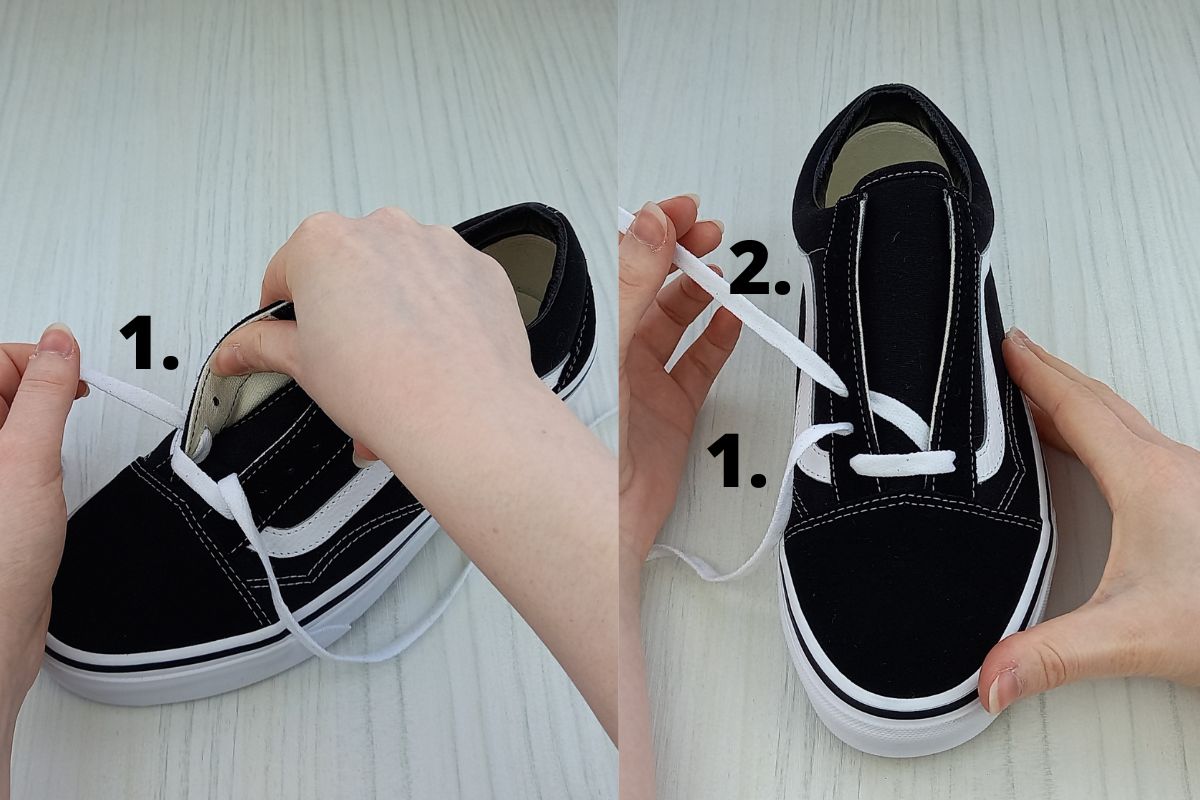

- Start by stuffing your shoes with socks to create a nice resistance underneath the tongue. This will help you achieve an even pattern all the way up the eyelets.
- Next thread your lace into the two bottom eyelets from above, not underneath.
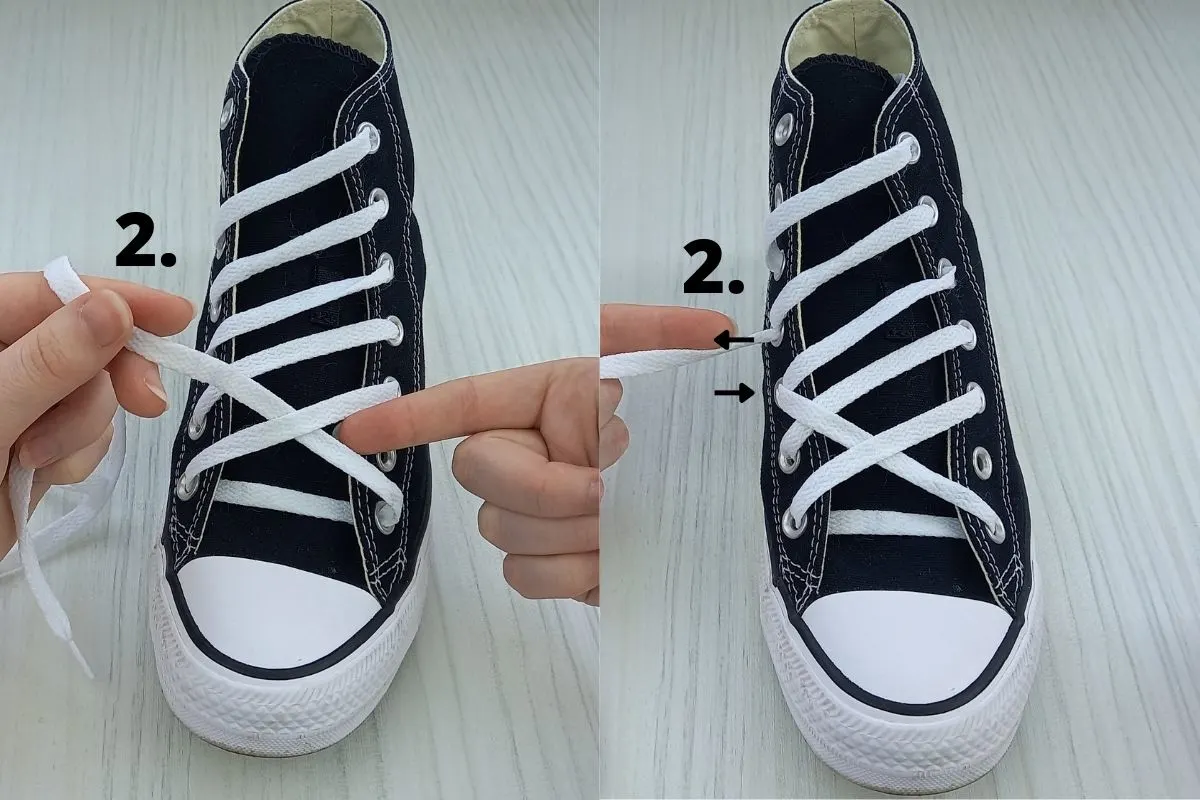
- Now bring the lace end on the left hand side (lace 1.) up into the second eyelet from the bottom, from underneath, as I have done in the above image.
- Then take the lace end on the right hand side (lace 2.) and bring it over the shoe tongue and up into the third eyelet on the left, as pictured. Make sure it’s coming up into the eyelet from underneath.
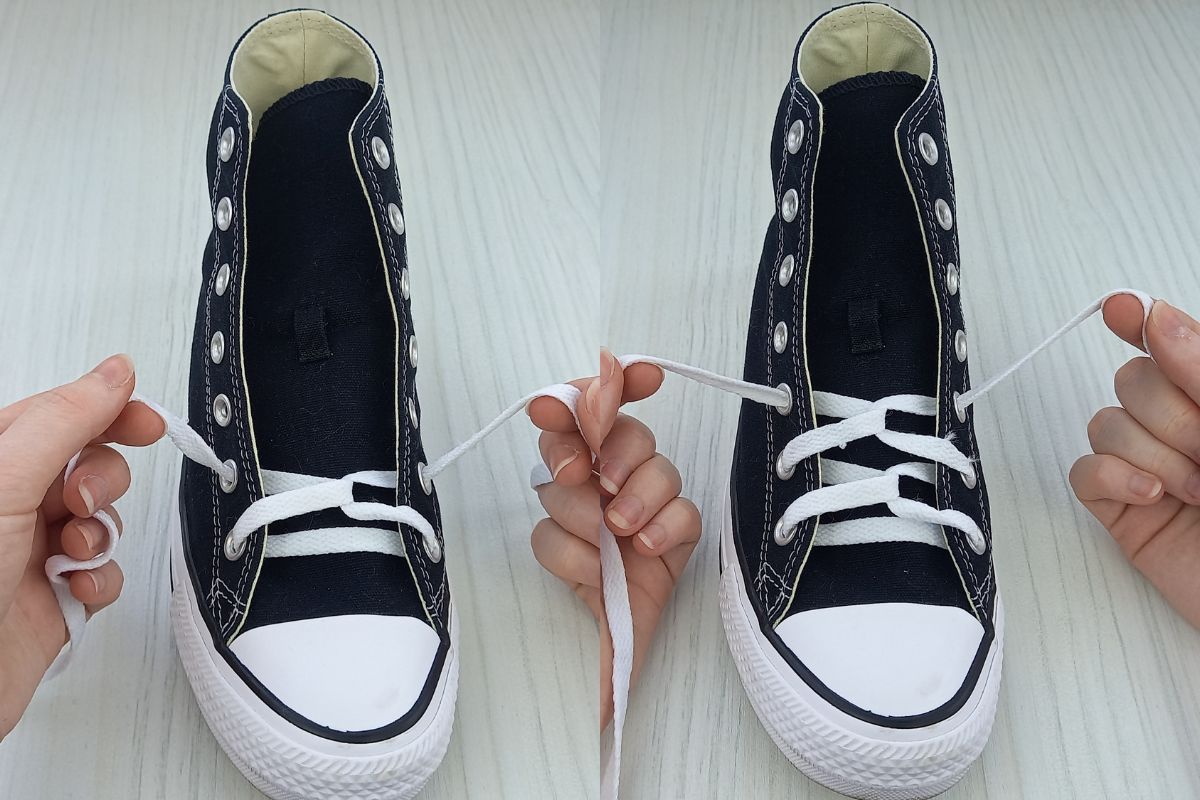
Step 2.


- Now bring lace end 1. over the shoe tongue and into the second eyelet from the bottom on the right hand side. This will create a little ‘bar’ over the shoe tongue, as pictured above.
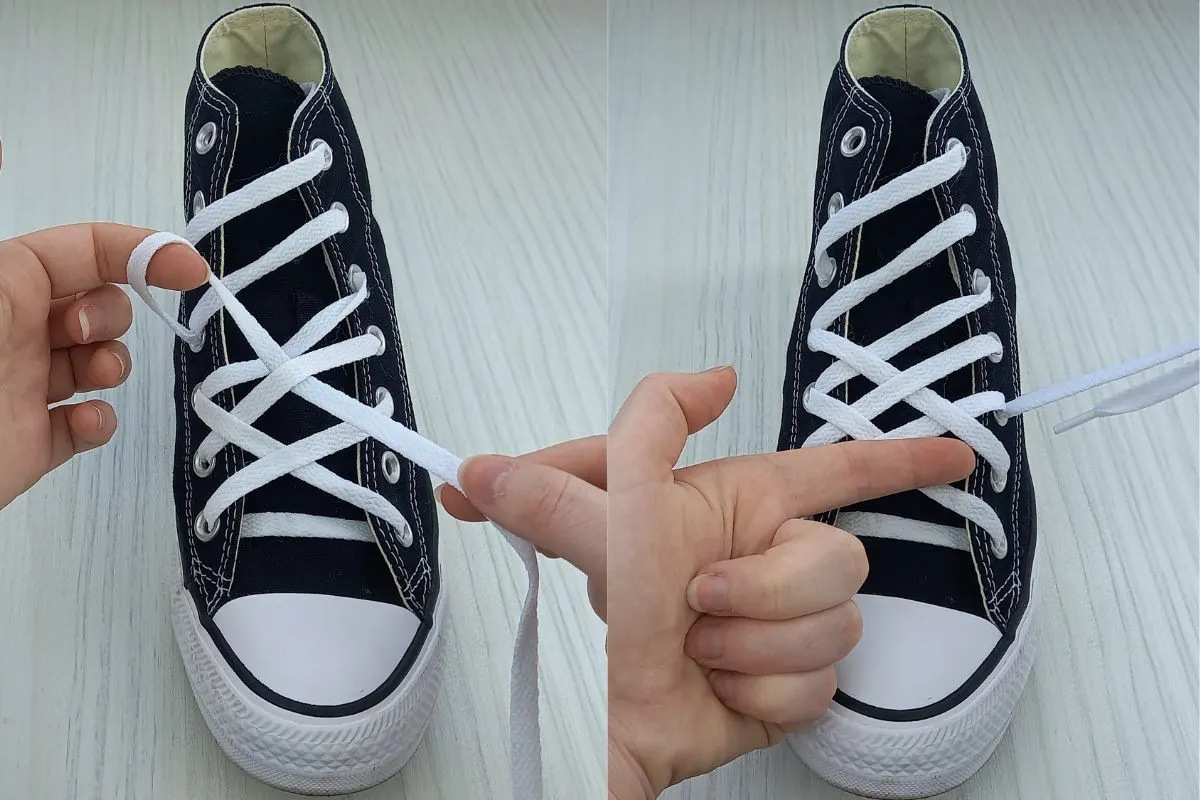
- Then take lace 1. and bring it back over the shoe tongue to the left hand side and feed it up into the fourth eyelet from the bottom, as I have done in the image above.
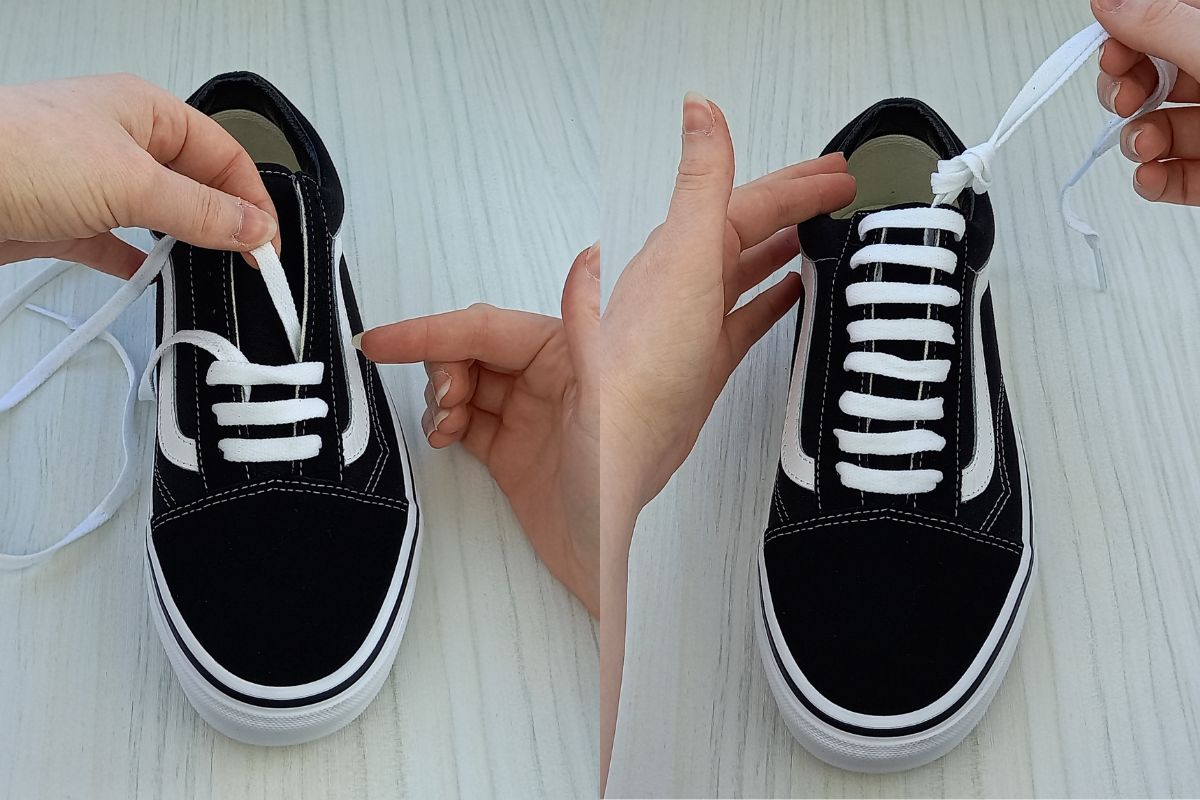
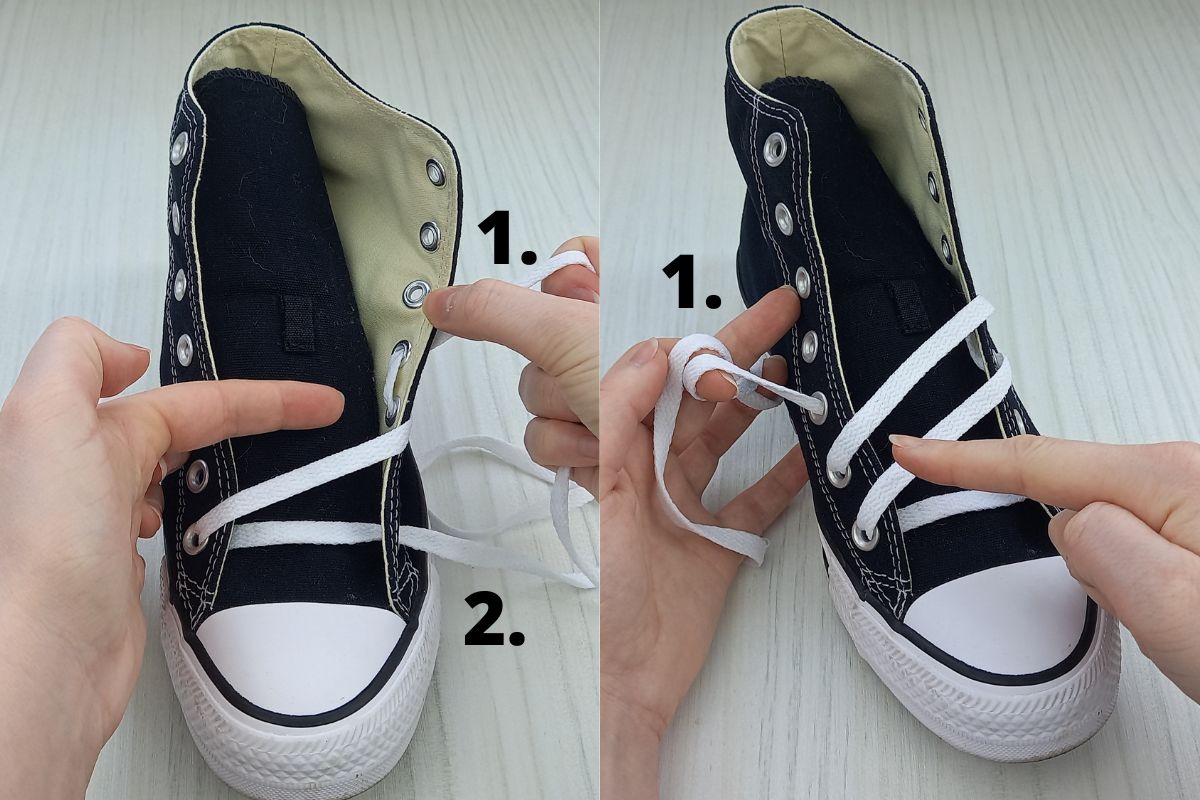
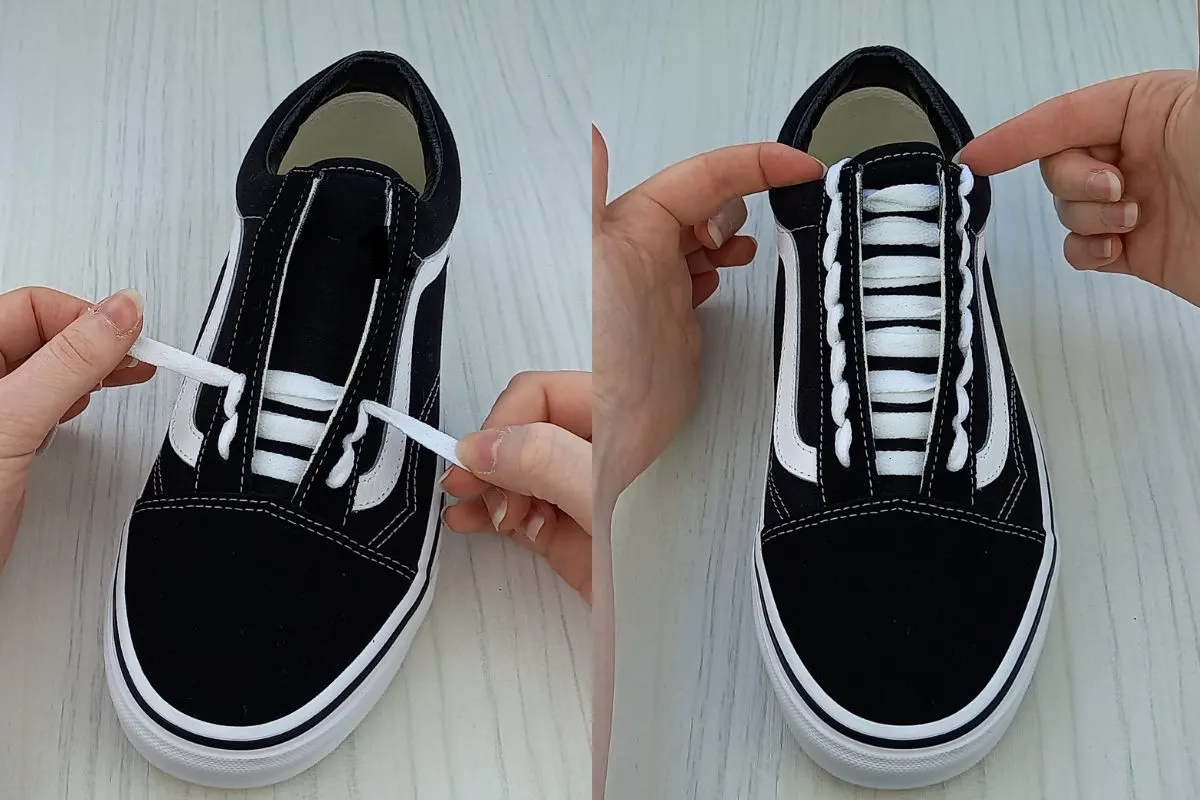
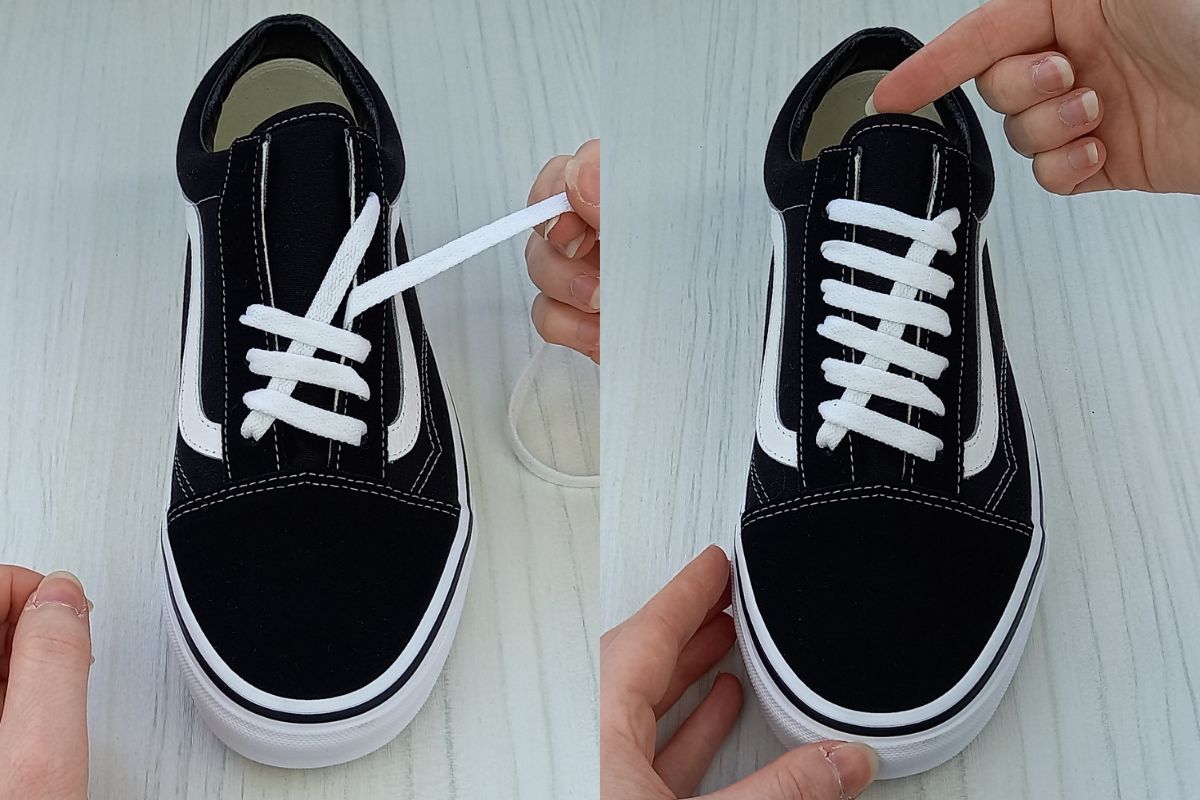
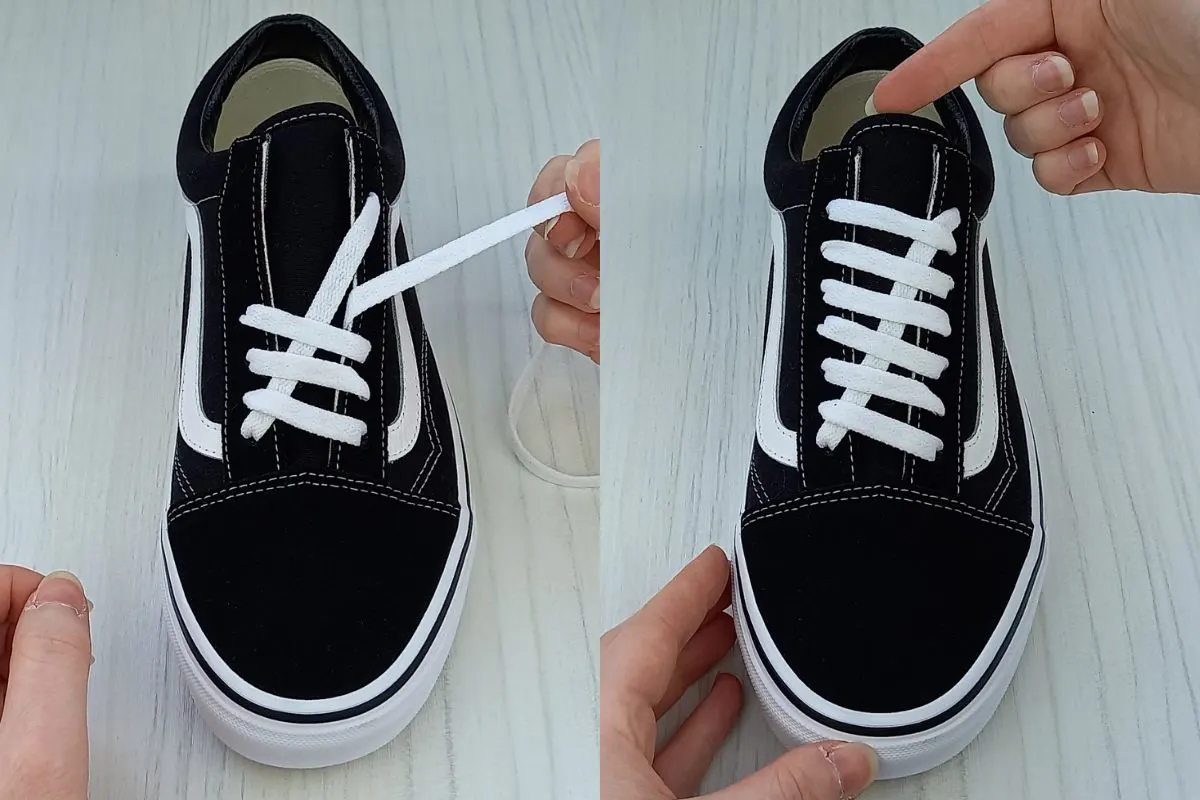
Step 3.

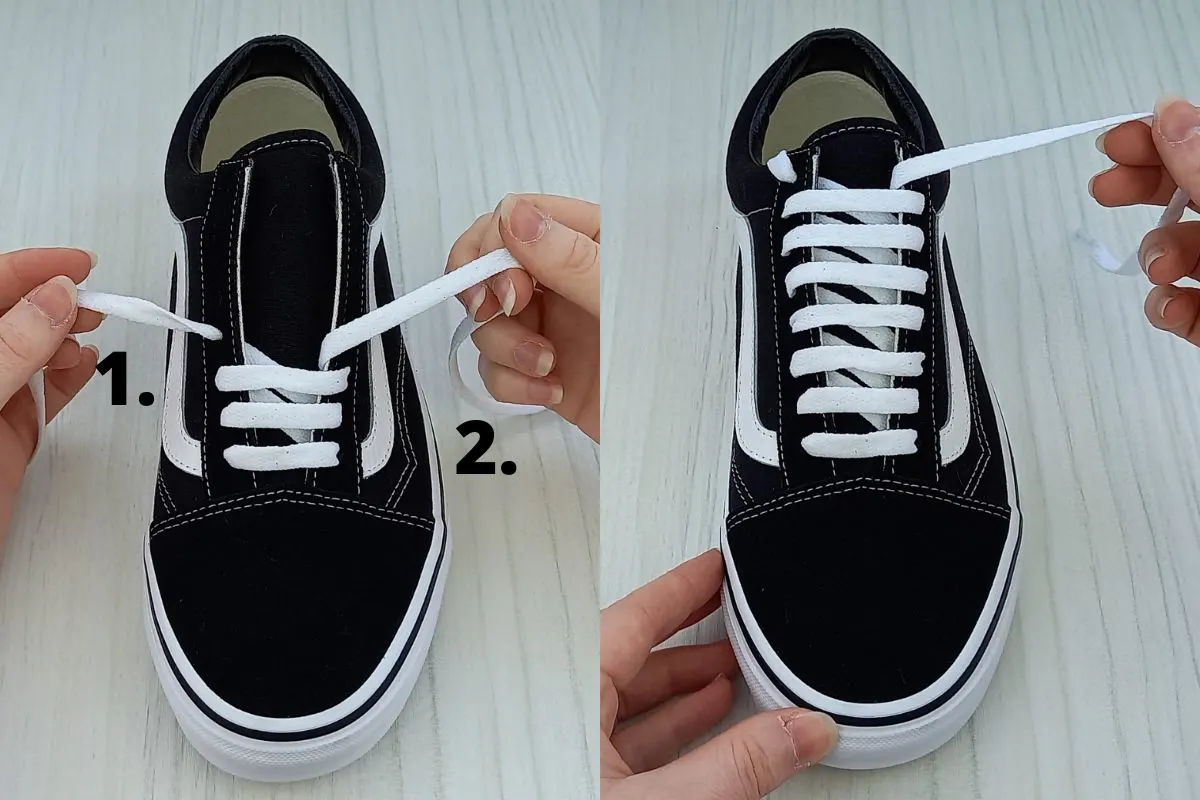
- Take lace 2. and bring it over the shoe tongue and down into the third eyelet from the bottom on the right hand side.
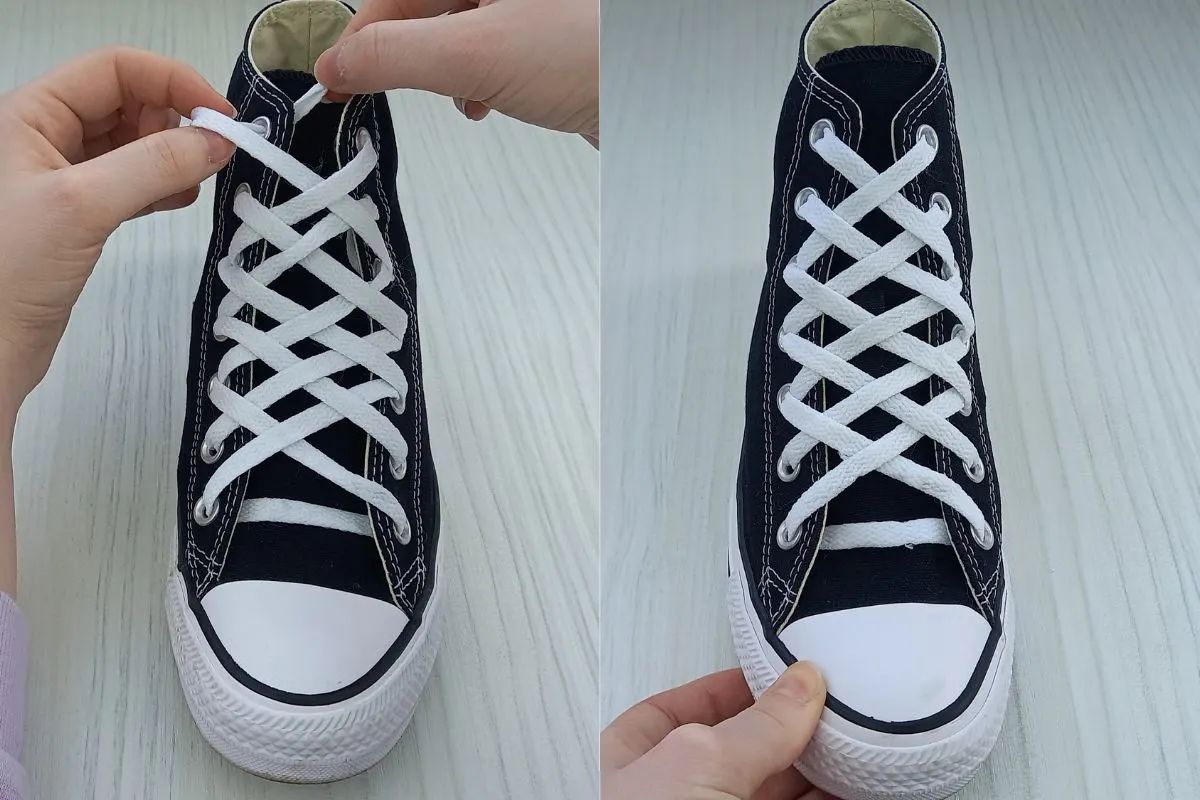
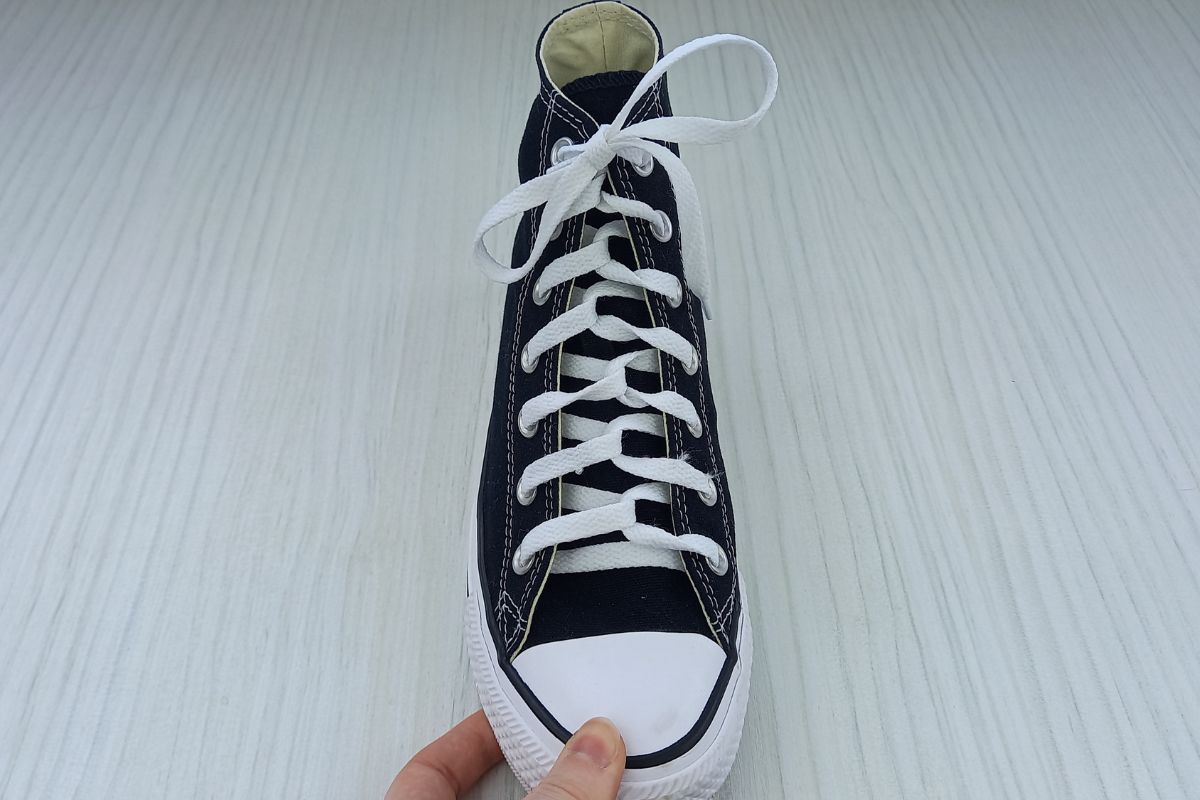
- Continue with this pattern all the way up the tongue, until you reach the top eyelets. You can bow your laces as normal, or tuck them behind the shoe tongue at the top.
If you need some extra help with this pattern, check out my video tutorial here (sawtooth lacing starts at 10:26):
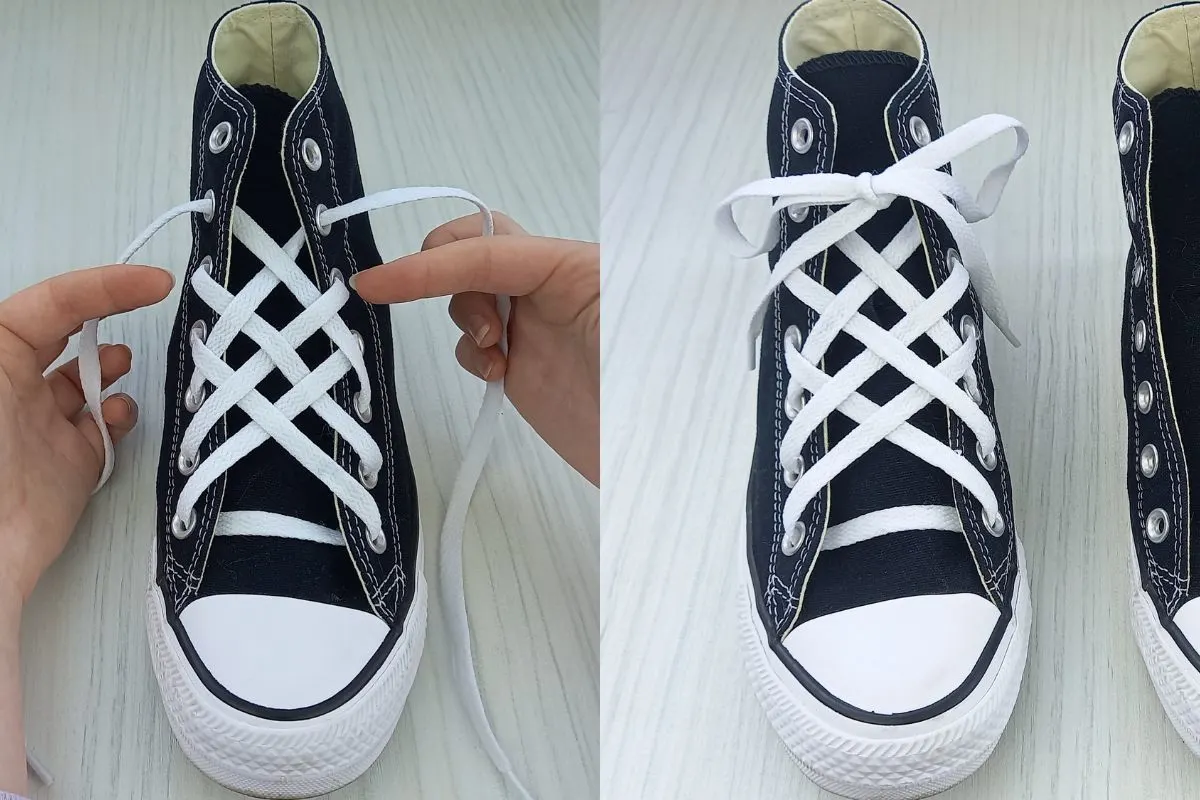
3. Diamond Shoe Lace Style
Diamond lacing is a super popular lacing style when it comes to functionality and aesthetics. Get a great look and slack resistant lacing in a few easy steps.
It can look quite tricky at first, but if you go slowly and follow along with my steps you can’t go wrong. I’ll also be including a video of how to do this below, to help you as much as possible!
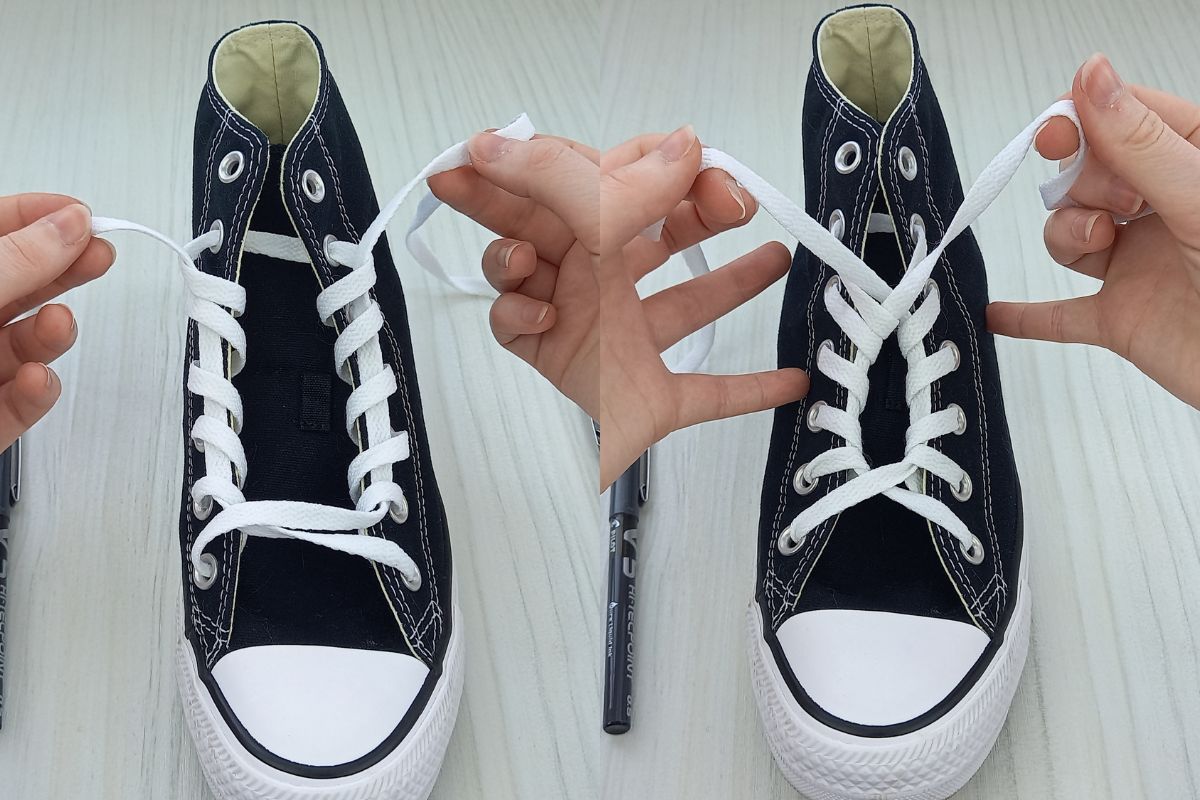
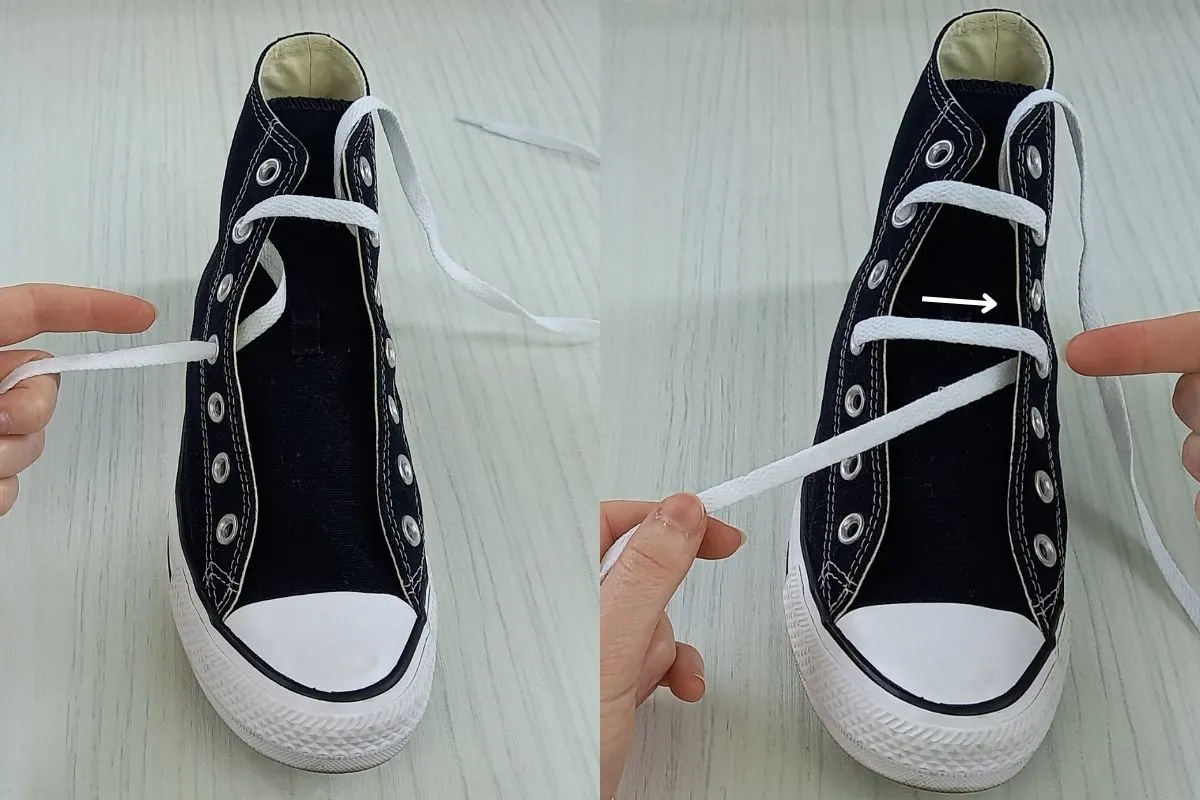
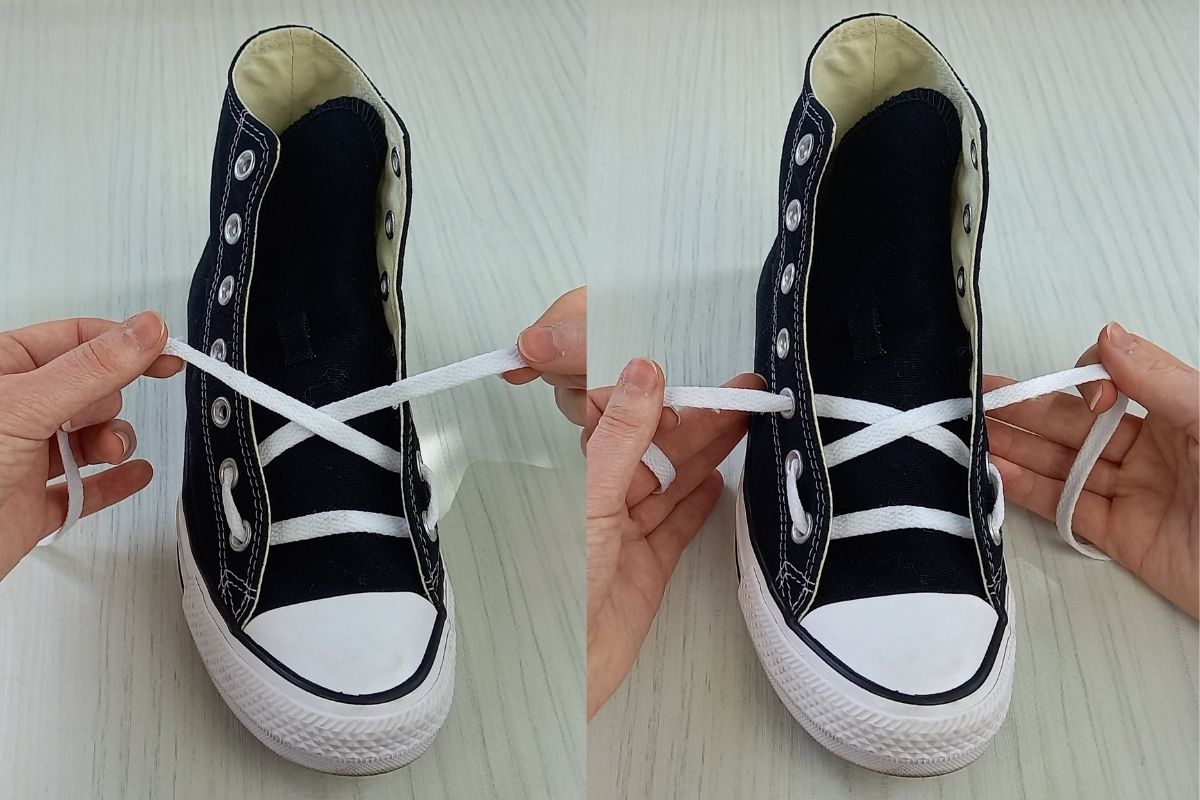
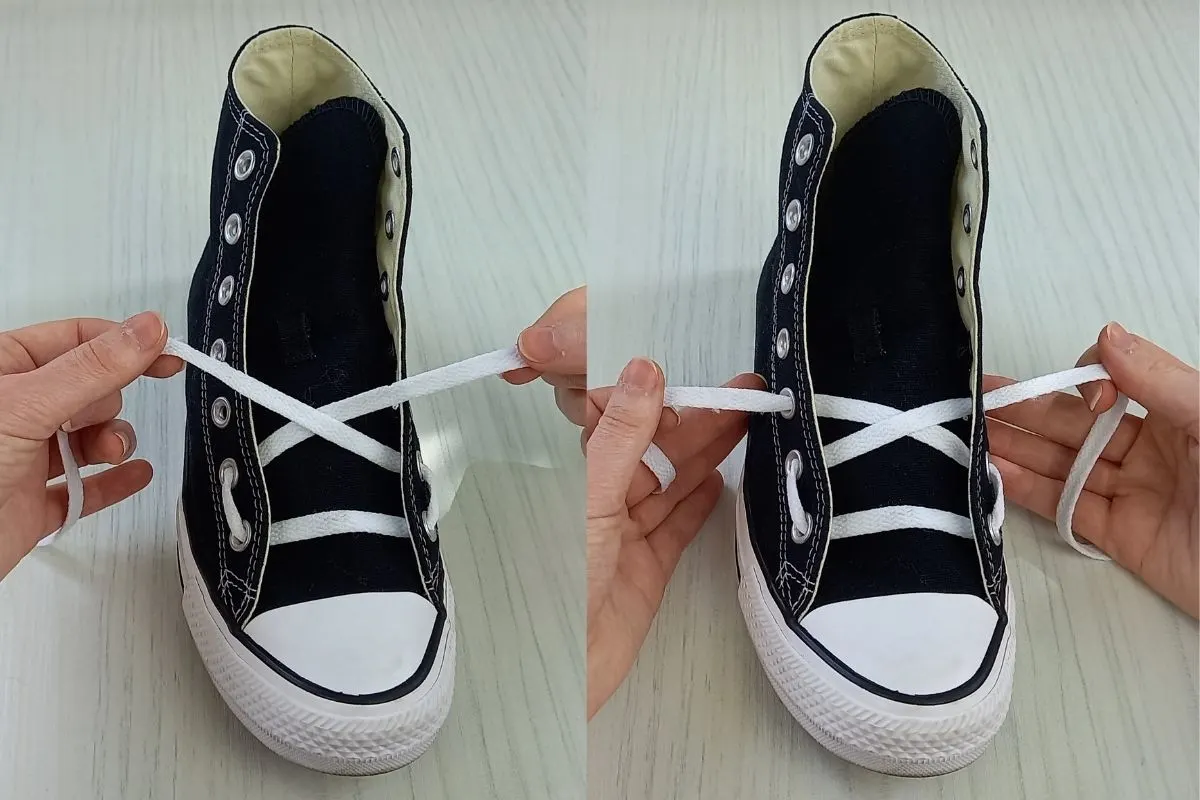
Step 1.

- Start by threading your lace ends through the two bottom eyelets of your shoes. Make sure they are coming up into the eyelets from underneath, as mine are in the above image.
- Then take the lace on the left hand side (let’s call it lace end 1.) and bring it across the shoe tongue and into the third eyelet from the bottom on the right hand side. Make sure it goes into the eyelet from above this time, not underneath.
Step 2.

- Take lace end 1. up into the fourth eyelet from the bottom on the right hand side, from underneath, as pictured above.
- Now bring lace end 1. back over the shoe tongue and down into the second eyelet from the bottom on the left hand side, from above. Now thread it up into the third eyelet from the bottom on the left side, from underneath this time. Double check your result against my picture!
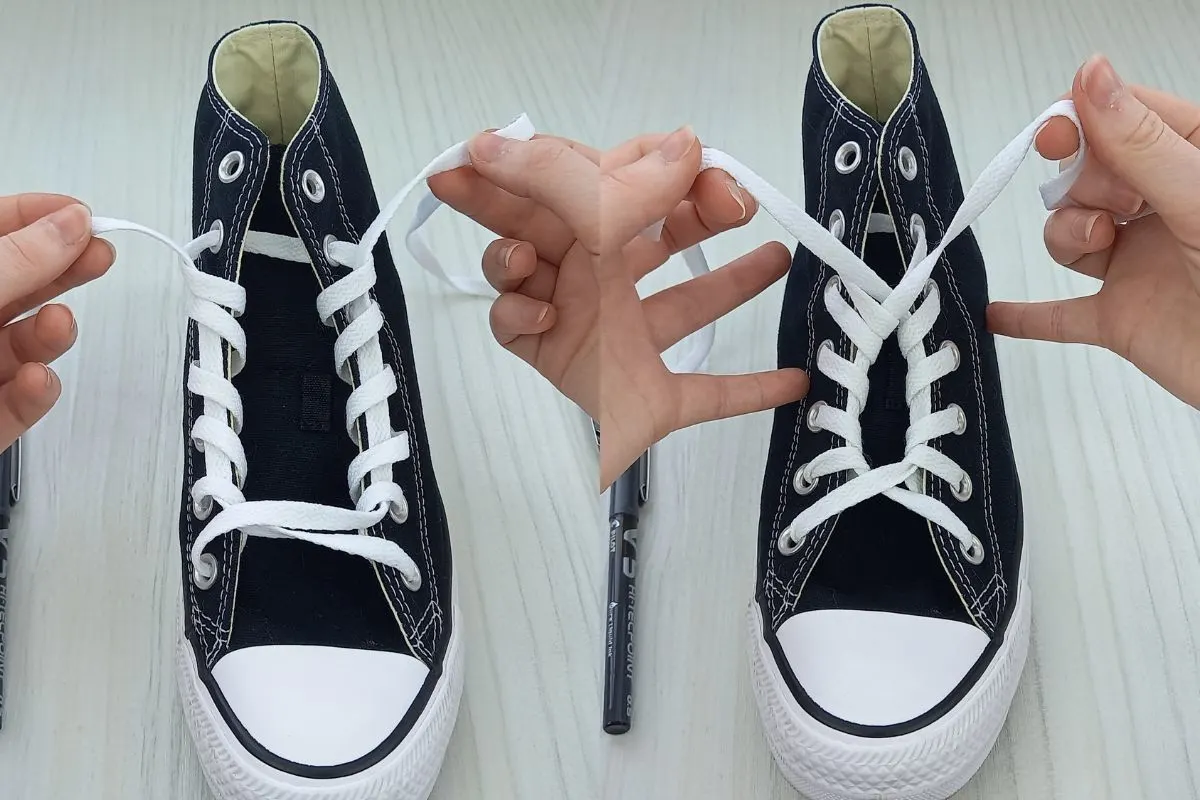
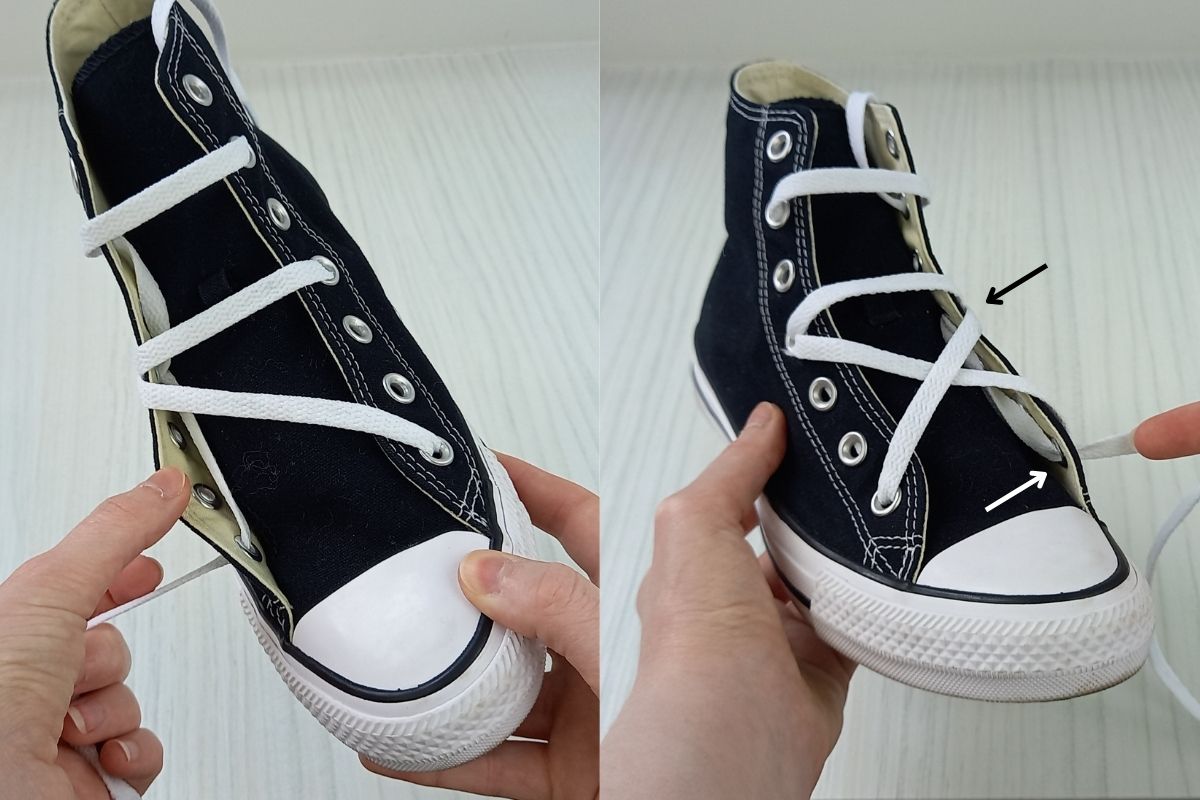
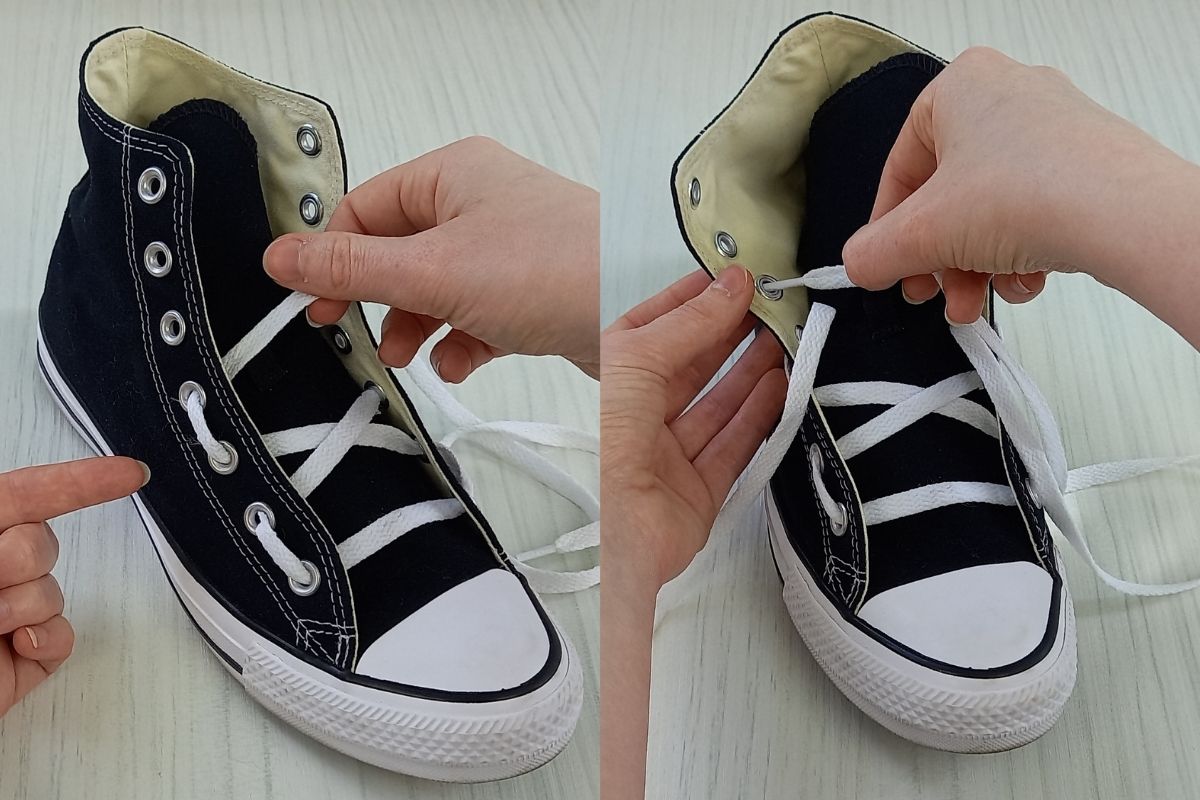
Step 3.

- Continue with this weaving pattern, taking lace end 1. all the way up the shoe tongue. If you need extra help with this, you can follow along with my video:
- Then take lace end 2. and thread it underneath the first diagonal lace as pictured above.
Step 4.
- Now take lace end 2. and thread it down into the third eyelet from the bottom on the left side. After this, bring it up into the fourth eyelet from the bottom from underneath, as I have done above.
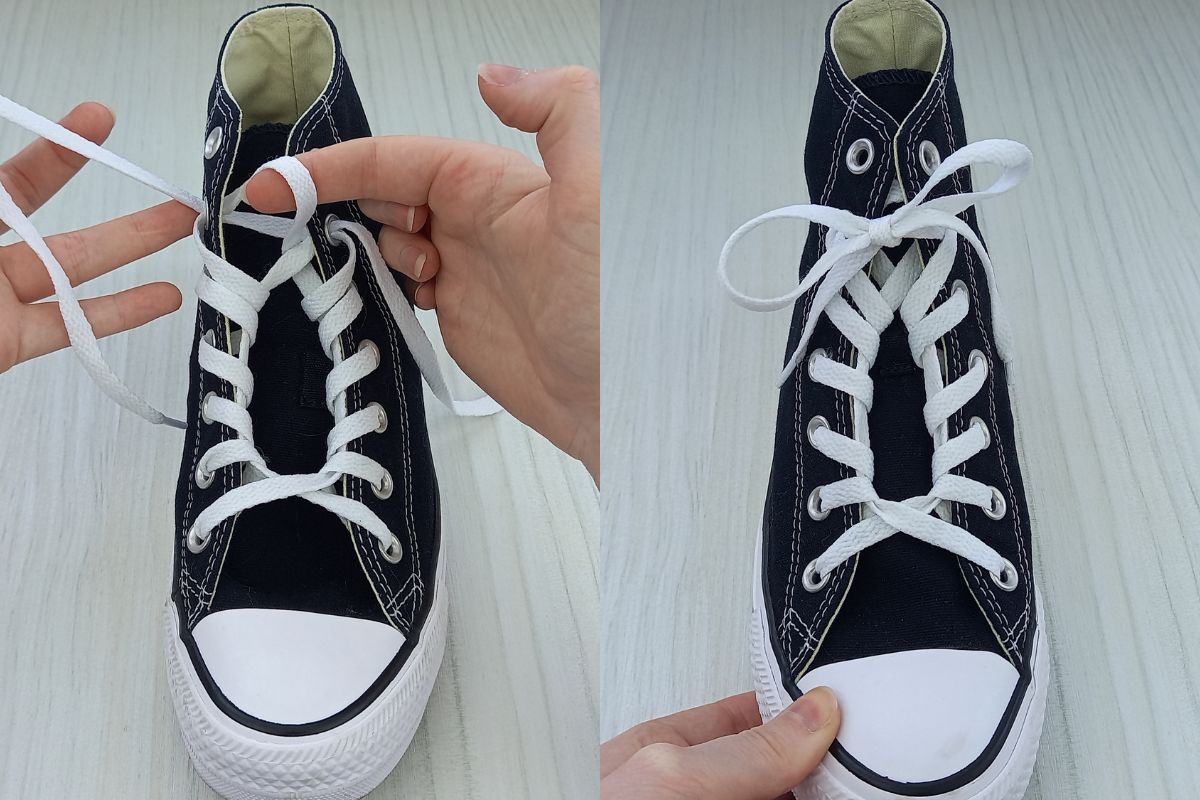
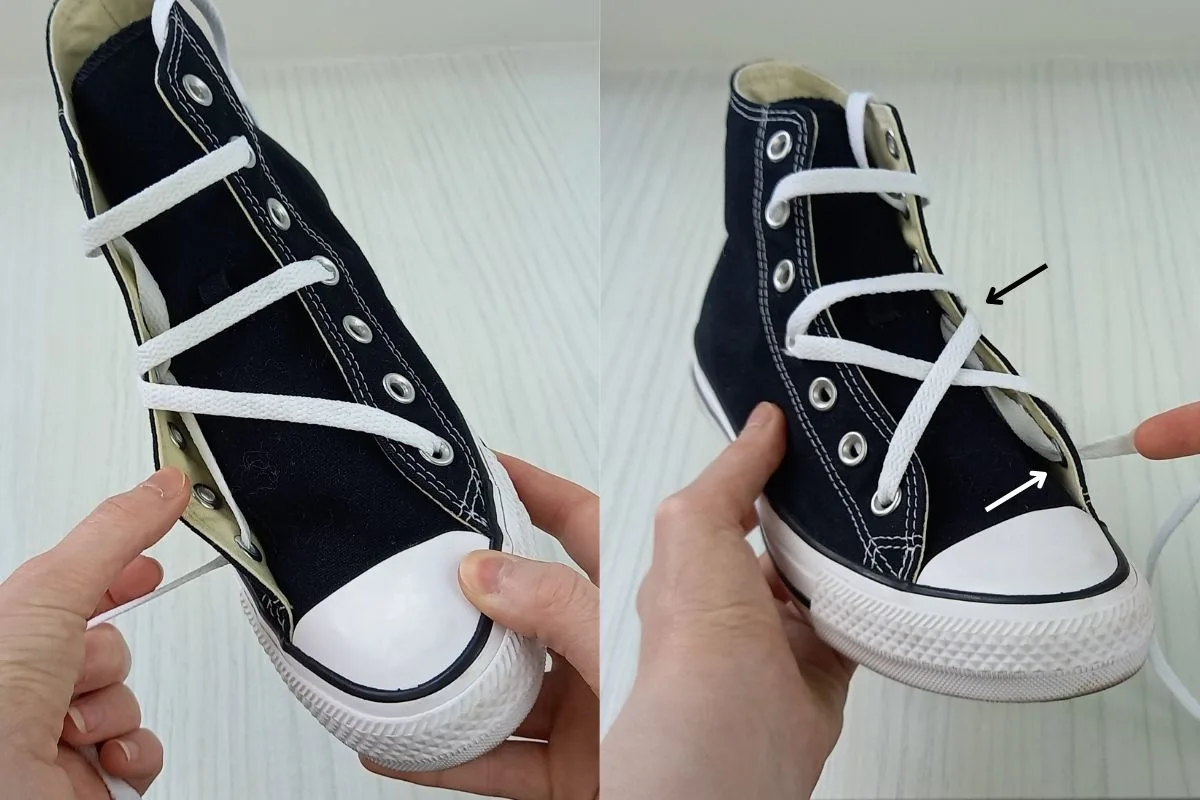
Step 5.

- Then take the lace and bring it underneath the second diagonal lace, as pictured.
- Feed it down into the second eyelet from the bottom on the right hand side. Now bring it up into the third eyelet from the bottom on the right hand side (from underneath), as pictured above.
Step 6.

- Continue with this weaving pattern, threading the lace under each diagonal lace until you reach the top eyelets.
If you need extra help with this style, I have a more in-depth guide here for you to follow: Diamond Lacing Shoes: EASY Guide With Photos.
4. Circle Shoe Lace Style
Circle lacing is an unusual lacing style that is quite rare to see. It’s a conversation starter and is actually a very secure lacing style too.
It’s way easier than it looks to do, so don’t be afraid to give it a go! Please note this lacing style requires a minimum of 6 eyelet pairs to do, if you want results like mine. It can be modified for a lower number of eyelet pairs.
Here’s how to achieve this shoe-lacing pattern:
Step 1.
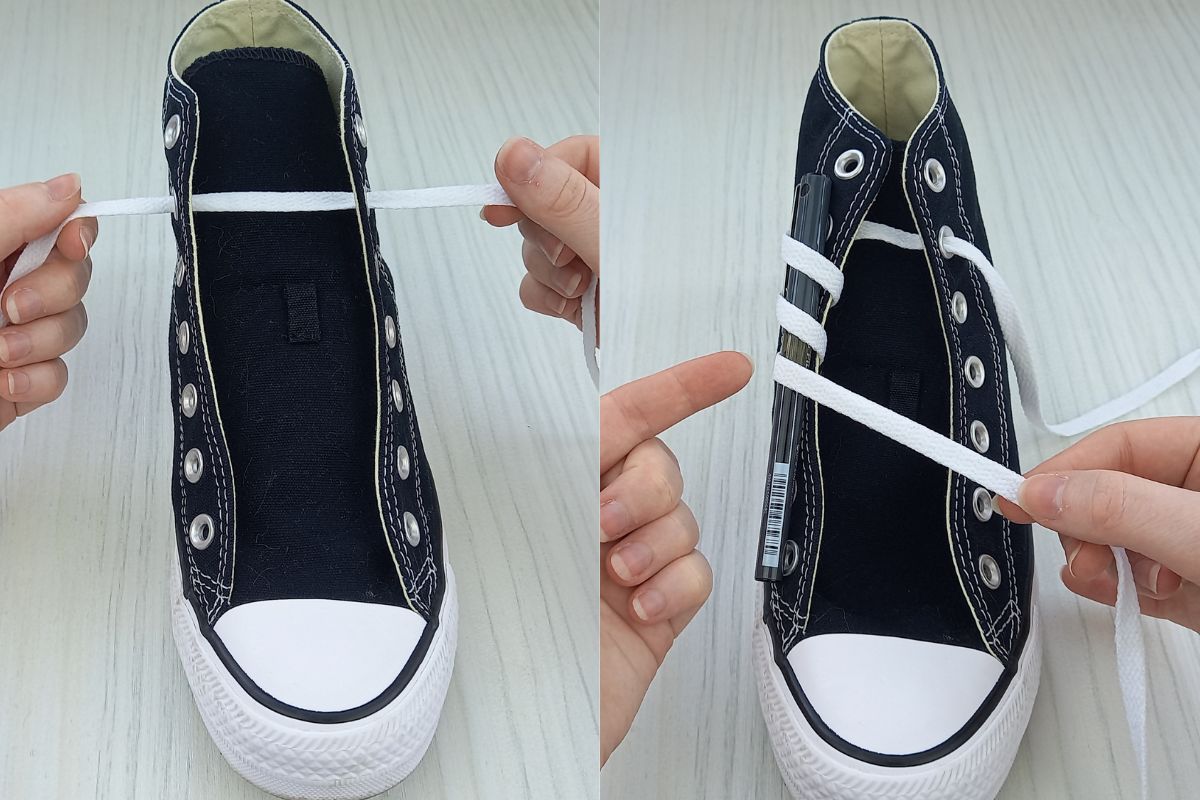
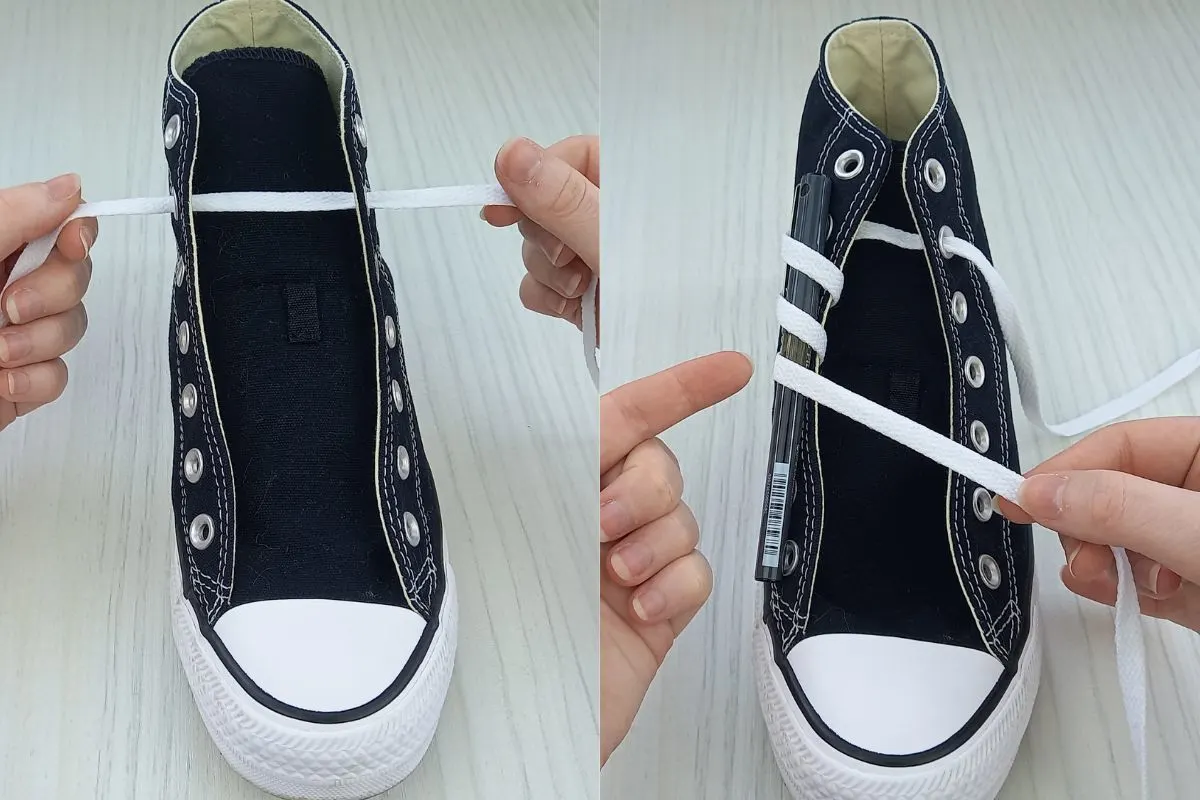
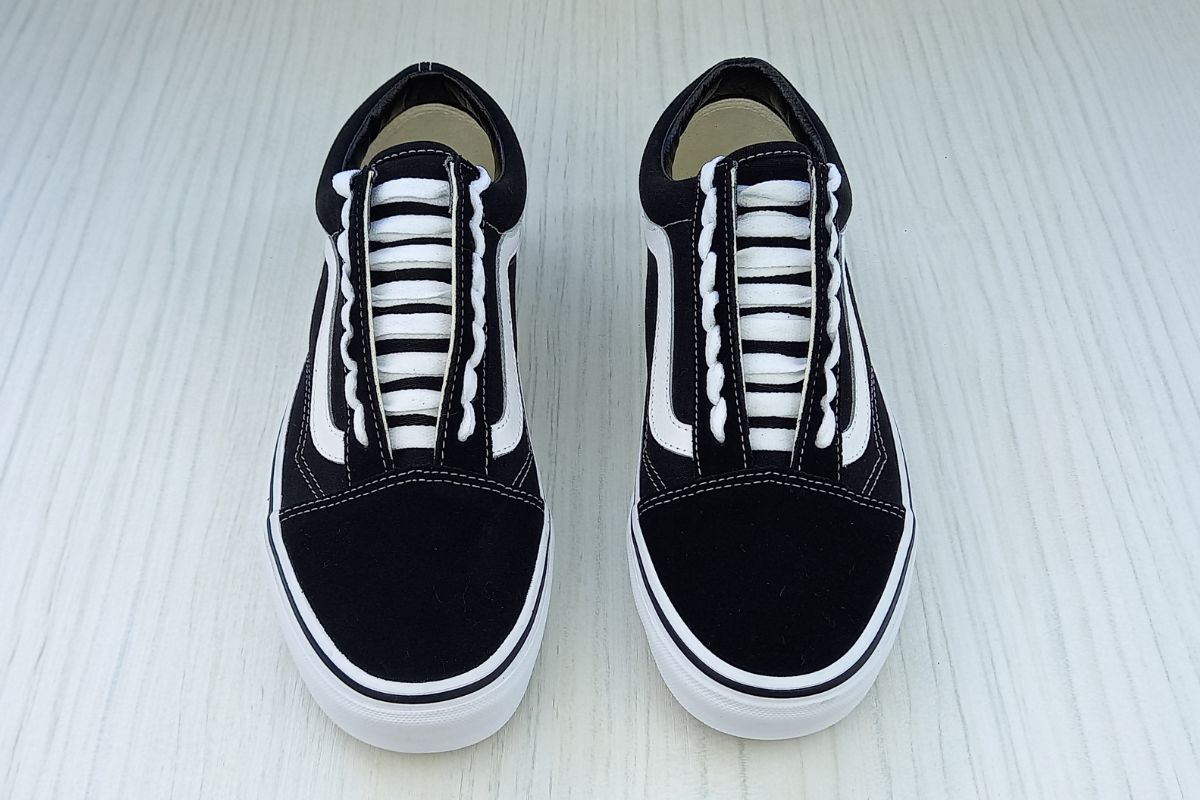
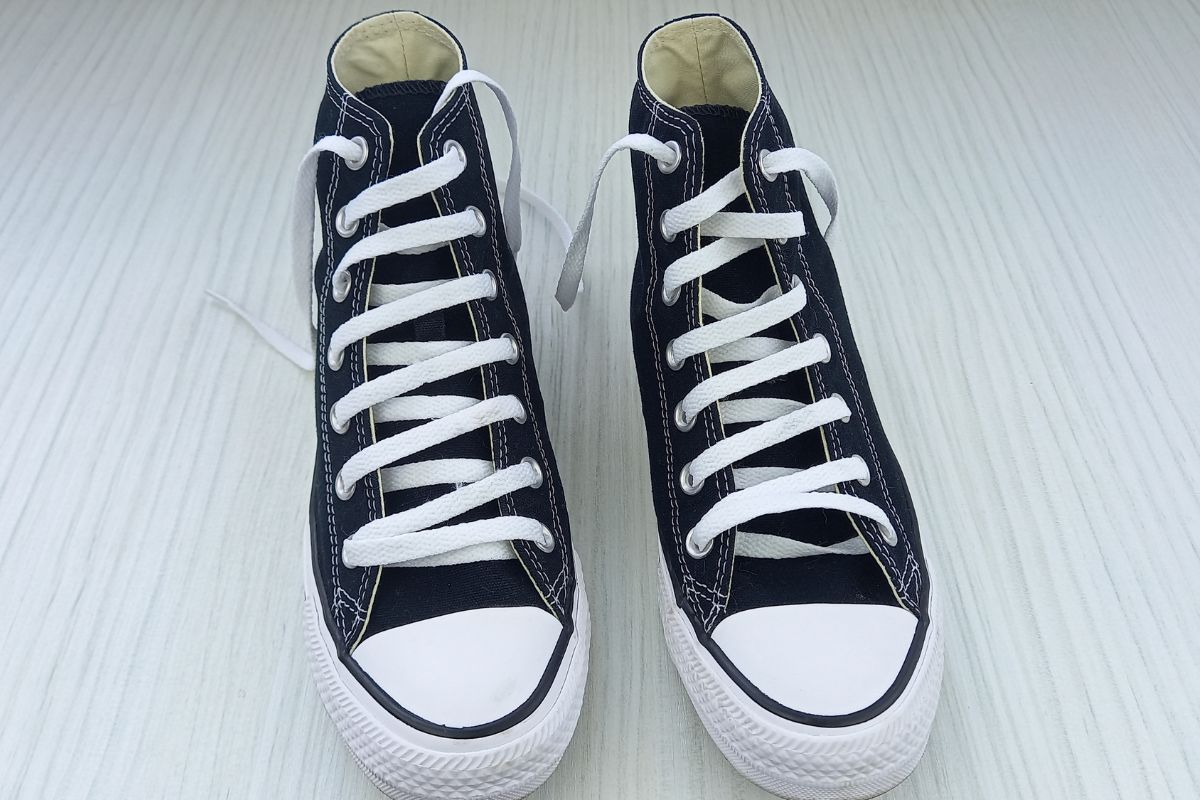
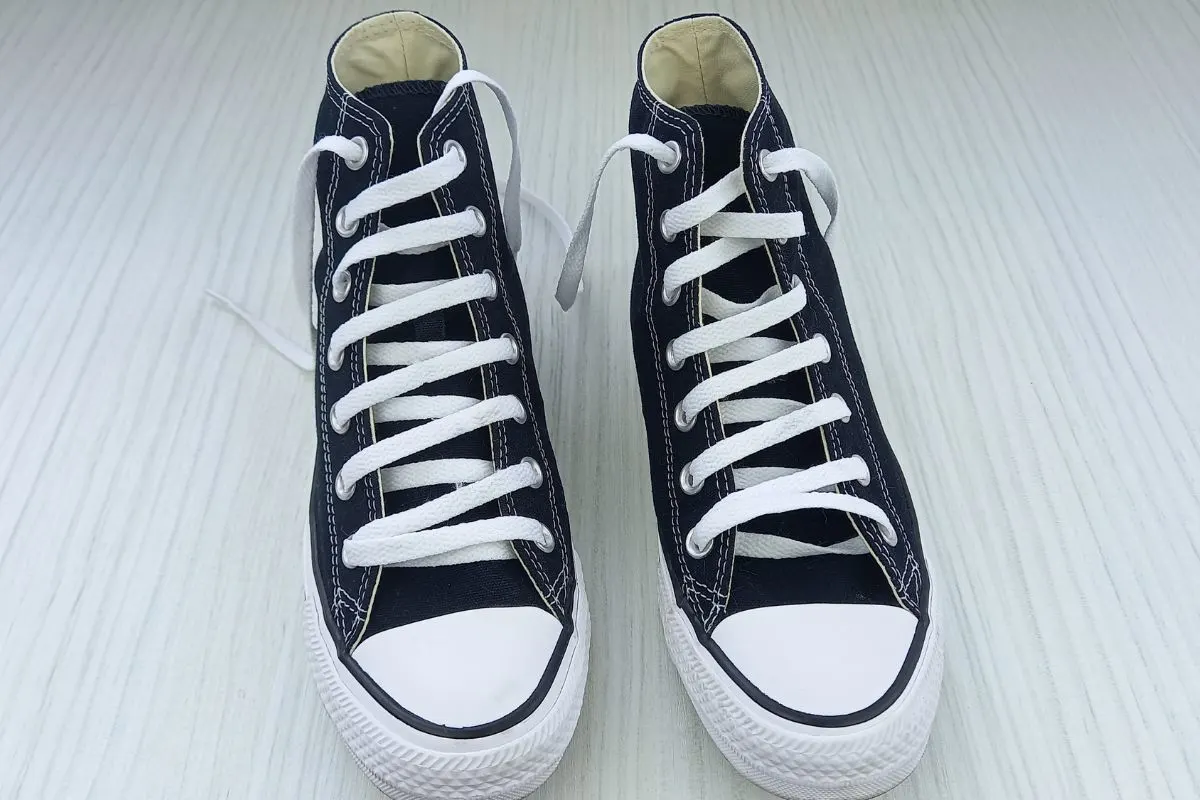
- Start by threading your lace ends into the two top eyelets of your shoes, as pictured above. Make sure the lace ends come out of the eyelets from underneath.
- Then take a pen (or a chopstick) and place it along the eyelets on the left hand side of your shoe. Begin weaving your lace around the pen, as I am in the above image. Thread the lace end into each eyelet as you go, securing the pen in place.
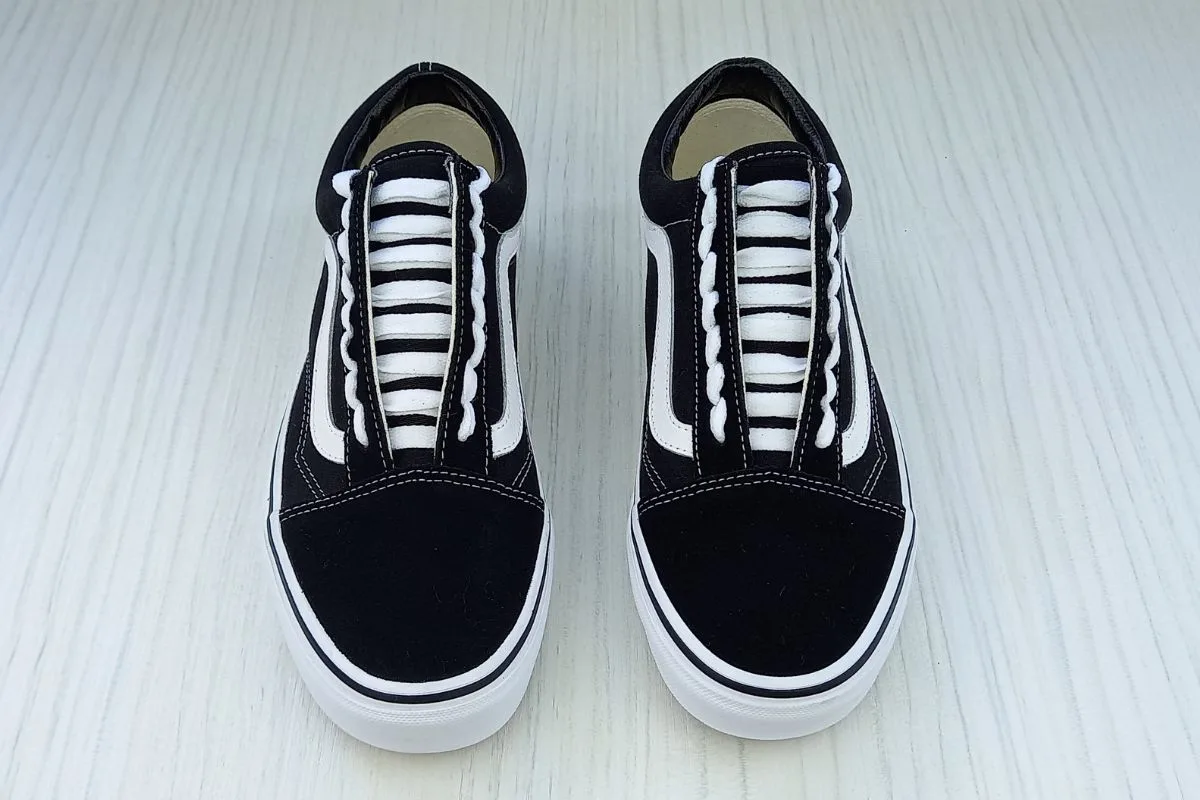
Step 2.

- Do the same on the other side with your lace and a second pen, until you have results like mine in the above image.
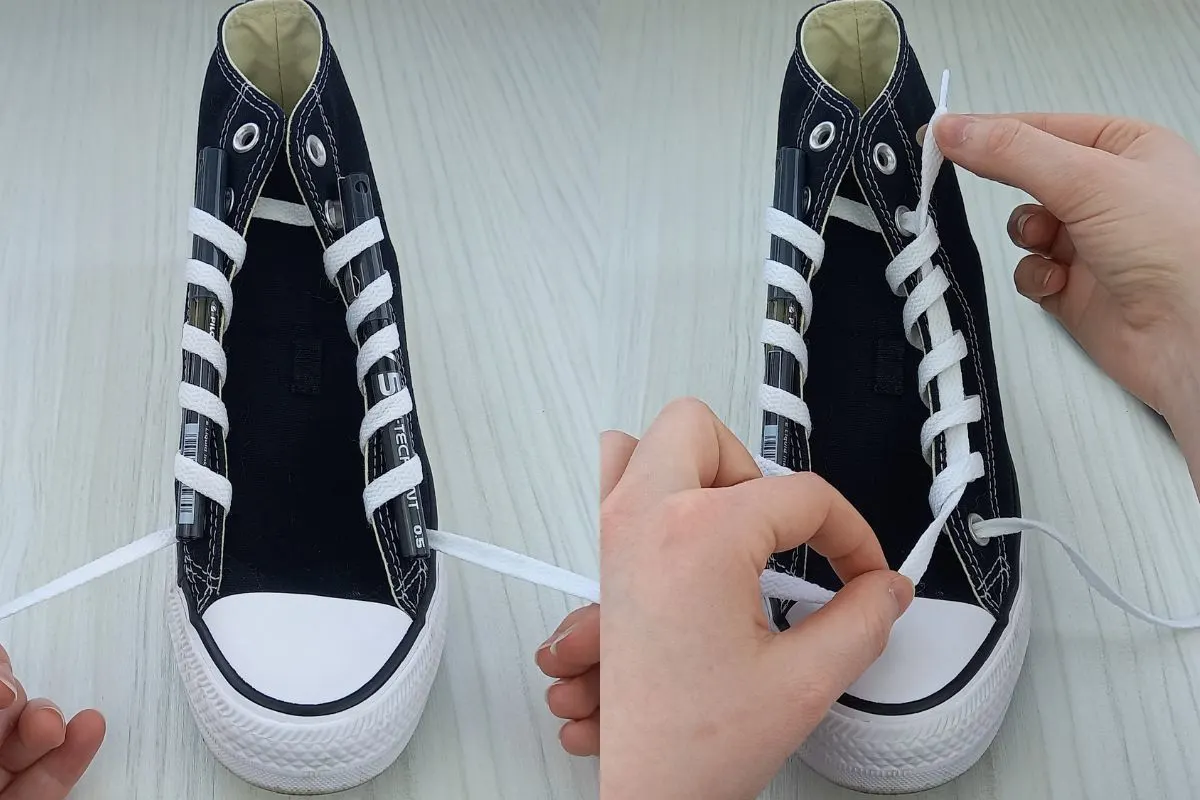
- Then thread your lace ends through the bottom eyelets on each side.
- Remove one of the pens and thread the remaining opposite lace up through the loops created, as pictured above.
Step 3.
- Take the other lace end and do the same – remove the pen and thread it through the loops on the opposite side.
- Once both lace ends are through cross them over and pull them tight. This is when your circle/oval will appear!
Step 4.

- At this stage you can finish off the pattern by threading each lace end into the second eyelet from the top, as I have in the above image. There should already be a lace through there. This will keep the circle looking right!
Making sure your shoelaces are crisp and clean will lead to the best results when trying out these lacing styles. Check out How To Clean Shoelaces – 5 FREE and Easy Ways to help!
5. Zipper Shoe Lacing Style

Zipper lacing is an extremely secure lacing style, where the laces are locked in place by the crossover pattern.
It looks intricate and impressive (but it’s fairly simple if you go slowly!).
Here’s how to do this shoelace pattern:
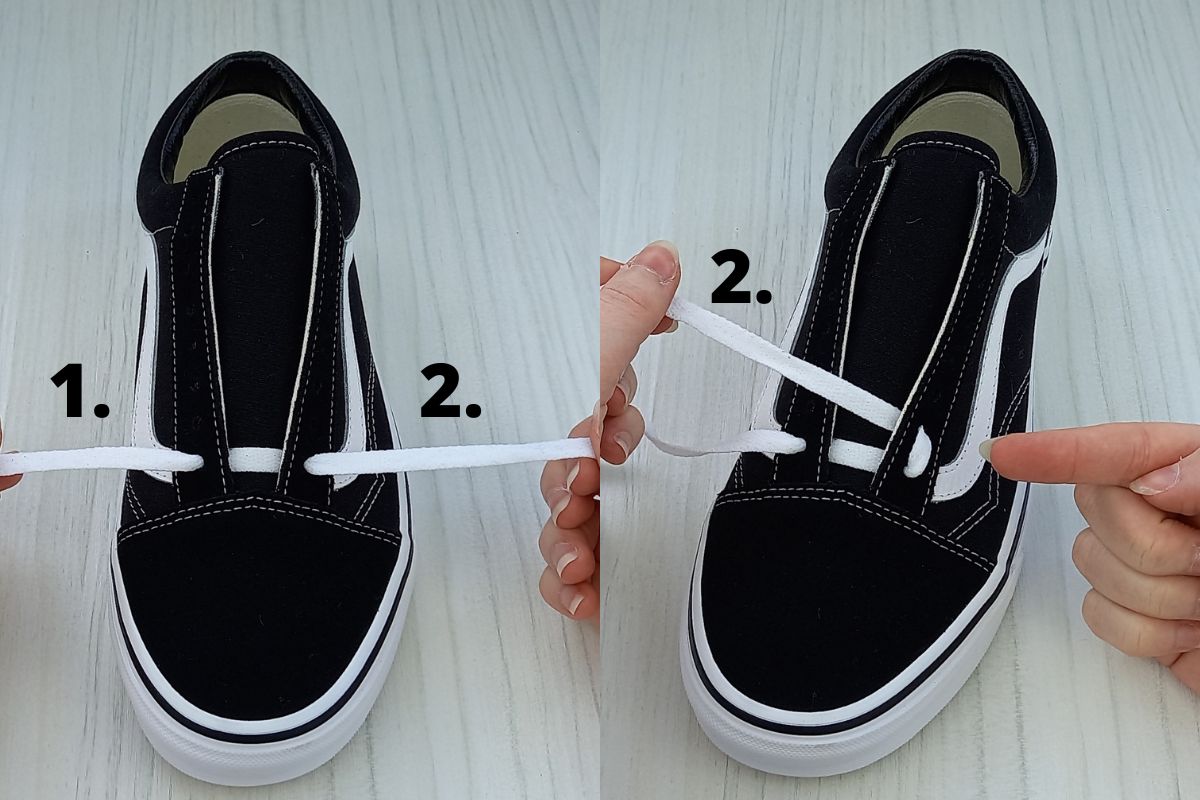
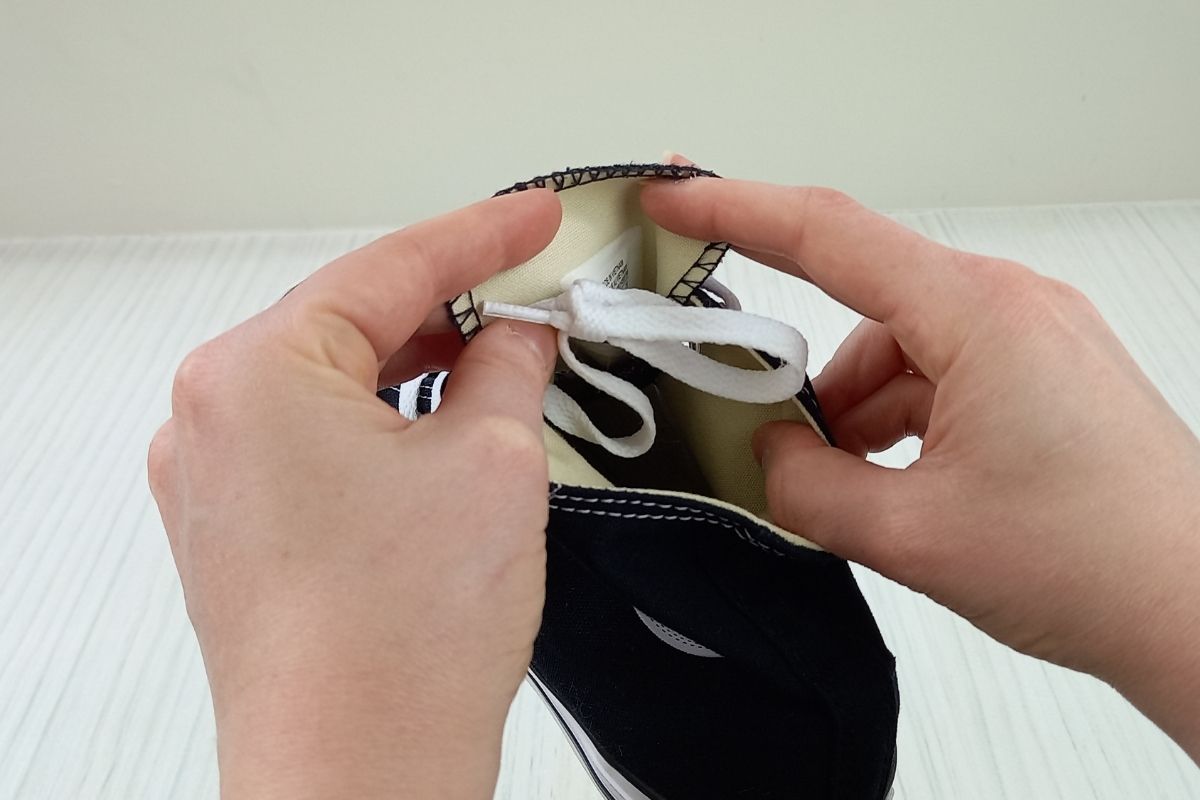
Step 1.
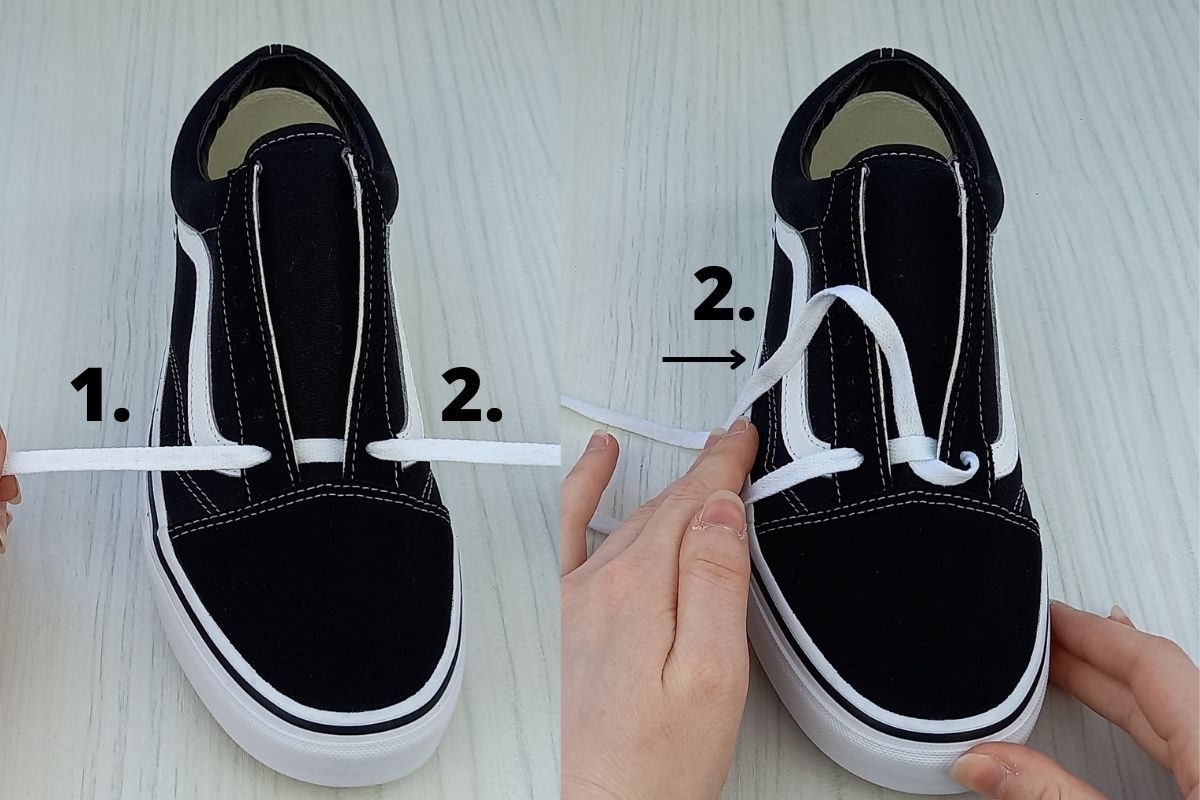

- Thread both lace ends through the bottom eyelets, making sure they come out of each from underneath.
- Then take lace 2. (as pictured) and thread it underneath the little loop that sits across the shoe tongue.
Step 2.


- Do the same with lace 1. then take both ends and feed them through the second eyelet up from the bottom on each side (as pictured).
Step 3.
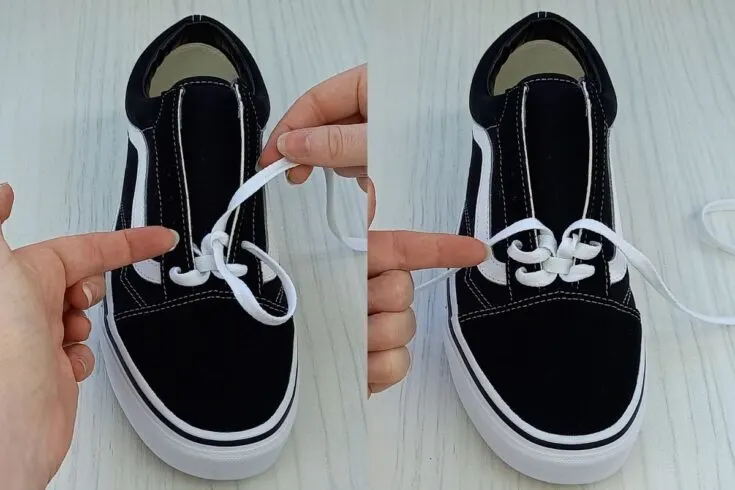
- Now thread each lace end through the loops created on the shoe tongue, as pictured above. Make sure to double check the picture to get the same results as me.
- Continue with this pattern all the way up the shoe tongue, depending on the number of eyelet pairs you have. When you are done you can simply bow the laces as usual at the top (or tuck the bow out of sight behind the shoe tongue for a crisp look).
6. Ladder Shoe Lacing Style
Ladder lacing (or military lacing as it’s often referred to) is a taught lacing style that looks neat.
The laces won’t slip and they can be easily cut, to get a boot off in an emergency situation. Over the years they have become a popular lacing style for the cool aesthetic of the ‘ladder’ effect, as well as their practicality.
Here’s how to ladder lace your shoes:
Step 1.
- Thread your lace through the two bottom eyelets.
- Take lace end 2. as pictured above, and thread it into the next eyelet up on the right hand side.
Step 2.

- Bring lace end 2. into the second eyelet from the bottom on the left hand side.
- Take lace end 1. and feed it into the same eyelet, as pictured above, then bring it across the shoe tongue and into the second eyelet from the bottom on the right hand side.The two lace parts should sit on top of one another on the shoe tongue.
Step 3.

- Continue with this pattern all the way up the shoe tongue. If you want a more detailed guide to follow along with, check out my post: Ladder Lacing Shoes: EASY Tutorial (Photos).
Alternatively, you can watch my video tutorial of this lacing style here:
7. Lattice Shoe Lacing Style
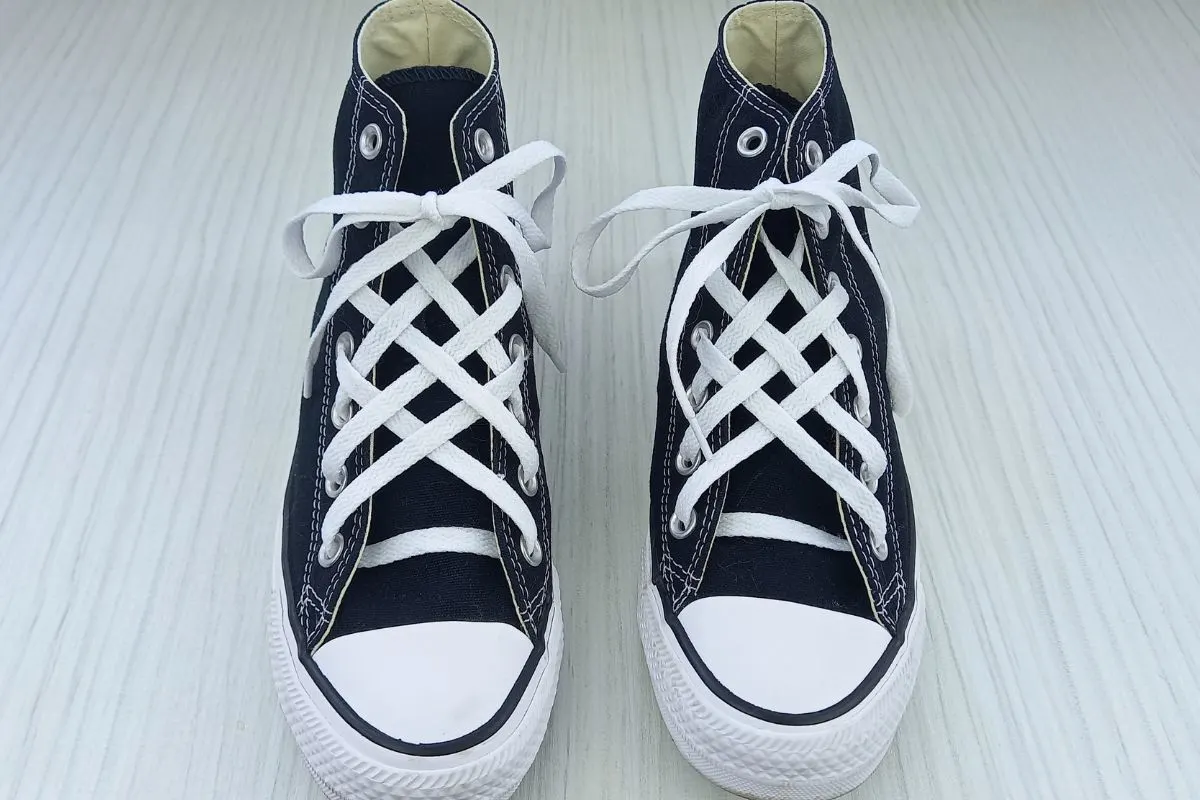
Lattice lacing looks really cool. It’s striking lacing style that puts a fresh spin on a boring pair of shoes.
It looks difficult to do, but it’s actually easy. Take your time and follow along with my steps!
Here’s how to achieve this shoelace pattern:
Step 1.


- Begin by feeding your lace ends into the two bottom eyelets of your shoes, so that they come out of the eyelets from underneath (like mine do in the above image).
- Then take lace end 1. and bring it across the shoe tongue and down into the fourth eyelet on the bottom on the right side (from above). Then feed it up into the fifth eyelet from the bottom on the right hand side from underneath, as pictured.
Step 2.
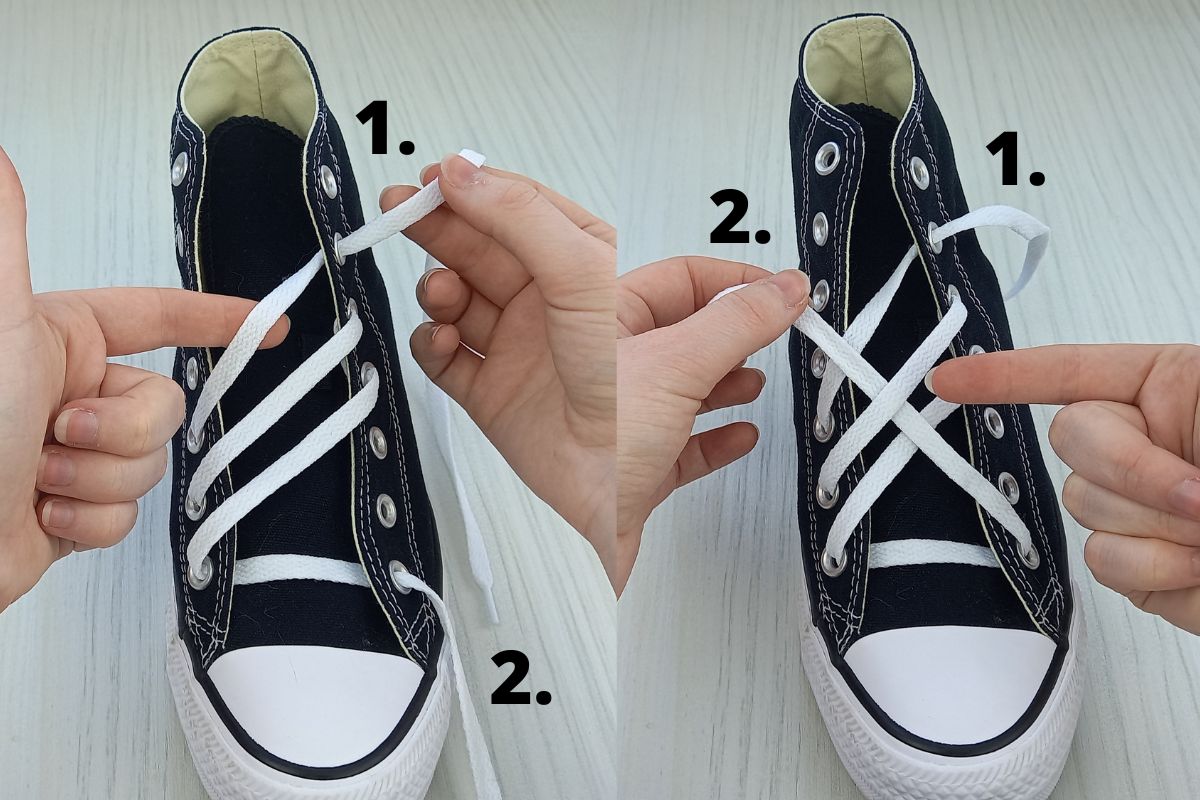

- Bring lace end 1. back over to the left hand side and feed it down into the second eyelet from the bottom. Then take it up into the third, from underneath, and then take it back over to the sixth eyelet from the bottom on the right hand side. Double check the above image for best results.
- Now move on to lace end 2. by threading it over, then under, then over the three diagonal lace lines (as pictured).
Step 3.
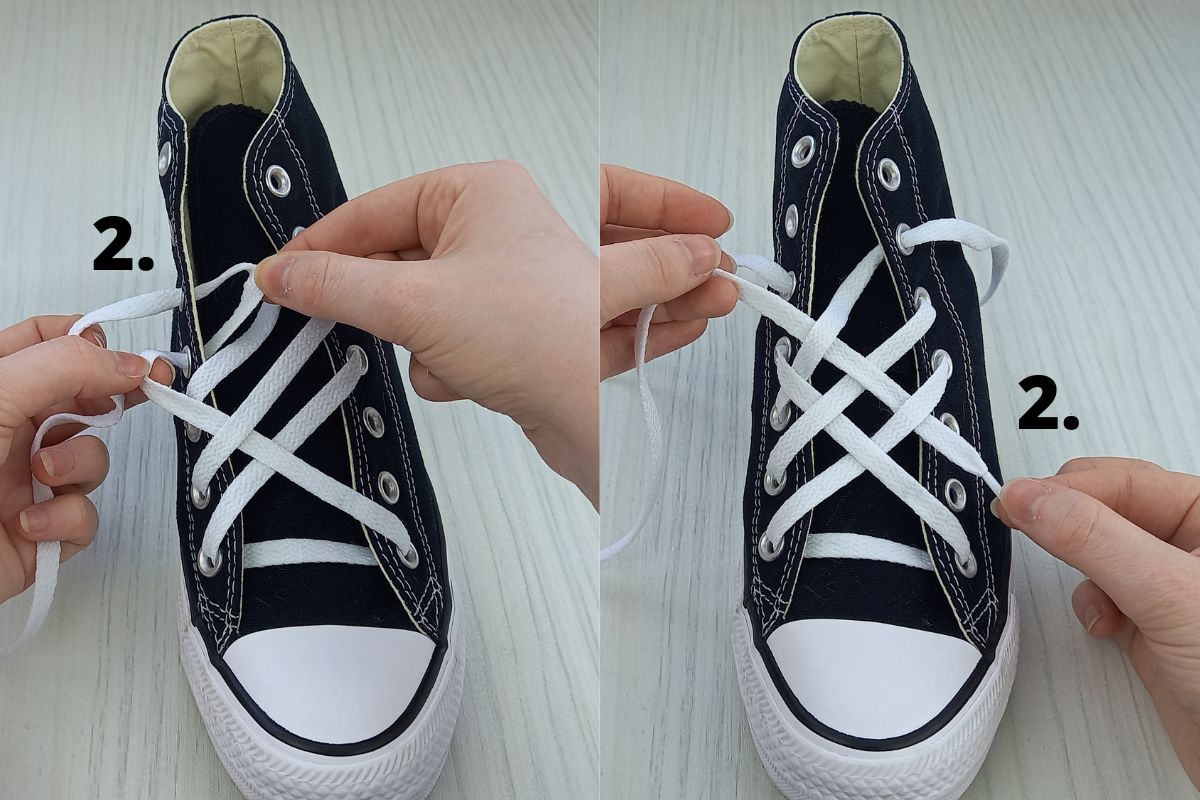

- Take lace end 2. and thread it into the fourth eyelet from the bottom from above, then up and into the fifth eyelet from the bottom from underneath, on the left hand side of your shoe.
- Then weave it under, over, then under the diagonal lace lines, as pictured above. Take a moment here to double check your pattern against mine.
- Then thread lace end 2. into the second eyelet from the bottom on the right hand side, down from above. Bring it up into the third eyelet from the bottom from underneath.
Step 4.
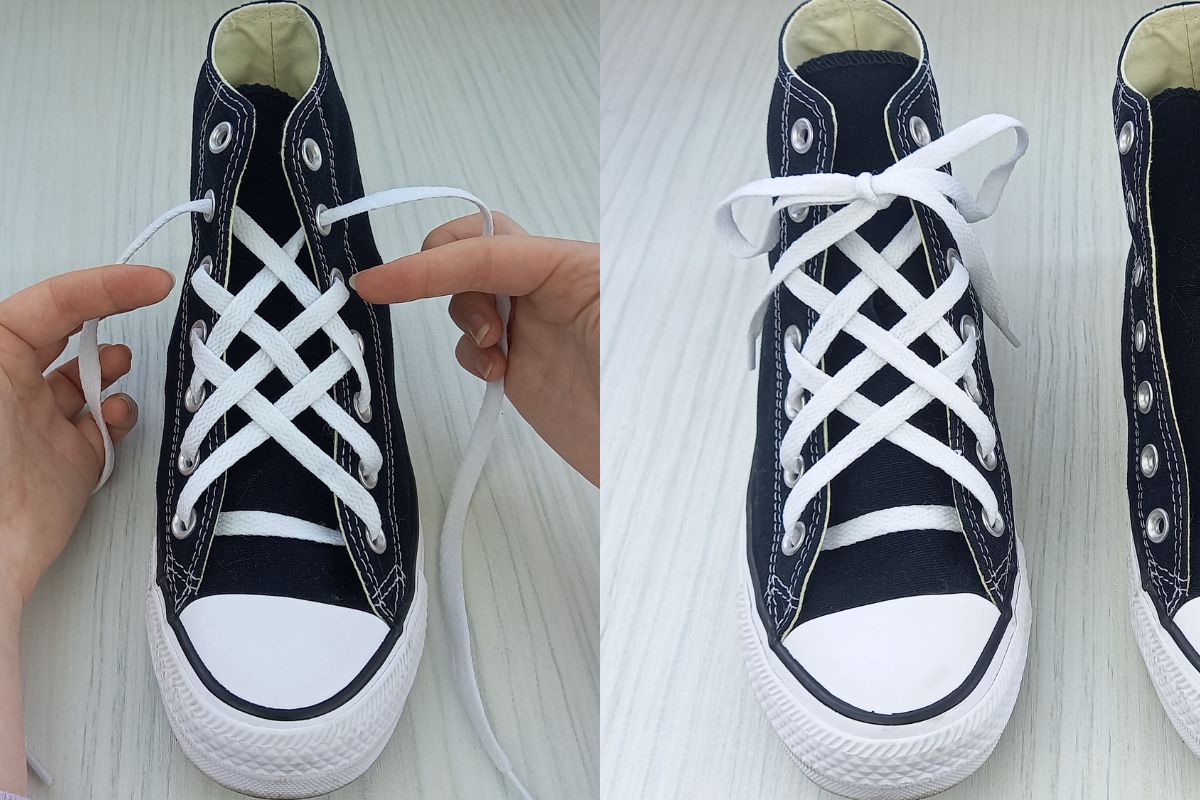
- Now weave lace end 2. over, under, then over the diagonal lines and into the second eyelet from the top on the left hand side, as I have done in the above image.
- Finish off the pattern with a bow!
If you’re in a hurry each morning and want to try a time saving hack, check out: How To Lace Shoes So They Slip On – 3 EASY Ways
8. Standard Shoe Lacing Style (with a twist)
Here is a fun twist on a standard lacing style – a hidden shoelace bow! This no-show bow lacing pattern will make your shoes look neater, in a few easy steps.
Step 1.
- Lace your shoes in a standard style. If you need help with this, see my video here:
Step 2.

- Tuck the shoelace bow out of sight behind the shoe tongue. It’s as simple as that, yet it’s an effective look for those who like a clean finish.
9. Lightning Shoe Lacing Style
Lightning shoe lacing is a striking lacing technique that looks awesome on sneakers. It looks best with laces that contrast the color of your shoes, for a pattern that pops. It’s so quick and easy to do too!
This can be done with any number of eyelet pairs above four.
Here’s how to do it:
Step 1.

- Thread your lace into the two bottom eyelets on the left hand side of your shoe as pictured.
- Then take the lace end that comes out of the very bottom eyelet and bring it across the shoe tongue and down into the very top eyelet on the right hand side.
Step 2.

- Take the other lace end and bring this across to the right hand side and feed it down into the bottom eyelet from above.
- Then bring it up and through the second eyelet from the bottom on the right hand side, as I have done in the above image.
Step 3.

- Bring the lace end back over to the left and down into the second eyelet from the bottom. Then feed it up into the third eyelet from the bottom from underneath. This is the pattern to follow all the way up the shoe tongue.
Step 4.
- Again bring the lace over to the right and into the next free eyelet. Keep going with this until you reach the top of the shoe. You can then tie your laces into a bow and tuck them out of sight underneath the shoe tongue.
10. Loop Cross Shoe Lace Technique
Loop cross lacing your shoes is a super fast way to achieve an unusual looking style, in a few simple steps. It’s a really cool way to lace shoes that takes no time at all!
Here’s how to do it:
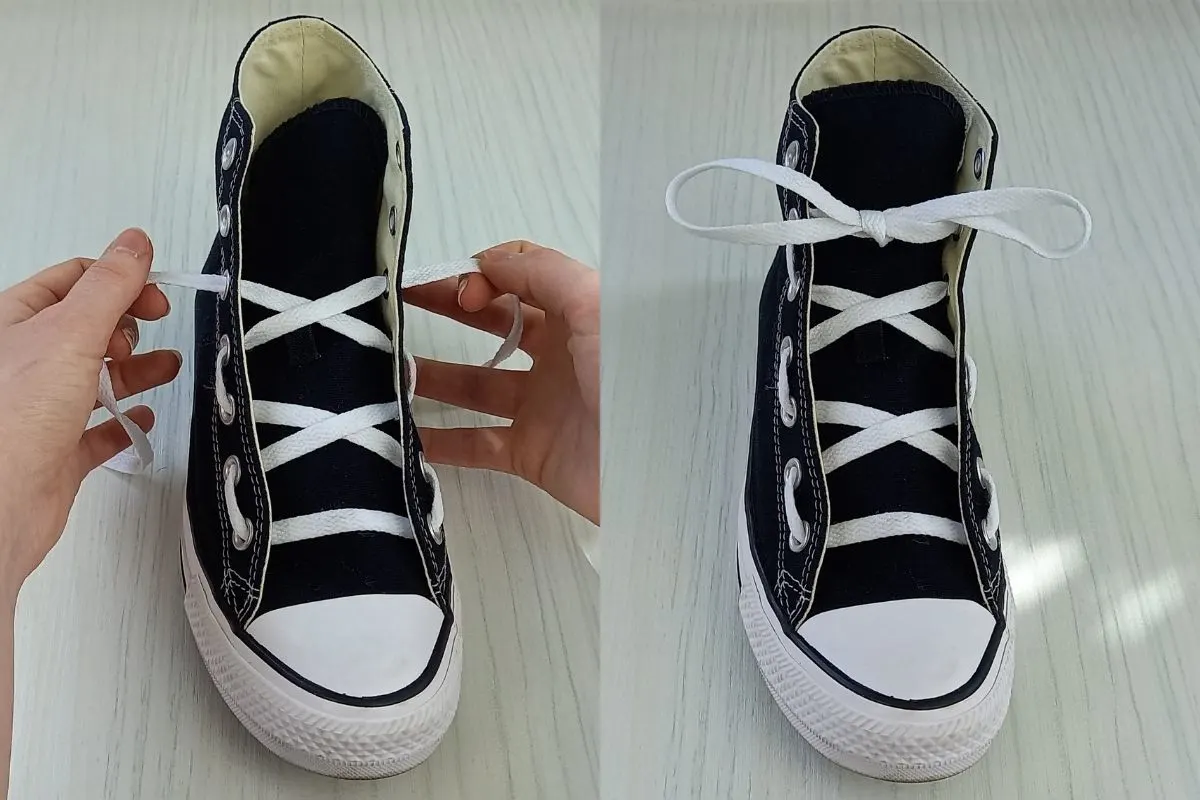
Step 1.

- Start by feeding your lace ends into the two bottom eyelets on your shoe, as I have done above.
- Then cross the laces over each other, as pictured.
Step 2.

- Thread the lace ends through the next eyelets up on your shoe.
- Again cross over the laces, then repeat.
Step 3.
- Continue this pattern all the way up the shoe tongue. When you reach the top eyelets bow your laces as usual and you are done!
11. Zig Zag Shoe Lacing Style
Zig zag lacing is a cool way to lace shoes for beginners as it requires little shoe lacing skill to do.
Here’s how to achieve this shoelace pattern:
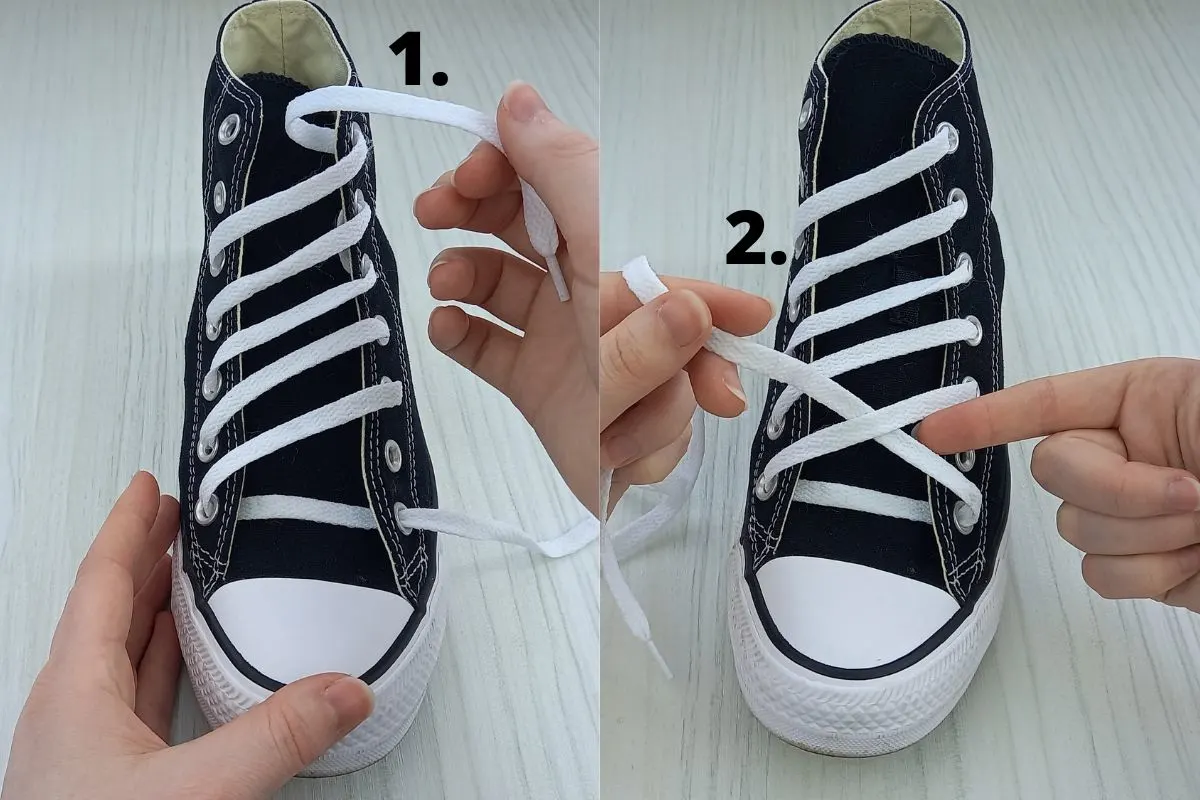
Step 1.

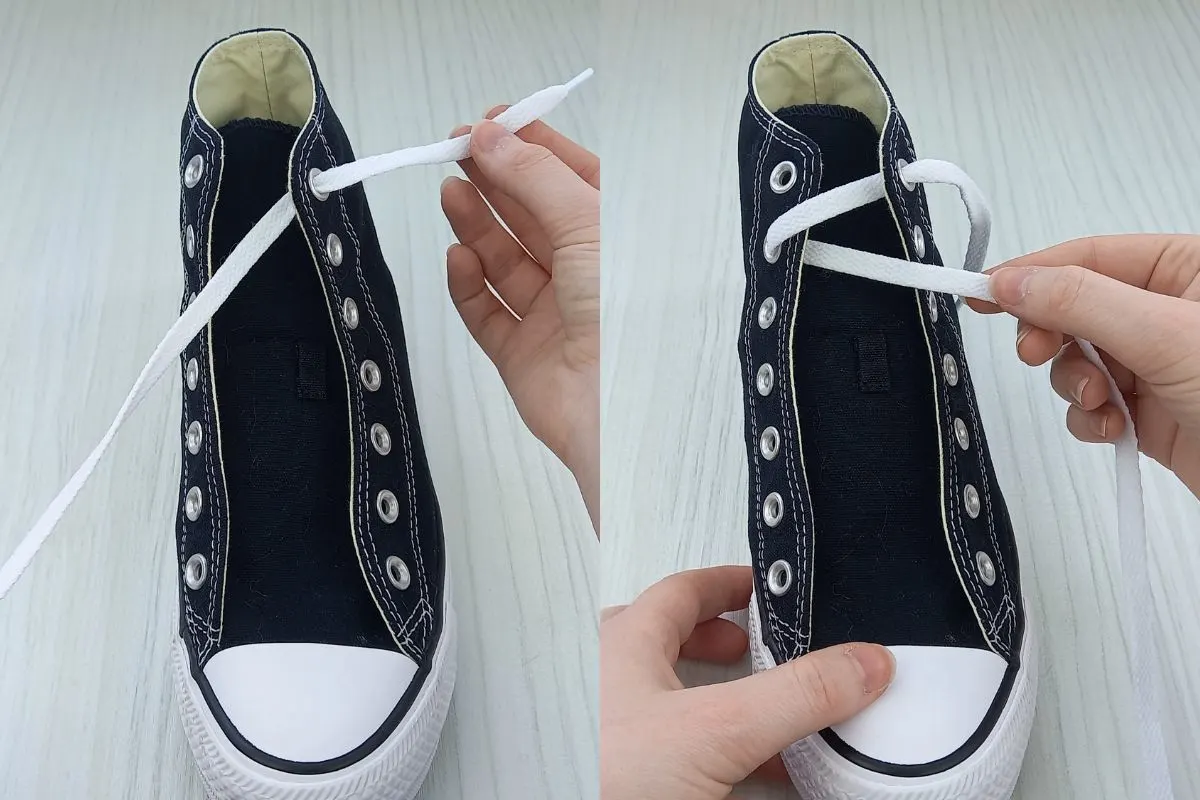
- Start by threading your lace end through the top eyelet on the right hand side, as I have done above.
- Then bring it over to the left hand side and down into the second eyelet from the top.
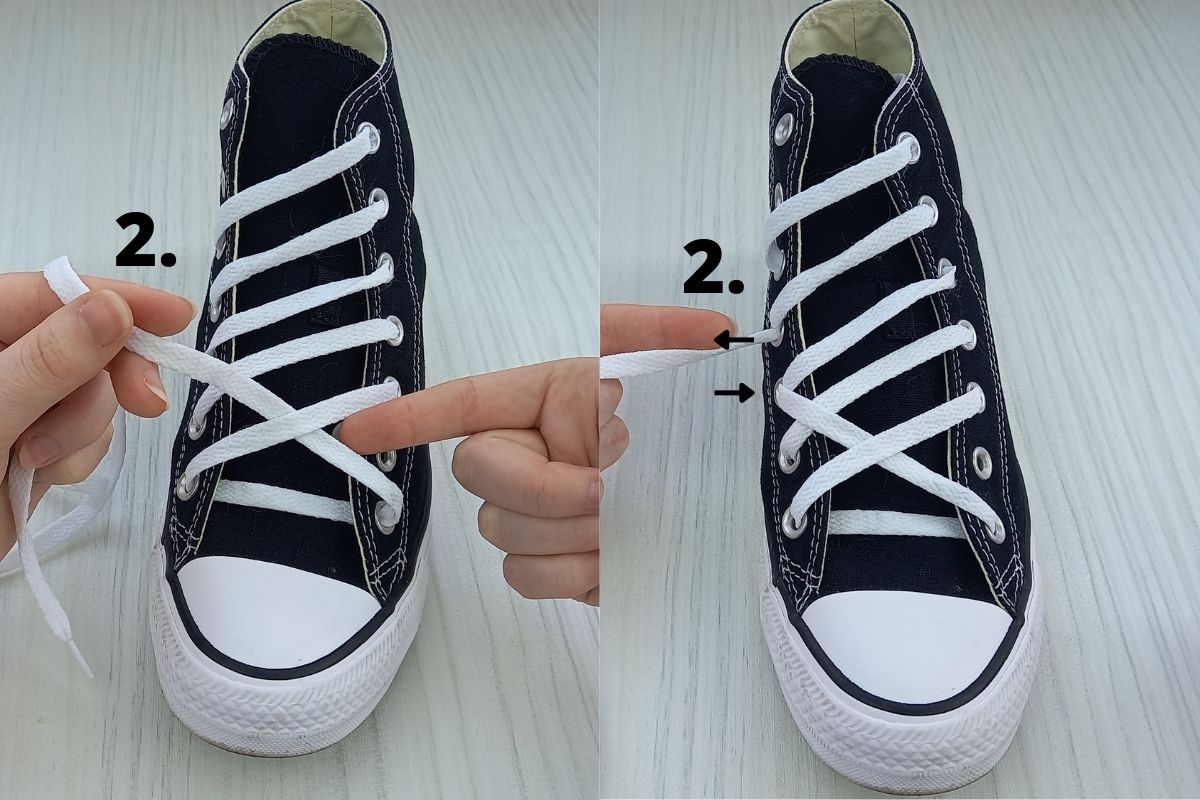
Step 2.
- Feed the lace end across the shoe tongue and into the second eyelet from the bottom on the right hand side. Repeat this pattern all the way down the shoe until you reach the bottom eyelet on the right hand side (as pictured).
Step 3.

- Bring the lace end over to the bottom eyelet on the left hand side, creating a ‘bar’ like effect.
- Then feed the excess lace up underneath the whole design, tucking it out of sight behind the side of your shoe. Thread it into the top eyelet on the left hand side, as pictured. At this stage you can bow your shoes as normal and you are good to go!
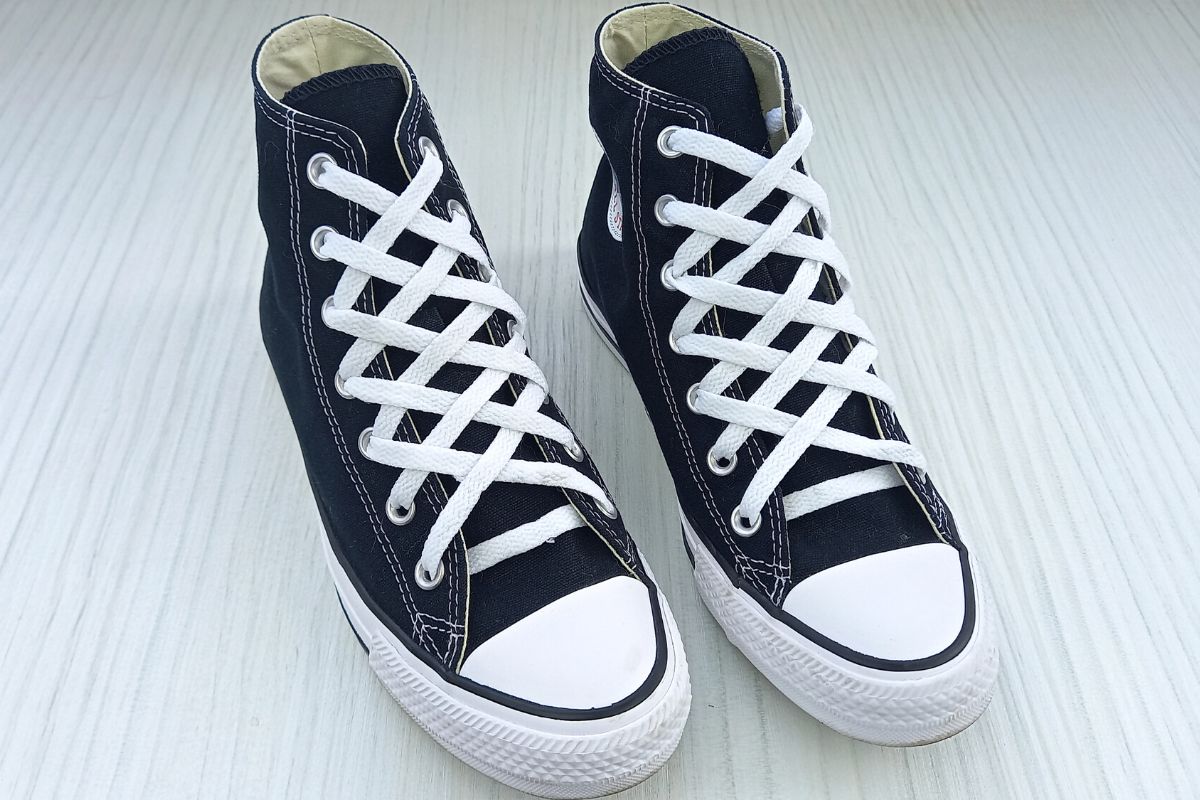
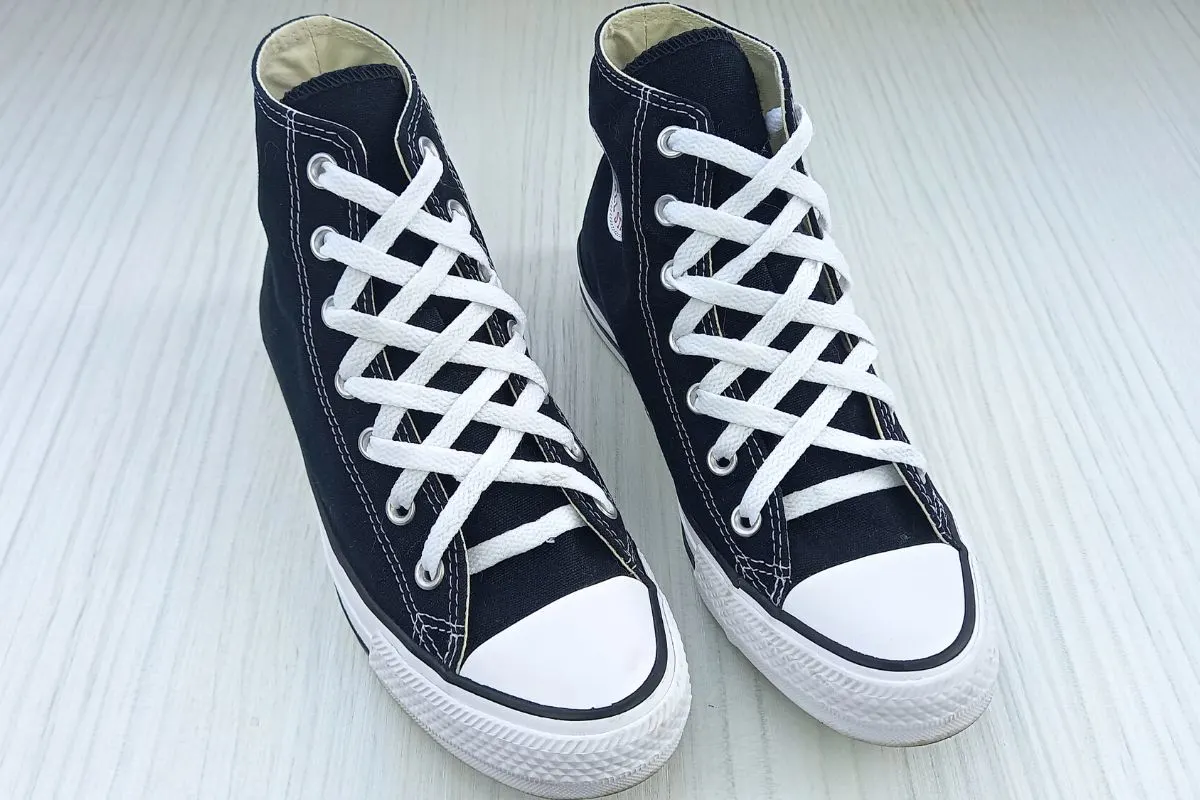
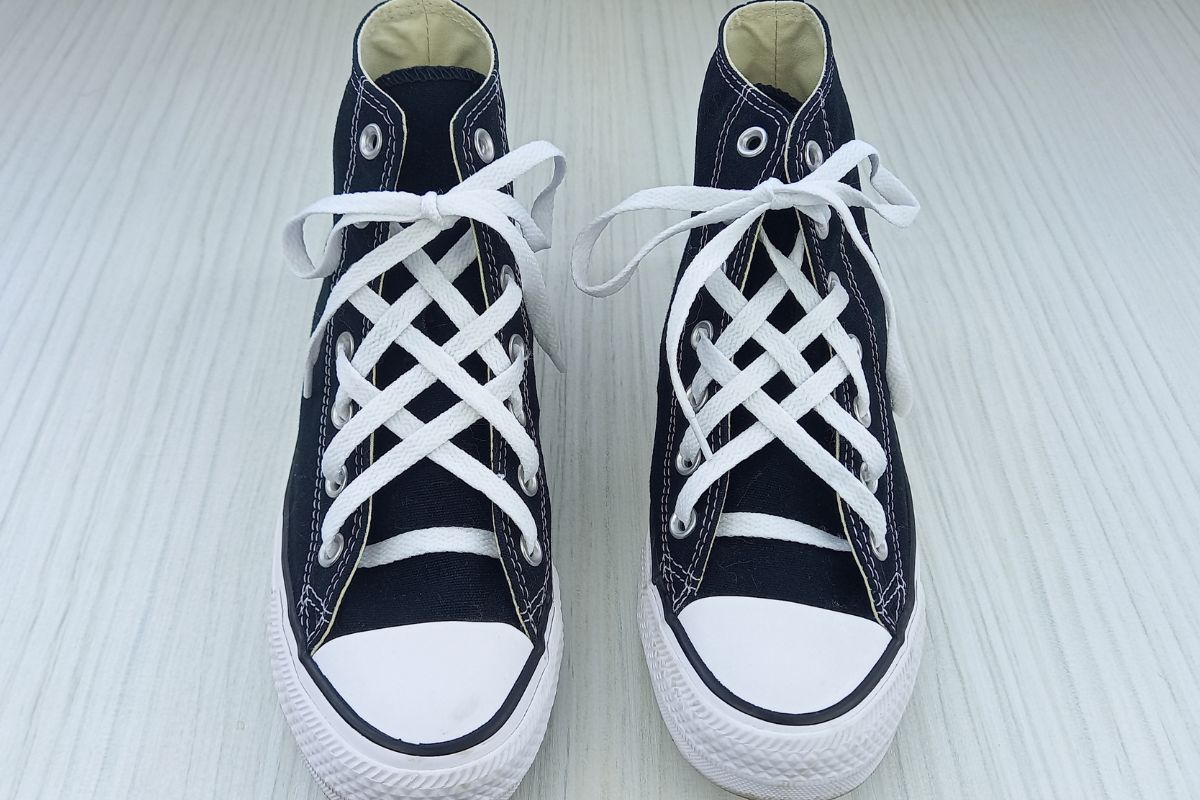
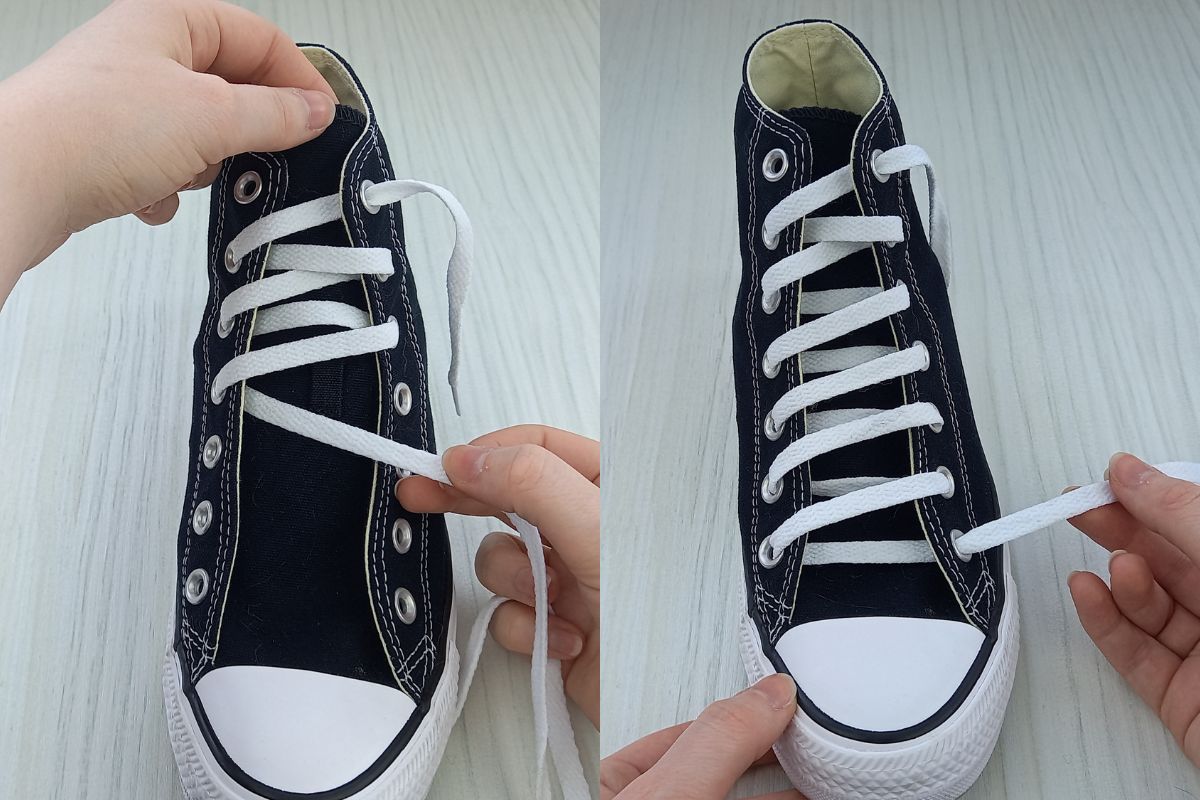
12. Star Lace Shoe Tutorial
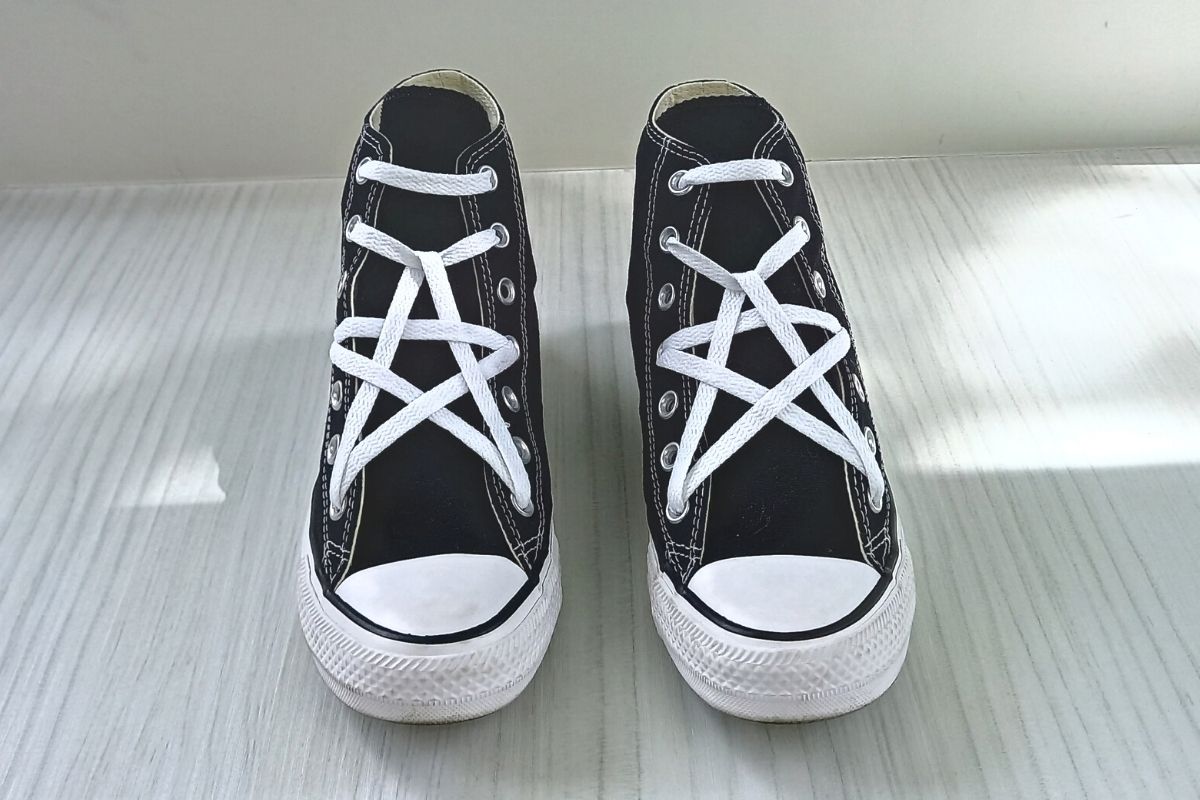
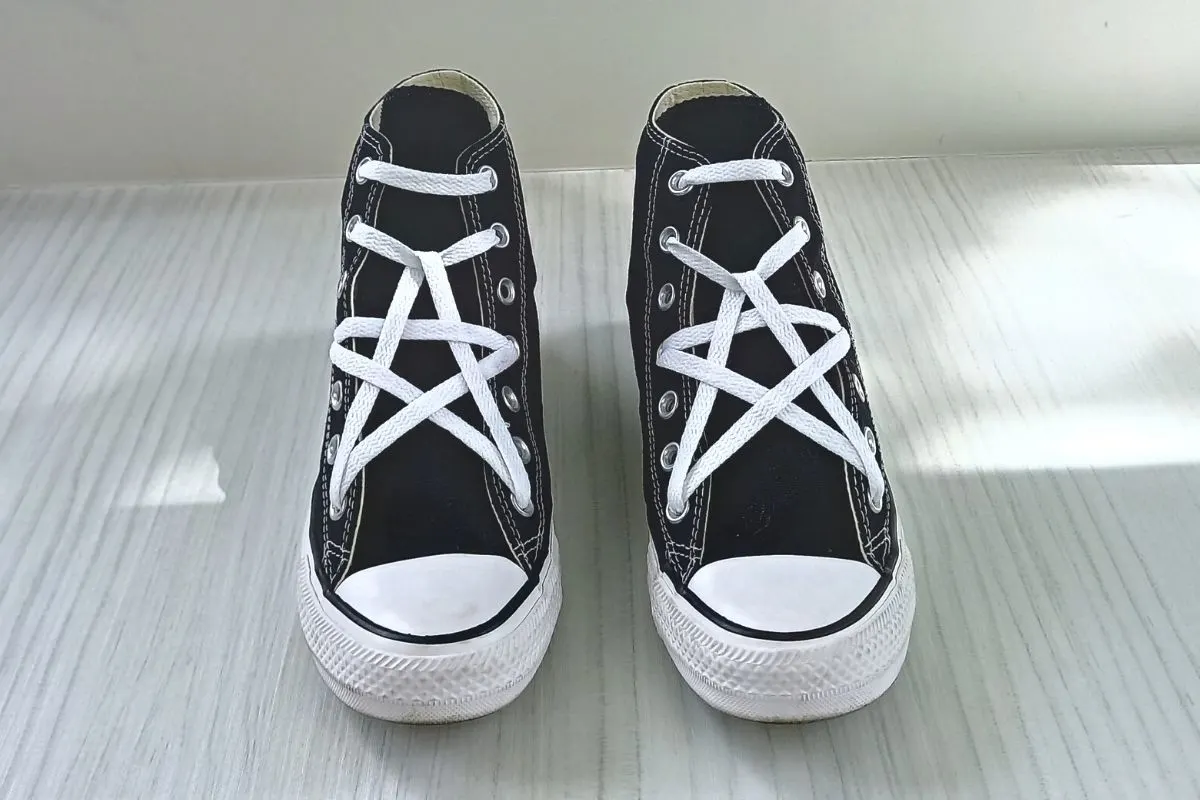
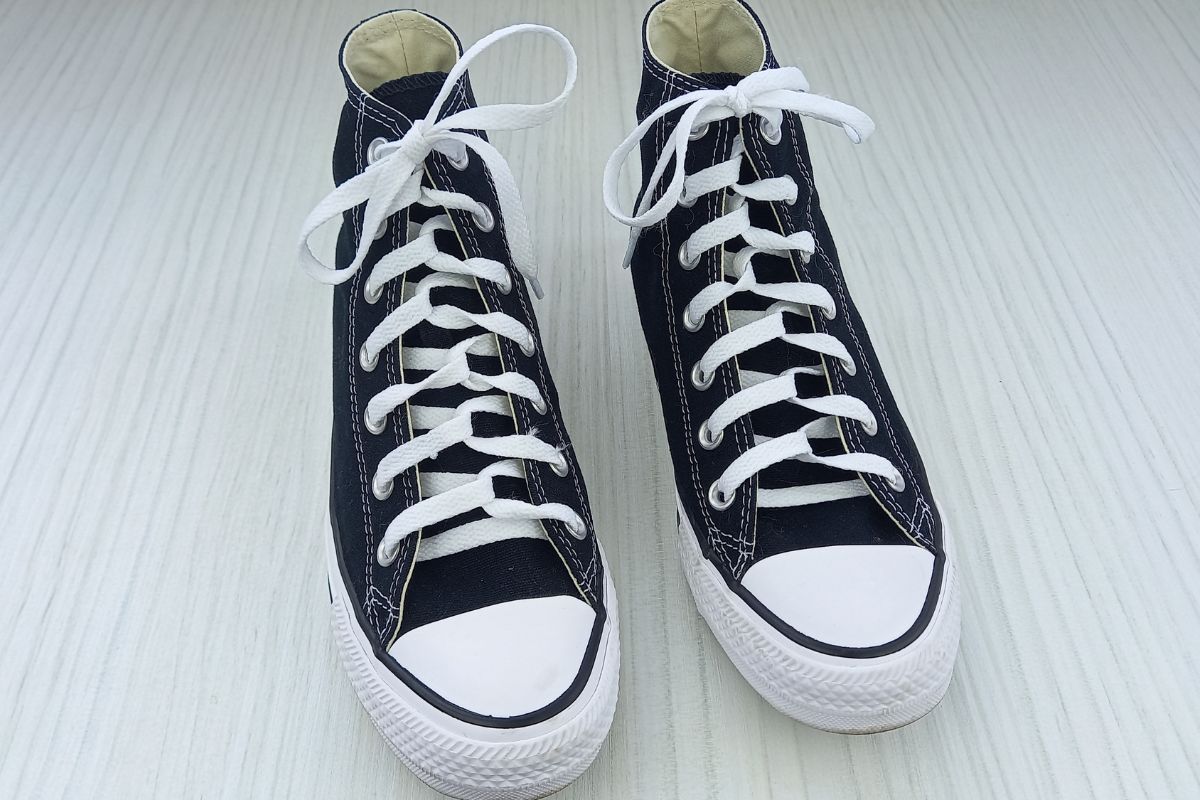
Star lacing is a super cool way to lace shoes, that is striking and different. It’s an iconic lacing style that is particularly popular on Converse sneakers. It works best on shoes with seven pairs of eyelets.
I have a video tutorial available of this lacing pattern if you would like to follow along with the steps (linked at the end of the written steps).
Here’s how to do this shoelace pattern:
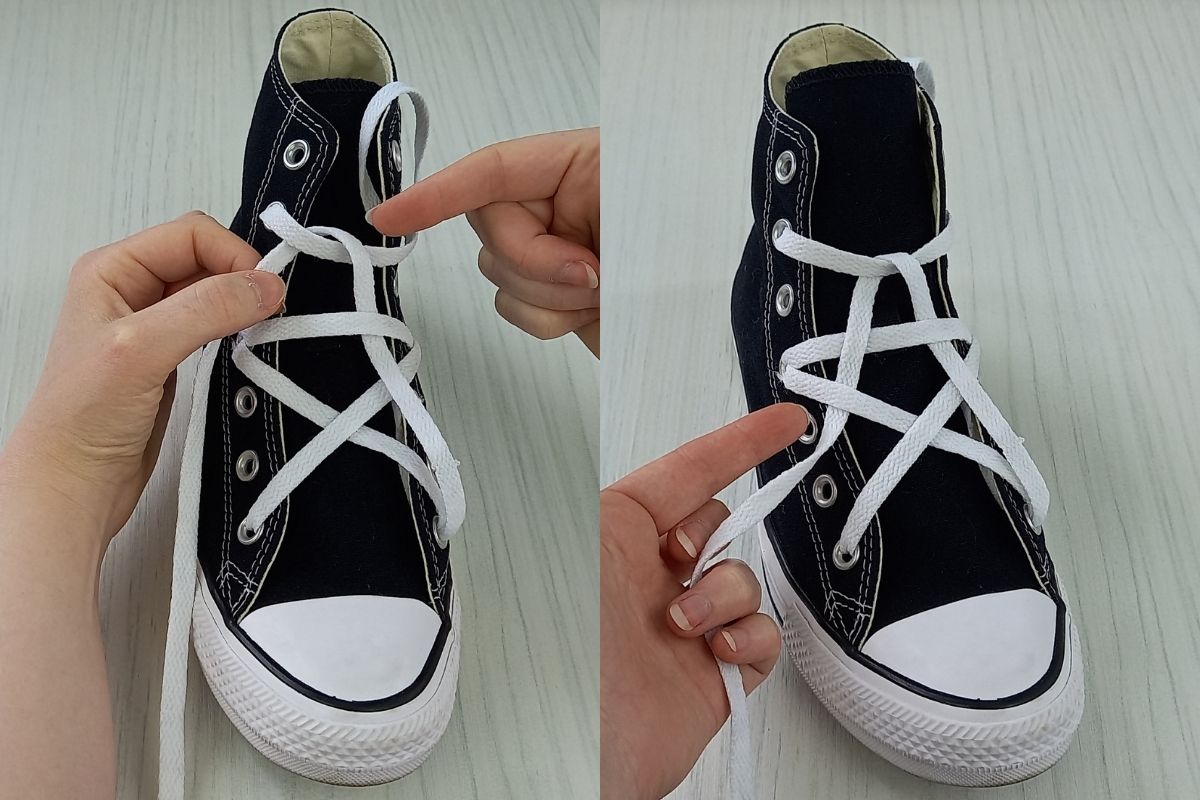
Step 1.
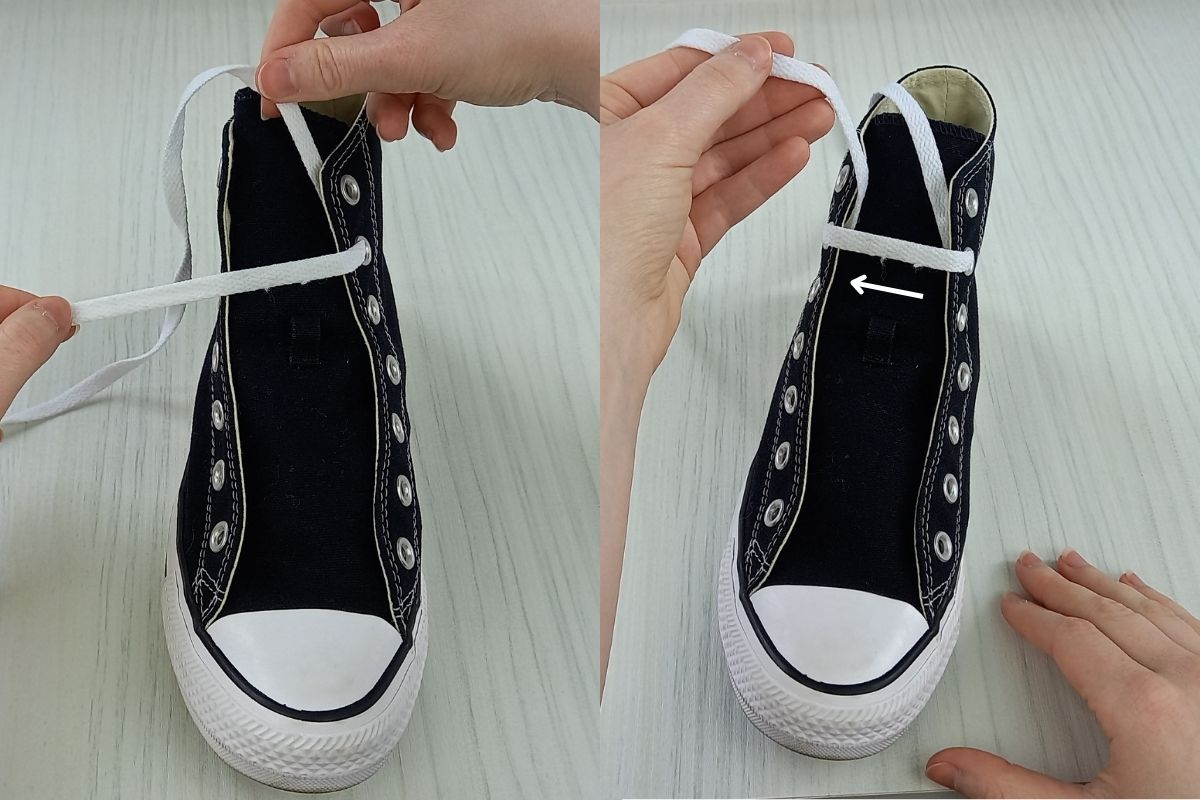
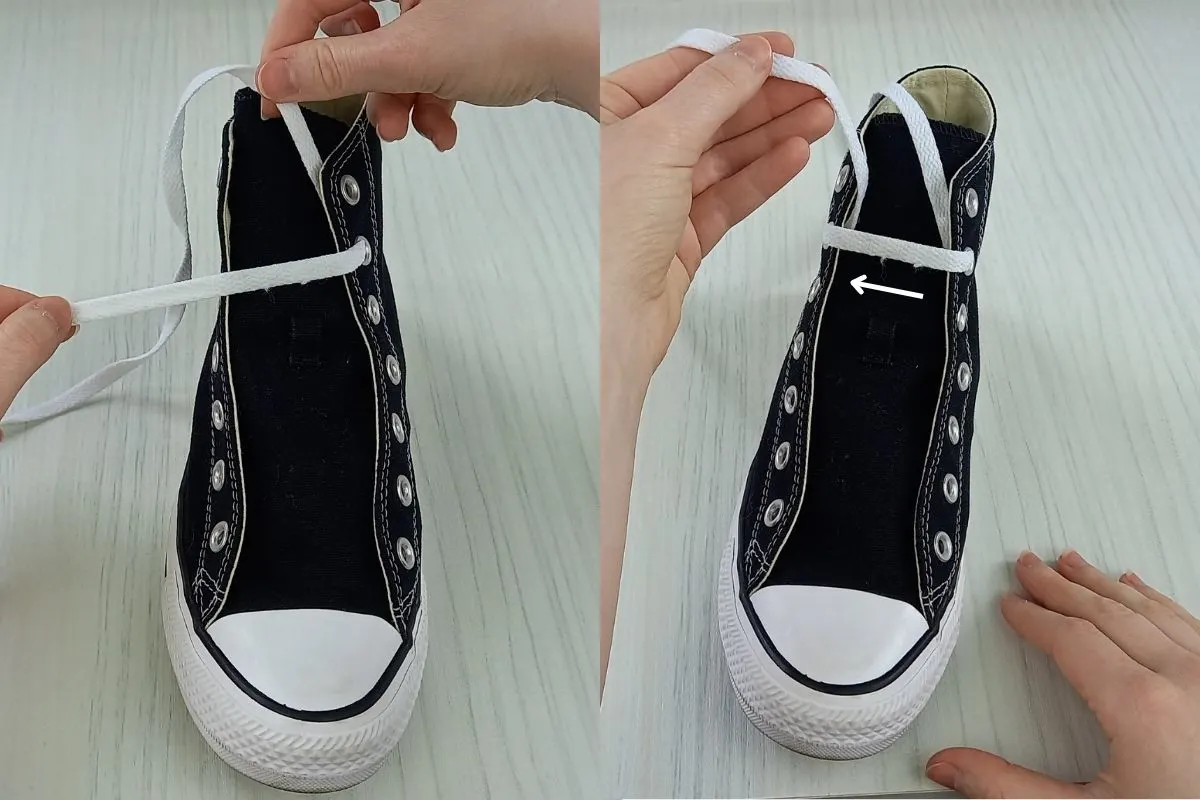
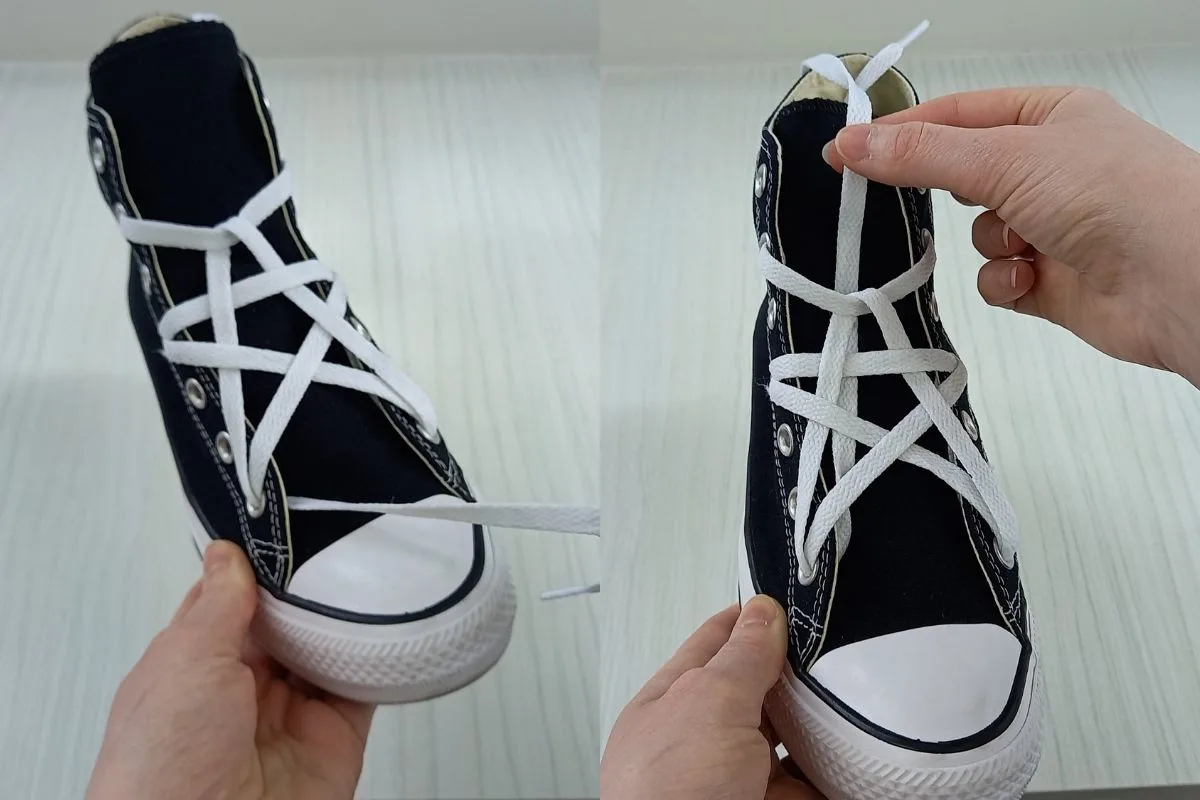
- Start by threading your lace into the second eyelet from the top on the right hand side (as pictured above).
- Then bring the lace across to the left and down into the second eyelet from the top.
Step 2.
- Feed the lace into the fourth eyelet from the top on the left, coming up into it from underneath, as I have done above.
- Then bring the lace over to the right and into the corresponding fourth eyelet.
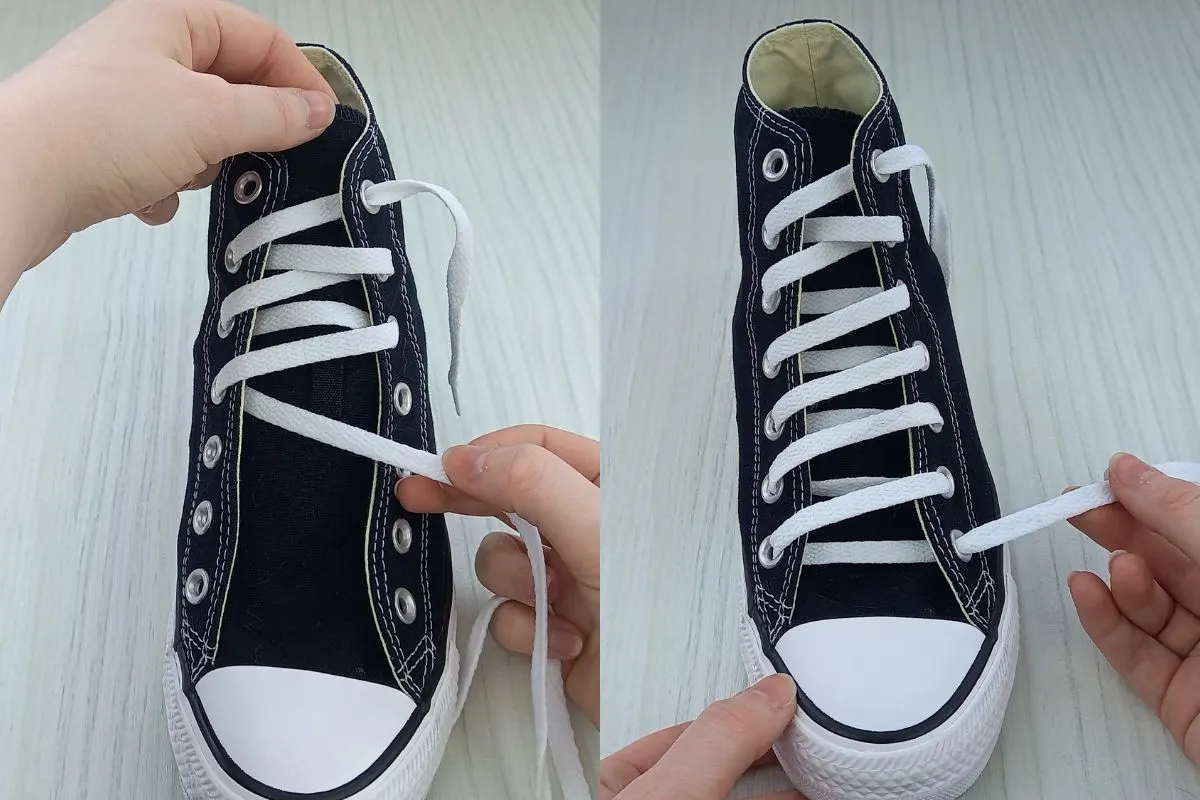
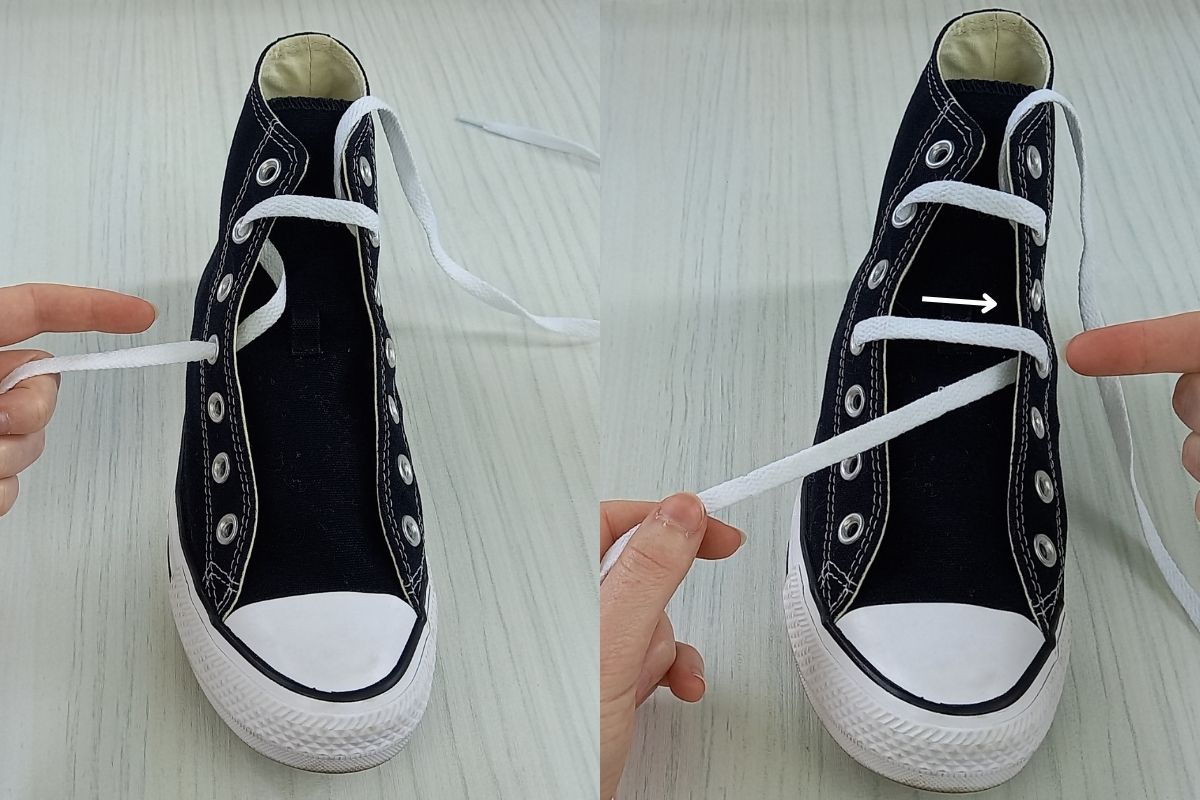
Step 3.


- Now bring the lace all the way down to the bottom eyelet on the right, bringing it up into it from underneath.
- Then take it across to the left and into the fourth eyelet from the top, from above this time.
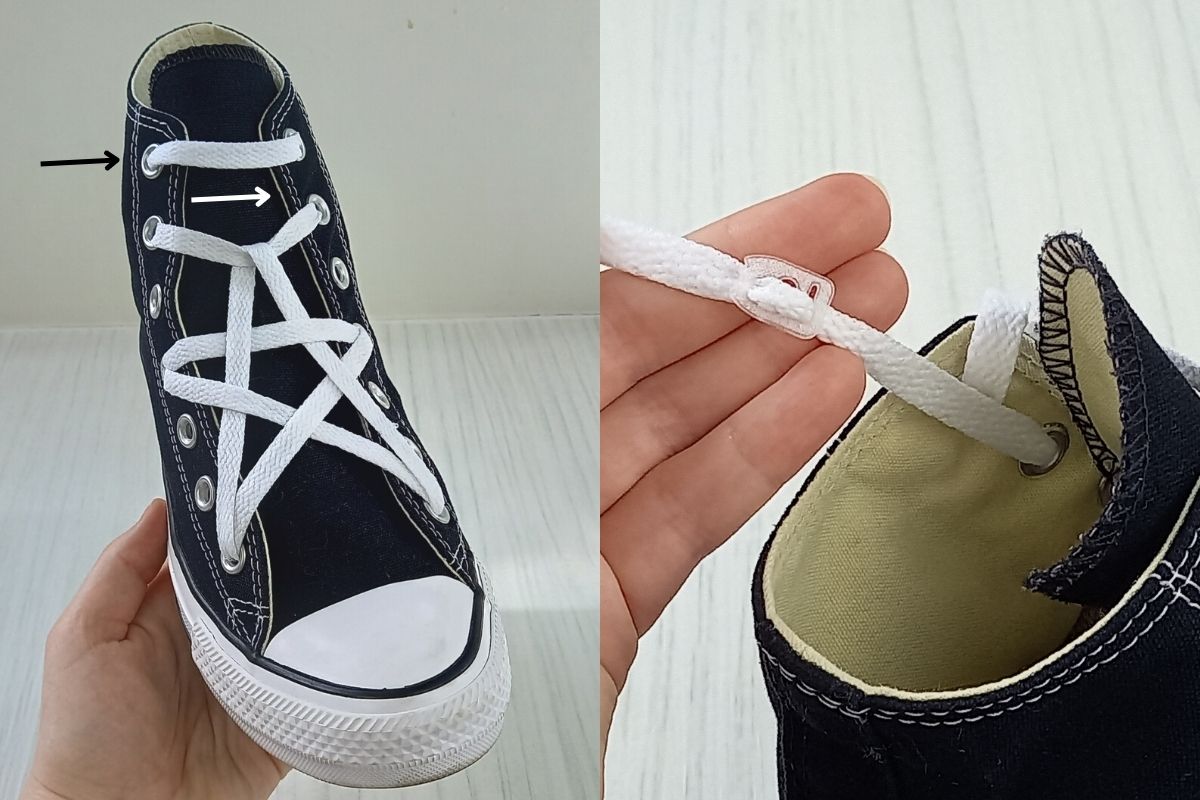
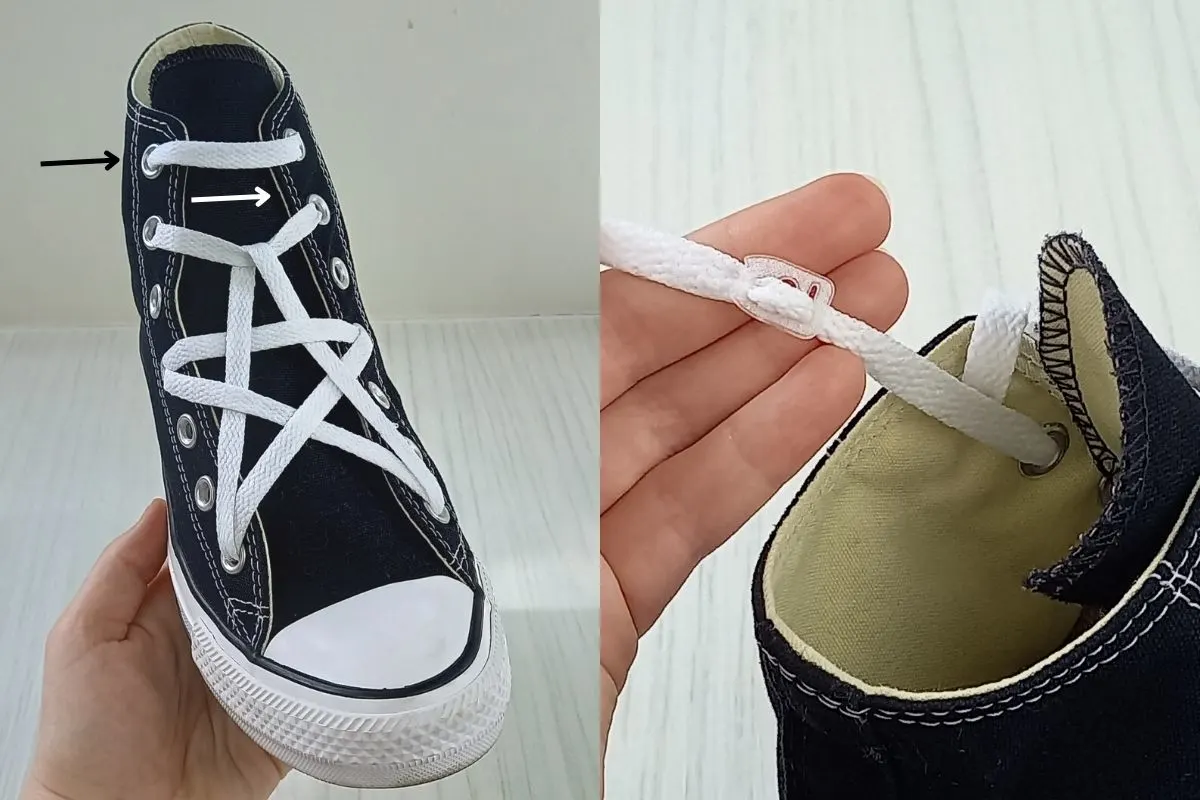
Step 4.
- Take the lace and feed it down to the bottom eyelet on the left, coming up into it from underneath.
- Now take it over to the fourth eyelet on the right, feed it in from above and then bring it down to the very bottom eyelet on the right and up into it from underneath.
If you are finding this a bit tricky, I have a more in-depth guide to star lacing here: Star Lacing Shoes: EASY Tutorial With Photos.
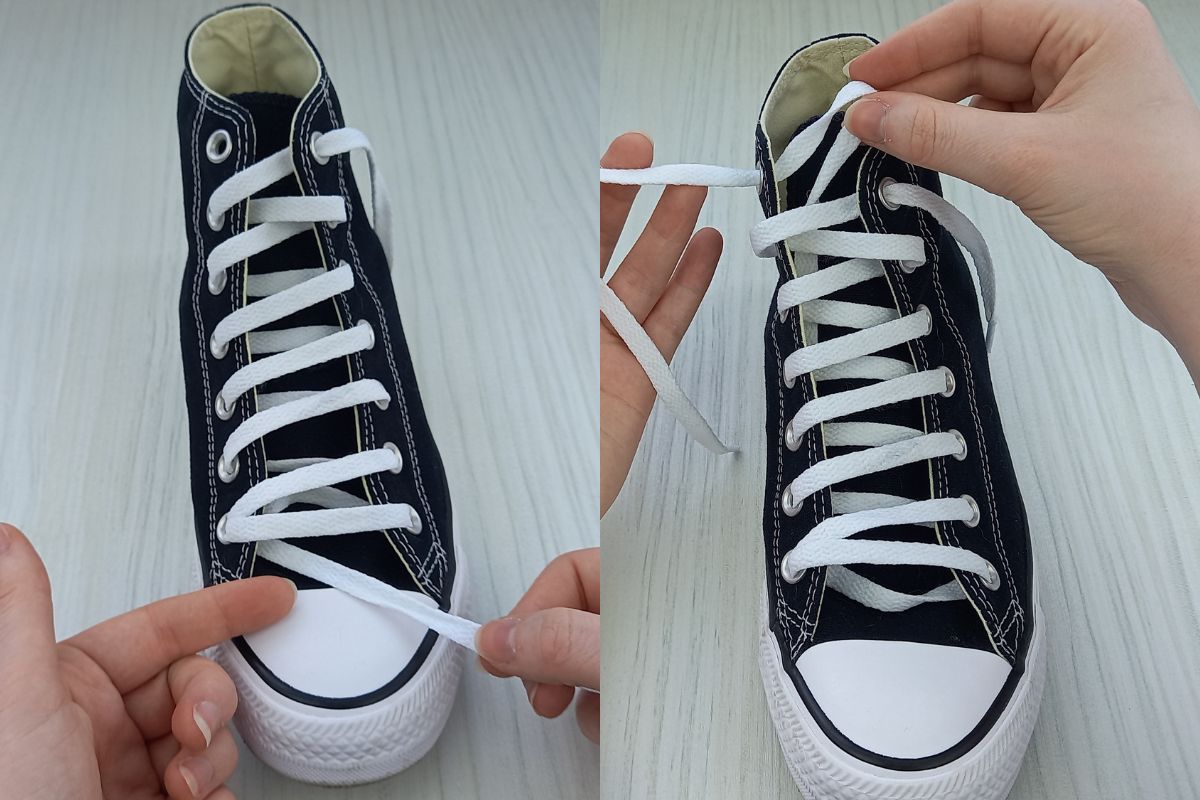
Step 5.

- Now take the lace and weave it under the second ‘bar’ that we created earlier. Hook and loop it over the first bar as I am in the above image.
- Now feed it over the second bar and under the arm of the star as pictured. Make sure to double check yours looks the same at this stage.
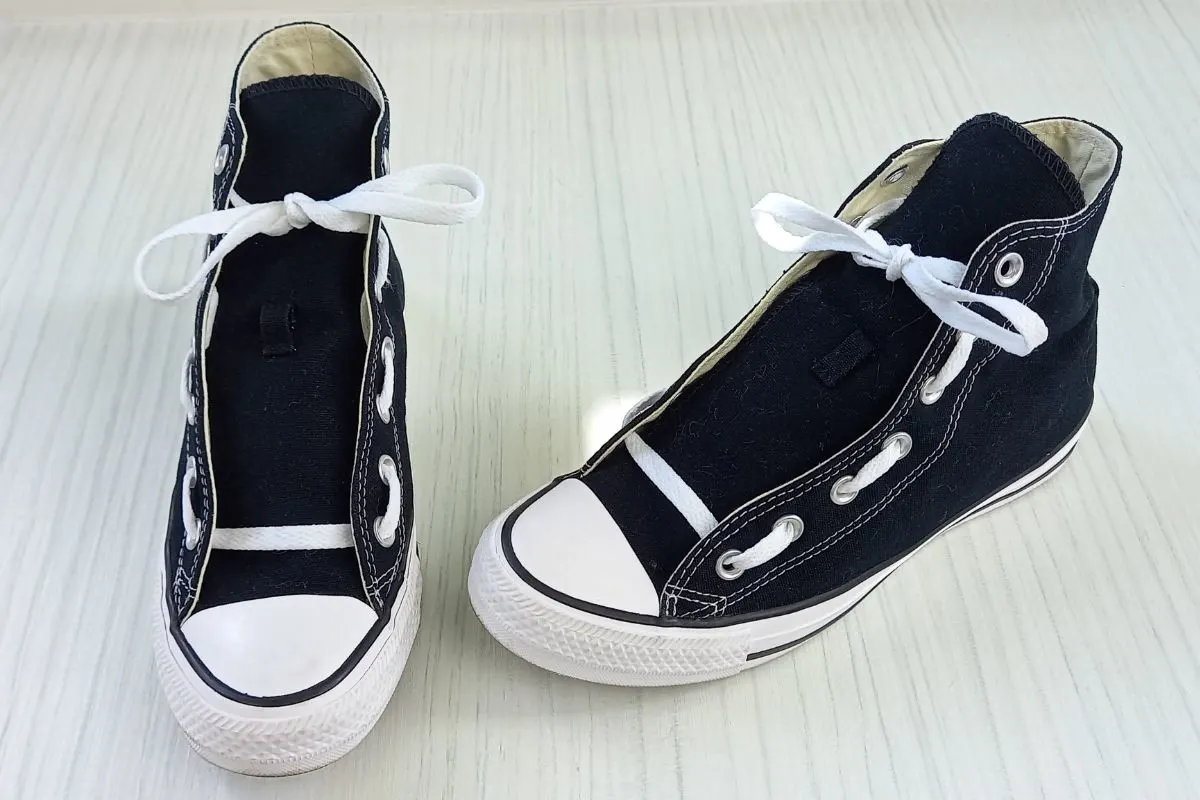
Step 6.

- Now feed the lace through the bottom eyelet on the left from above, then bring it up the shoe tongue underneath the whole design.
Step 7.
- Thread it into the top eyelet on the left from underneath. Then bring it across and down into the top eyelet on the right from above to make a crisp ‘bar’ like finish. At this stage you can simply knot the excess laces together and tuck them down into the shoe, or use a lace anchor to hold them in place.
If you need extra help, here is a video of me showing the steps that you can follow along with:
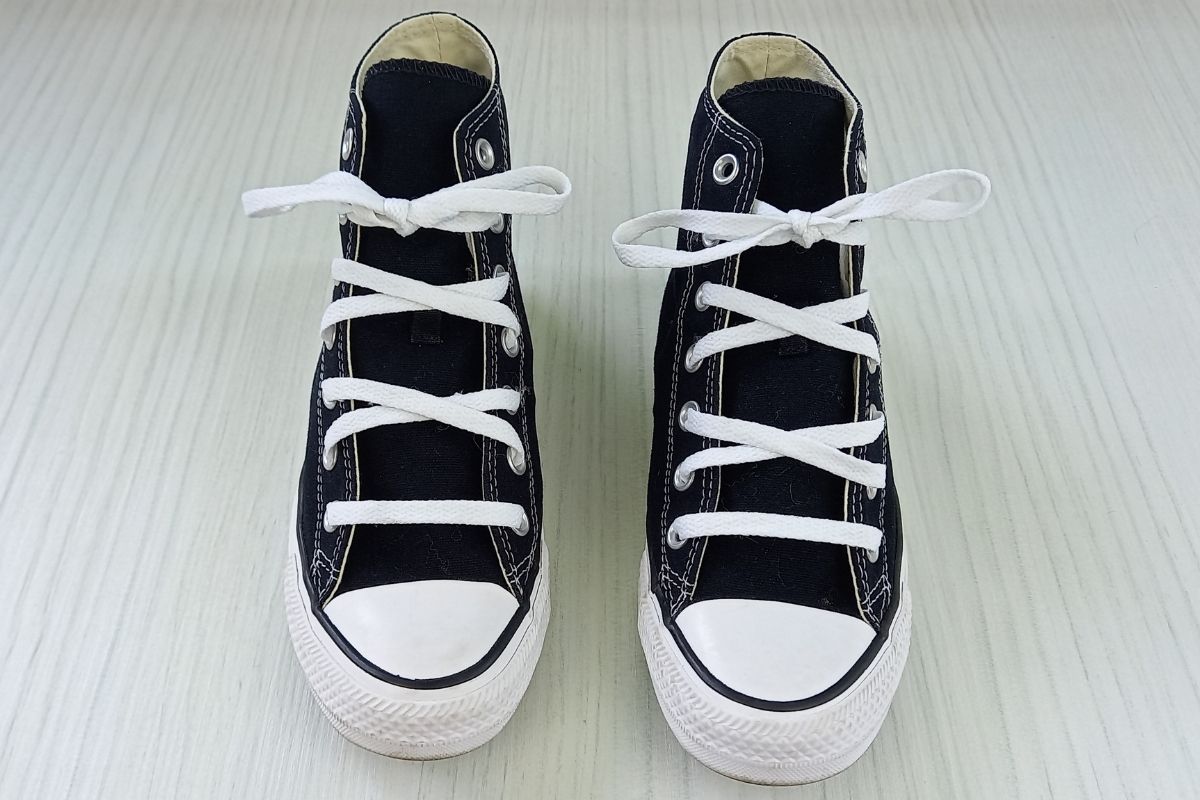
13. Blank Tongue Shoe Lace Style

This blank tongue lacing style looks a little weird at first. It’s kind of like an optical illusion! How can a shoe be laced without laces? It’s a cool lacing style that definitely gets second glances.
Here’s how to do it:
Step 1.
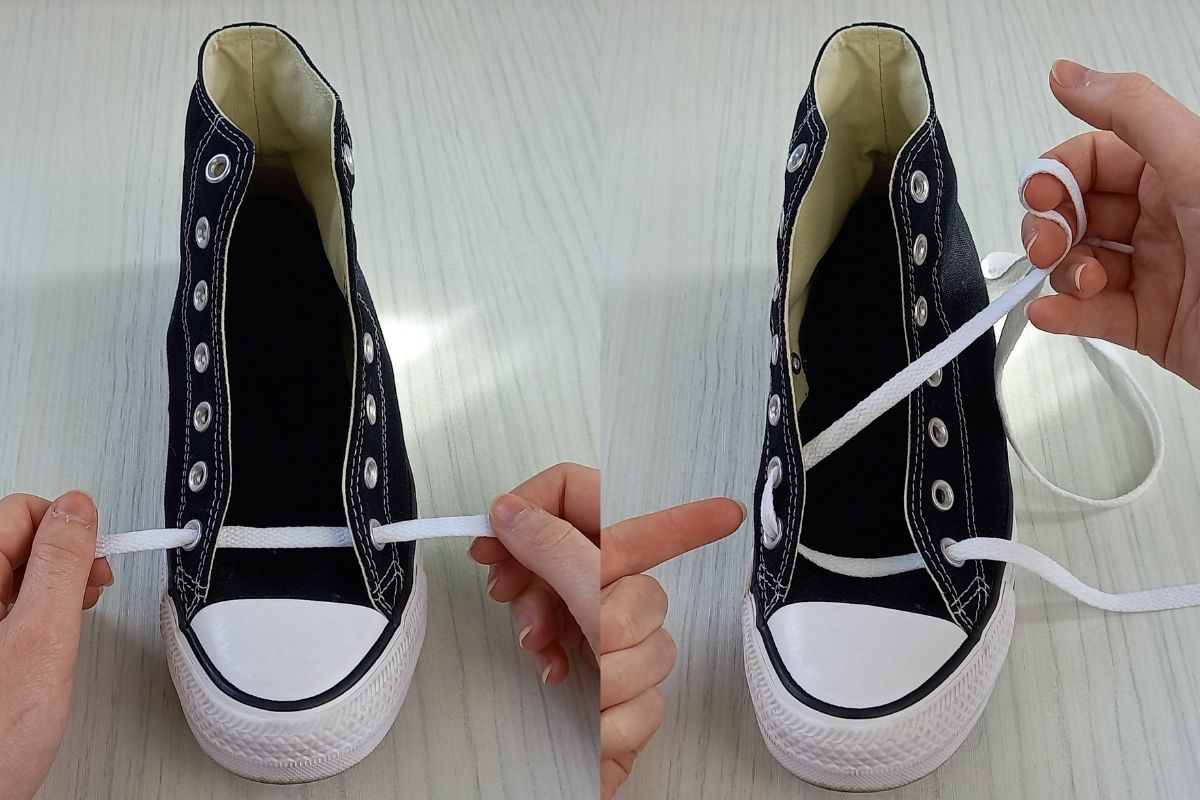

- Begin by threading your lace through the two bottom eyelets of your shoe, as I have done in the above image. You want to ensure the laces are coming up through the eyelets from underneath.
- Then take the lace end on the left and thread it up into the second eyelet from the bottom on the left, to create a little outside loop as pictured.
Step 2.
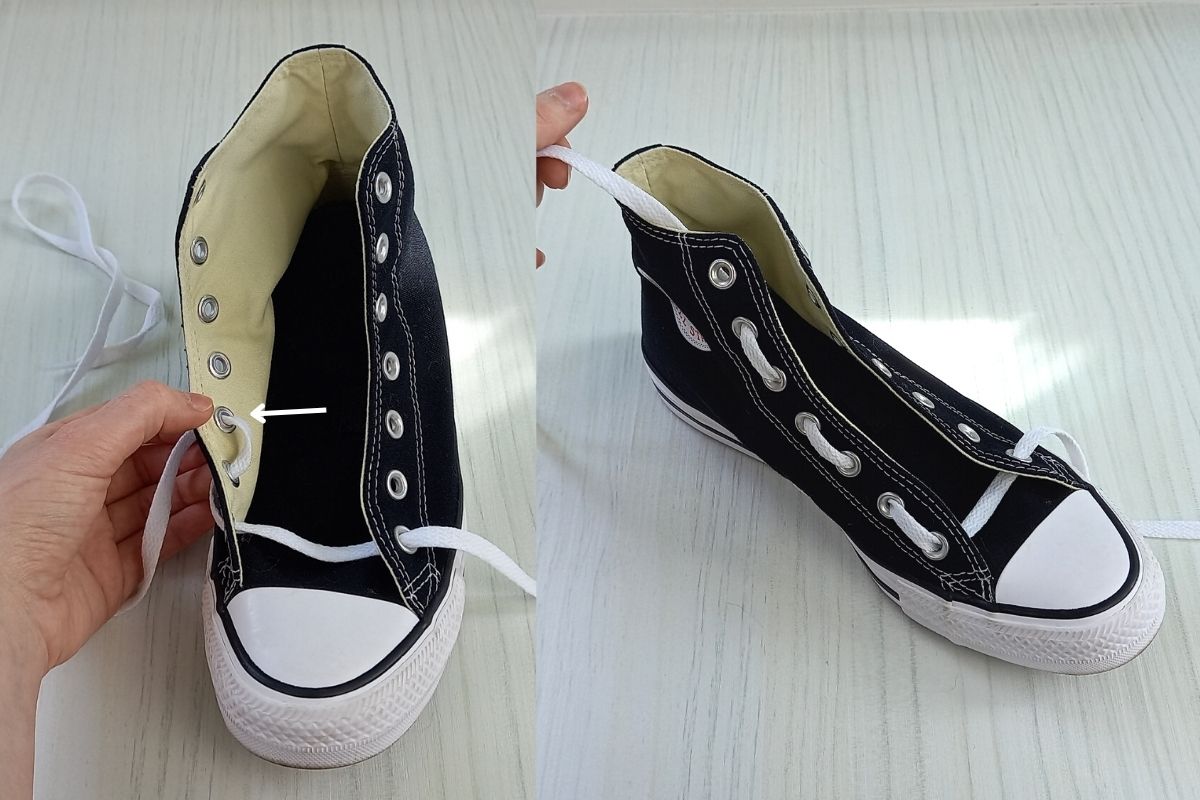

- Now feed this lace into the third eyelet from the bottom on the left from underneath this time. Keep weaving the lace this way until you reach the second eyelet from the top (if you have shoes with an odd number of eyelet pairs – if they are even it will be the top eyelet).
Step 3.

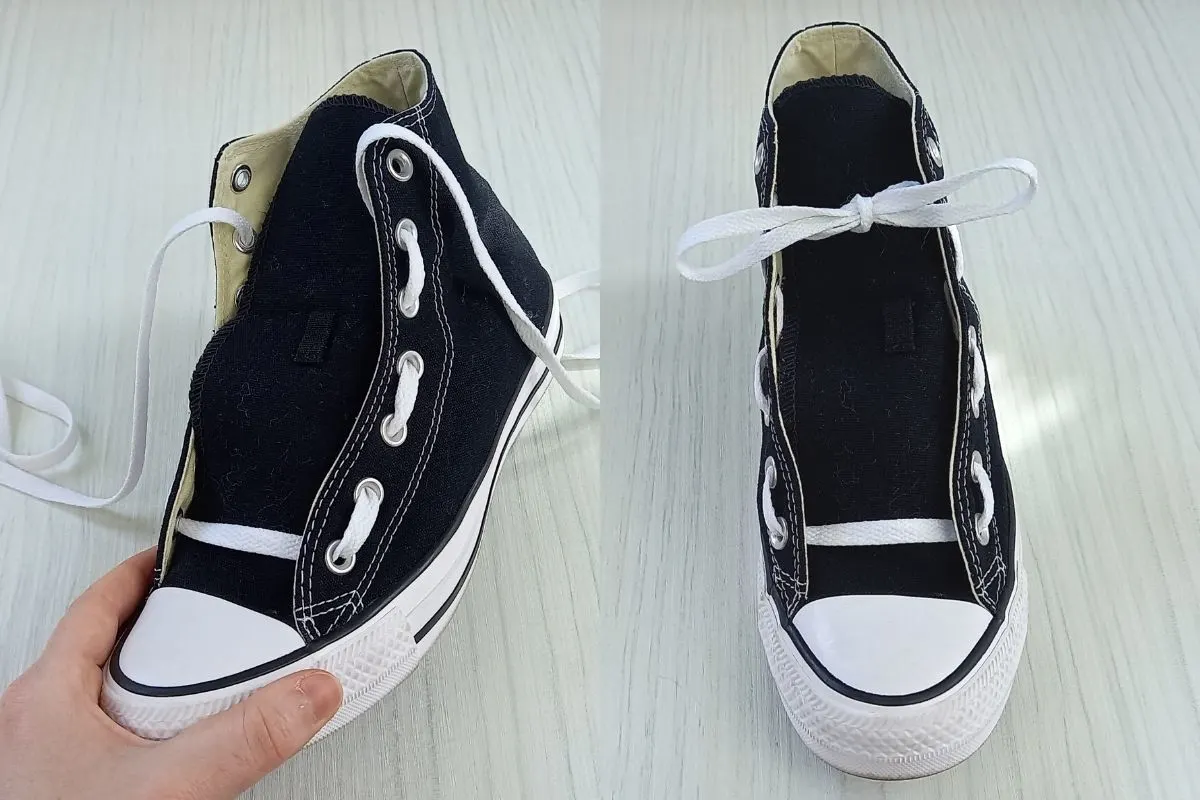
- Repeat this pattern on the right side, and then bow the laces together at the top when you are done!
14. Bow Tie Shoe Lace Style
Bow tie lacing looks really smart. It’s a fast and secure way to lace up your shoes that looks great on sneakers and dress shoes alike. It’s a quick and cool way to lace shoes!
Here’s how to achieve this shoelace pattern:
Step 1.

- Start by feeding your lace into the two bottom eyelets, as pictured.
- Then take each lace end and bring them up into the next eyelets on their own side, from underneath.
Step 2.

- Cross over the laces to create your first bow tie effect. Then thread the lace ends down into the third eyelets from the bottom on each side.
Step 3.

- Now take each lace end up into the next eyelet on their own sides again, from underneath.
- Repeat the pattern by crossing them over and feeding them down into the corresponding eyelets, as I have done in the above image.
Step 4.

- Bring the lace ends up into the second eyelets from the top and then bow them together to finish off the shoelace pattern.
15. Army Shoe Lacing Technique

Army lacing is a cool way to lace shoes that is quicker than it looks. The British, French, Dutch and Brazilian armies use this – how awesome is that?
Here’s how to do it:
Step 1.

- Start by feeding your lace ends into the two bottom eyelets, as I have done above.
- Then bring the lace end on the left into the second eyelet from the bottom, creating a loop on the outside of the shoe.
Step 2.
- Repeat this on the other side and then cross over the laces as pictured.
- Bring the laces into the third eyelets from the bottom.
Step 3.

- Repeat the outside loop pattern again by bringing the laces into the next eyelet up on their own sides.
- Then cross over the laces again and feed them into the next eyelet up. Go slowly and double check your results against my picture above.
Step 4.

- Finish off the pattern by taking the laces into the next eyelet up on their own sides, as we did before, then bringing them across the shoe tongue into a neat bow. This is a super cool way to lace your shoes!
Related posts
Thank you for reading this post on cool ways to lace your shoes. I hope you feel inspired to try out some cool new lacing techniques and put a fresh spin on your shoes!
For more lacing content, check out:
How To Lace Vans – 7 Cool Ways (EASY guide)
How To Lace Converse – 9 EASY Ways

Lorna is a footwear geek and the founder of Wearably Weird. She created a YouTube channel in 2021 for fellow footwear fanatics, dedicated to detail-rich footwear reviews and info. She has a fashion media qualification (awarded in 2011).