
Straight lacing (also known as bar lacing) is a crisp looking shoe lacing technique that not only looks cool, but is a time saving hack too. Once your shoes are straight laced you can simply slip them on each morning without the need to tie them up every time.
Straight lacing has it’s uses in the military, in sporting and in marching bands, for formal use too. It’s also a historical way of lacing up dress shoes.
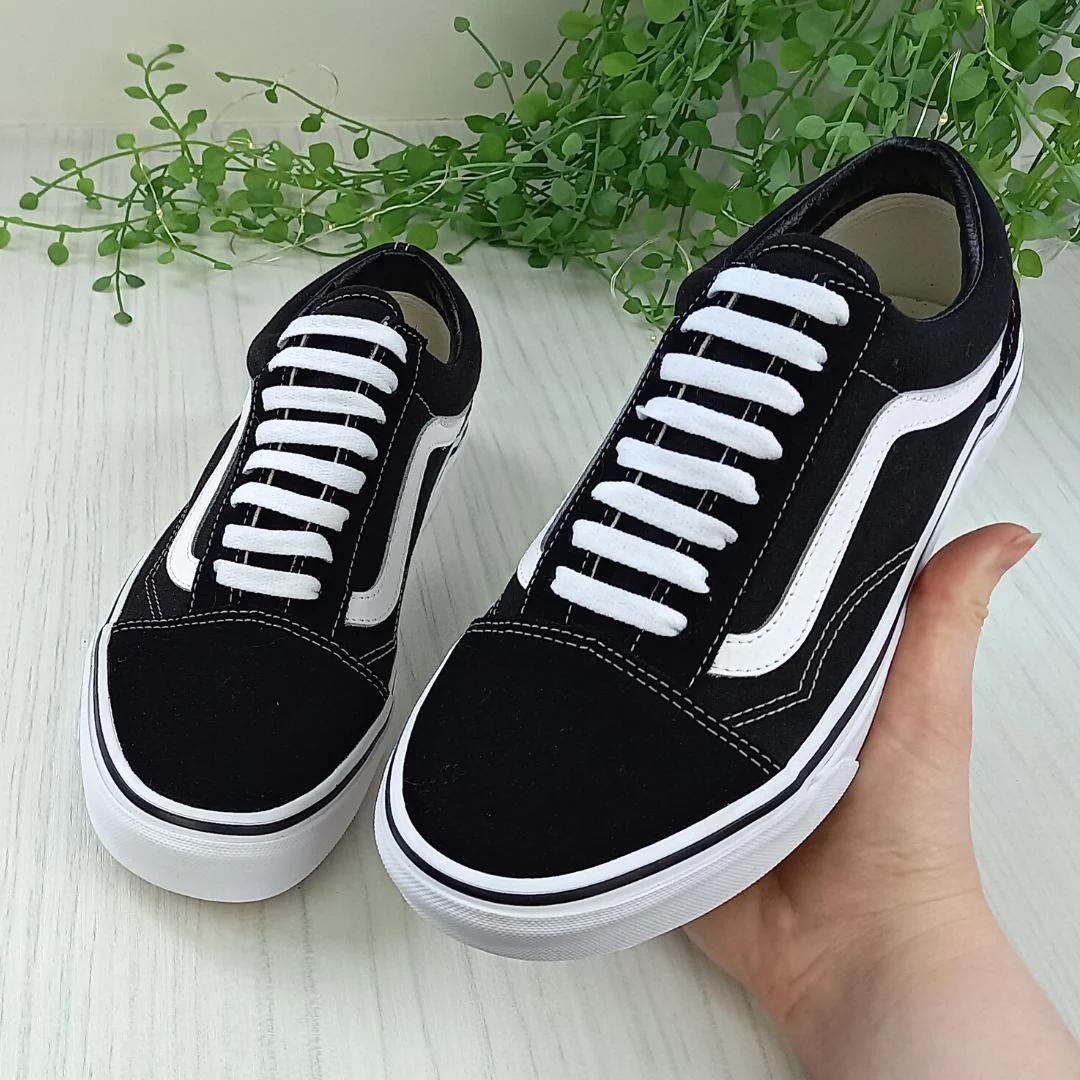
The lacing style features horizontal straight laces that cross the shoe tongue, with hidden laces that run vertical underneath the canvas sides. The result is a tidy, crisp effect that is comfortable on the top of the foot. It allows for better flexibility of the foot too.

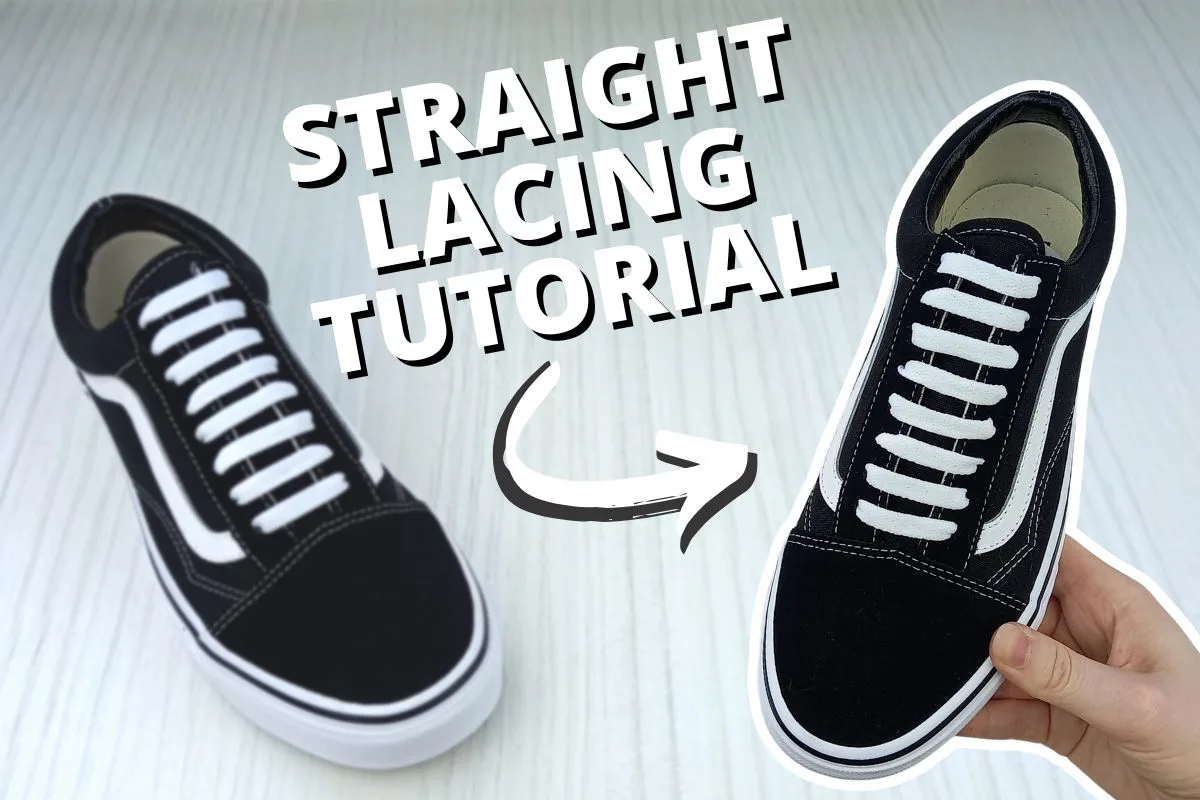
In this tutorial I’ll be showing you how to achieve the straight lacing technique, including step by step instructions with photos and a video to make it as helpful as possible for you. I’ll be showing how to do this using my pair of Vans, have have seven pairs of eyelets. Please note this lacing style can be done on any number of eyelets!
*This post may link to online stores. If you click a link and buy something, I may get a commission. Learn more.
How To Straight Lace Shoes (also known as bar lacing)
Straight lacing can seem a little difficult at first glance, however once you get going with the pattern you’ll realise it’s super simple. Make sure to double check your results with my photos as you go and take your time with it.
Here’s a video tutorial of me showing how to straight lace (or bar lace – same thing!) my pair of Vans, if you’d prefer to watch the steps:
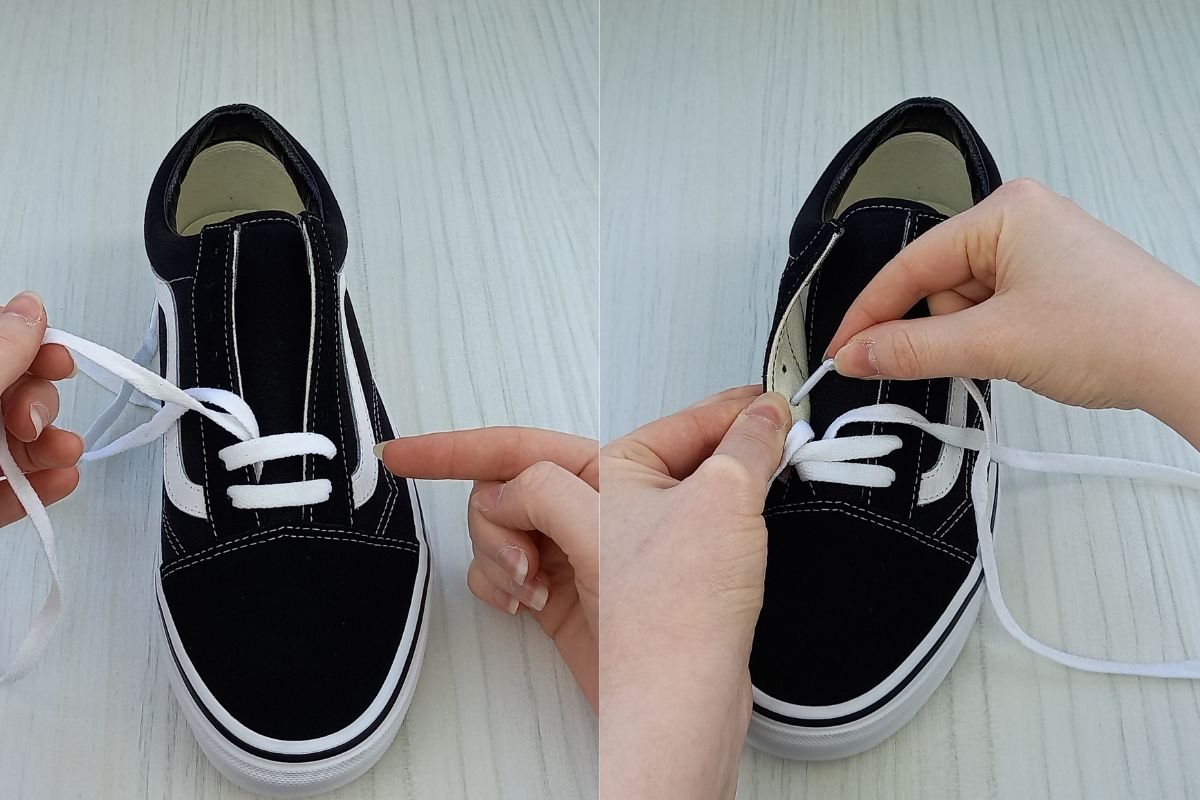
Step 1.


- Start out with fresh clean laces for best results. Check out my guide to cleaning shoes laces if you need to freshen yours up first.
- Slide a pair of socks underneath the shoe tongue, to add resistance under it. This way your bar lacing pattern will turn out evenly.
- Thread your lace down into the two very bottom eyelets on your shoe. It’s important to thread the lace into the eyelets from above, not from underneath, as I have done in the above image. As you will see, we have created the first ‘bar’ like straight lace. Ensure both laces are the same length at this stage.
- Next take the lace end on the right hand side and feed it up into the second eyelet from the bottom, from underneath this time, as pictured above. Make sure your result looks like mine in the above image, and the lace is definitely coming up into the second eyelet from the bottom, on the right, from underneath.
Step 2.

- Now bring the lace on the right hand side over the shoe tongue to the left hand side.
- Thread it down into the second eyelet on the left hand side from above, to form the second crisp straight lace. At this stage make sure your ‘bars’ are even and the same length. You want to always be checking this as you progress through the pattern, for an even turn out.
- Now move on to the other lace, and feed it up into the third eyelet from the bottom on the left hand side, from underneath (just like we did before). Double check how I have done this in the above image. You want to make sure you are using the other lace here, and not the one we have already been working with.
You may also like: Star Lacing Shoes: EASY Tutorial With Photos
Step 3.
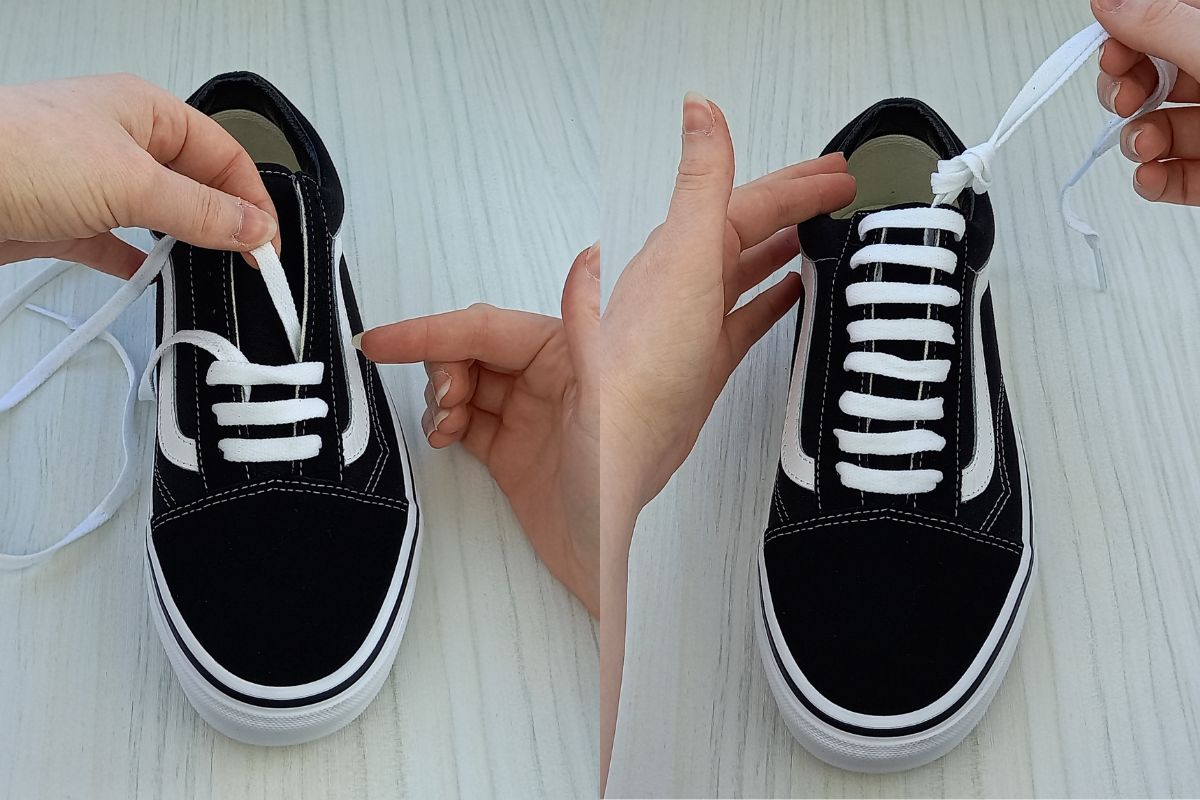

- Now bring the lace over to the right hand side and feed it down into the third eyelet from the bottom on the right. Make sure it’s going down into the eyelet. This should form your third straight lace ‘bar’. Check it looks like mine in the above image.
- Next repeat this pattern, working with one lace at a time until you reach the top eyelets. Go slowly and double check all of your laces look even and straight. If the laces twist up, don’t be afraid to go back a step and re-do any.
- Once you reach the top of your shoe, if your shoe features 7 pairs of eyelets like mine the two lace ends should come out in the two top eyelets on the right hand side. At this stage there are two ways to finish off the design:
- Tie a knot in the two laces as I have done in the above image. Simply tuck the laces down into the shoe and slip it on to test the slack. If the lace knot bothers the side of your foot you can:
- Use lace anchors to finish off the design. Lace anchors are a handy little tool that slips on your lace ends. Once you pull them flush with the eyelet, they sit out of sight and hold your laces in place without the need for tying them. I recommend these lace anchors, they are low priced and work really well to finish off designs in a neat and convenient way.
Here’s how a lace anchor works:

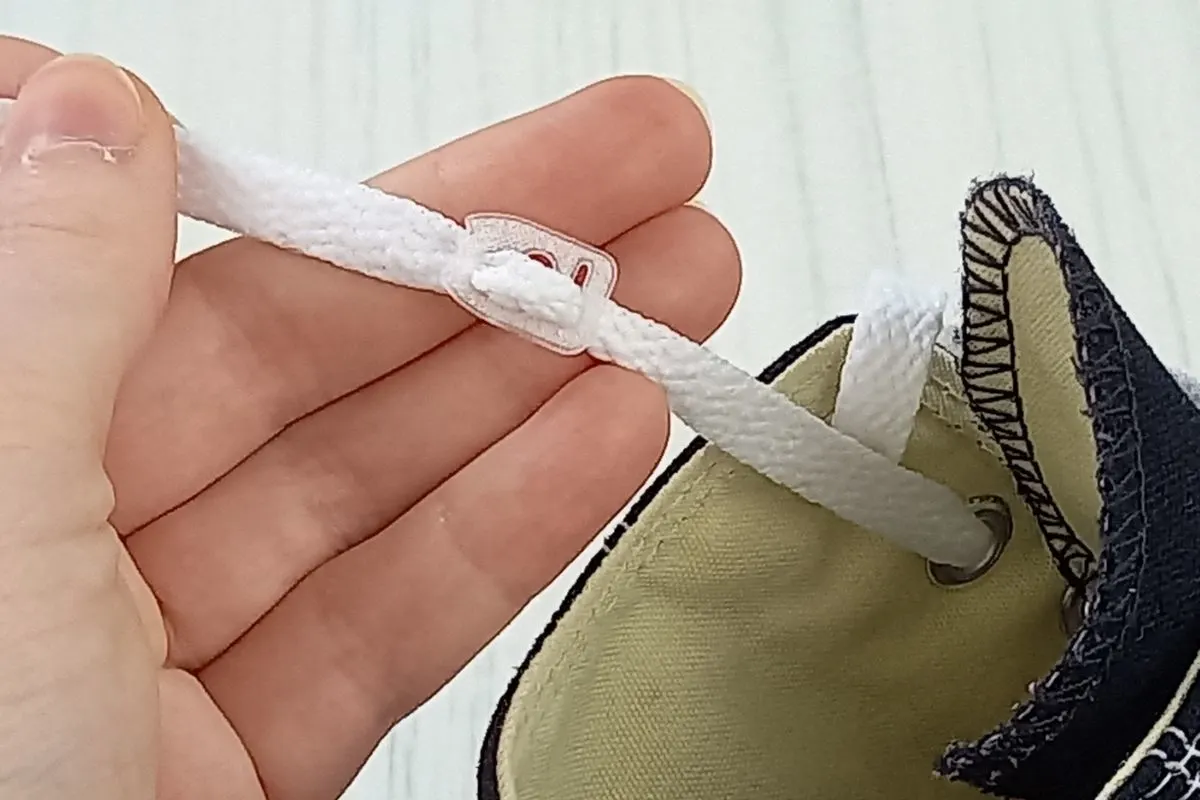
It just slides onto the laces and you can pull it down to meet the eyelet. Adjust it to loosen and tighten your laces as needed.
When all of the above steps have been completed, your shoes should be neatly bar laced. Here’s how they should look:

Cool fact: in military situations straight lacing has the added benefit of ease of shoe removal. The straight ‘bars’ that cross the shoe tongue can be quickly cut for super fast removal of shoes in an emergency.
Best Shoelace Length For Straight Lacing
Different shoelace lengths will be needed for shoes with different amounts of eyelet pairs.
Here is a table to help you find the shoelace length needed for bar lacing, on your individual pair of shoes:
| Number of eyelet pairs | Shoelace length in inches |
|---|---|
| 4 | 27 |
| 5 | 36 |
| 6 | 36 |
| 7 | 45 |
| 8 | 45 |
Extra Advice
- Before starting the bar lacing technique slide a pair of balled up socks underneath the shoe or sneaker tongue. This will create some resistance under the tongue, for the bar laces to sit on. This way they’ll turn out nice and evenly, instead of wide at the bottom and short at the top.
- Always use fresh clean laces for best results. Dirty or frayed laces just don’t look as crisp. Brand new laces, or fresh laces out of the washer will have a starchy quality to them that makes them sit nicely.
- Use funky colored or patterned laces for a twist!
- Try out lace anchors for an adjustable way to slip on your shoes. Finish off the bar lacing design by securing your laces with these little anchors.
- Straight laces work best on pairs of shoes that have an even number of eyelets.
Odd Eyelet Pairs Modifications
Straight lacing works best on shoes that have eyelets pairs in an even number (8, 12, etc). If you have shoes with an odd number of eyelet pairs (5, 7, 9 etc), there are a few ways to get around this.
- In the top two eyelets you can lace the ends through and bow them.
- Tuck the bow behind the shoe tongue for a crisp finish.
- Leave the top two eyelets blank, and tuck the lace ends down under your shoe insole.
- Create a cross over lace in the top 4 eyelets, to put a twist on the design.
- Use lace anchors to fasten the lace ends neatly out of sight. You can trim the laces after applying the lace anchors for comfort. Alternatively you can tuck the lace ends down inside the shoe, if this doesn’t bother you.
FAQs
What is straight lacing?
Straight lacing (also known as bar lacing) is a shoe lacing technique that allows for shoes to slip on and off without the need for tying. The laces cross over the shoe tongue in a straight (or bar) like fashion.
Both laces ends run straight across the shoe tongue, each moving over an eyelet from underneath, and coming up two eyelets above.
Related Articles
Thank you for reading this tutorial on straight lacing shoes. I hope you try out straight lacing for yourself using my step by step instructions, and see how fresh it makes your shoes look!
For more lacing content, check out:
How To Lace Shoes So They Slip On – 3 EASY Ways
How To Lace Vans – 7 Cool Ways (EASY guide)
How To Lace Converse – 9 EASY Ways

Lorna is a footwear geek and the founder of Wearably Weird. She created a YouTube channel in 2021 for fellow footwear fanatics, dedicated to detail-rich footwear reviews and info. She has a fashion media qualification (awarded in 2011).