
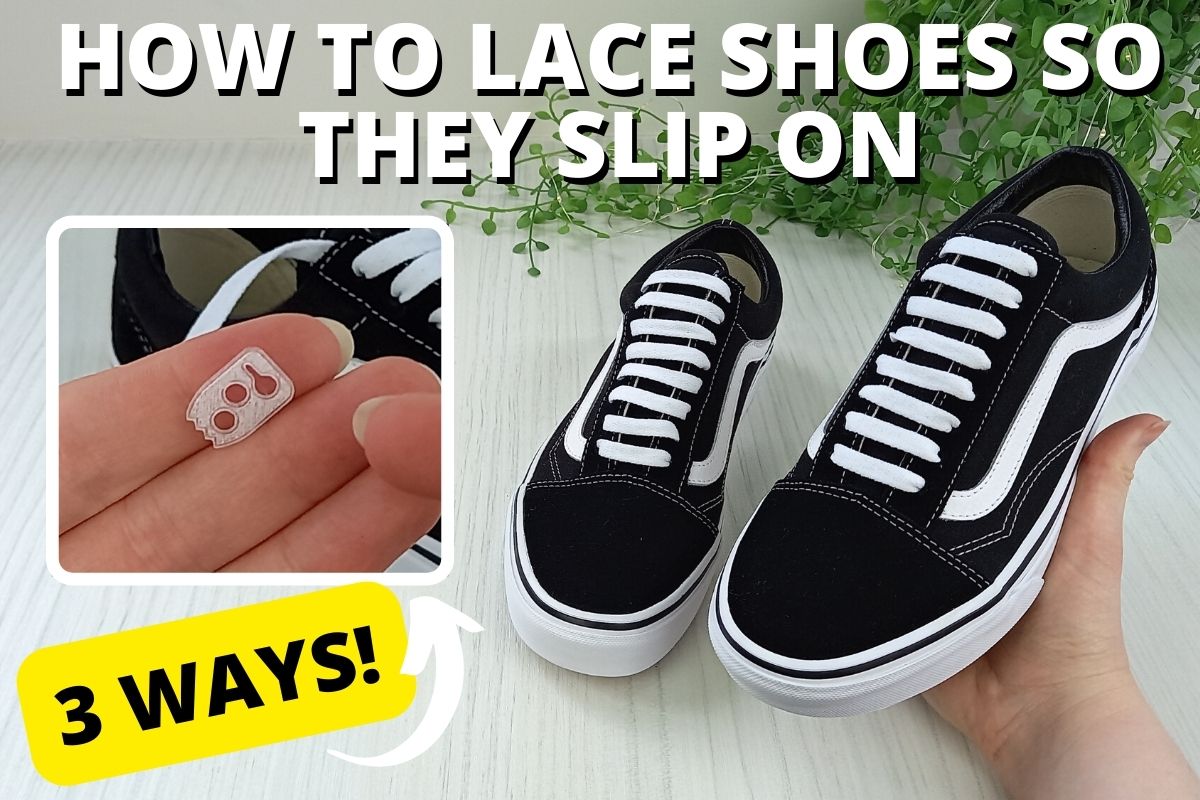
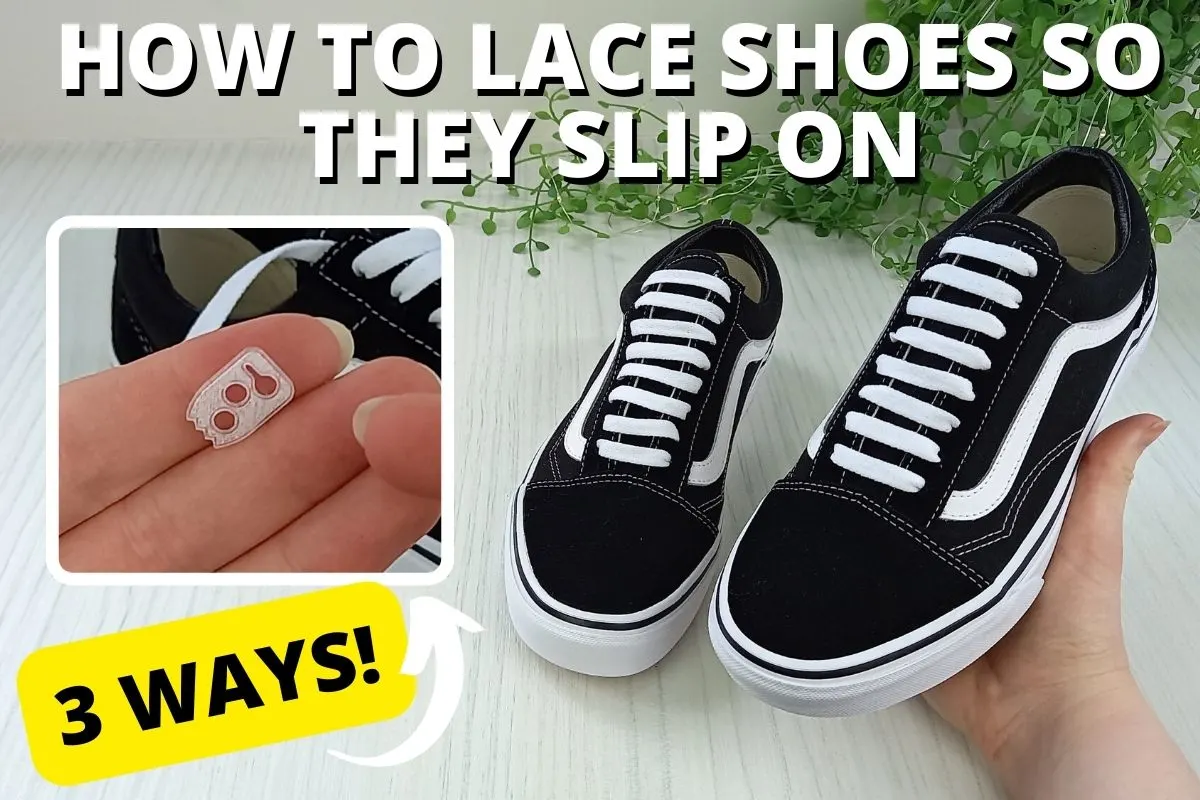
Learning how to lace shoes so they slip on saves time, and makes life easier. I like lacing my shoes in a way so I don’t have to tie them each day. It’s a great life hack for adults like myself but also for busy parents who want to save themselves the morning lacing hassle of wrestling with their kid’s shoes by the door.
There are three easy ways to do this – a lacing technique called straight lacing, or using elastic laces that you only need to tie once (check out my recommendation below), or using lace anchors which grip the laces in place so the shoe can easily slip on without the need to tie them.
I’ll be covering all three methods in this post, so you can decide which is best for your needs.
*This post may link to online stores. If you click a link and buy something, I may get a commission. Learn more.
How To Lace Shoes So They Slip On
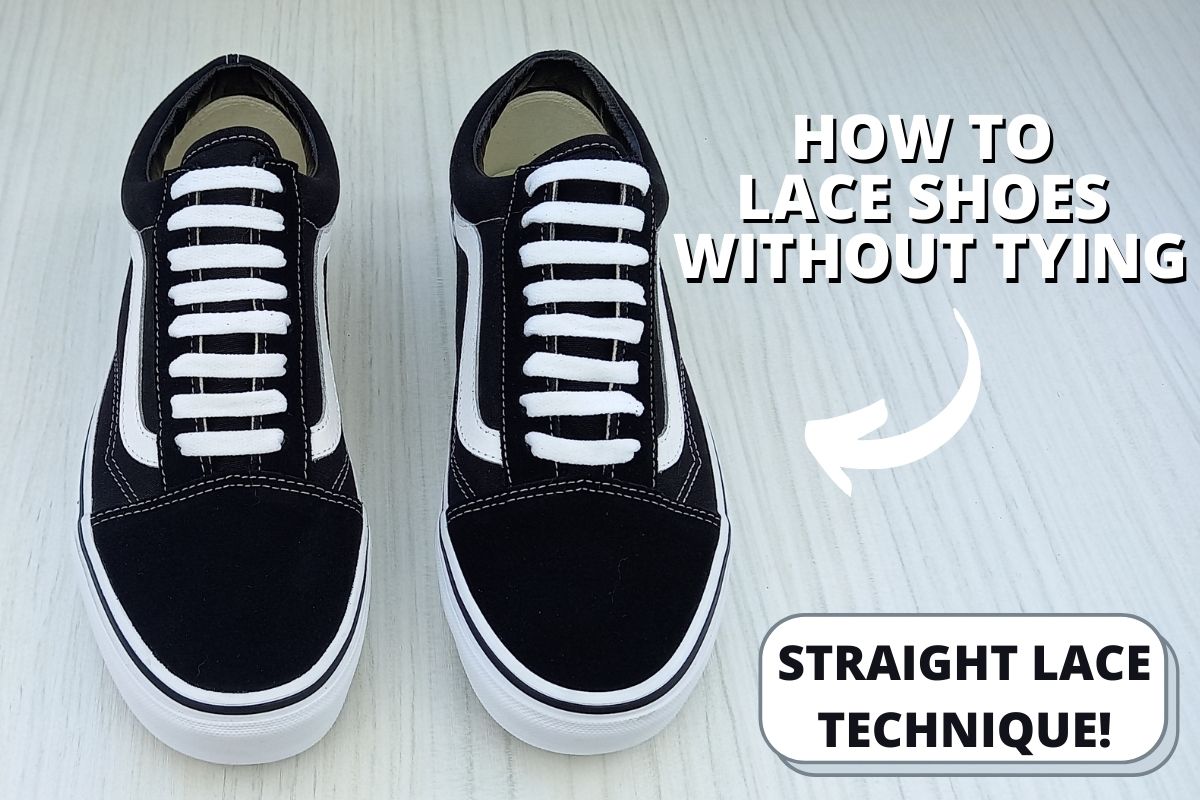
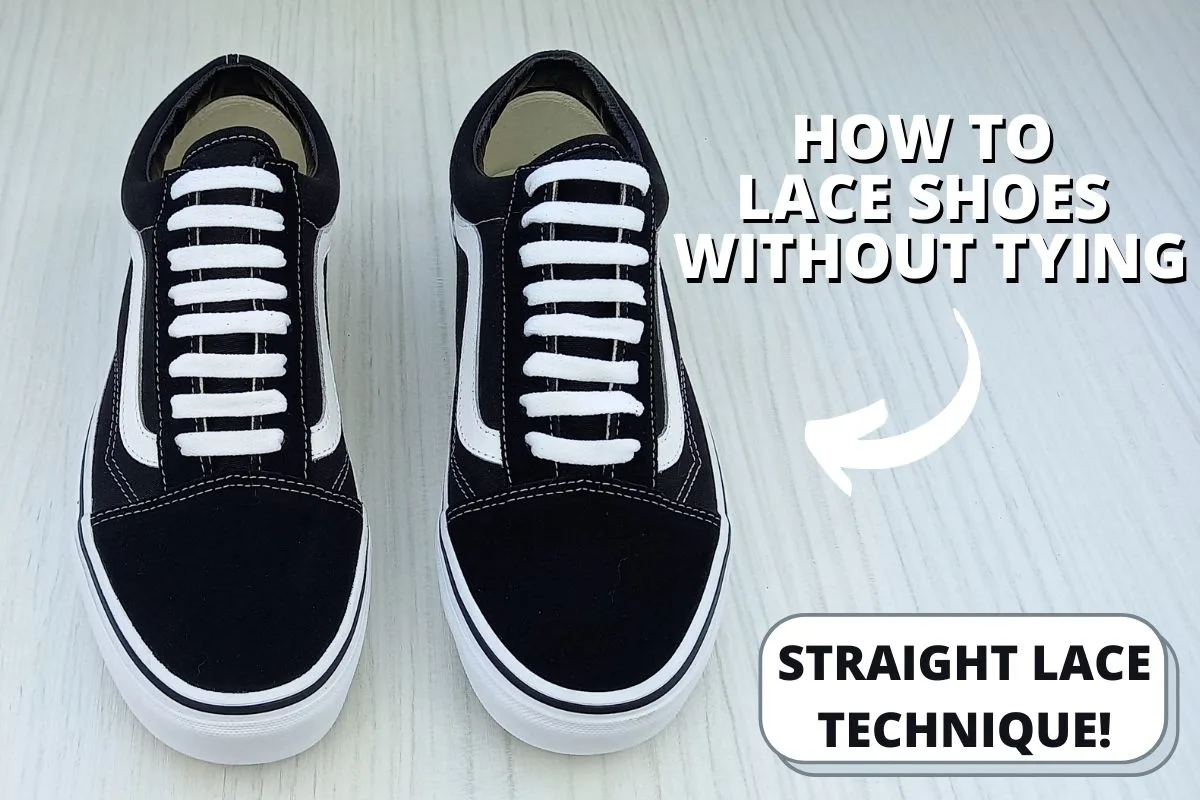
My favourite way to lace shoes so they slip on is to lace up my shoes using the straight lace technique. This lacing style features a practical knot that slides under the shoe tongue and doesn’t need retying with each wear. It also looks really cool and has a ‘bar’ like effect.
Here’s what it looks like:
Keep scrolling to the second part of the post for this FREE method (including pictures of my own shoes and a step by step guide).
There are also a couple of ways to save time tying your laces, using products. You can purchase elastic shoelaces (perfect for kids!) or try out lace anchors.
I’m going to cover both in the first section of this article, for those who want a quick fix that is guaranteed to save them time each day, stop their laces coming slack, or feeling too tight.
Use Lace Anchors
Laces anchors are much more than a little piece of plastic, they are a really functional way to keep your laces in place. Say goodbye to lace bows and hello to lace styles that you can easily slip on without tying.
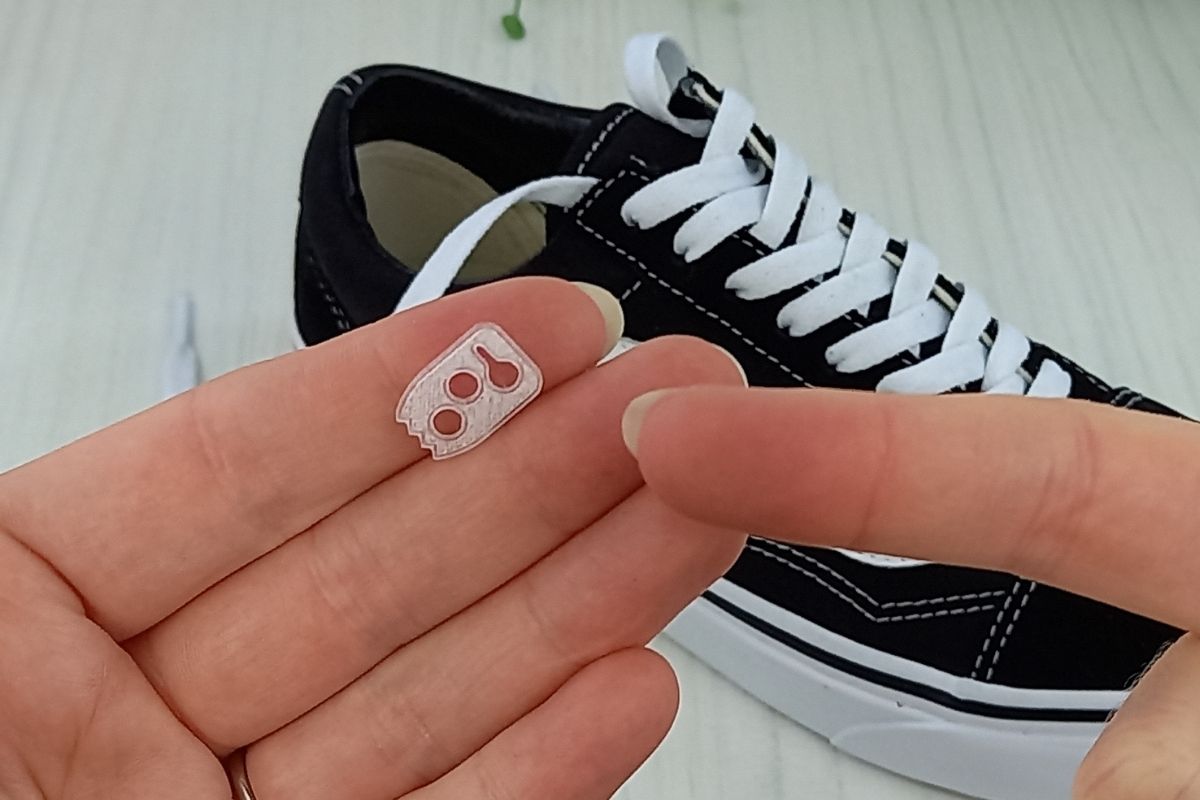

The great thing is they are inexpensive, and very easy to use.
Lace anchors attach easily to your laces and sit out of sight behind the top eyelets. They prevent any slipping or slackening of your laces, holding them nicely in place. They won’t rub against your feet thanks to their positioning, which is great.
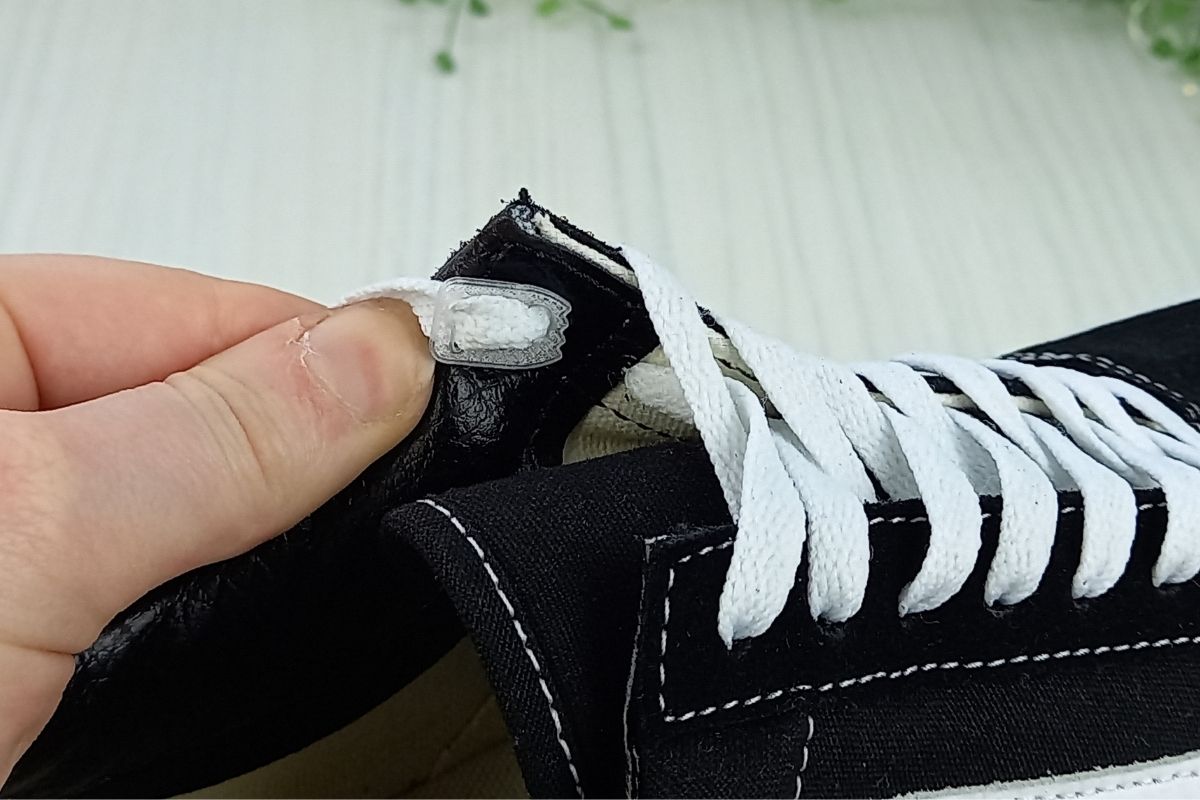

Simply slip them over the laces and pull them up to the top eyelet. Don’t worry, they’ll hold tight just like that.
I recommend these lace anchors here. They are very well priced and get the job done.
Once the lace anchors are on, there are two ways to deal with the excess laces at the top. Either you can trim them off (don’t worry they won’t come loose), or you can bow your laces and slip them out of sight behind the shoe/sneaker tongue.
Personally I like to put mine out of sight. I don’t like to trim laces, but that’s just me. I find if I trim my laces, when it comes to cleaning them then re-lacing the shoes, it’s difficult to get a frayed lace end through an eyelet.
If you aren’t worried about cleaning your laces in future, then go ahead and trim them after you’ve attached the lace anchors.
Check out this video of me demonstrating how to use a lace anchor, and straight lace shoes so they slip on:
Use Elastic Laces
Elastic laces are a quick way to lace up your shoes and create a no tie result. Save a bunch of time spent tying your laces by switching them out for elastic laces. You can simply tie them up once, and then pull your shoes on and off easily in future. They are a good option for both adults and kids.
These elastic laces ( No Tie Shoe Laces – Check Current Price Here) are my top pick because they work well and are cheap. I love a good price!
I really like anything that saves me time. Little life hacks like this are brilliant.
When threading elastic laces through your sneaker or shoe eyelets you will find they feel quite springy. A tip for tying them is to make sure the laces are the same length on each side when lacing your laces all the way up. I like to stop several times during the lacing process to double check my sides are even.
It sounds obvious but it’s common to get to the end of lacing up your shoe to find you have one short end. Just go slow and make sure everything is even. Then you can tie a bow, or a knot and either keep it on the top of the shoe tongue or neatly tuck it behind. I like to tuck it out of sight for a crisp look.
Elastic laces are great for those who have bad backs, as you can just slip on your shoes. They are ideal for kids and busy parents who need to get them out the door quickly, and they are great for adults themselves who like to save time.
You may also like: 15 Cool Ways To Lace Shoes: Shoelace Patterns Tutorial
How to Lace Shoes Without Tying Them
A great way to lace up your shoes without having to tie them each time is to lace your shoes in the ‘straight lace style’. The straight lace style is also commonly referred to as bar lacing, and it’s a popular lacing style for a cool and practical look.
At first it can look a little bit tricky to do, but I promise it’s straight forward once you get started with the pattern. Taking your time and going slowly is best.
It’s really worth spending 10 minutes or so learning to lace your shoes this way, so you can save countless minutes in future having to lace your shoes each day!
Straight Lace Style Technique
I’m going to demonstrate how to do this lacing style on my favourite pair of Vans. This style also looks great on other sneakers like Converse, or on shoes.
Step 1.

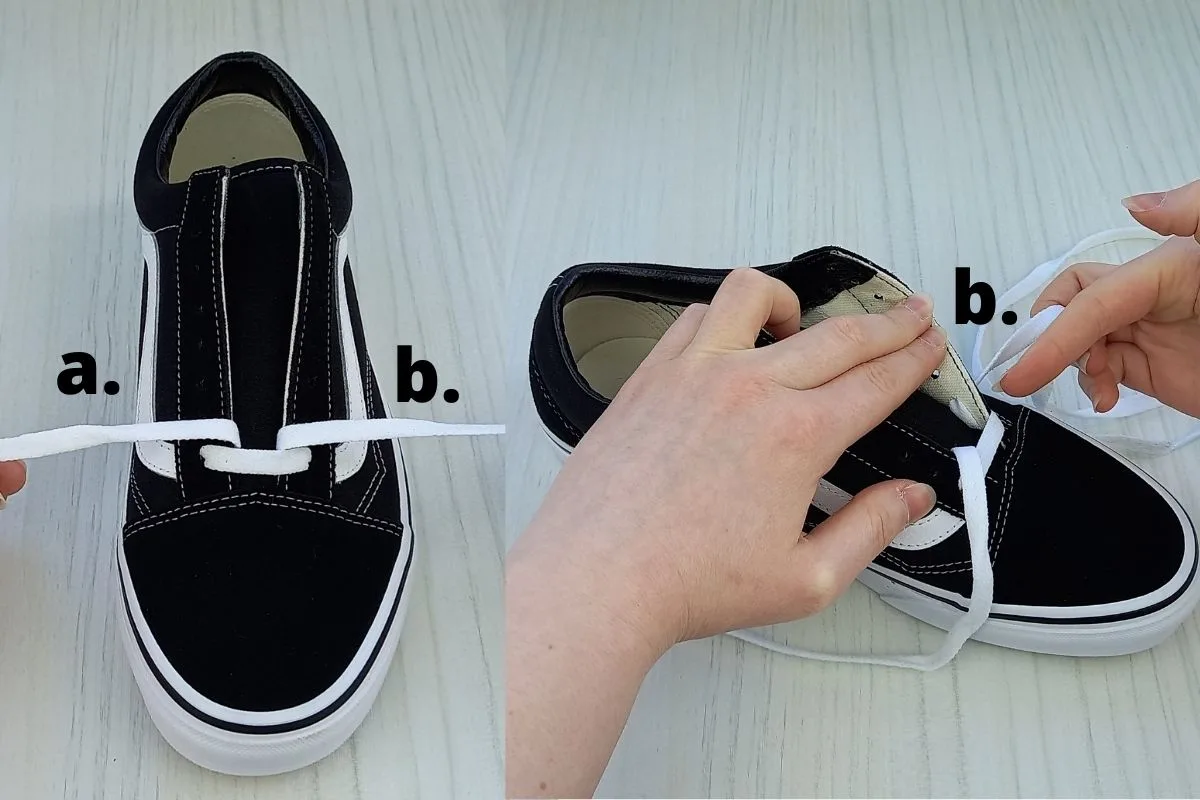
- Take your lace and thread it through the two bottom eyelets of your shoes or sneakers. Make sure the lace is going down into the eyelets from above, not coming up through them from underneath.
- Once this is done you will have your first ‘straight lace’.
- Next take lace b. and bring it up into the second eyelet from the bottom on the right hand side. You can see how I have demonstrated this in the above photo.
- Make sure lace b. is coming up through the second eyelet from underneath this time.
Step 2.
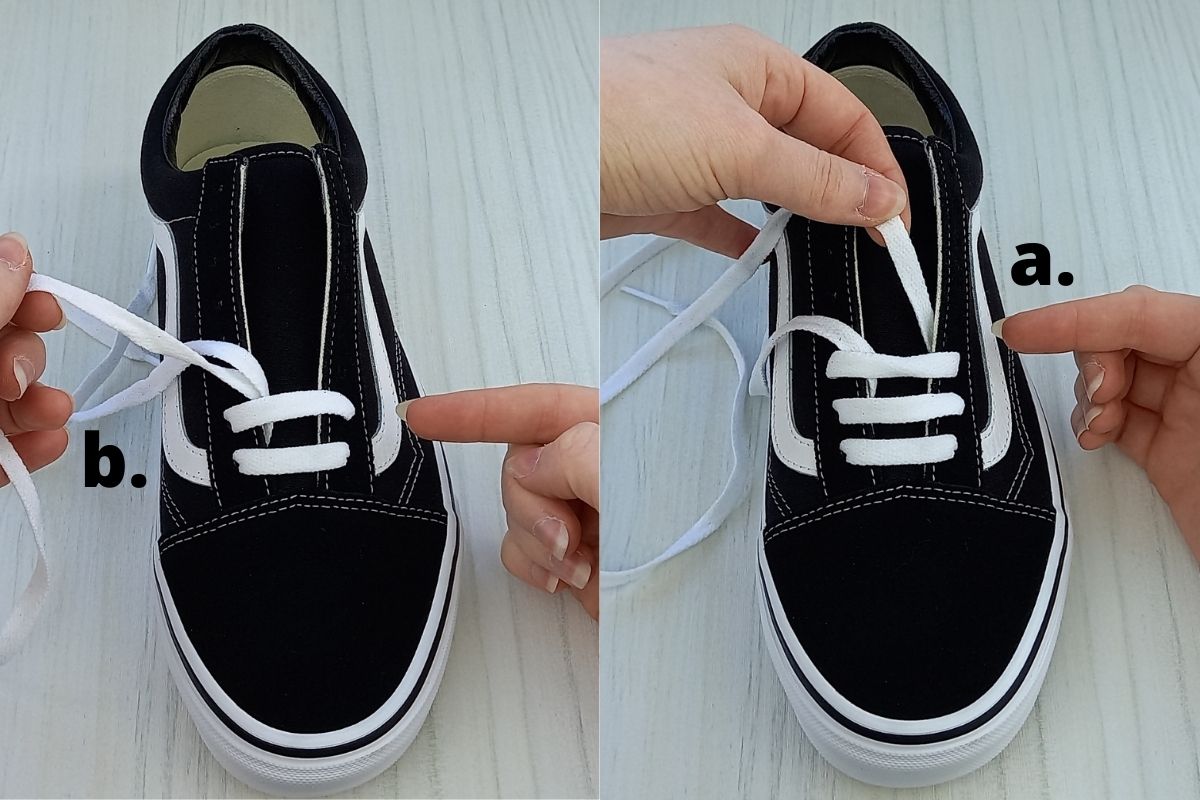

- Bring lace b. over to the left hand side and thread it down into the second eyelet there. Now you will have your second ‘straight lace’.
- Now it’s time to turn our attention to lace a., simply take it up into the third eyelet from the bottom on the left hand side. Thread it over to the third eyelet on the right hand side, as I have done in the above photo.
- We are just repeating the pattern here. Once you have done this you should have a result just like mine. If it doesn’t look right, go back over step 1. and step 2.
Step 3.

- Continue this lacing pattern all the way up the shoe or sneaker tongue.
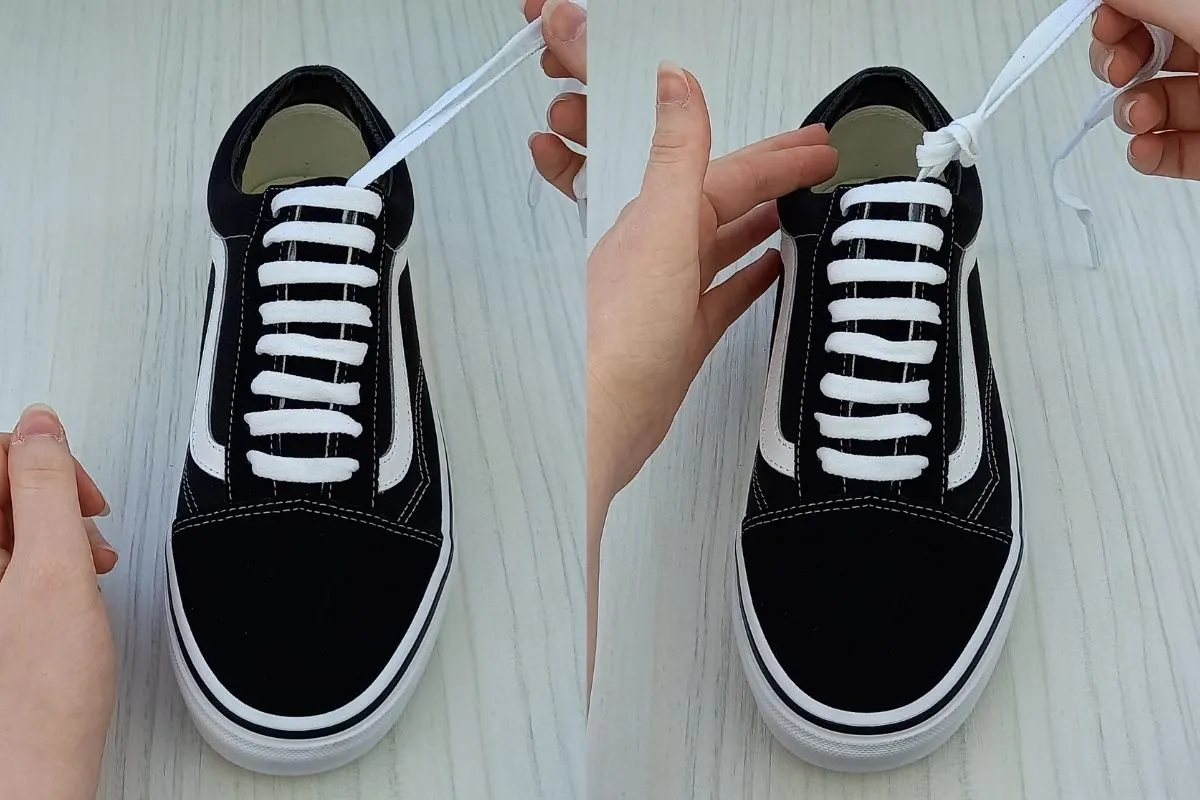
- When you reach the top eyelets, it’s time to make our knot. You will see at this stage what makes this style a ‘slip on’ lace style.
- Take the laces at the top and tie them together into a knot, as I have done in the above photo. Your laces should both be over on the right hand side, if the pattern was followed correctly.
- This knot can now be tucked down into the shoe or sneaker out of sight. The knot should be pretty tight, so the laces don’t slacken.
- If you find the laces feel too tight to slip your foot into the shoe, simply tie the knot further down the lace ends and loosen the ‘straight laces’ with your fingers. Once you find the perfect fit, your shoe or sneaker will simply slip on with every future use.
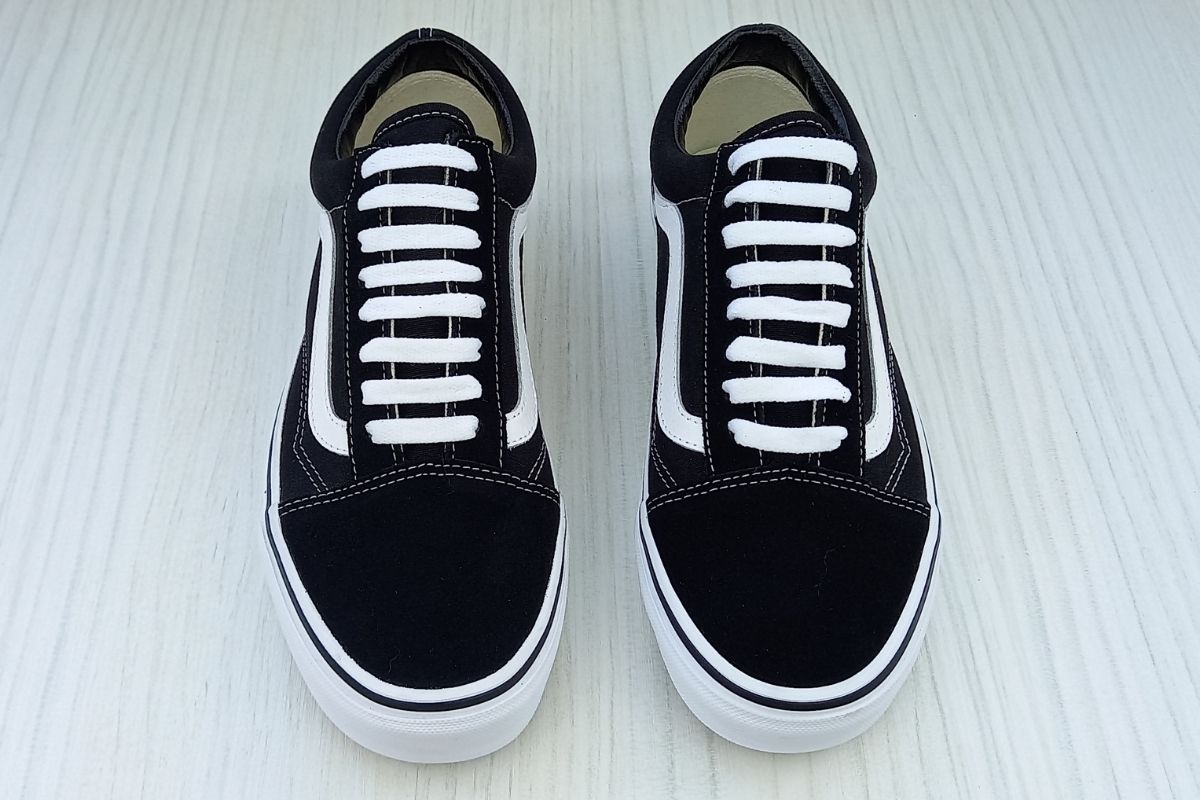
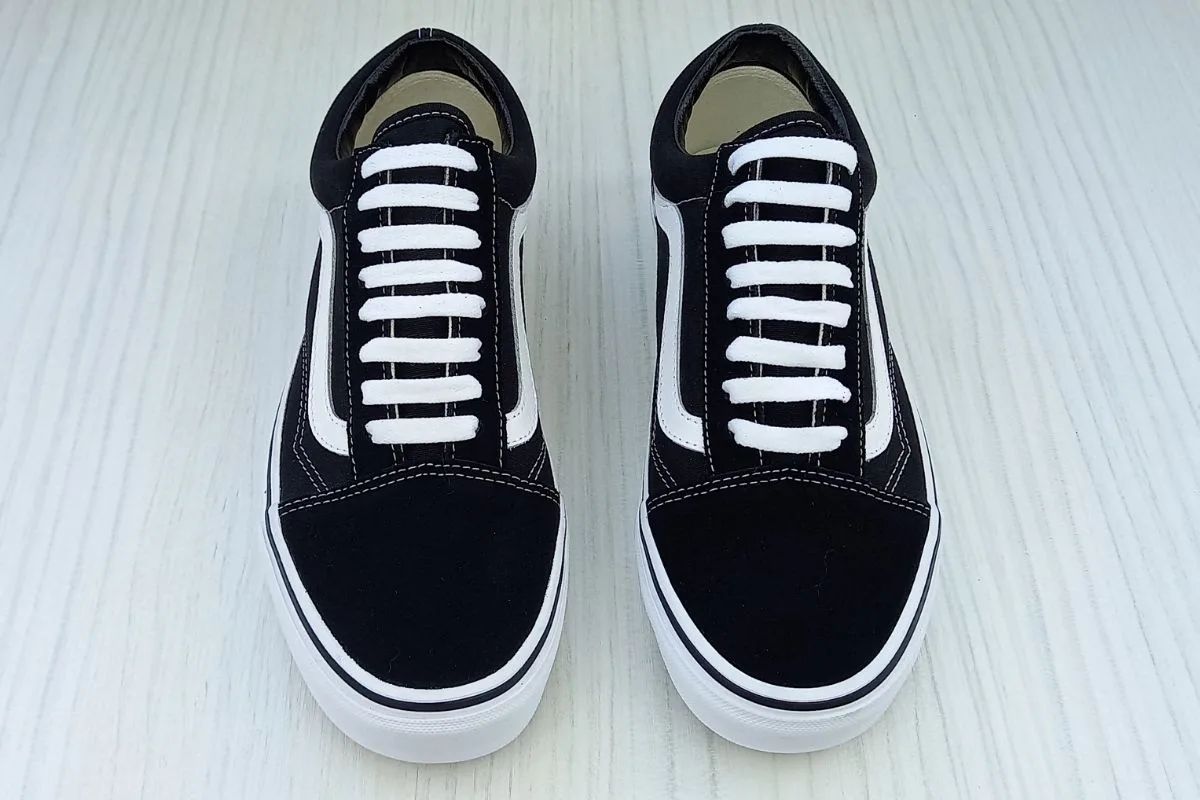
Once completed your shoes or sneakers should look like mine in the above photo. Enjoy your slip on lace style, and not having to tie your shoes!
Remember, you can always adjust the tightness of the laces by moving the lace knot down the lace ends a little bit, to create more slack, until it feels right for you.
You may also like: How To Hide Shoelaces: 5 FAST Hacks
Related Articles
Thank you for reading this post on how to lace shoes so they slip on. I hope you now feel confident to try out a new lacing style, or to purchase a product to help fix this problem for you. Saving time is key!
For more lacing content, check out:
How To Lace Vans – 7 Cool Ways (EASY guide)
How To Lace Converse – 9 EASY Ways
How To Lace Air Force 1s (STANDARD Way)
How To Ladder Lace Doc Martens (And Other Boots)

Lorna is a footwear geek and the founder of Wearably Weird. She created a YouTube channel in 2021 for fellow footwear fanatics, dedicated to detail-rich footwear reviews and info. She has a fashion media qualification (awarded in 2011).