
Learning how to lace Converse in different ways is an easy way to elevate your Converse sneaker game. Mix up your look by trying out some new designs, to style with your favourite outfits.
There are so many cool ways to lace Converse, and as a long term fan of the Converse brand I’ve tried out at least a dozen over the years. In this guide I’m going to include my top 9 ways to lace Converse, from cool designs to practical designs. The designs may look a little difficult at first, but they are actually very EASY!
Here is a graphic showing all of the different styles I’ll be covering in this post:


To jump to a style, simply select it’s number from the table of contents below. These designs work for both high top Converse and low top Converse.
Let’s get lacing!
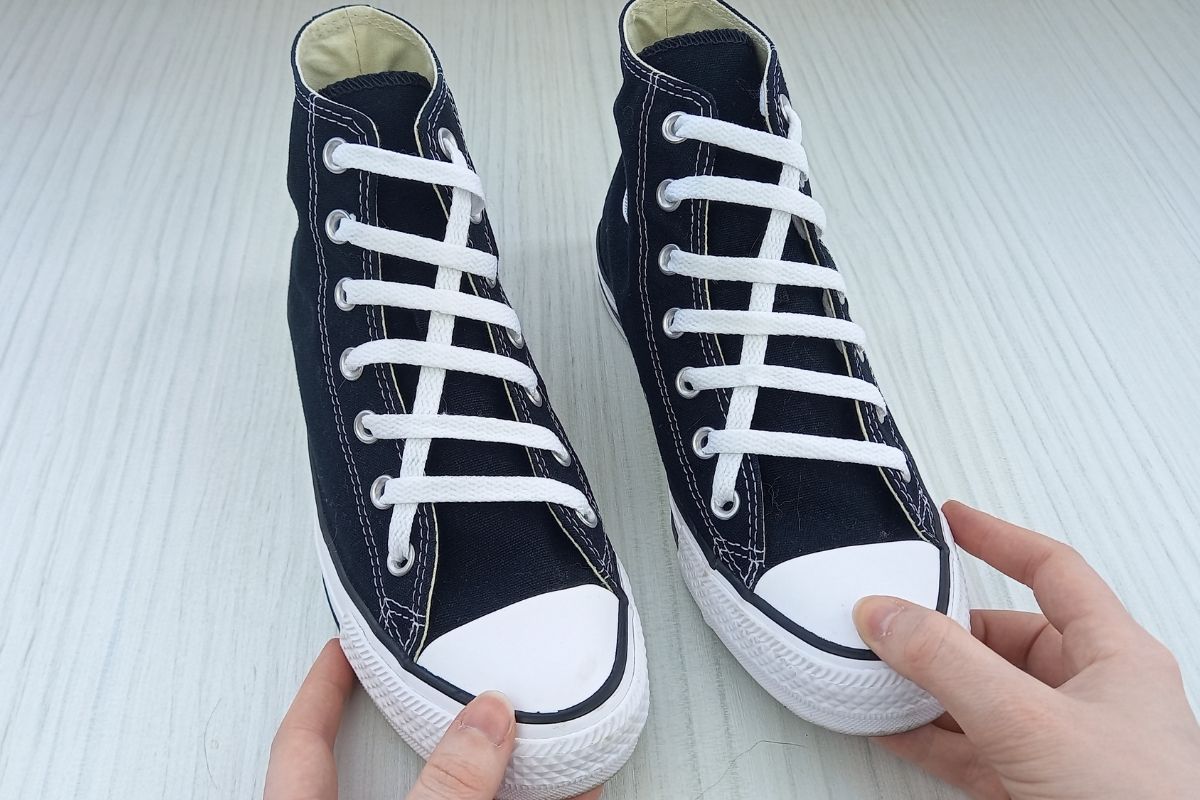
1. How to Lace Converse (Standard Way)

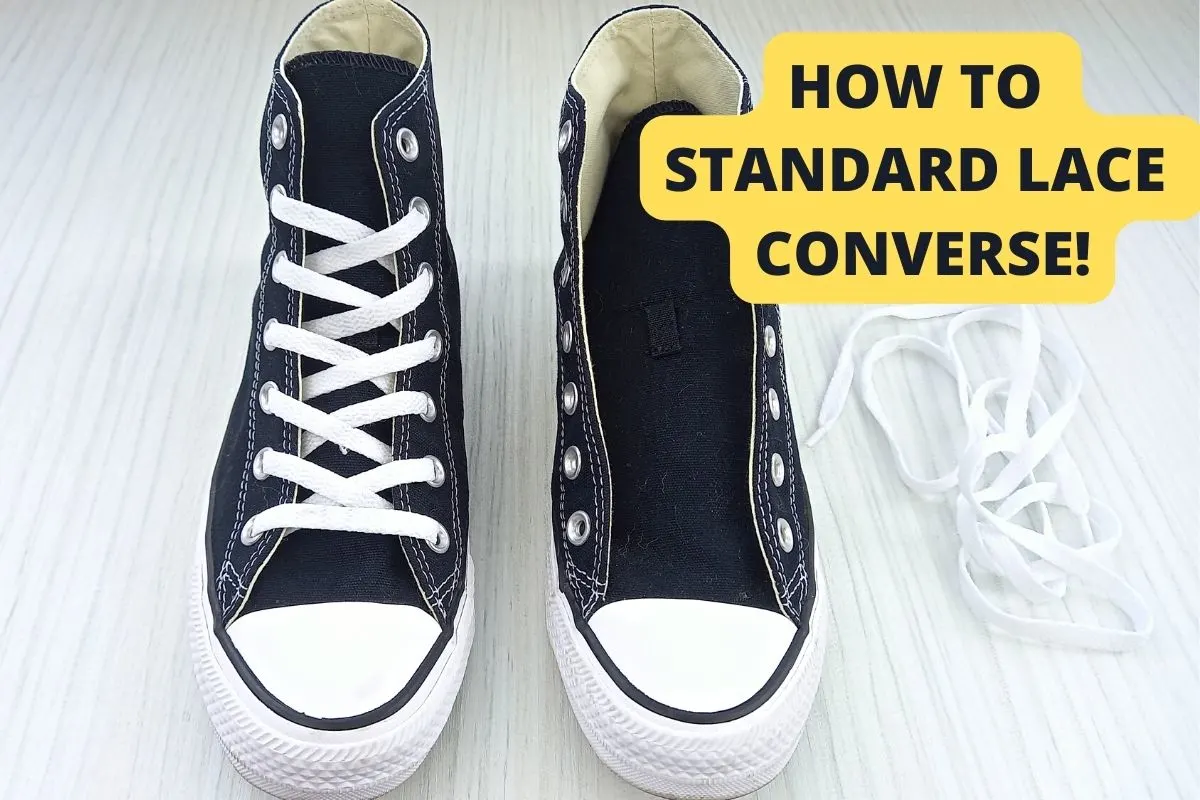
Standard lacing is a great way to lace your High Tops. It’s easy to do and secures the sneakers nicely, with a classic look. It’s a great style to come back to if you’ve taken out your laces (to clean your shoes or style a new design) and forgotten how to it.
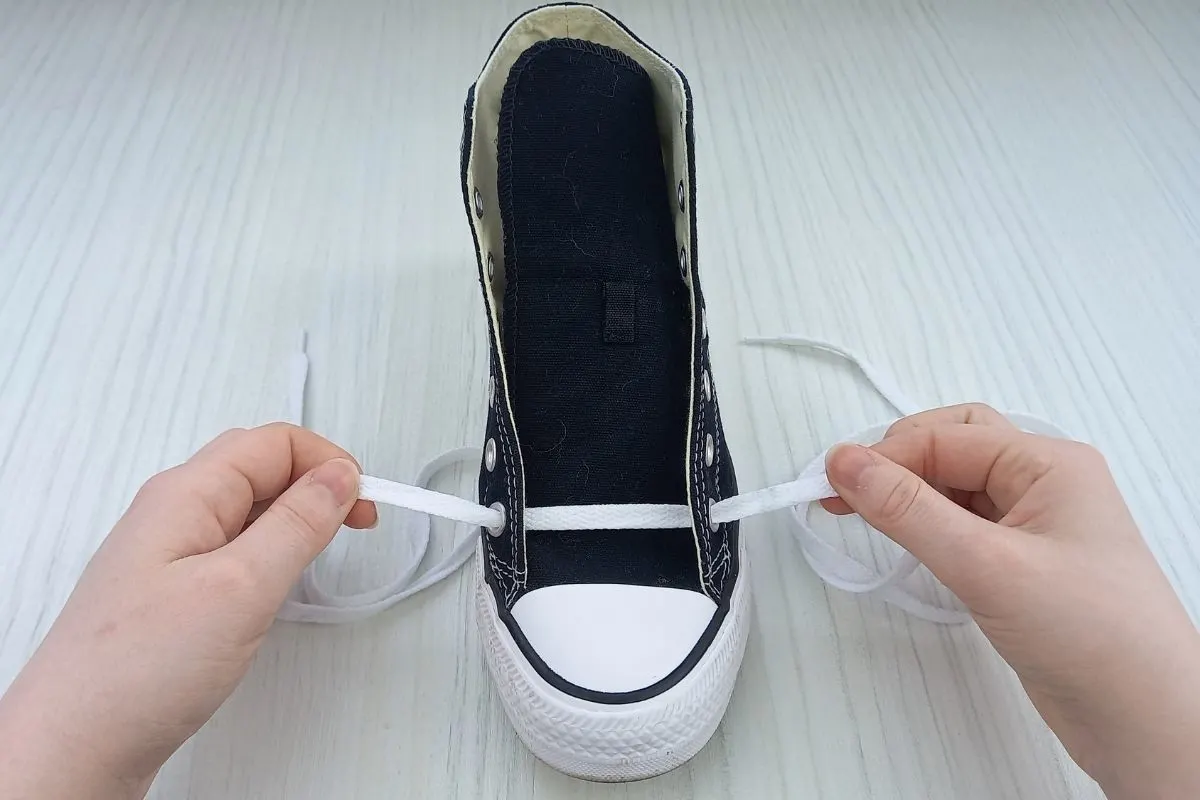
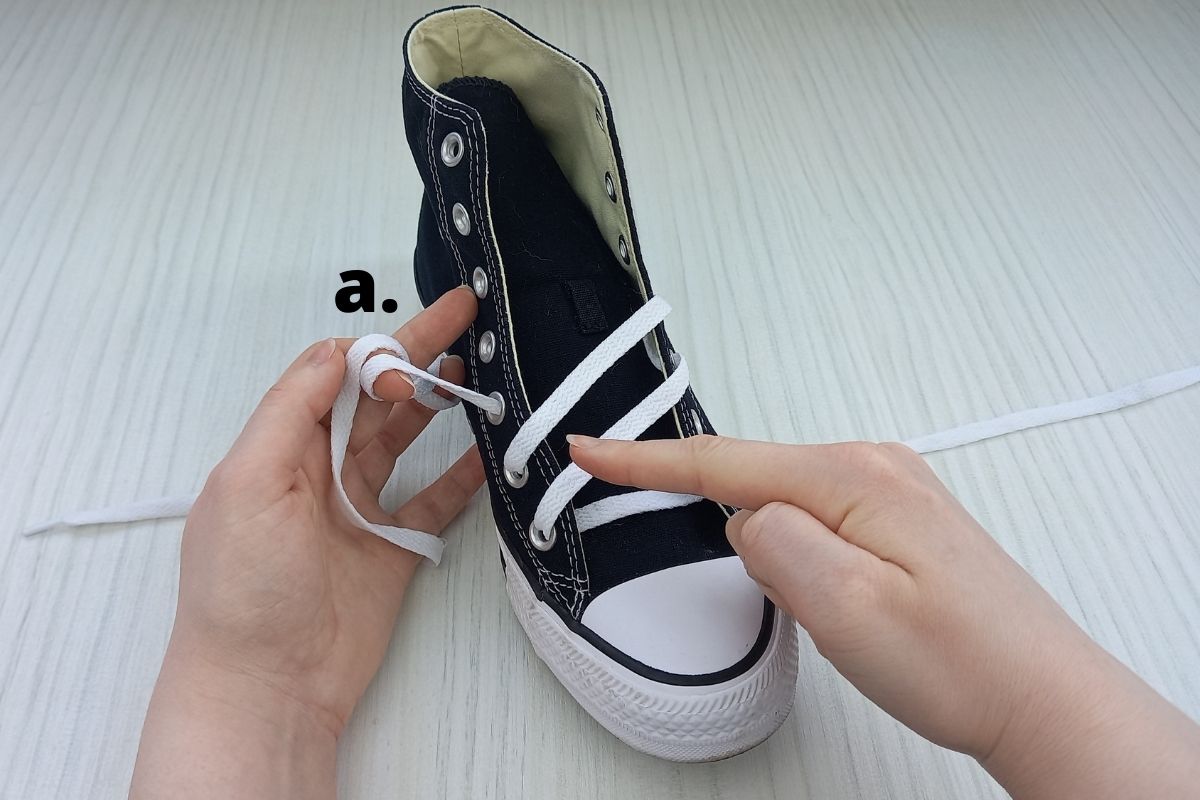
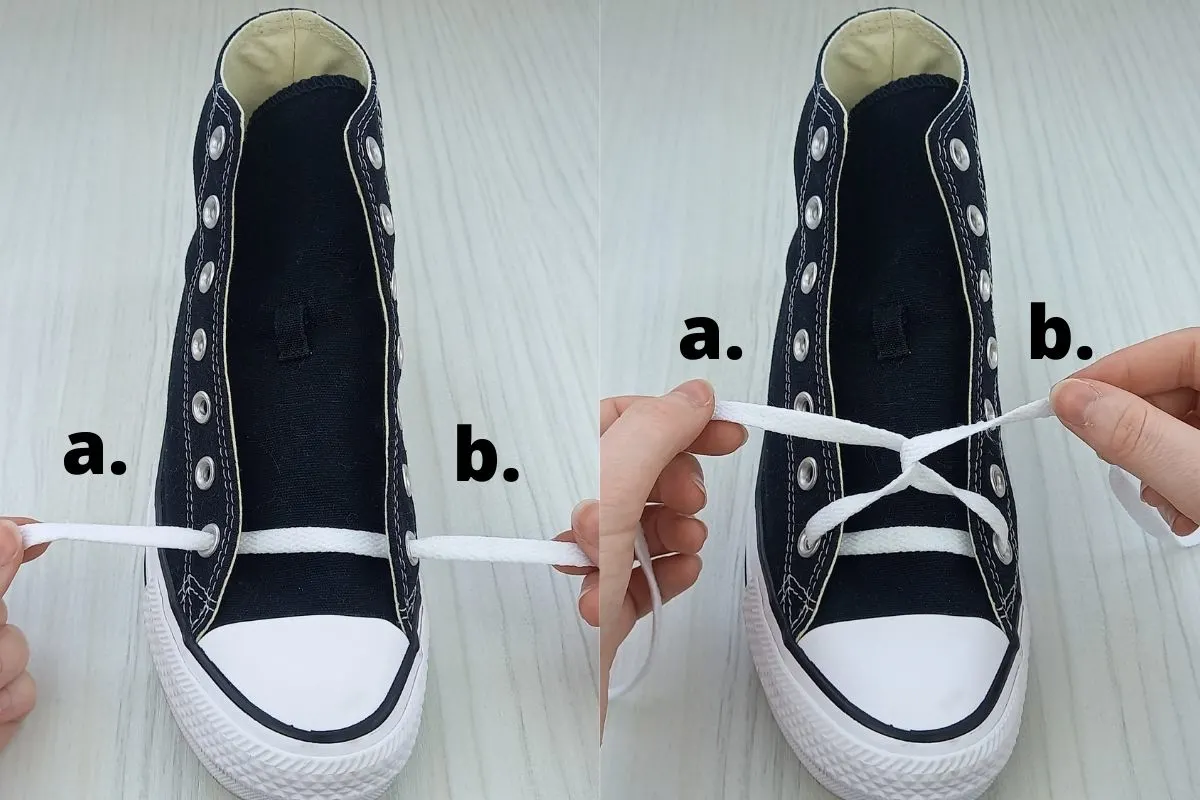
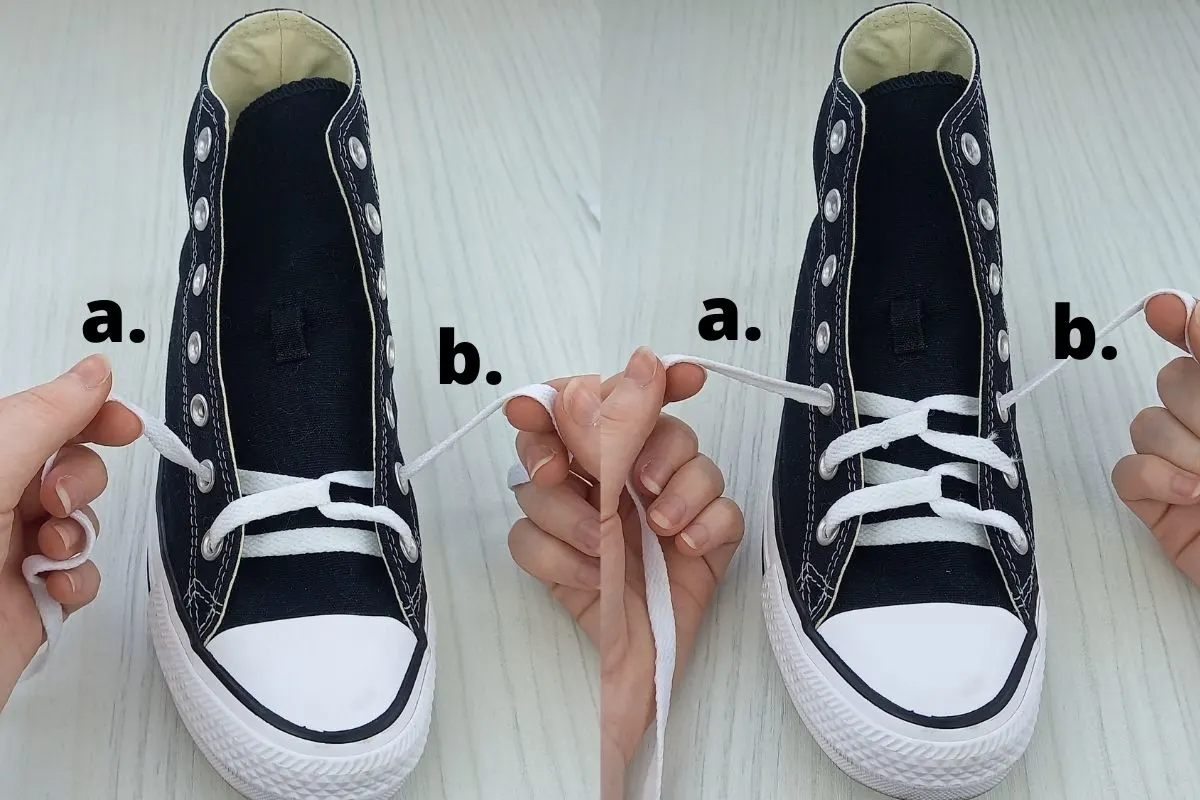
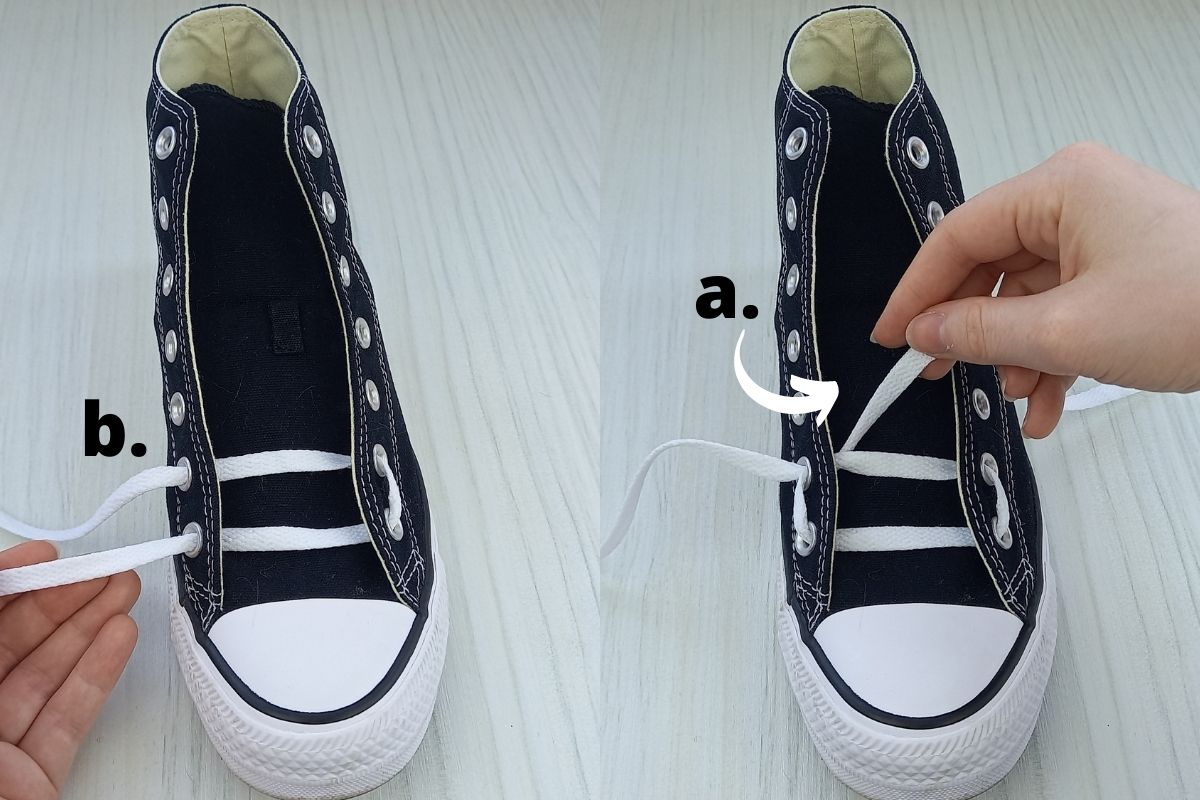
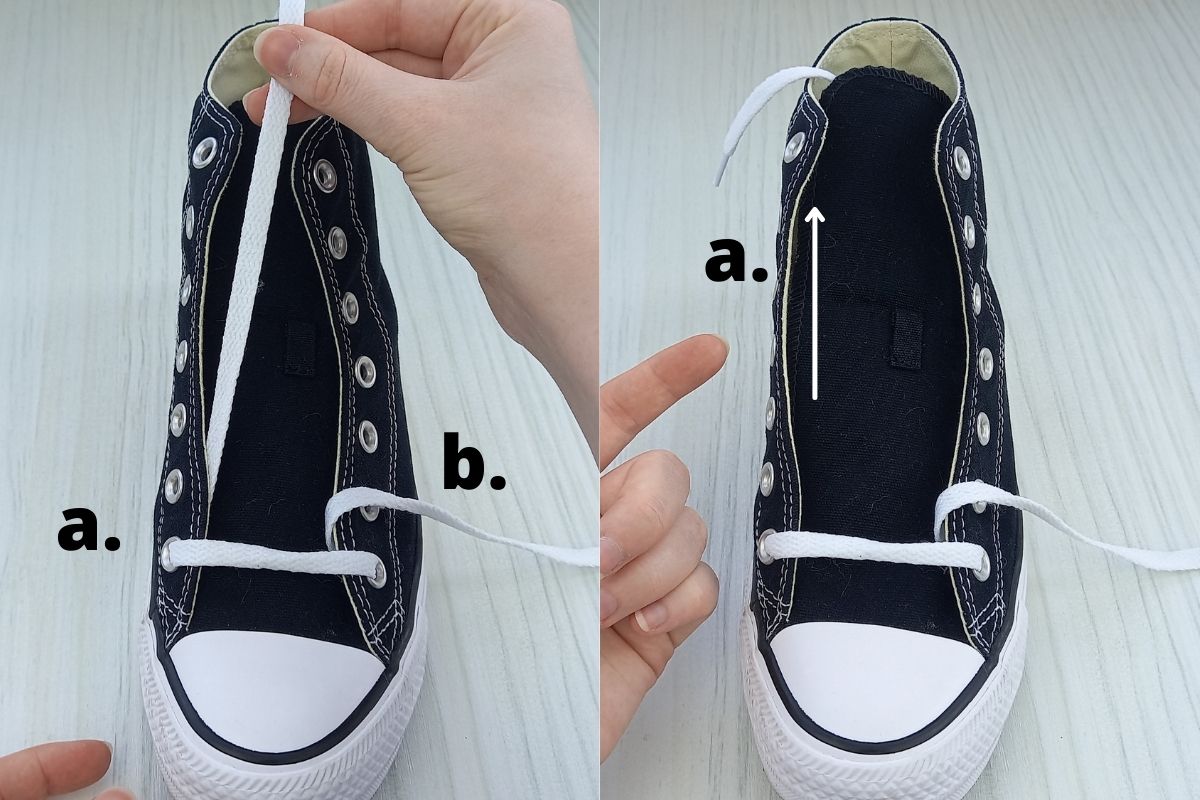
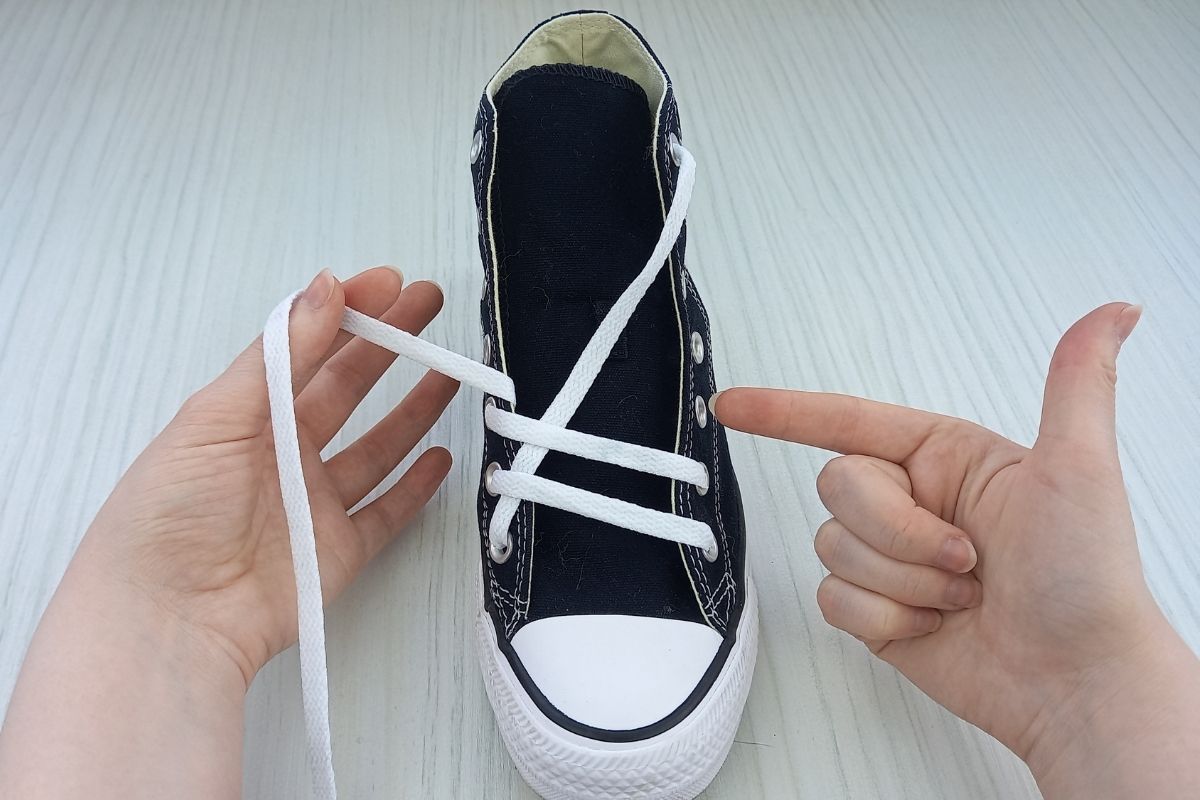
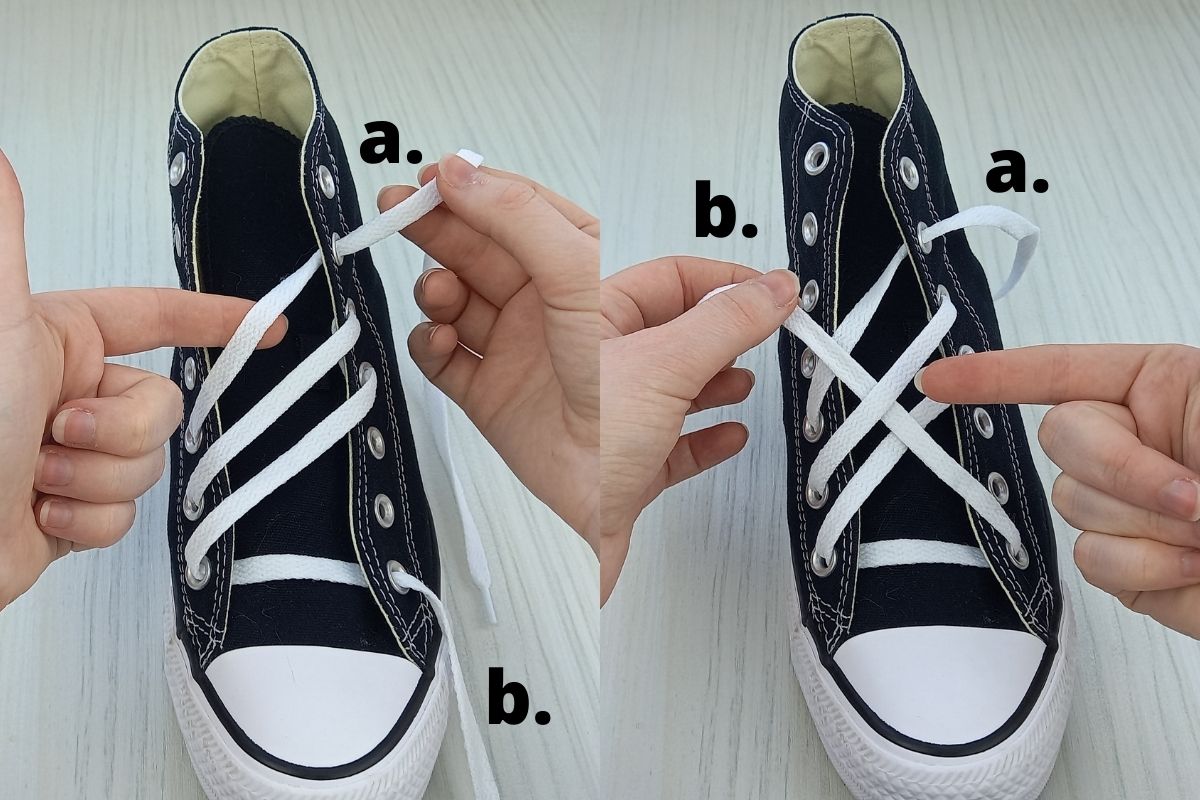
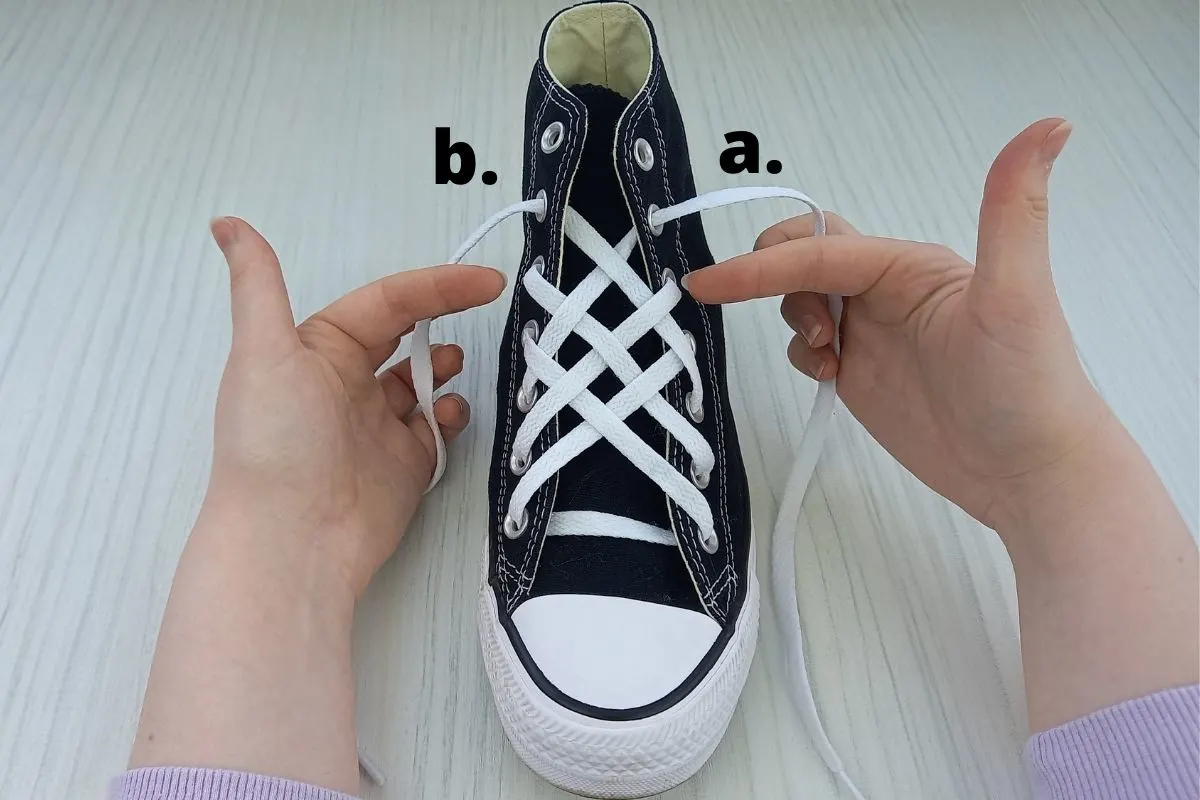
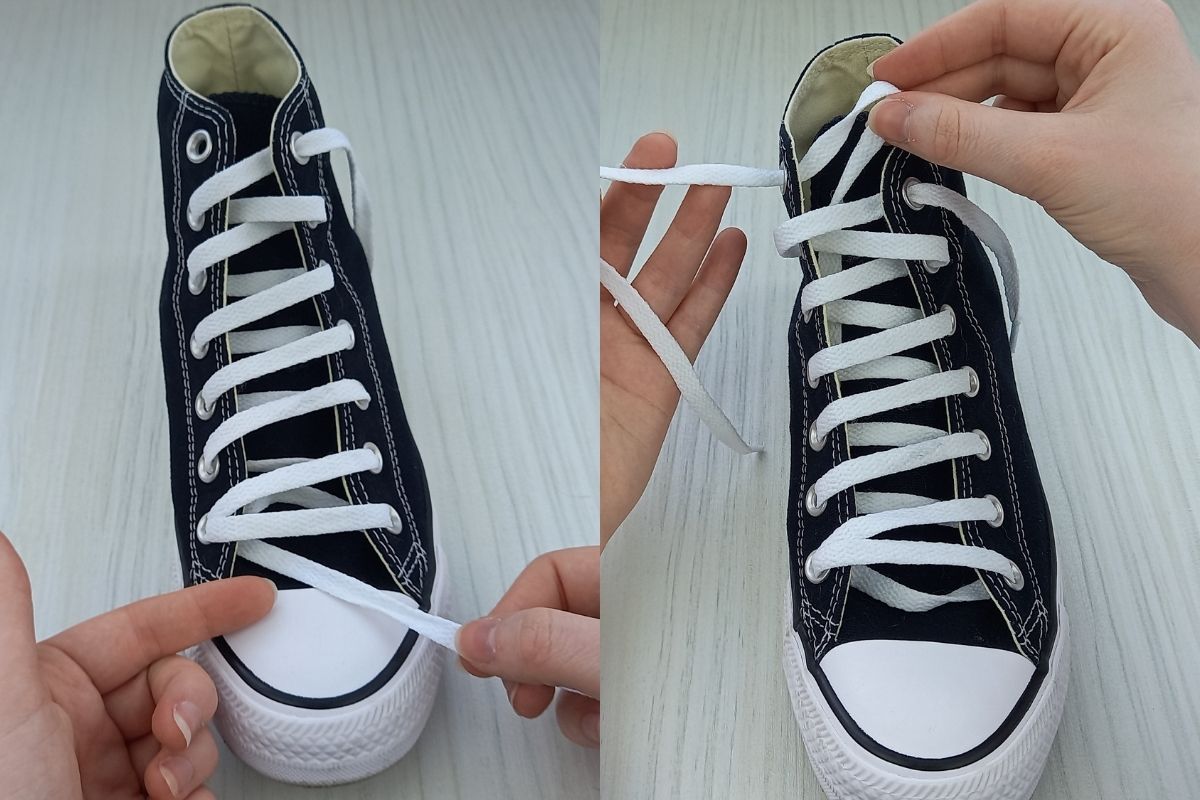
Step 1.
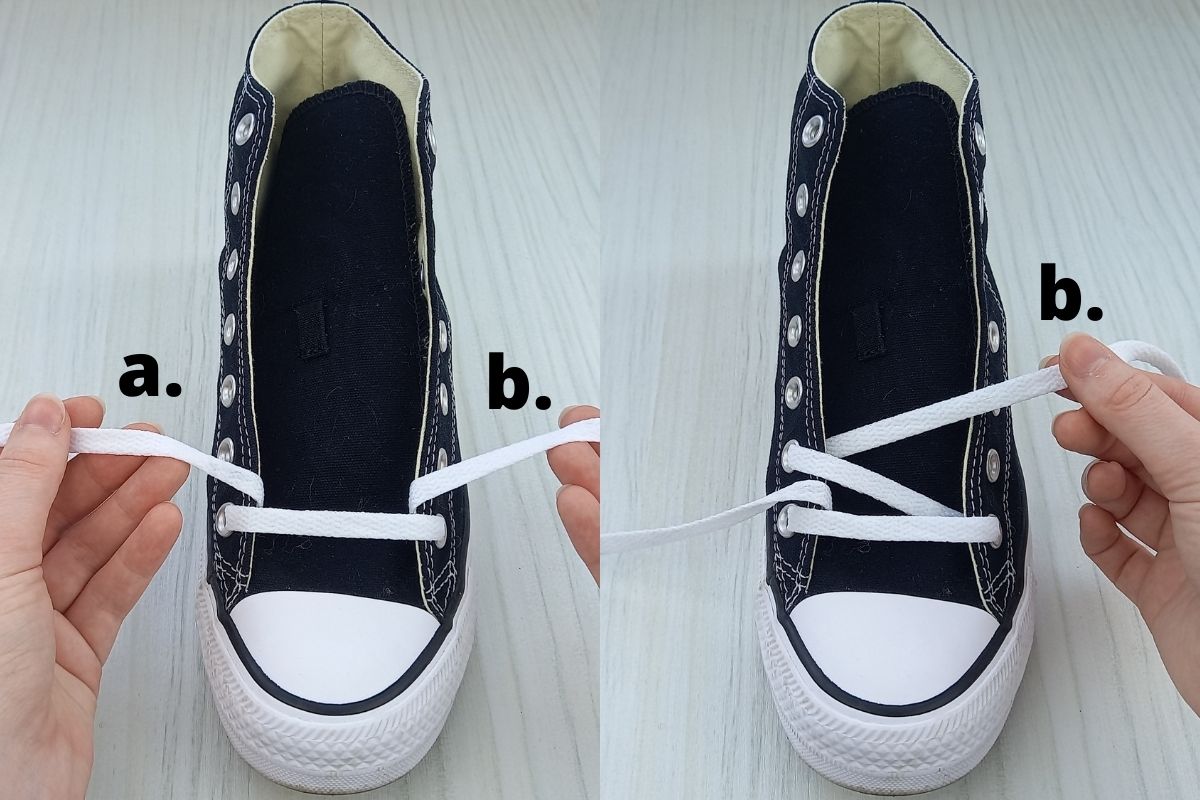

- Thread the lace through the bottom two eyelets, as I have done in the above image.
- Take lace b. and cross it over the sneaker tongue to feed into the second eyelet on the right.
- Make sure the lace goes into the eyelet from above, not underneath.
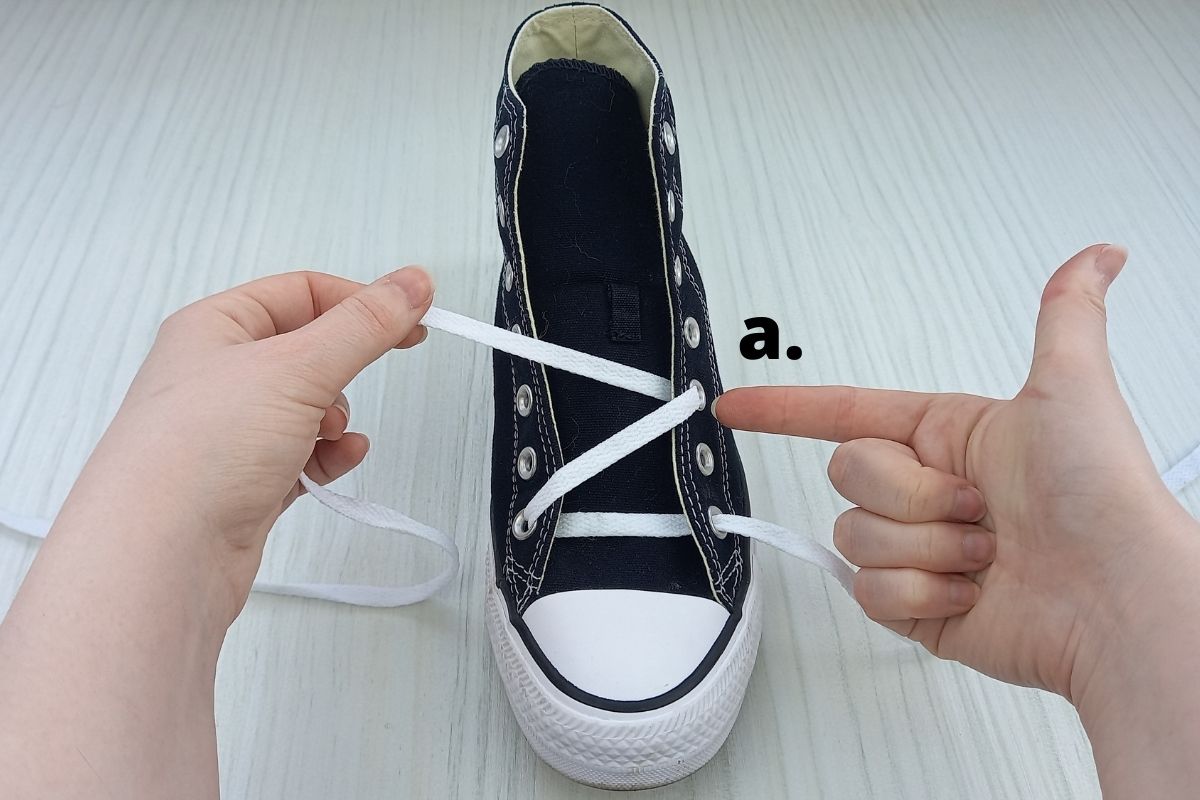
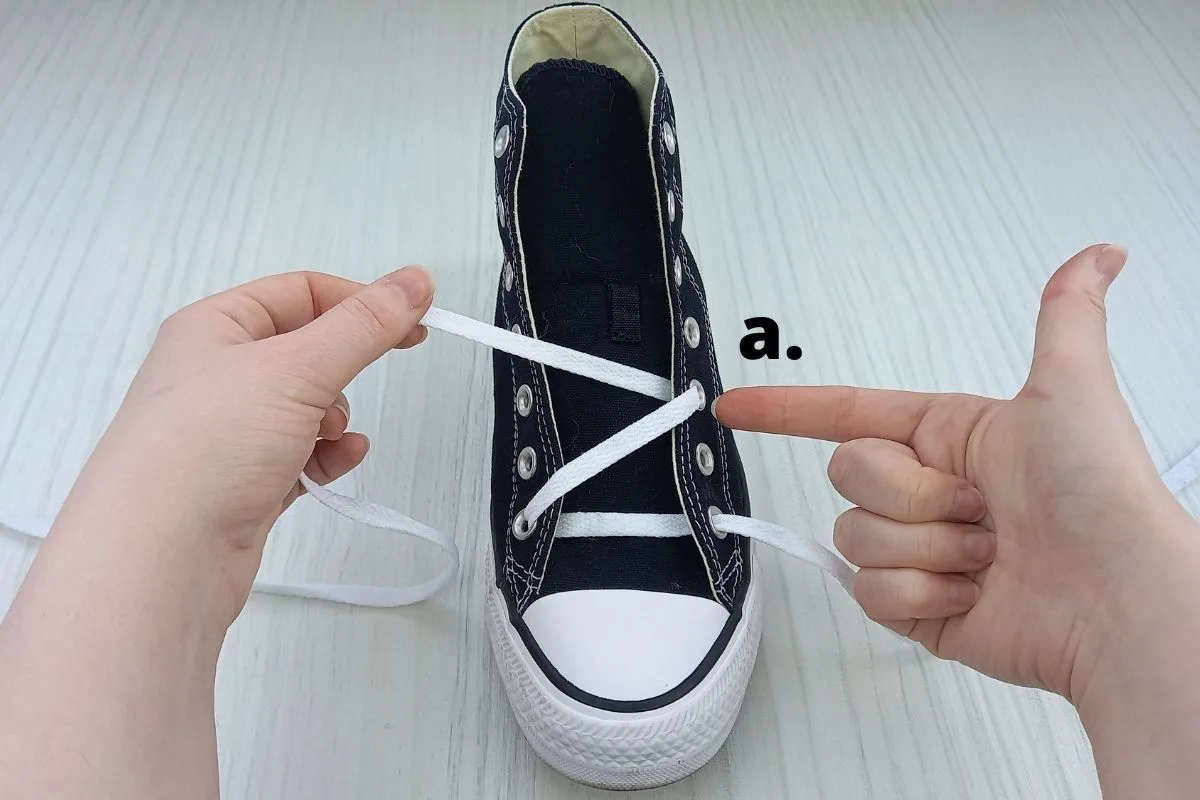
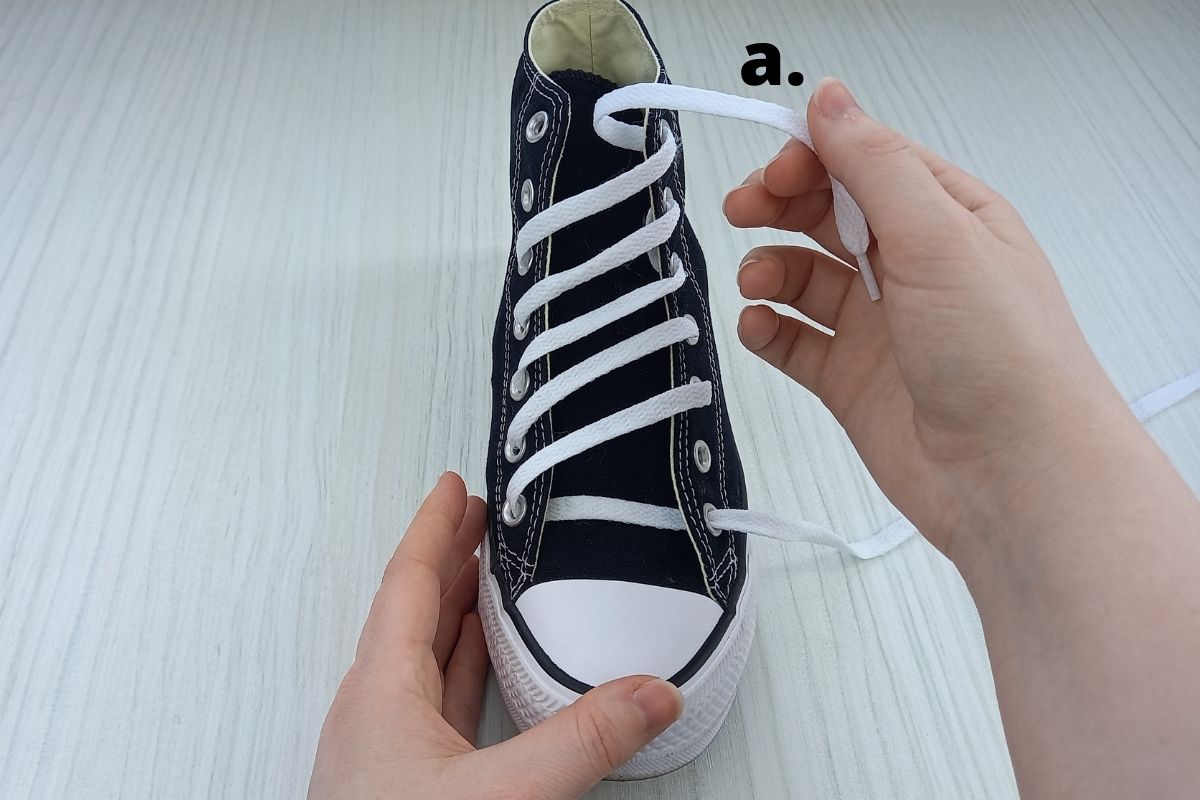
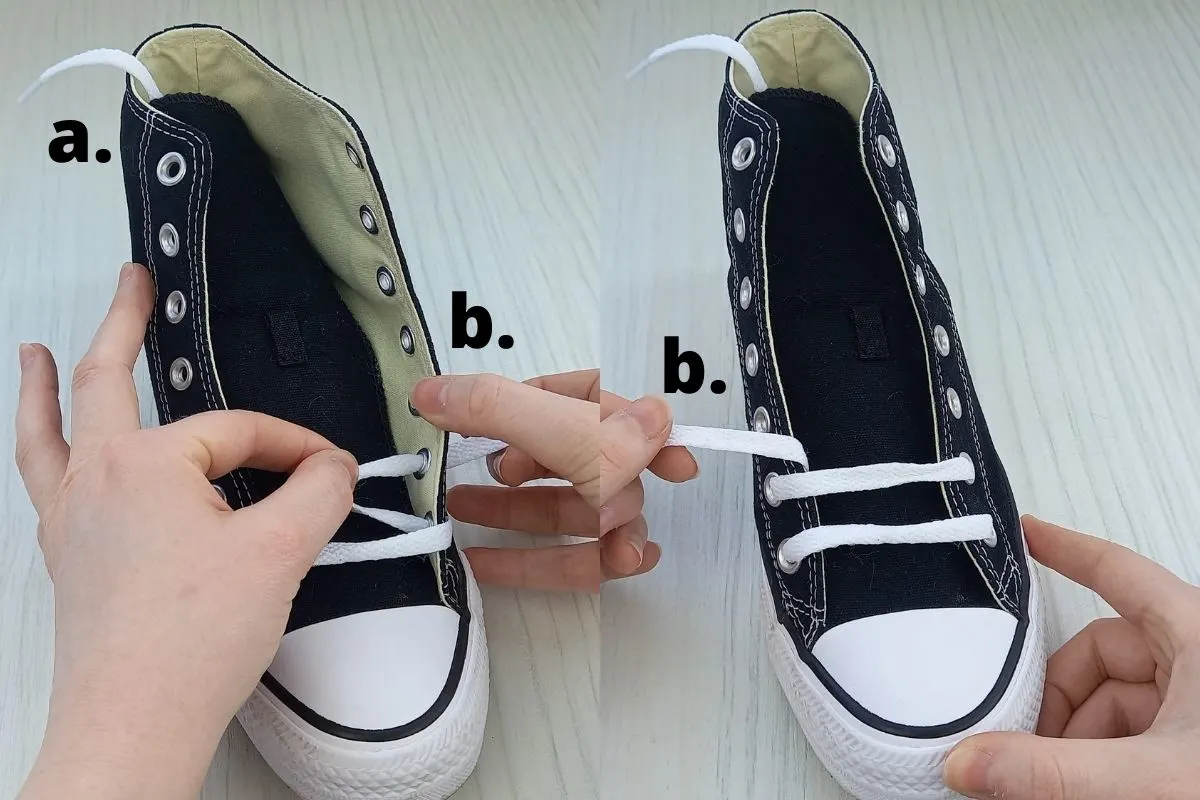
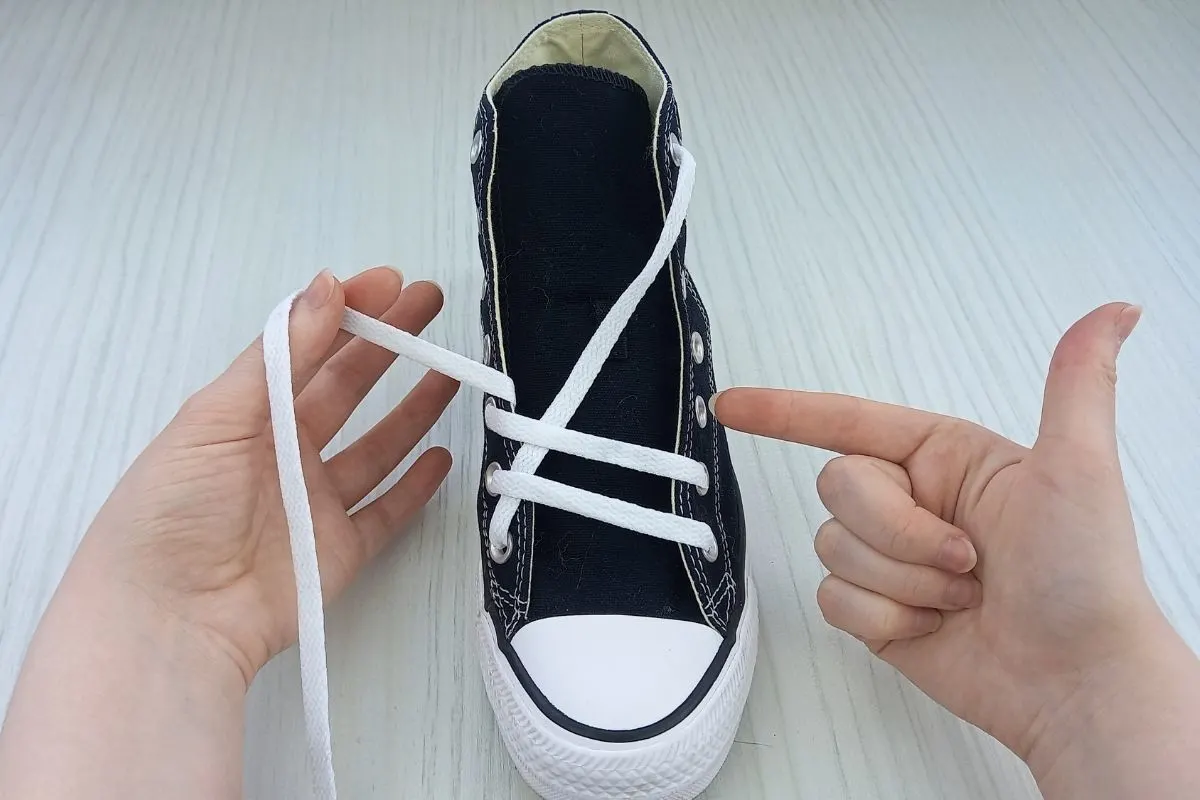
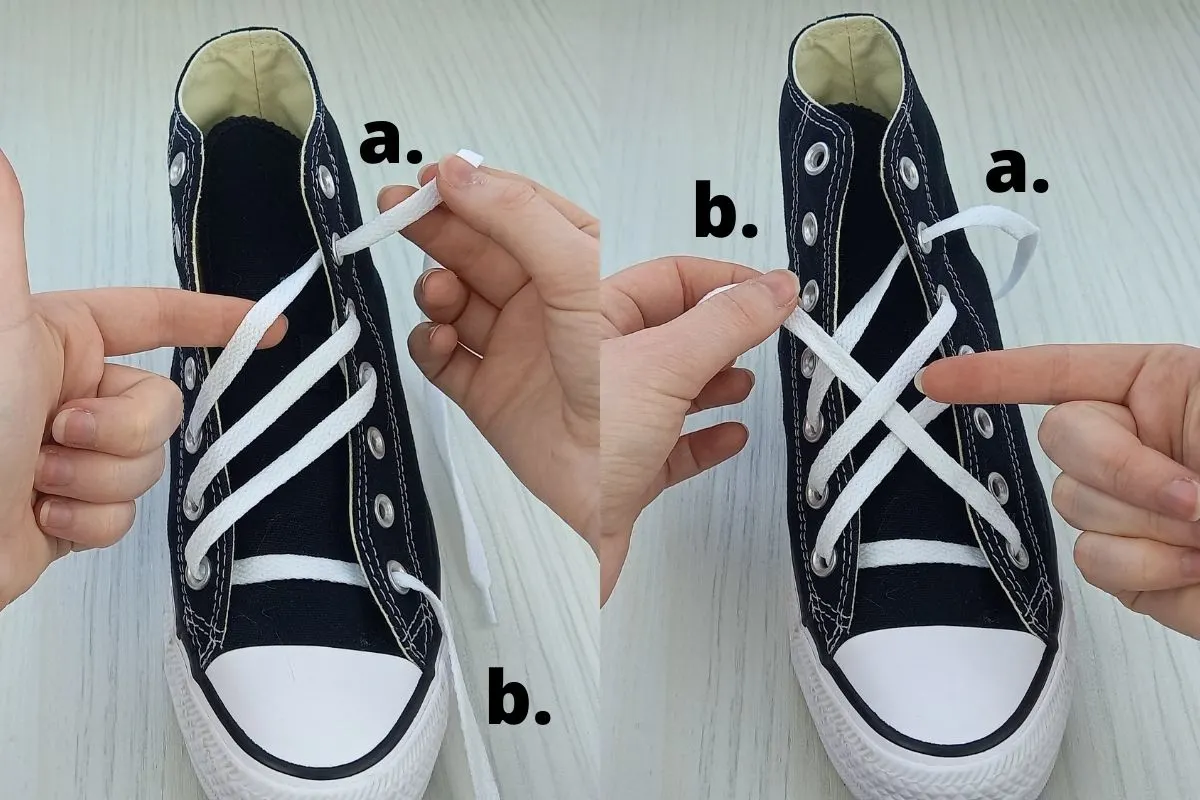
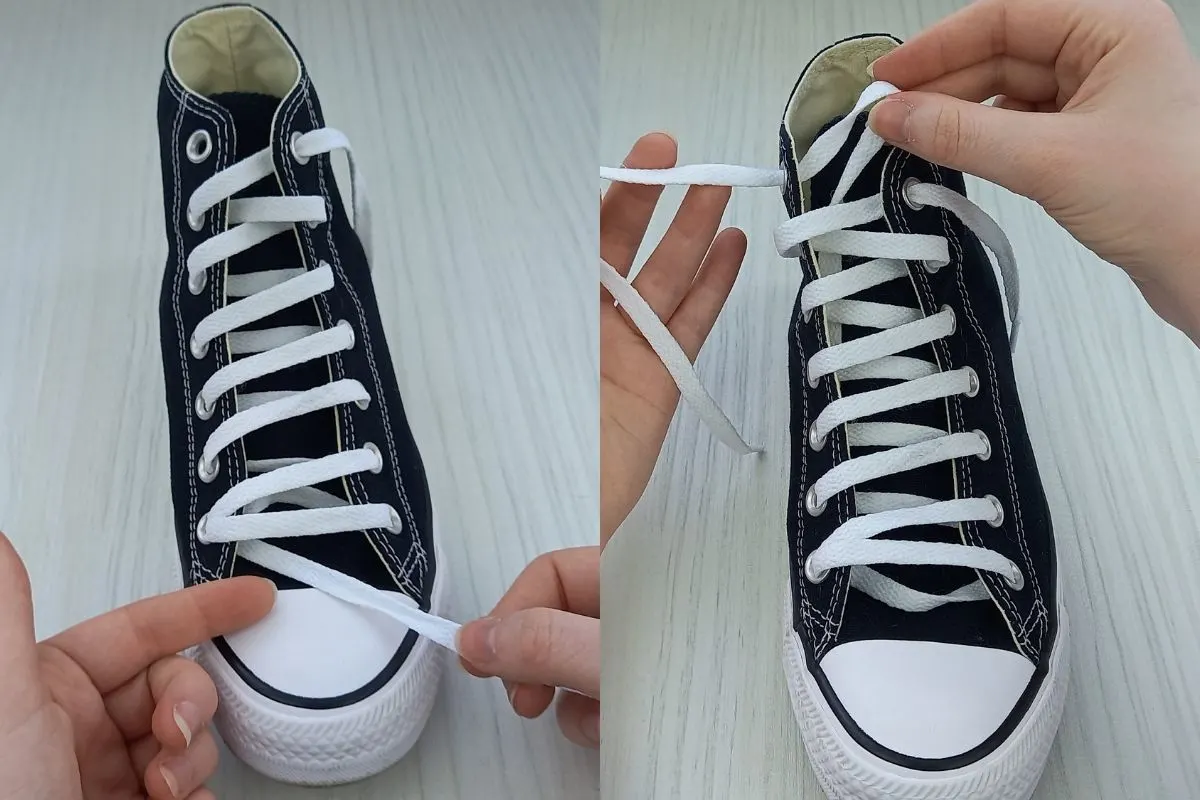
Step 2.
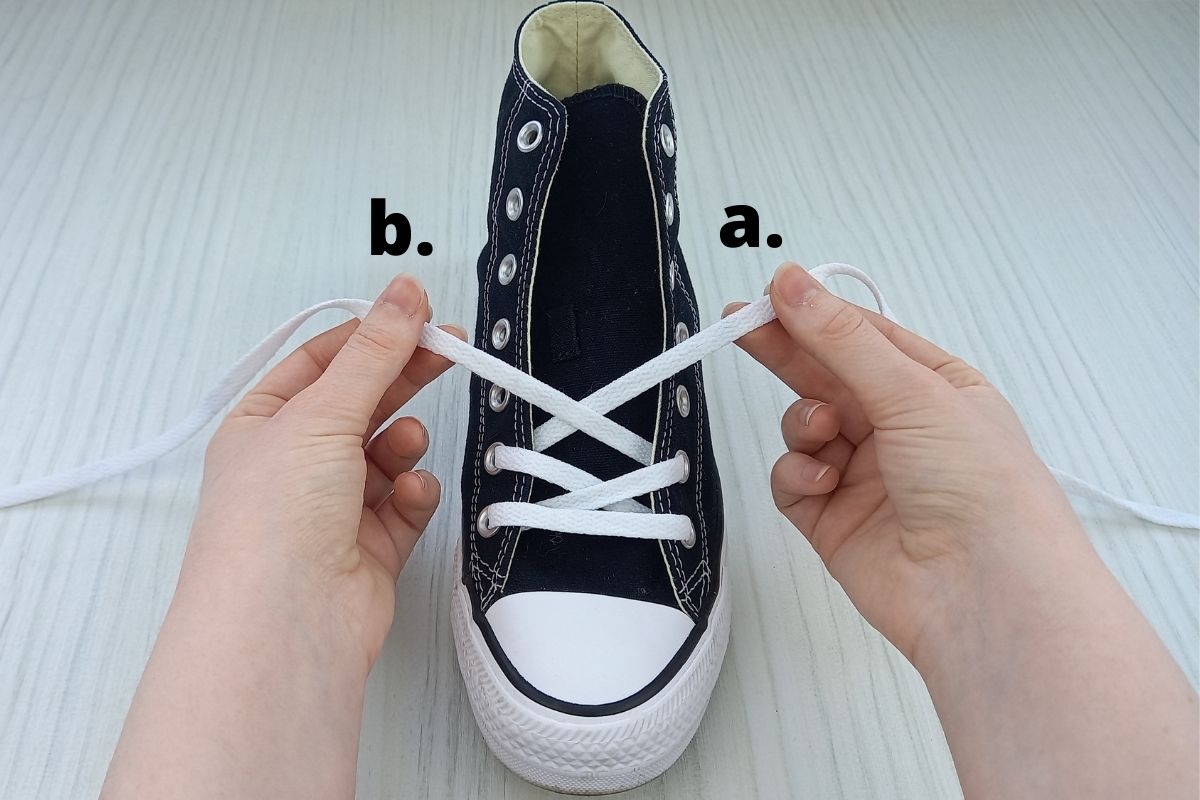

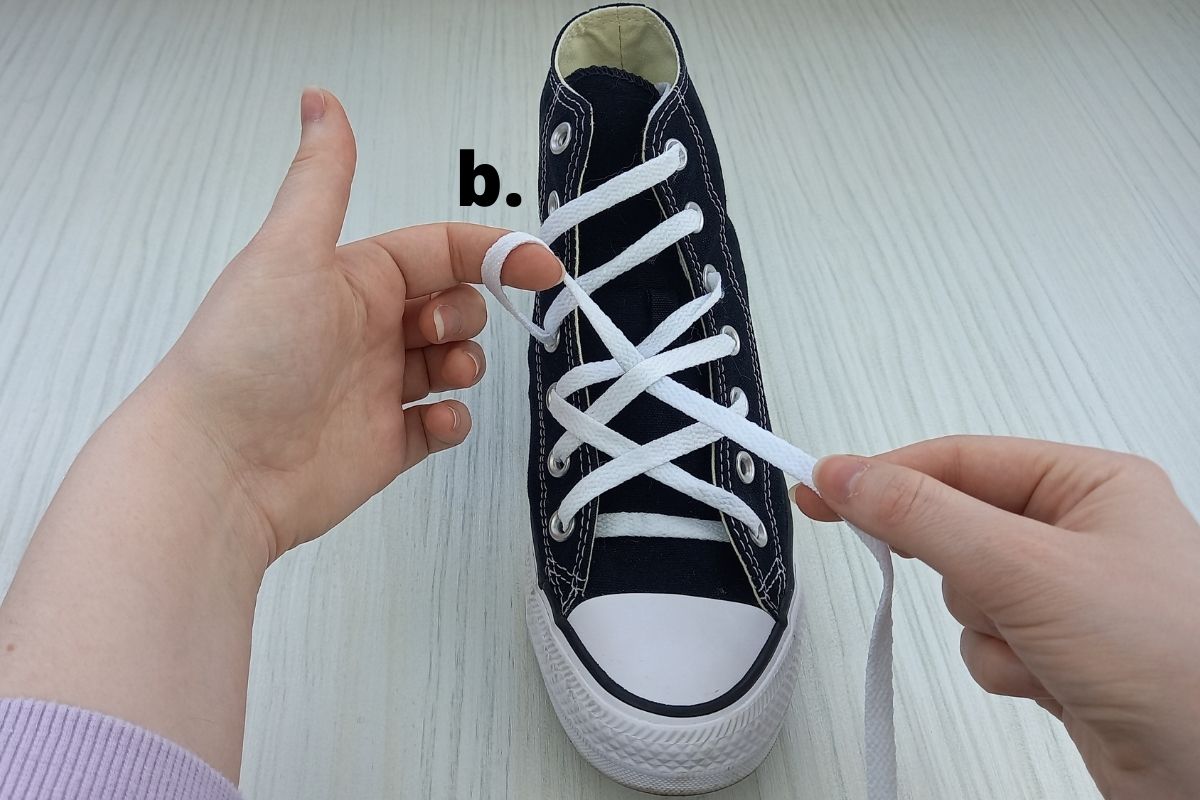
- Continue this step with lace a. making sure the laces are crossing, as I do in the above image.
- Feed both lace a. and b. into the corresponding eyelets on the opposite side. Follow this pattern until the laces reach the eyelets second from the top.
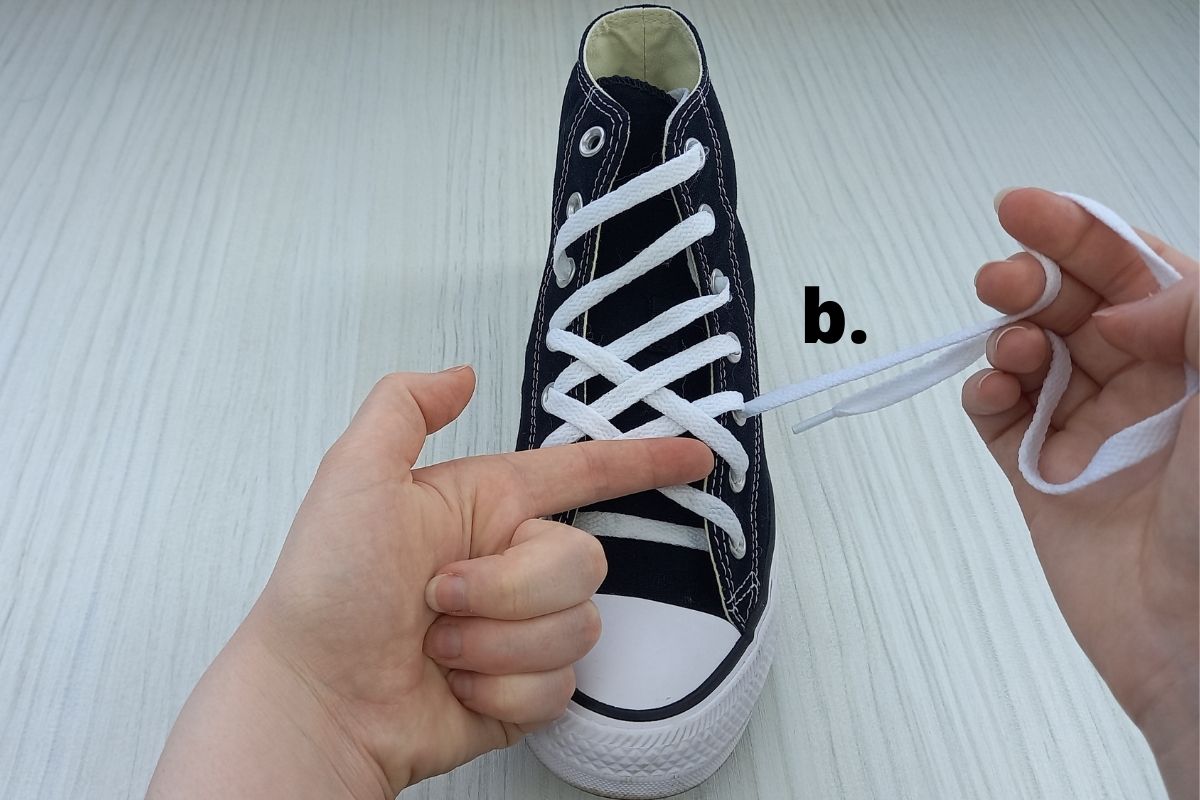
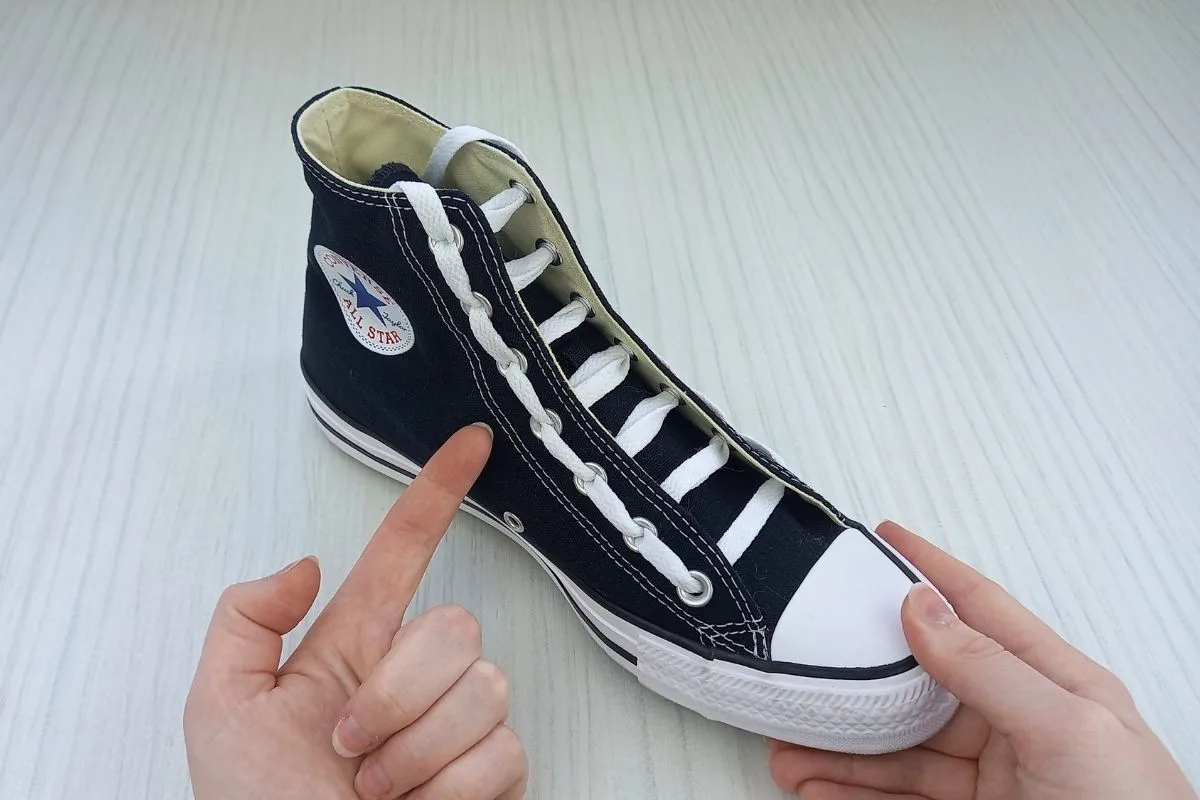
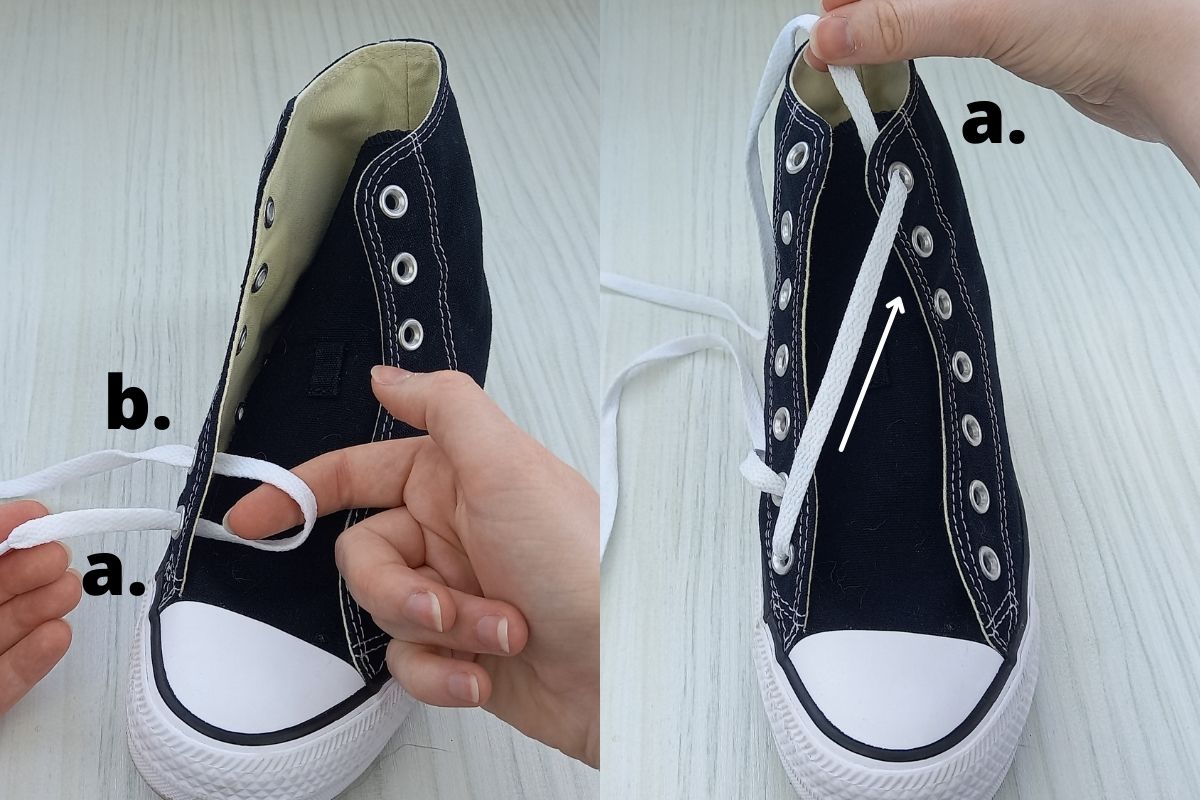
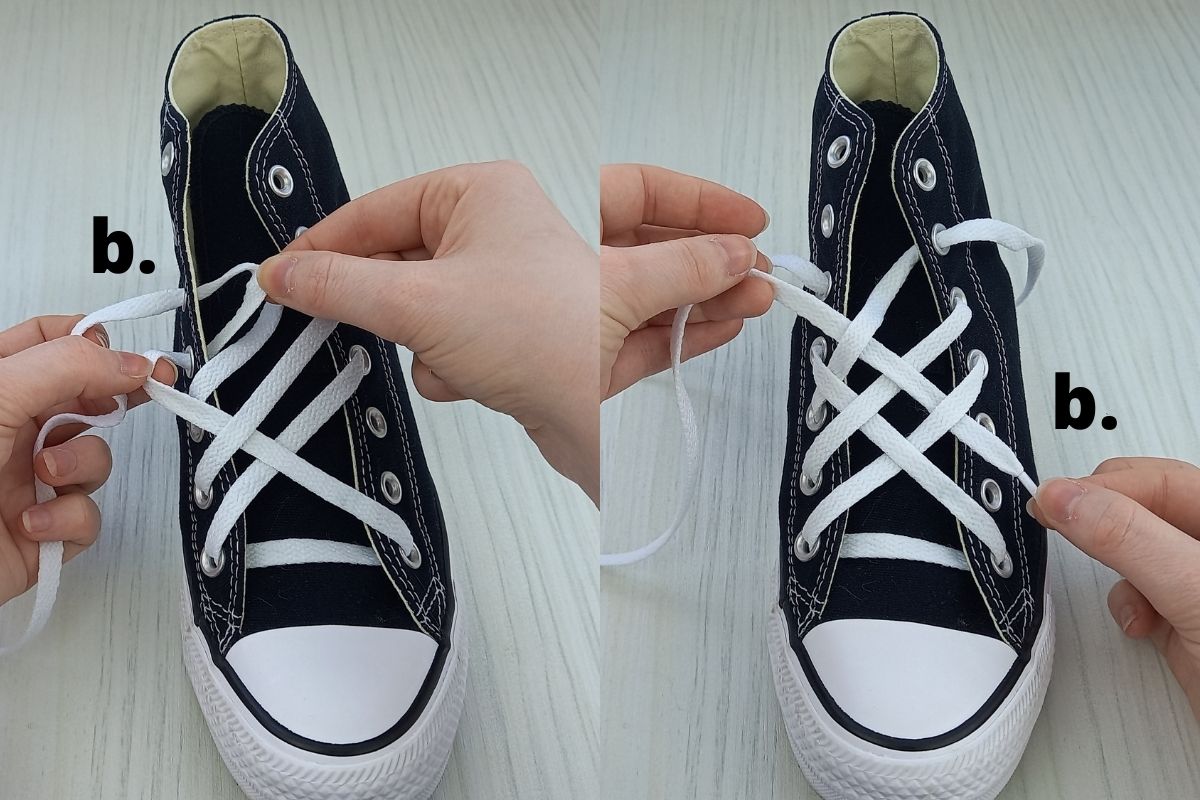
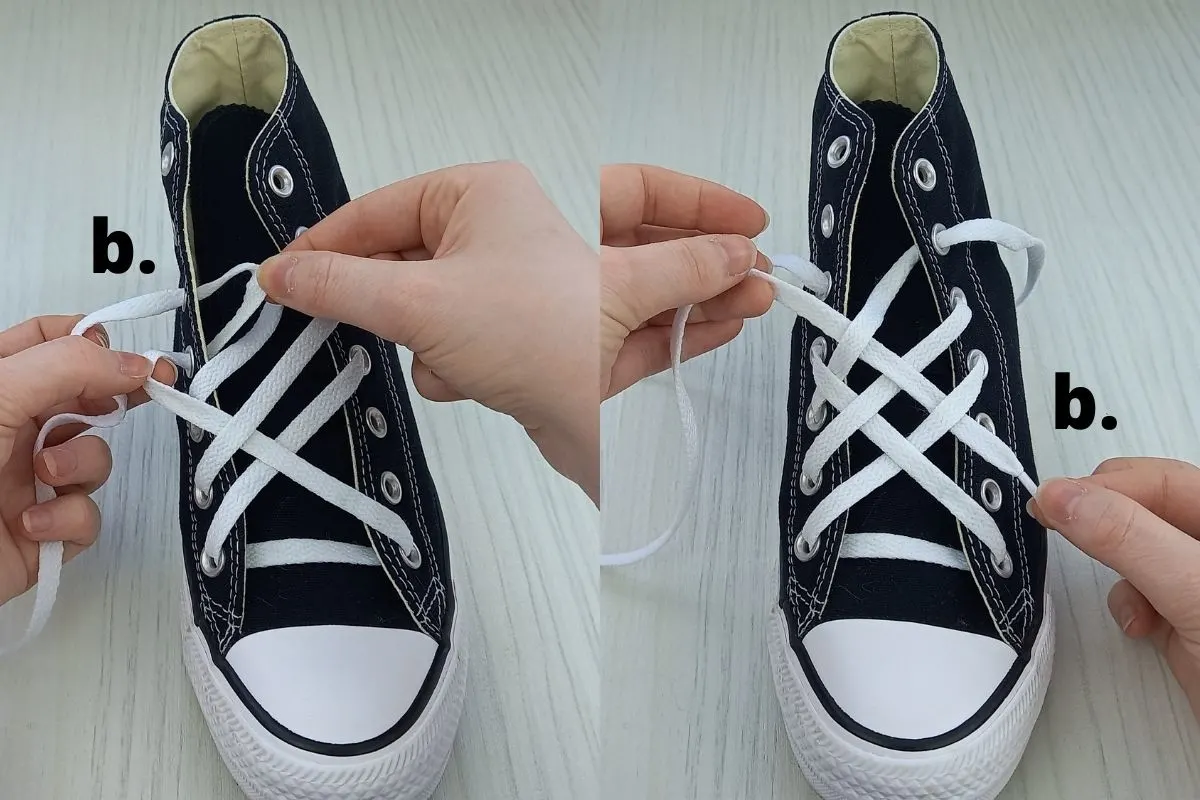
Step 3.


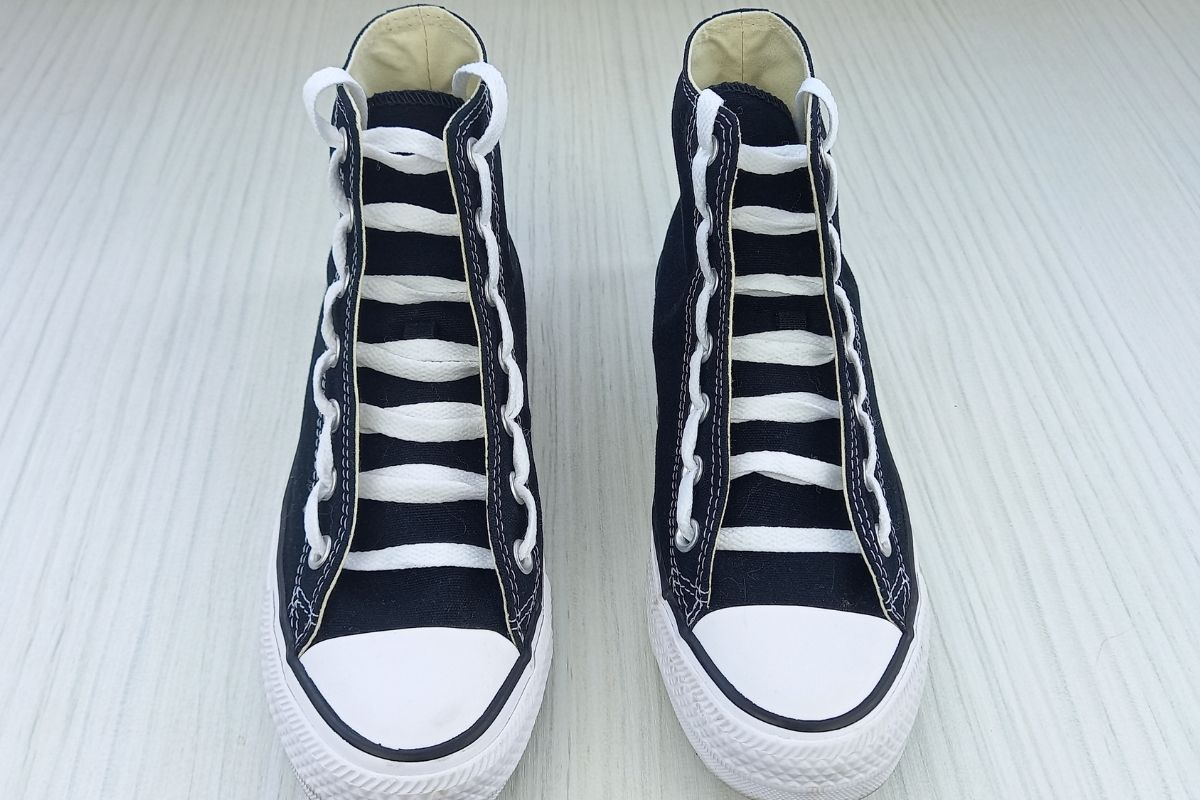
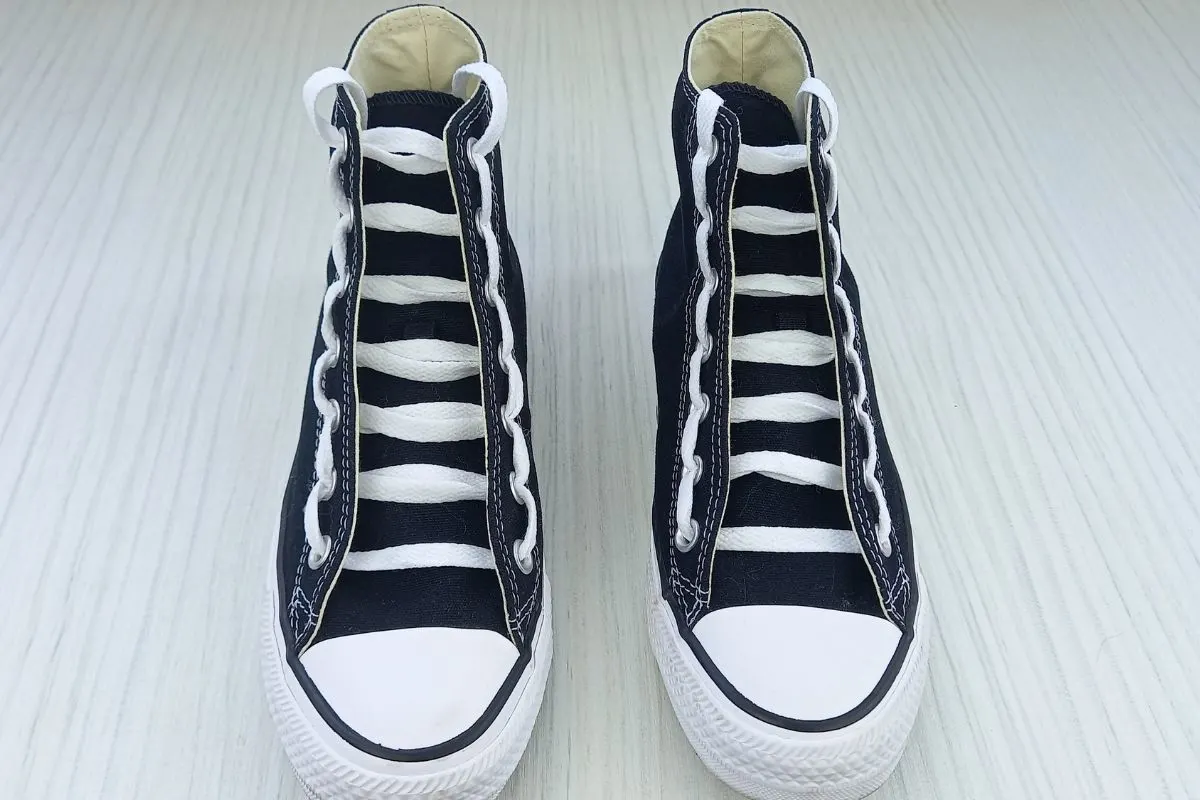
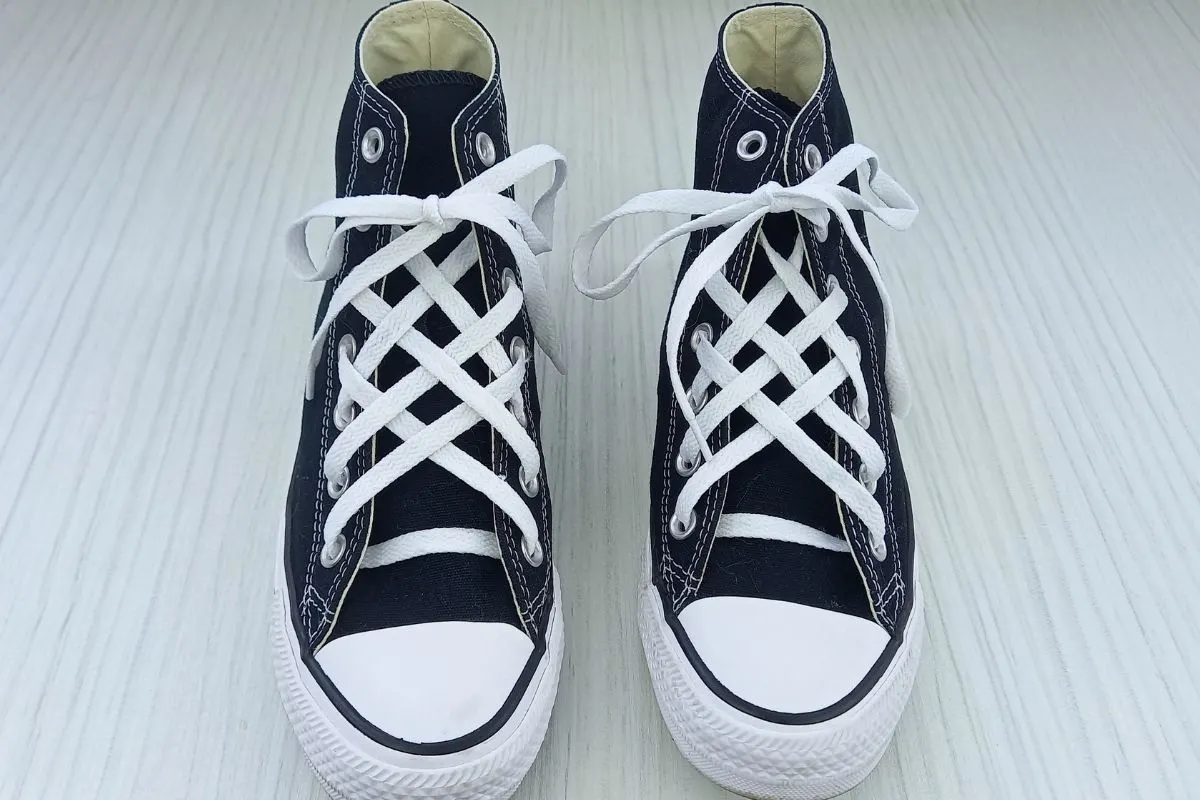
- Now the laces are threaded through all eyelets barring the top, you can stop here. The pattern should look like the image above.
- If you want to tie your laces here and have them visible, do so. If you would prefer a ‘hidden knot’ continue to lace your laces up to the top eyelet. When you wear your Converse with jeans the hem of the jeans should cover the top knot.
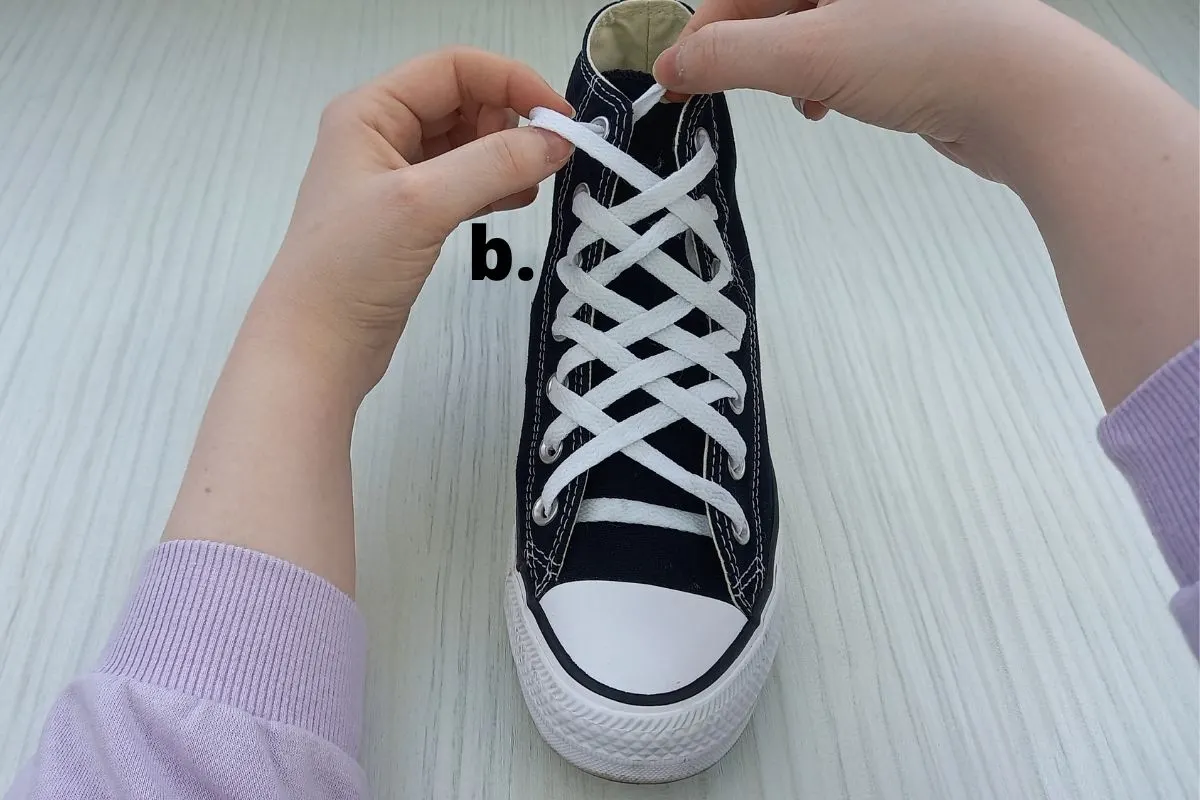
This is the standard lacing pattern that Converse come with fresh out of the box.
If you learn best by watching videos, here is a video on how to lace Converse in the standard style on the Wearably Weird YouTube channel:
2. How to Diamond Lace Converse

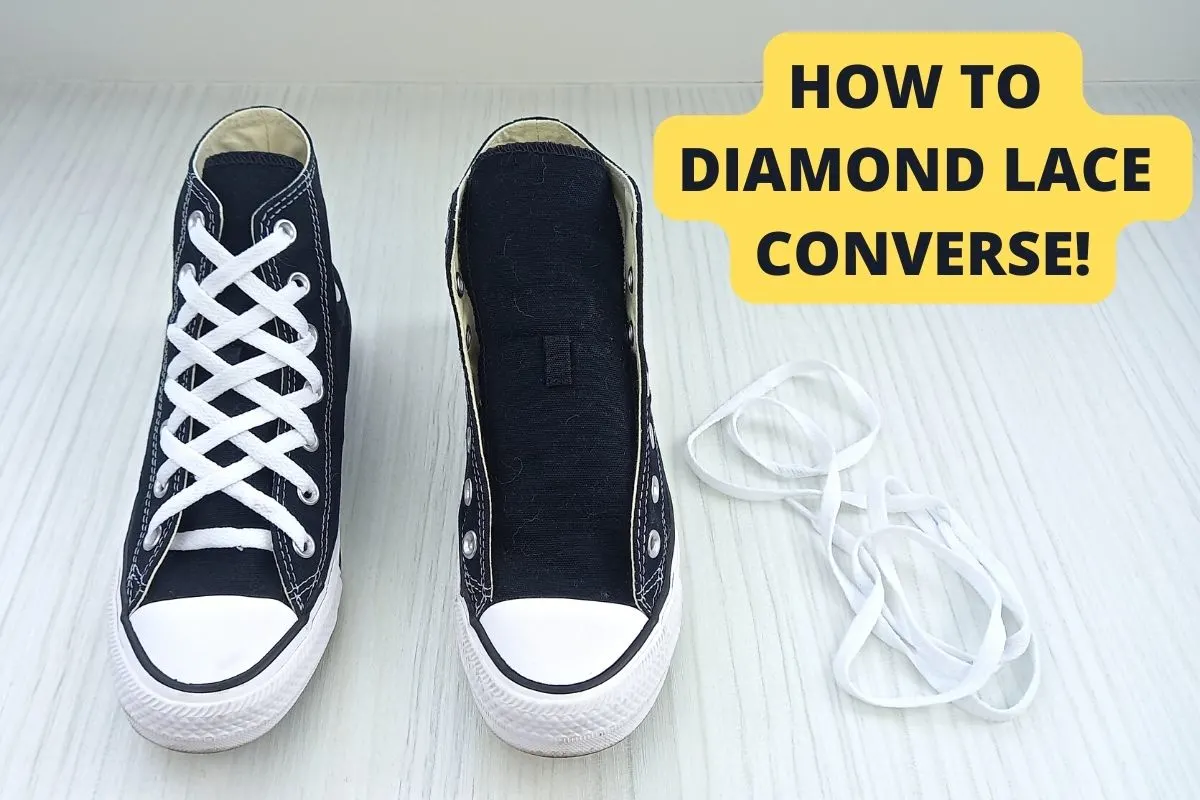
If you want a super cool lacing design on your Converse, try out the diamond lacing pattern. It looks intimidating at first, but I promise it’s simple when you follow the steps slowly. The result is awesome, fresh and crisp.
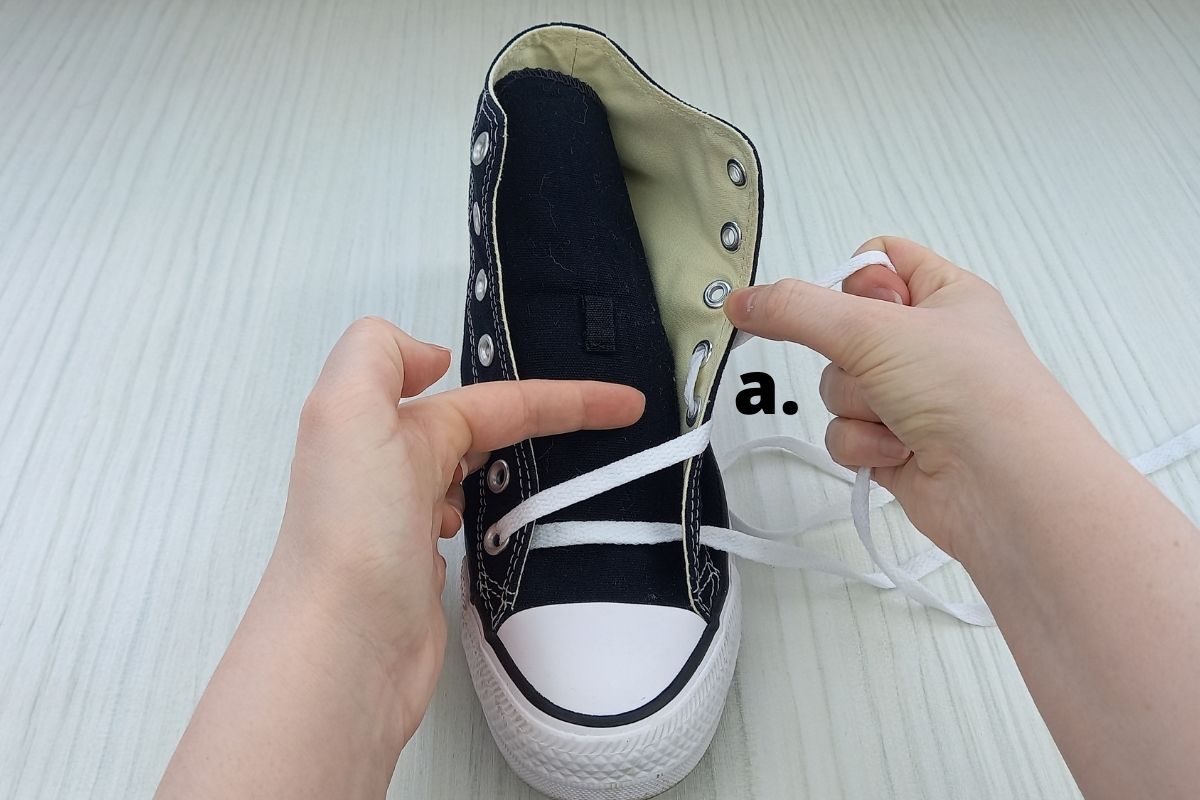
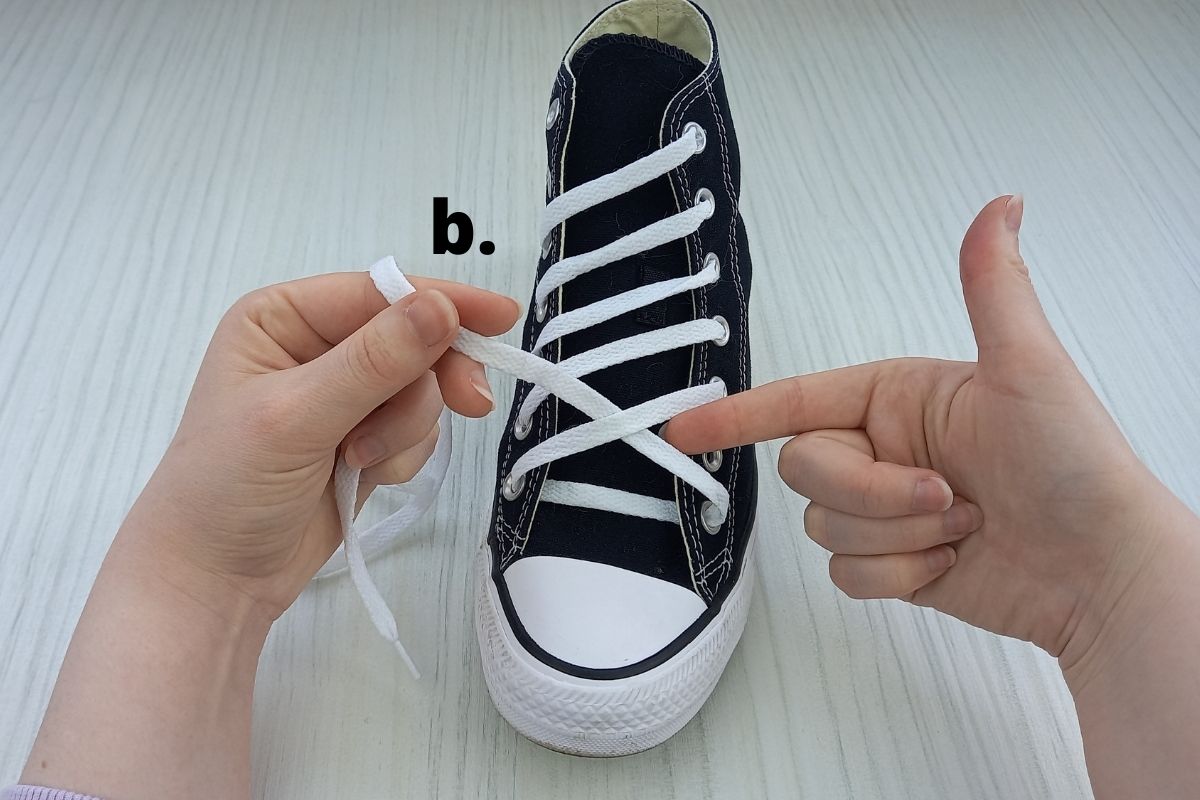
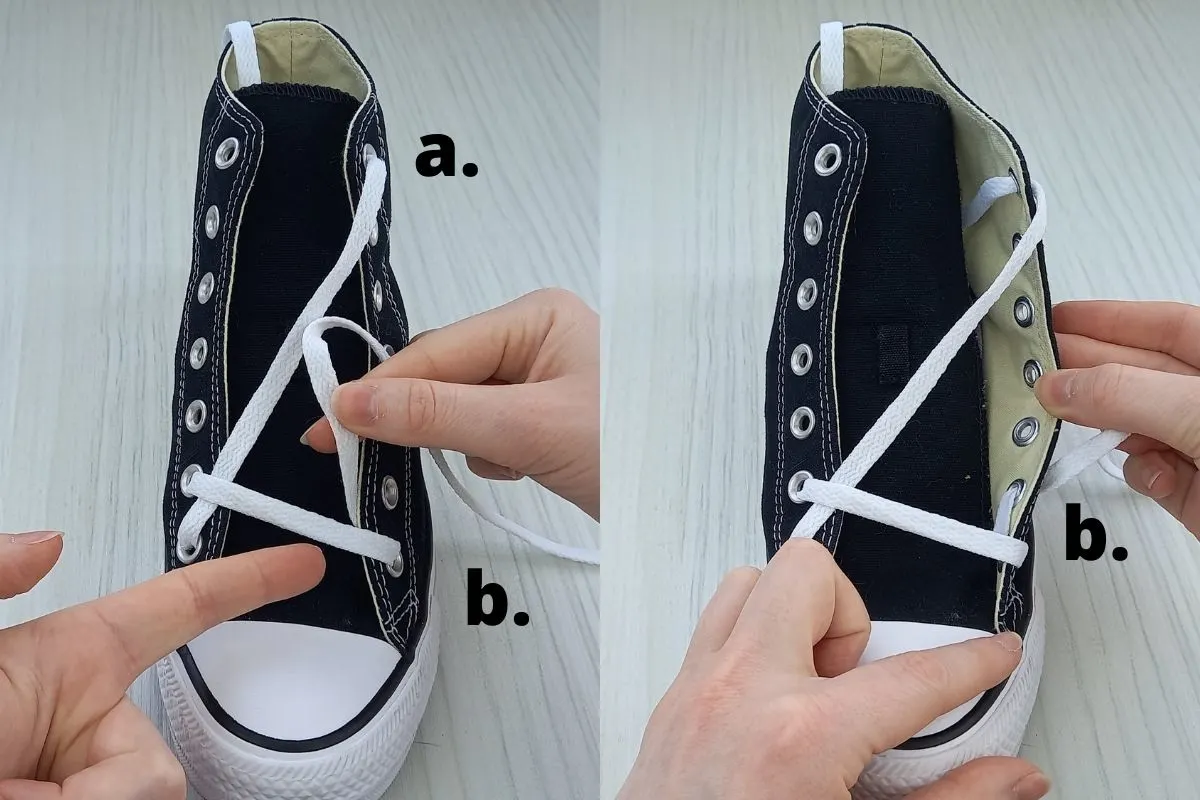
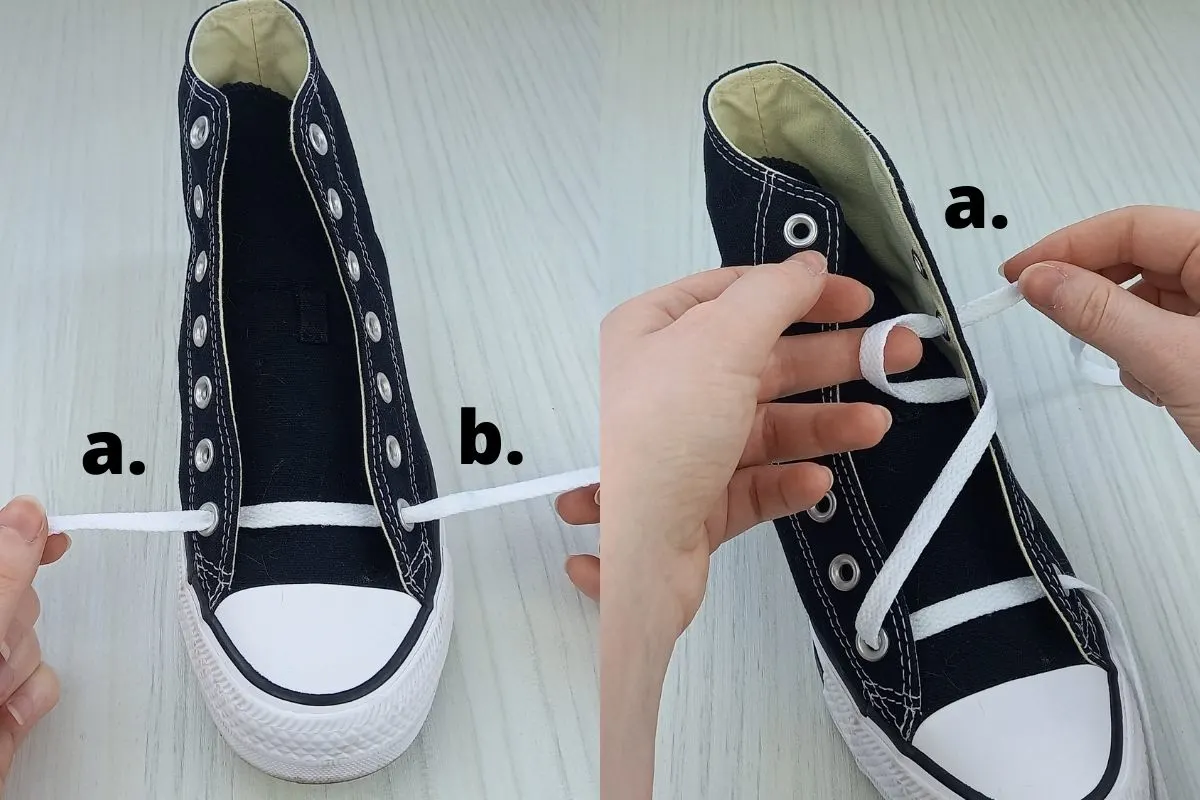
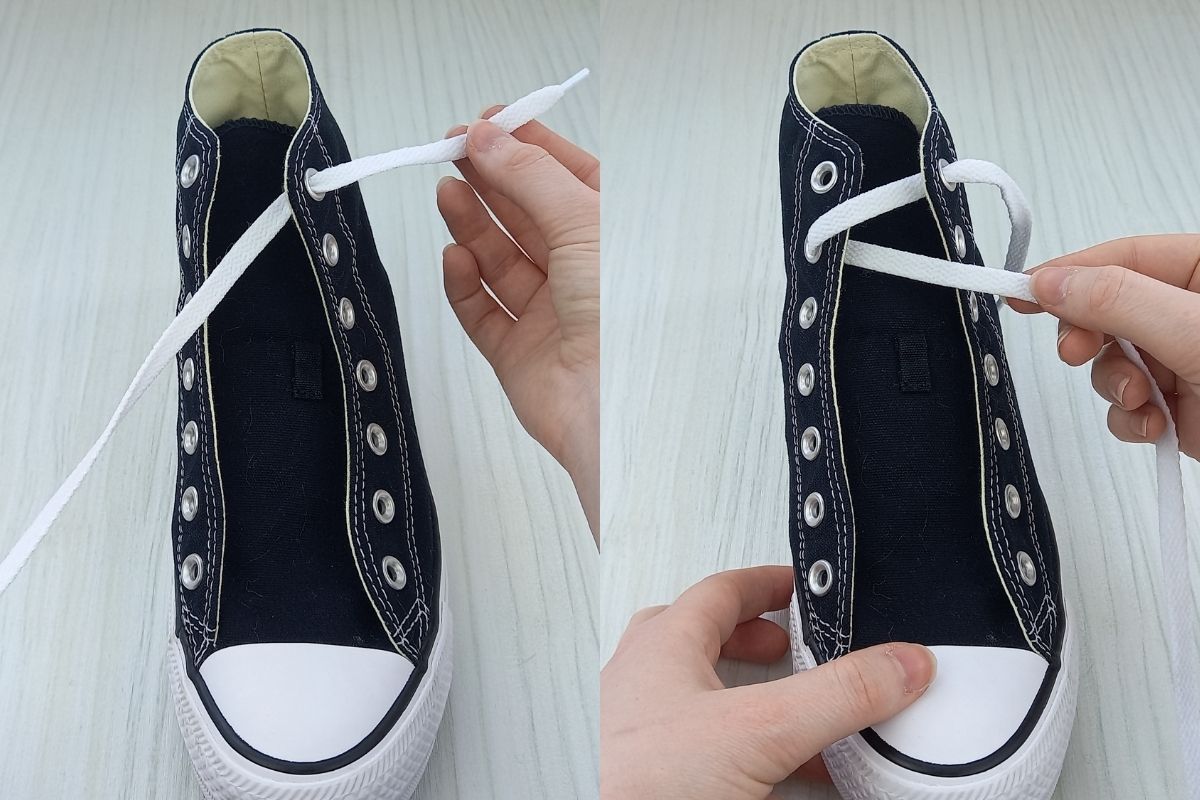
Step 1.

- Thread your lace through the bottom two eyelets.
- Make sure to thread the lace from underneath the eyelets, not over the top, as I have done in the above image.
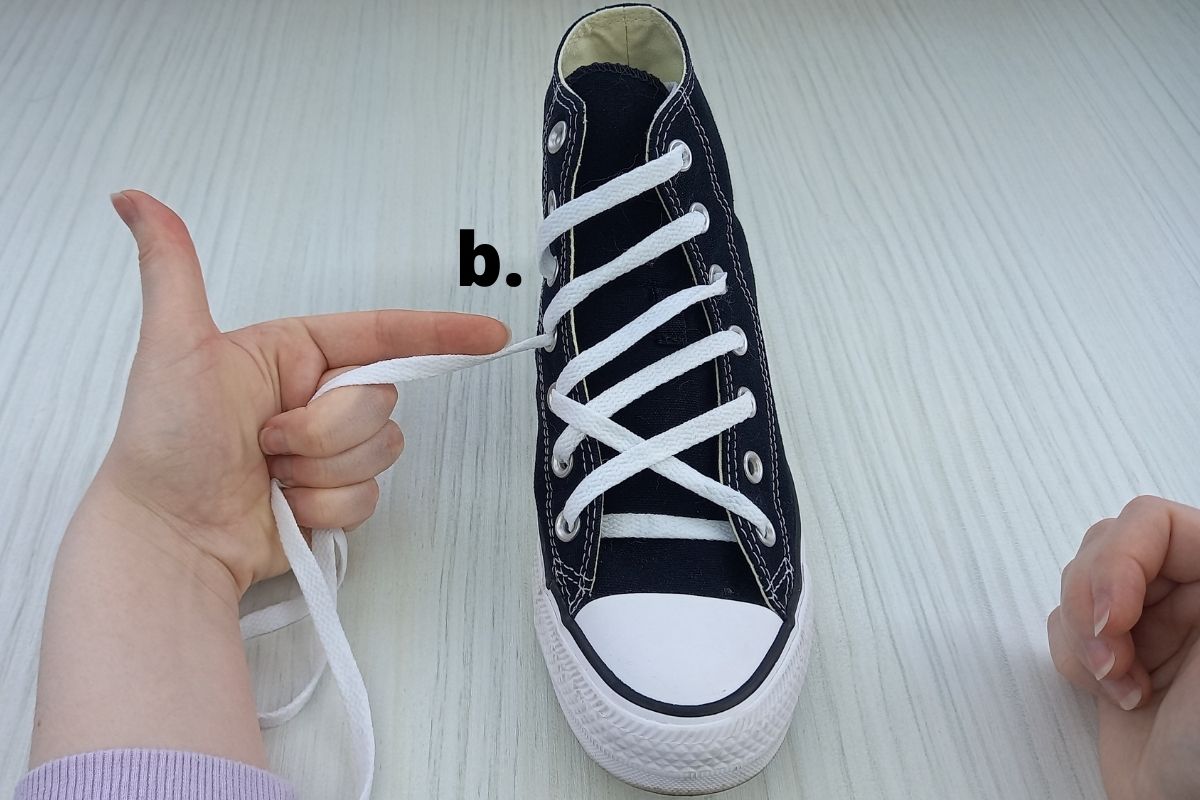
Step 2.
- Take lace a. and thread it into the third eyelet from the top on the left side.
- Make sure the lace goes into the eyelet from the top, as pictured above.
Step 3.

- Take lace a. and feed it into the next eyelet up on the left hand side, as pictured.
Step 4.

- Bring lace a. back over to the right hand side and feed it into the second eyelet from the bottom, as shown above.
- Then feed lace a. into the next eyelet up on the right hand side. This is the pattern to follow until lace a. reaches the top eyelet on the left hand side (as pictured below in step 5).
Step 5.

- If you have followed the pattern correctly your lace should look like the above image.
- Double check it at this stage to make sure it’s correct before we move onto lace b.
Step 6.

- Take lace b. and weave it underneath lace a. as shown above.
Step 7.

- Once lace b. is woven under lace a. feed it into the third eyelet from the bottom on the right hand side.
- Then take it under and up through the next eyelet up on the right hand side, as I show in the above image.
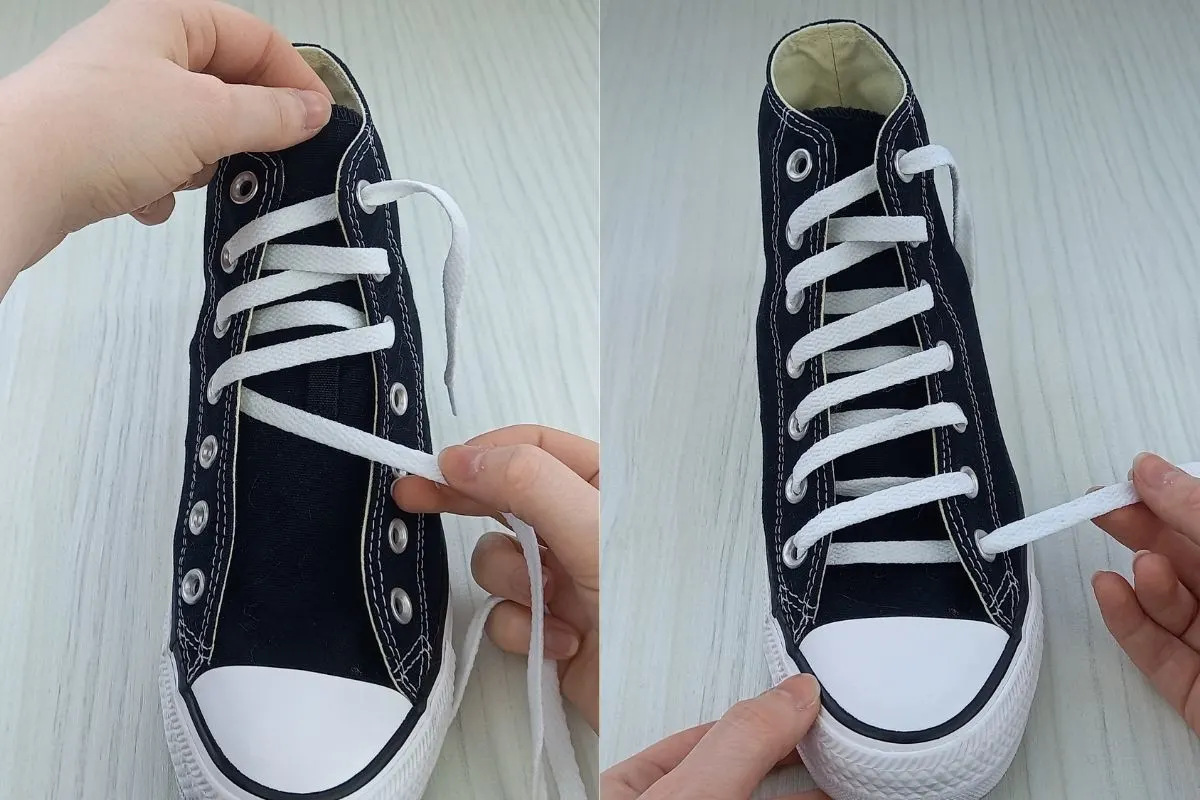
Step 8.

- Take lace b. and weave it down under lace a. as pictured.
Step 9.

- Feed lace b. into the second eyelet from the bottom on the left hand side.
- Take it up and through the next eyelet up on the left hand side as pictured.
- Continue with this weaving pattern until the laces look like the below image in step 10.
Step 10.

- At this stage check the pattern is correct using the above image.
- Then feed lace b. into the top eyelet on the right hand side to finish the look.


You should be left with a cool looking diamond lace pattern that elevates your Converse look.
Here is a video on how to diamond lace Converse on the Wearably Weird YouTube channel:
3. Loop Cross Lace


This ‘loop cross’ lace style pattern looks unusual and it’s super easy to do! This is one of my favourite lace styles for Converse as it’s really quick to put together.
Step 1.

- Thread your lace through the two bottom eyelets, as pictured above. Make sure they are threaded through underneath, not above the eyelets.
- Next take lace a. and lace b. and cross them over twice, to form a little loop. See how I have done this in the above picture.
Step 2.

- Thread lace a. and b. through the next eyelets up from the bottom.
- Continue with this pattern, threading, looping twice and threading again, as pictured above.
- I like to continue threading the laces this way all the way up to the top eyelets on the sneakers, however you could stop at the one from the top if you like that look better.
- Once finished your sneakers should look like the below image:


This is a super quick way to elevate your Converse style. It looks much harder than it is and would look even cooler if you used two different colored laces, to get a twisting visual effect.
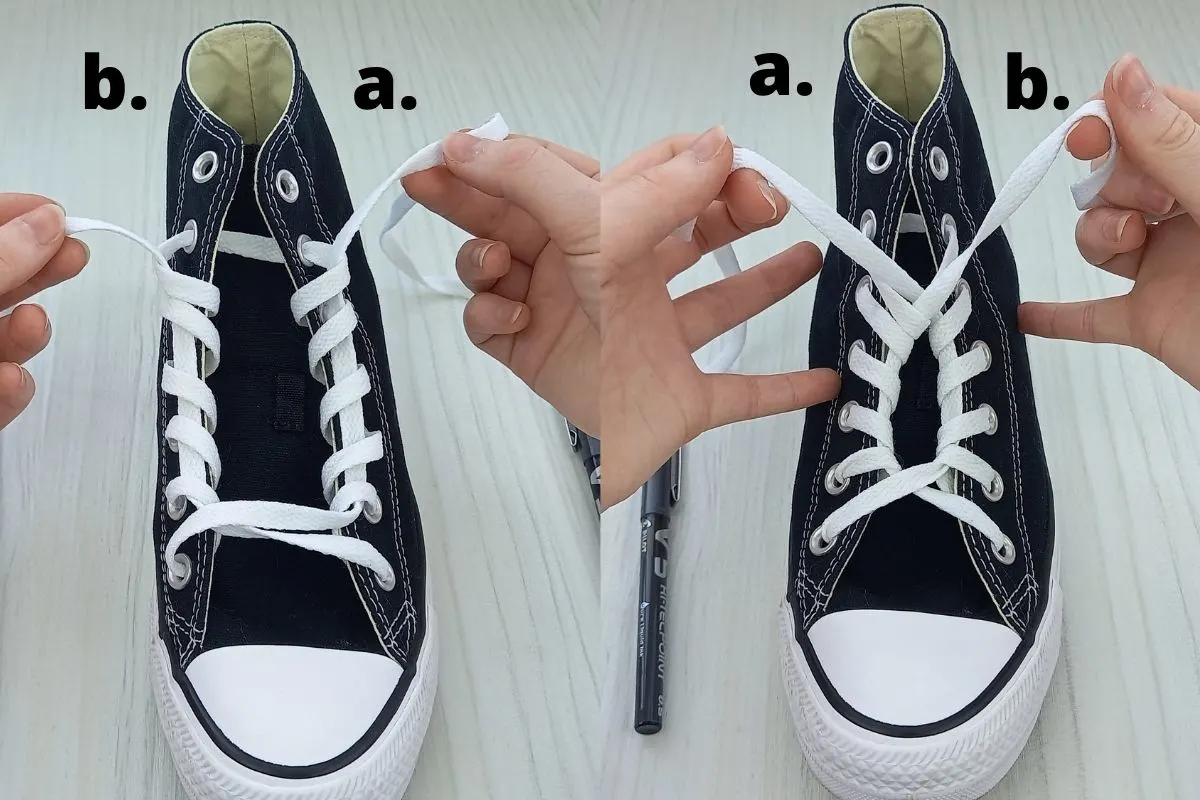
4. Circle Lace


Circle lacing is an unusual way to lace your Converse that isn’t seen much. If you like to stand out and enjoy rocking styles that are really different, then give this design a go (it’s way easier than it looks). Plus, this design keeps your Converse really secure, so it’s a good one if you are active.
Step 1.

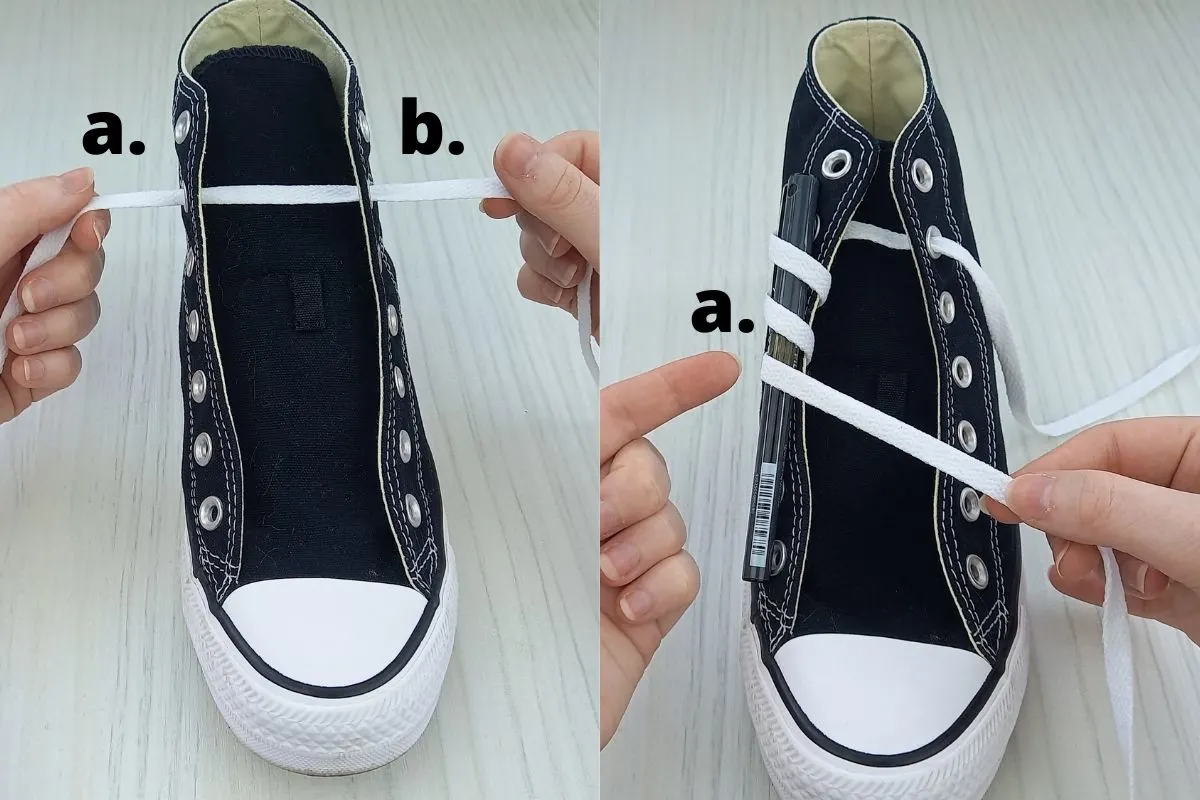
- Thread your lace through the second eyelets from the top on both the left and right side of your sneaker.
- Then take a pen and place it against the left side of your sneaker, as I have done in the above image.
- Wind and weave the lace through the eyelets and around the pen, to create an even looping affect as pictured above.
- Continue with this until you reach the bottom eyelet on the left hand side.
Step 2.

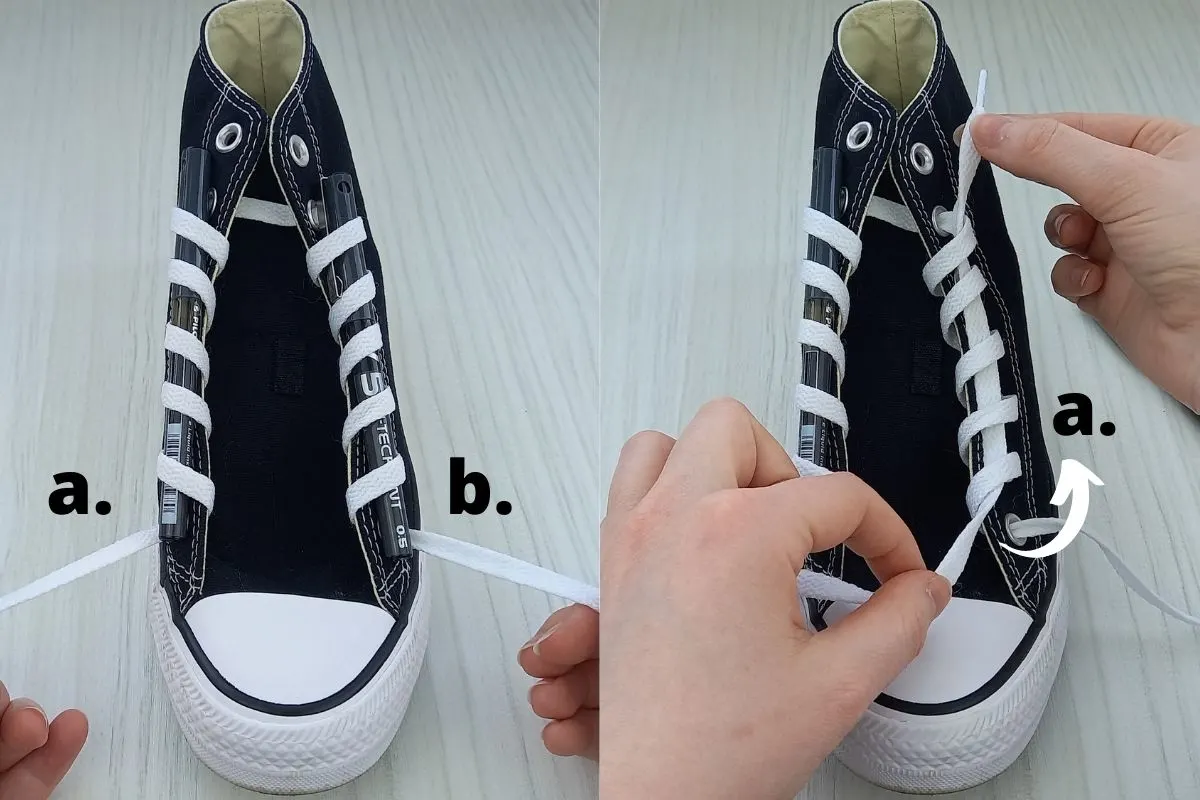
- Repeat the pen looping technique on the right hand side until the lace reaches the bottom eyelet.
- Then take lace a. and thread it through the loops created by lace b. on the left hand side. Follow the above image and you can’t go wrong.
Step 3.
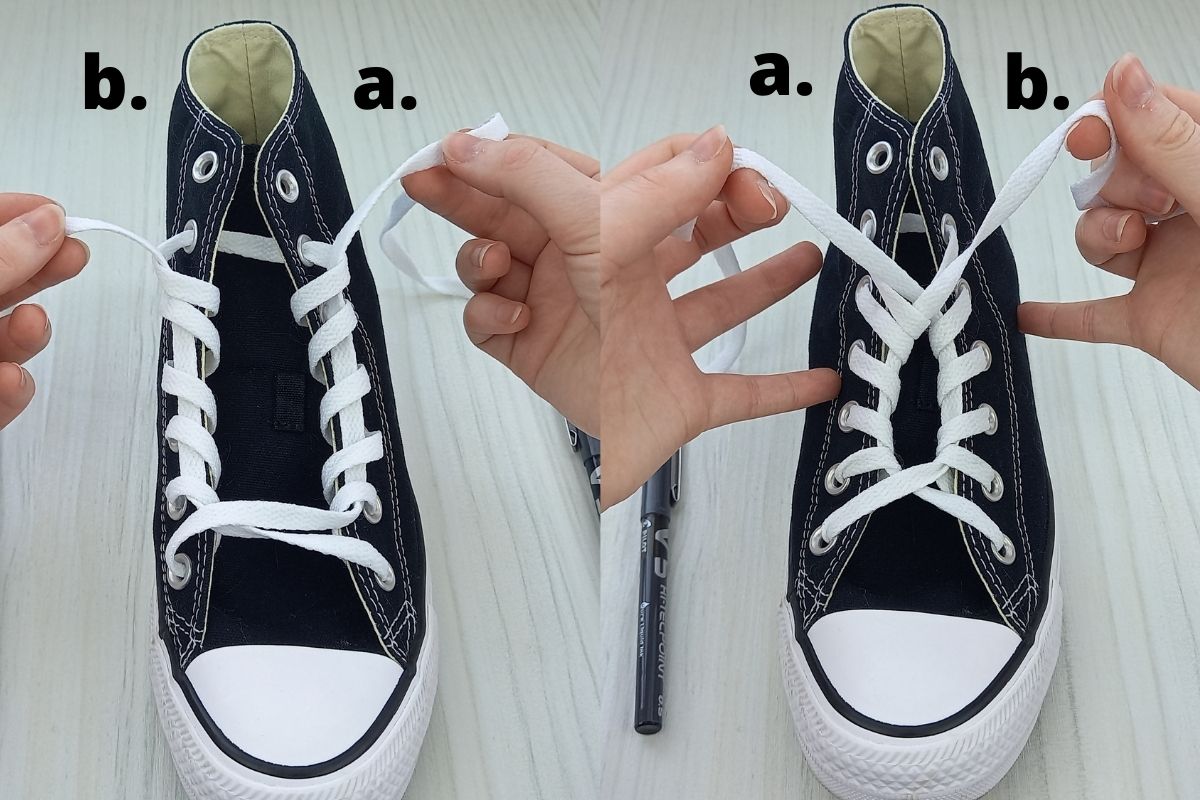
- Repeat this by threading lace b. through the loops created by lace a.
- Then, cross over lace a. and lace b. and pull the laces tight. This will create the circle effect in the laces as pictured above.
Step 4.

- Next thread lace a. through the top eyelet on the right hand side. Repeat this with lace b. on the other side.
- Now you can tie your laces in a knot and you will see how the effect looks. If done correctly you should have the same results as the below picture:


If you want a rounder circle effect you can start the whole pattern an eyelet lower, so the third from the top not second. Personally I like this look and I like to lace my Converse really high, but a rounder looking circle would look cool too.
5. How to Ladder Lace Converse


Ladder lacing is an awesome way to tie your Converse if you like a tight secure fit that doesn’t slip. It looks so fresh too, especially when seen from the side.
Here’s how to do it.
Step 1.
- Thread your lace through the bottom two eyelets, with the lace coming out from underneath the eyelet, not above (as pictured).
- Then feed lace b. through the second eyelet from the bottom on the left hand side, as above.
Step 2.

- Cross lace b. over the sneaker tongue and thread it through the second eyelet from the bottom on the right hand side.
- Then take lace a. and feed it up and through the second eyelet from the bottom on the right hand side. The two laces should now be thread through this eyelet, as pictured above.
- You have now created the first ‘ladder’. Simply repeat this pattern all the way up the sneaker until you reach the top eyelets.
- Once you have done this, it should look something like the below image:

Notice how the sides look, with the laces feeding through the eyelets.
This is a really interesting visual design for your Converse laces.
6. How to Bar Lace Converse


A lot of Converse fans want to know how to lace Converse so they slip on. Bar lacing is a great way to achieve this, as it creases a loose lace fit, that looks really cool. Bar lacing is a favourite lace design in the skate footwear world, due to it’s iconic look.
Here’s how to bar lace your Converse:
Step 1.

- Thread your lace through the bottom two eyelets on your Converse, making sure that they are threaded from above not beneath, as pictured.
- Take lace a. and pull it all the way to the top of the sneaker tongue. Then tuck it away behind the sneaker tongue as pictured above.
Step 2.

- Thread lace b. through the eyelet above it. Then bring the lace over to the right hand side and feed it through the second eyelet from the bottom. If you like you can do this with lace a. also, so it sits above lace b. however I have tucked lace a. out of the way for this tutorial.
- Follow this thread pattern all the way to the top until you have a bar lace effect across the whole sneaker tongue.
- If done right your sneakers should look like the below image:


Bar lacing looks great and gives Converse a really crisp look.
Here is a video on how to bar lace Converse on the Wearably Weird YouTube channel:
7. Lightening Lace


Lightening lacing your Converse is SO EASY to do and takes no time at all. It’s a really striking lace design that’s eye catching and cool.
here’s how to tie your Converse in a lightening lace style:
Step 1.

- Thread your lace through the bottom two eyelets on the right hand side of your Converse, as I do in the above image.
- Take the a. lace end and pull it up and across the sneaker tongue until it threads through the top eyelet on the left hand side. Make sure the lace is entering the eyelet from above not underneath. Double check the above image to make sure you get this right.
Step 2.

- Take lace b. and cross it over the sneaker tongue.
- Thread it through the bottom eyelet on the left hand side of the shoe.
- Then take it up and through the eyelet above as shown in the image, until it threads out.
Step 3.
- Take lace b. and cross it over the sneaker tongue, before feeding it into the third eyelet from the bottom on the right hand side.
- Then feed lace b. into the eyelet above, just like we did on the other side of the shoe.
- Repeat this pattern all the way up the eyelets to the top of the sneaker.
- Then you can tie your laces and hide the knot behind the top of the sneaker tongue, or wear the knot visible, it’s up to you.

You should be left with a cool lace design with one of the laces running through, which mimics a lightening bolt. This design is really different and makes your Converse pop.
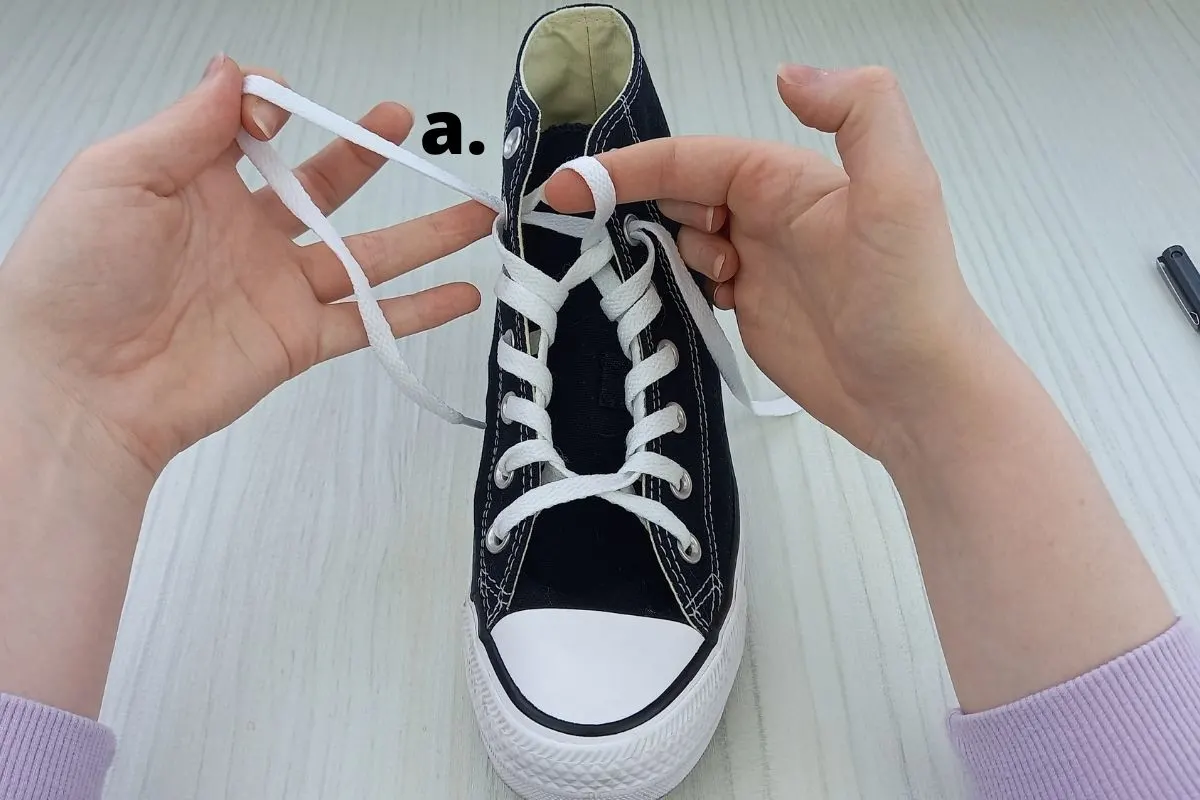
8. Lattice Lace


Lattice lacing your Converse makes them look really intricately designed. The lattice lace looks difficult and edgy, however it’s really quite simple to pull of when you know the steps.
Here is how to lattice lace your Converse:
Step 1.

- Thread your lace through the two bottom eyelets as pictured above. Make sure you are threading the lace underneath the eyelets, not above them.
- Take lace a. and thread it through the 4th eyelet from the bottom on the left hand side, crossing it across the sneaker tongue to do so, as I do in the above image.
- Then take lace a. and feed it through the next eyelet up, as pictured.
Step 2.
- Once you have followed the step 2. section, you can bring lace a. back over to the right hand side and thread it through the second eyelet from the bottom. Follow the same pattern and thread it up and into the eyelet above, before crossing it back over to the left hand side and repeating.
- Once you have threaded it across 3 times (as picture above) it’s time to move on to lace b.
- Take lace b. and weave it over, under and over the three lace lines created by lace a. exactly how I have in the above image.
Step 3.
- Thread lace. b into the 4th eyelet from the bottom on the right hand side.
- Next thread it under and up through the next eyelet up on the right hand side, as pictured.
- Take lace b. back over to the left hand side, weaving it under, over and under the laces, exactly how I have above. Feed it into the second eyelet from the bottom on the left hand side and then up and through the third eyelet from the bottom on the same side.
- Weave the lace back over, under and over the laces and up through the second eyelet from the top on the right hand side.
Step 4.

- Follow the pattern outlined in the previous two steps and you should have a lattice pattern as pictured above.
- Study the image and make sure you weaved the laces correctly.
- When done, your sneakers should look like the below image:

The lattice lace effect is so visually appealing. Enjoy your design!
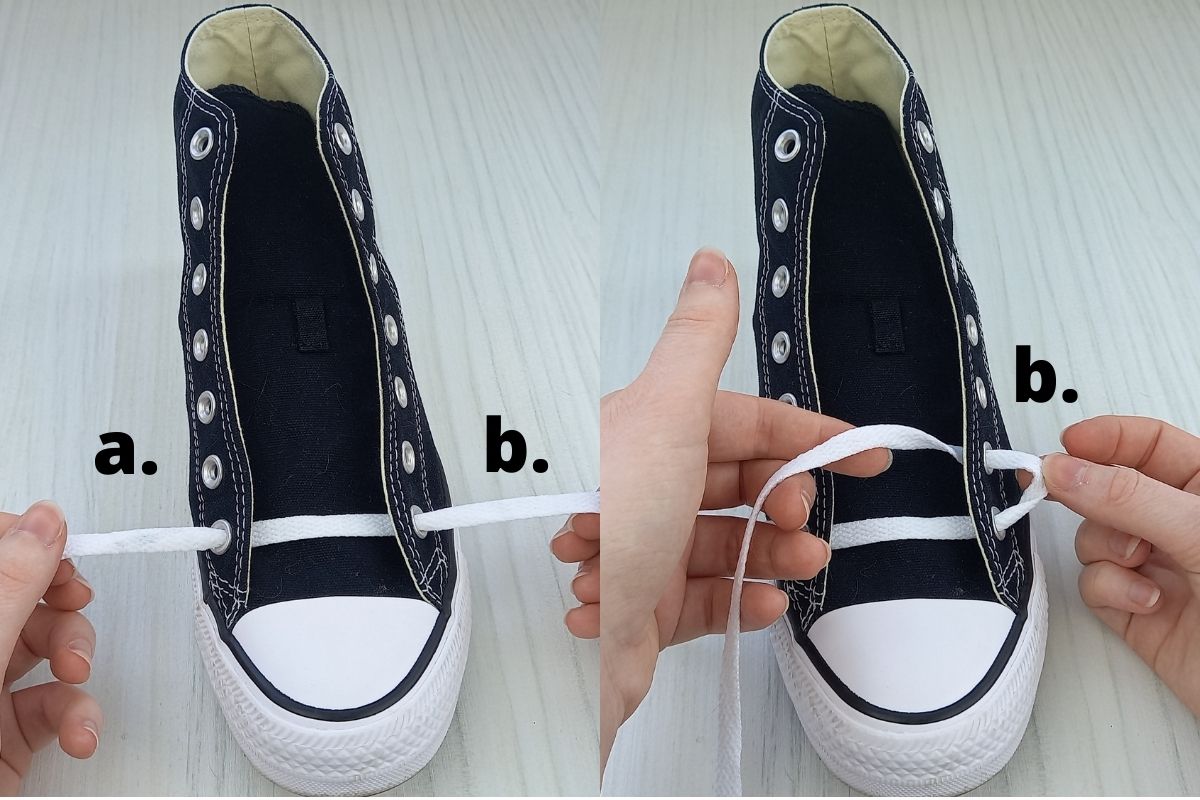
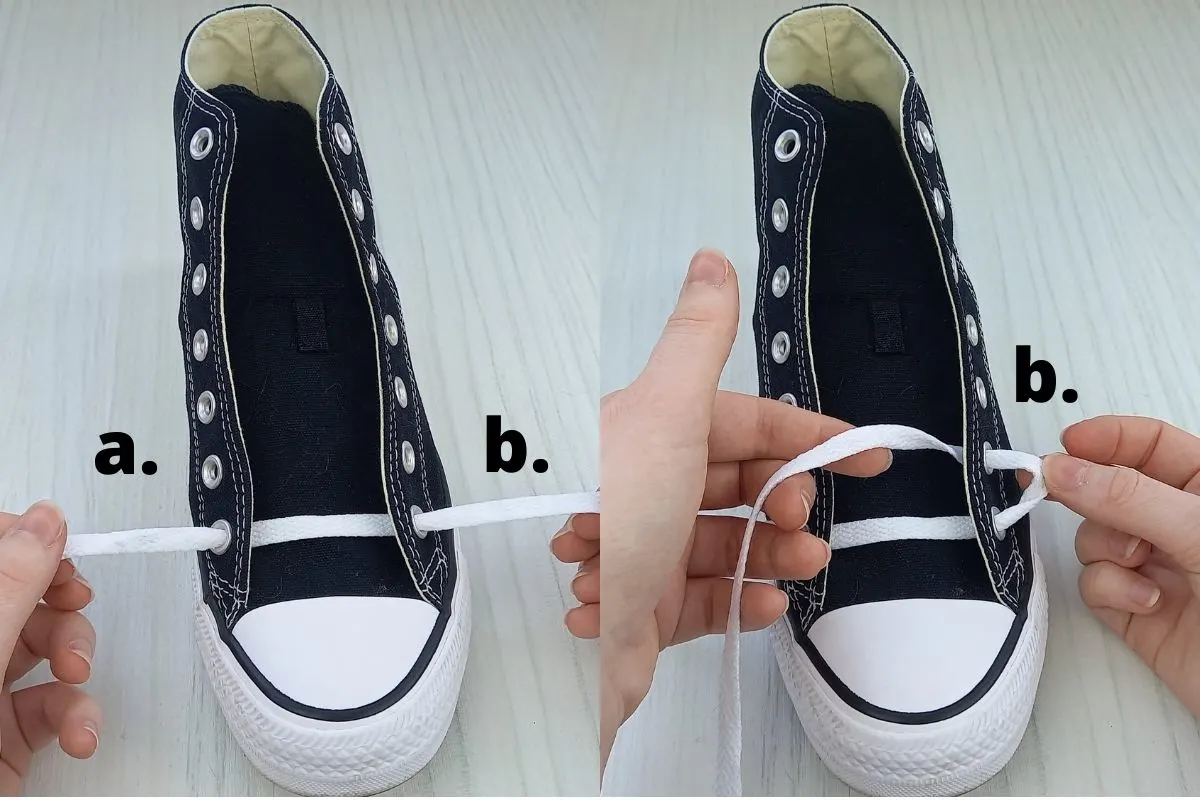
9. Zig Zag Lace


Zig zag lacing your Converse is ideal for those who enjoy a loose casual fit. It’s super easy to do and can be achieved in just a few steps.
Here’s how to zig zag lace your Converse:
Step 1.

- Thread your lace through the top eyelet on the left hand side of your Converse.
- Pull the lace through until only a few inches of the lace remains on the left hand side, as pictured above.
- Then take the lace over and through the next eyelet down on the right hand side.
Step 2.

- Repeat the pattern in step 1 simply threading the lace from eyelet to eyelet on each side as pictured above. This should create a zig zag effect.
- Once you reach the bottom eyelet on the left hand side stop there.
Step 3.
- Take the lace and thread it back over and through the eyelet on the right hand side to create a nice finish.
- Then take the lace and pull it all the way up to the top eyelet on the right hand side, making sure to tuck it behind the laces and sneaker tongue for a hidden finish.
- Once your lace is threaded through the top eyelet you can knot your laces together at the top and finish the look.
- If done correctly the zig zag effect should look identical to my Converse sneakers in the below image:


Zig zag lacing is quick and easy to do and it has a relaxed cool finish.
Tips For Lacing Converse
Here are some extra tips to keep in mind when lacing your Converse, which should make creating any pattern easier:
- Make sure you use clean fresh laces. Clean laces will have a starchy, crisp feel to them which creates a nice neat look. Muddy laces just won’t look as fresh.
- Make sure your laces are at least 45 inches long, for best results. for low tops, you can use a shorter lace if you like, as there aren’t as many eyelets.
- Take care to clean your Converse canvas upper and eyelets, for a smart finish. It’s easier to work with clean shoes and mud-free eyelets.
- For more interesting lace designs you could mix it up with two different colored laces to make funky patterns.
Related Articles
Thank you for reading this post on ‘how to lace Converse’ I hope you are inspired to try out some of the designs and enjoy wearing them out with your favourite outfits.
For more Converse content, check out:
Converse Sizing: Do Converse Run Big or Small? (FAQs/ Chart)
Are Converse Comfortable? A 30 Day Review & FAQs
Are Converse Good For Running? – A 30 Day Test
How To Break In Converse (FAST, Painless Methods)

Lorna is a footwear geek and the founder of Wearably Weird. She created a YouTube channel in 2021 for fellow footwear fanatics, dedicated to detail-rich footwear reviews and info. She has a fashion media qualification (awarded in 2011).