
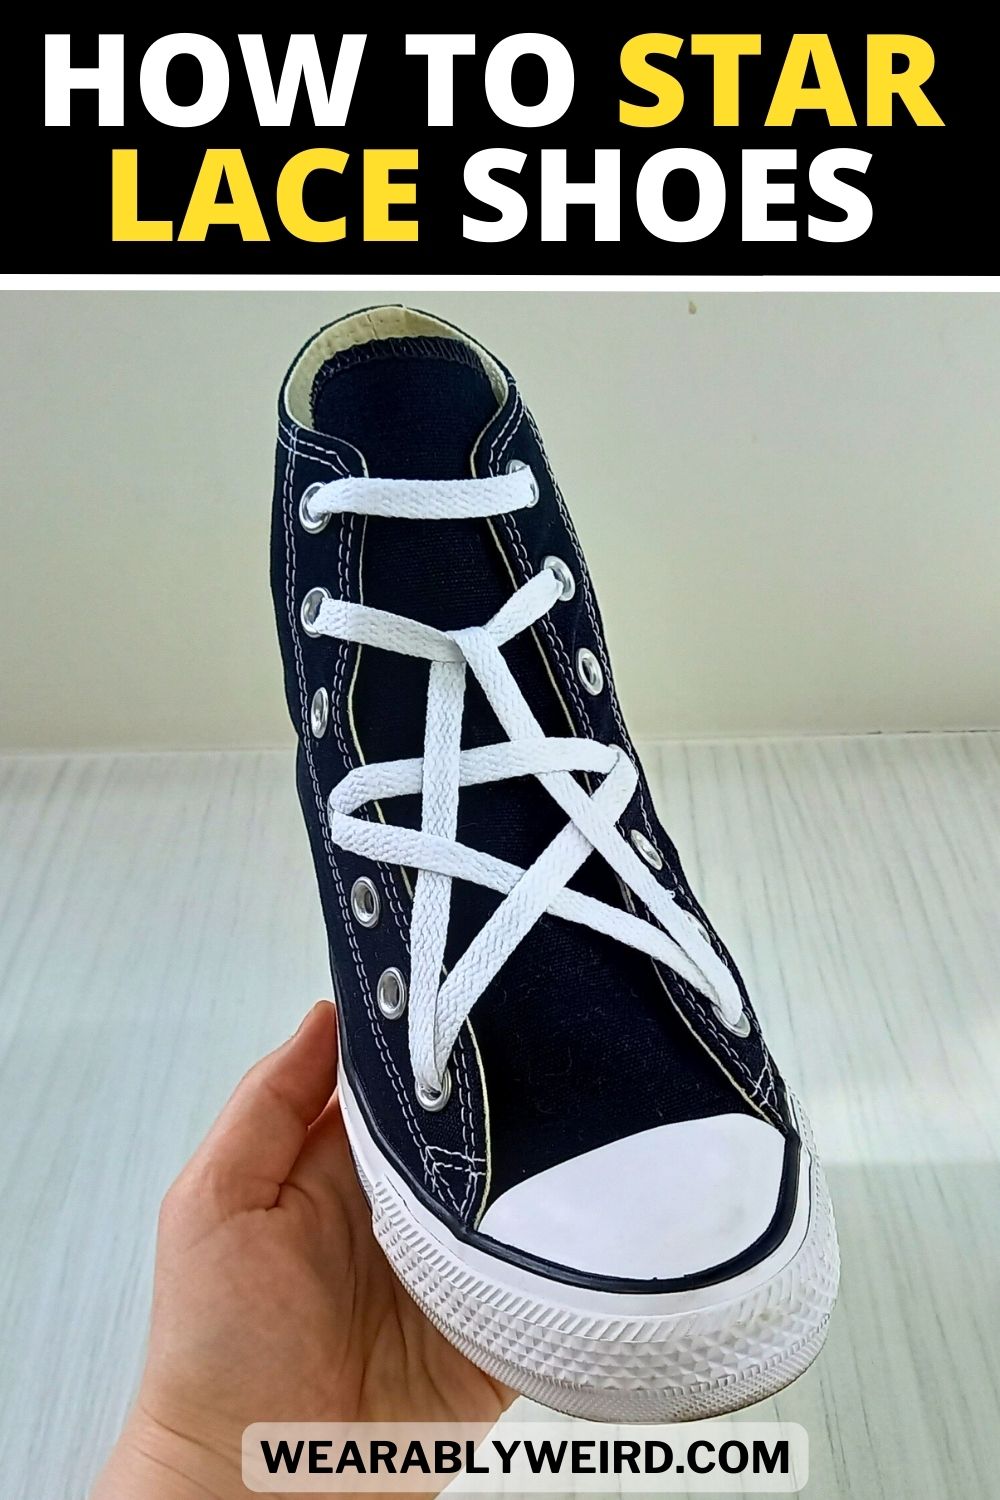
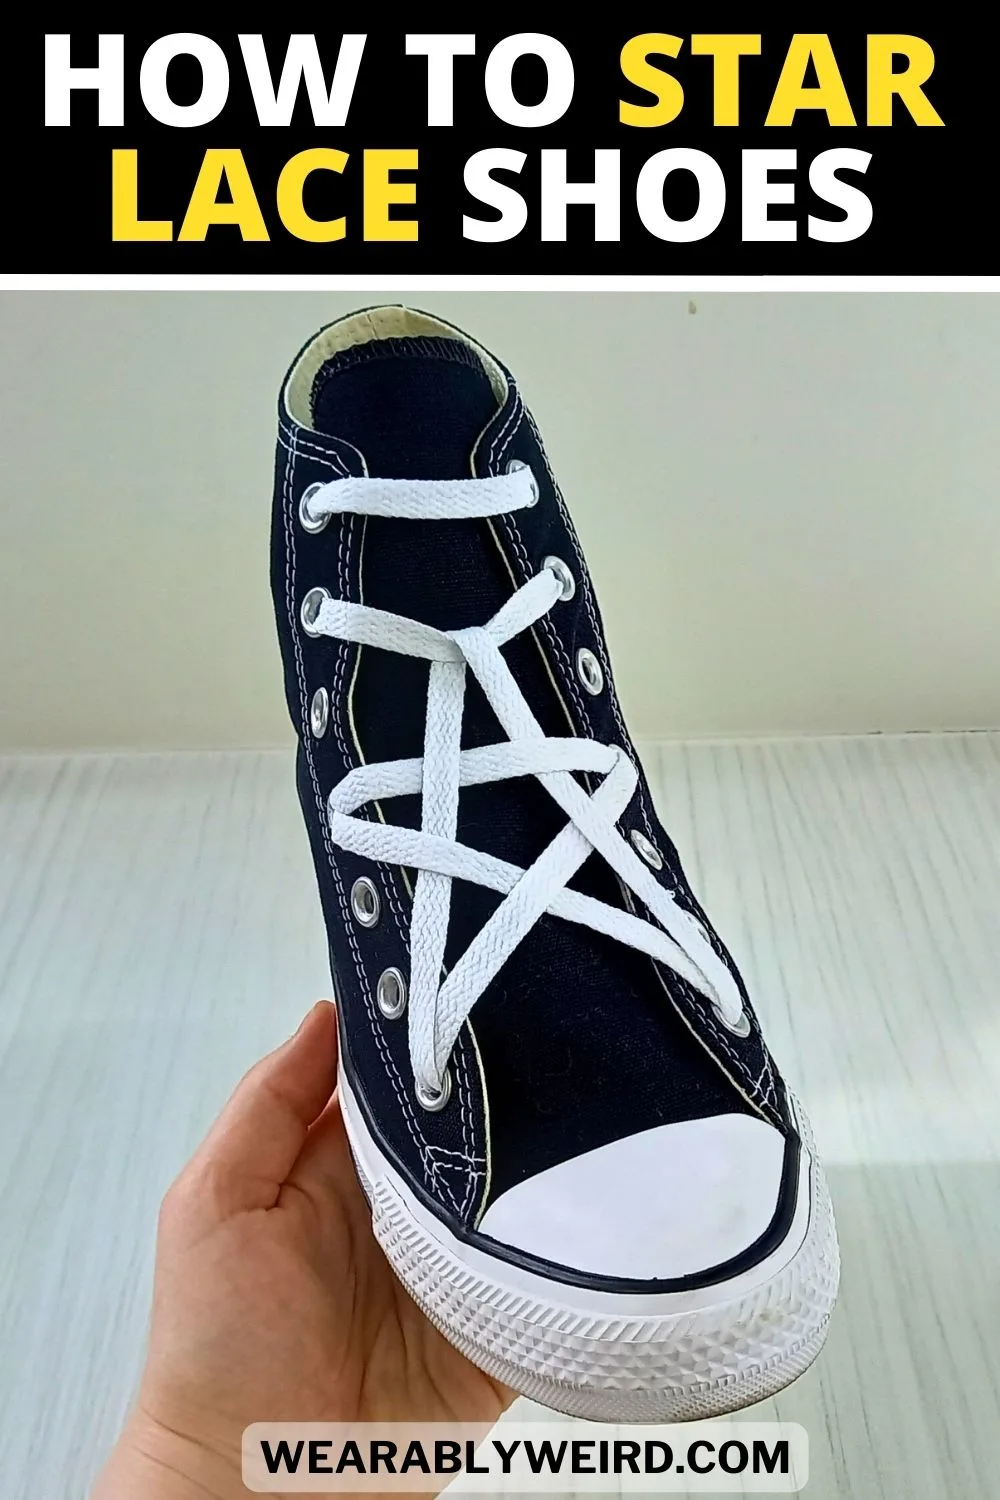
Star lacing (also known as pentagram lacing) is an eye catching way to lace your shoes. Take a boring pair of sneakers and give them a fresh twist with this lacing pattern.
In this guide I’ll show you just how easy star lacing shoes is, including a step by step photo guide and a video for you. I’ll be demonstrating how to star lace using my pair of Converse that have seven eyelets.


*This post may link to online stores. If you click a link and buy something, I may get a commission. Learn more.
How To Star Lace Shoes (also known as pentagram lacing)
Star lacing can look a little tricky at first, but it’s actually quite simple. Go slowly and follow each step at your own pace. Don’t forget to double check your results against my photos along the way.
Here is a video tutorial of me showing you how to achieve the star lacing technique if you would prefer to watch the steps:
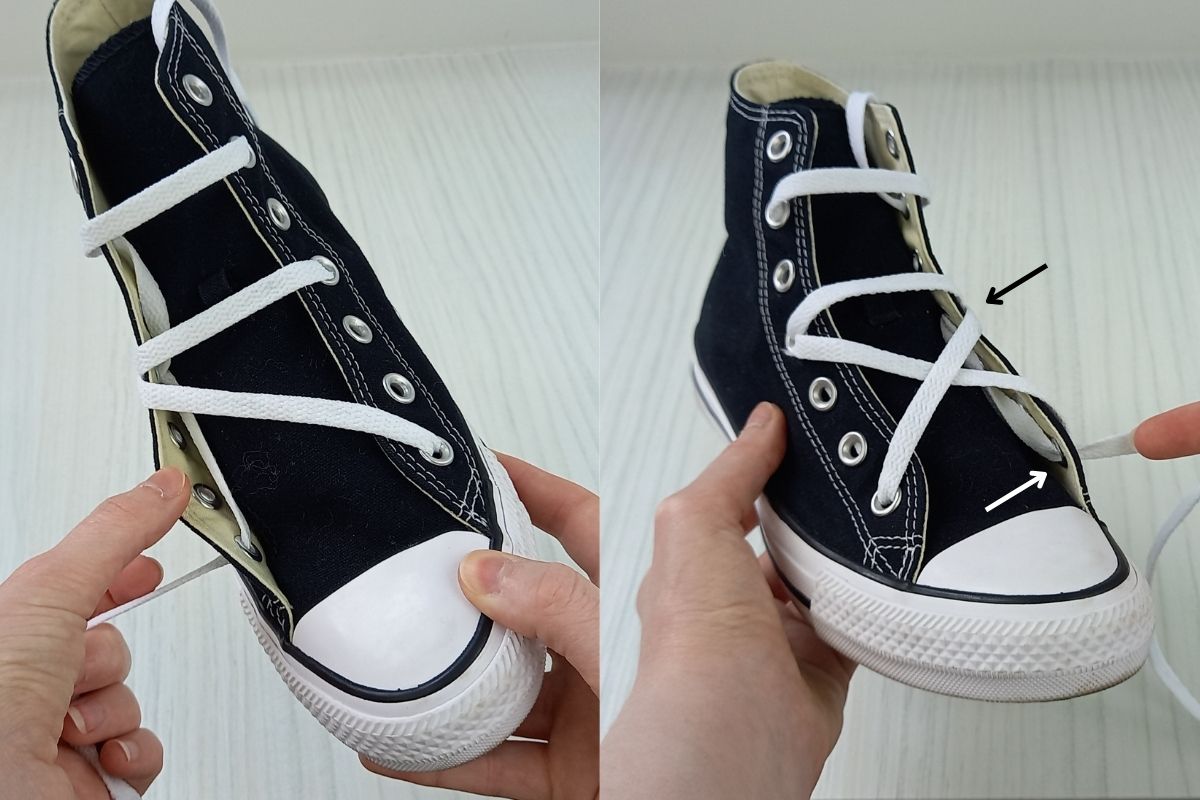
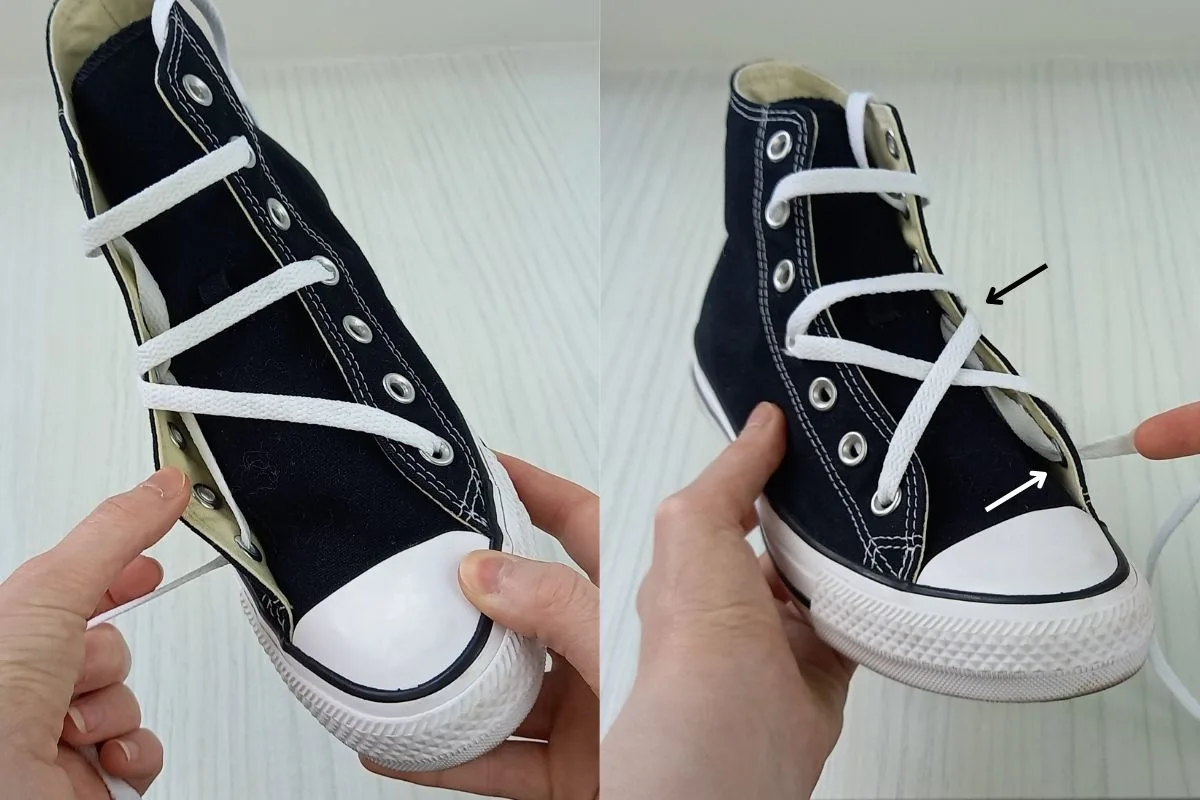
Step 1.
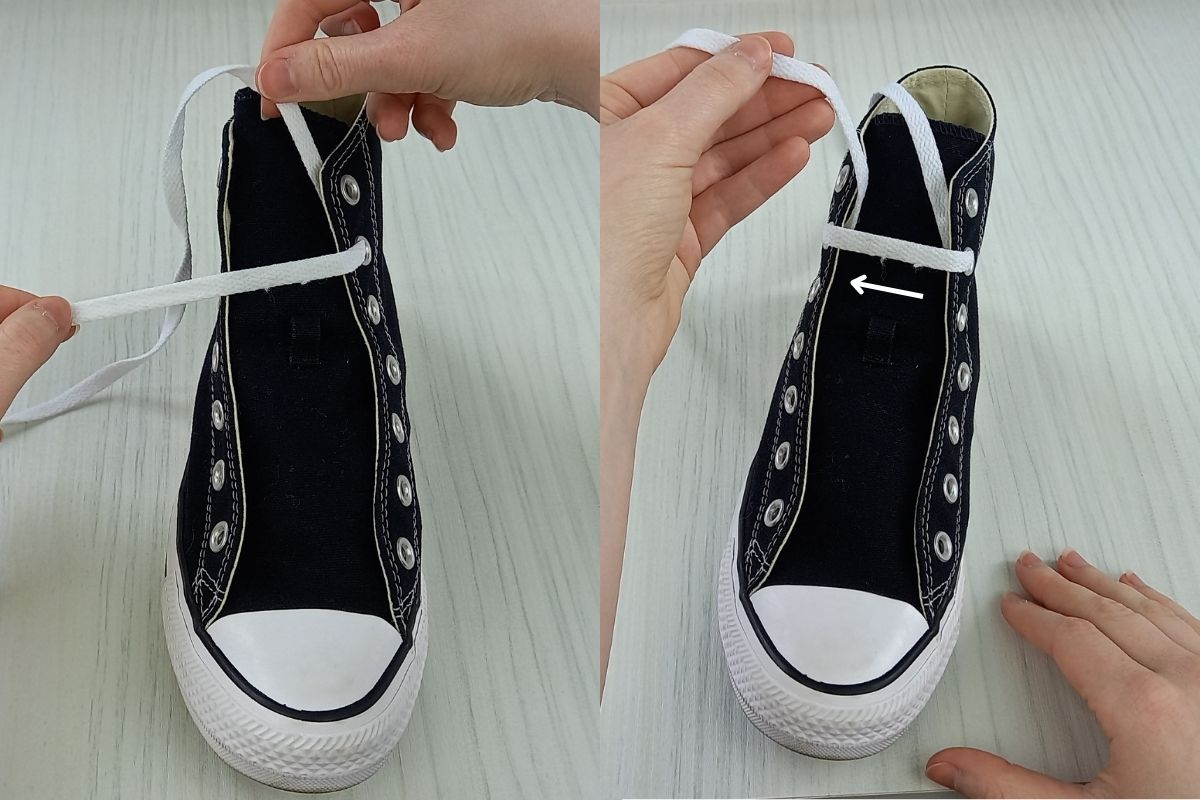
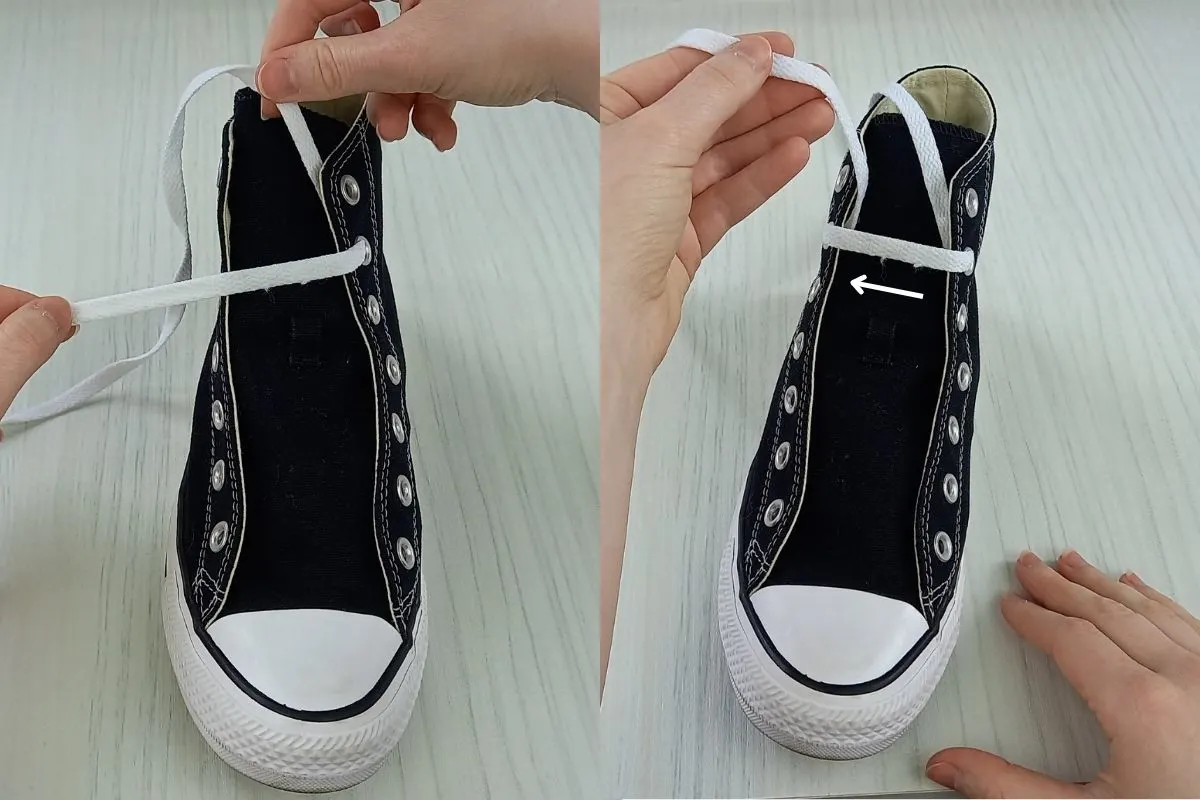
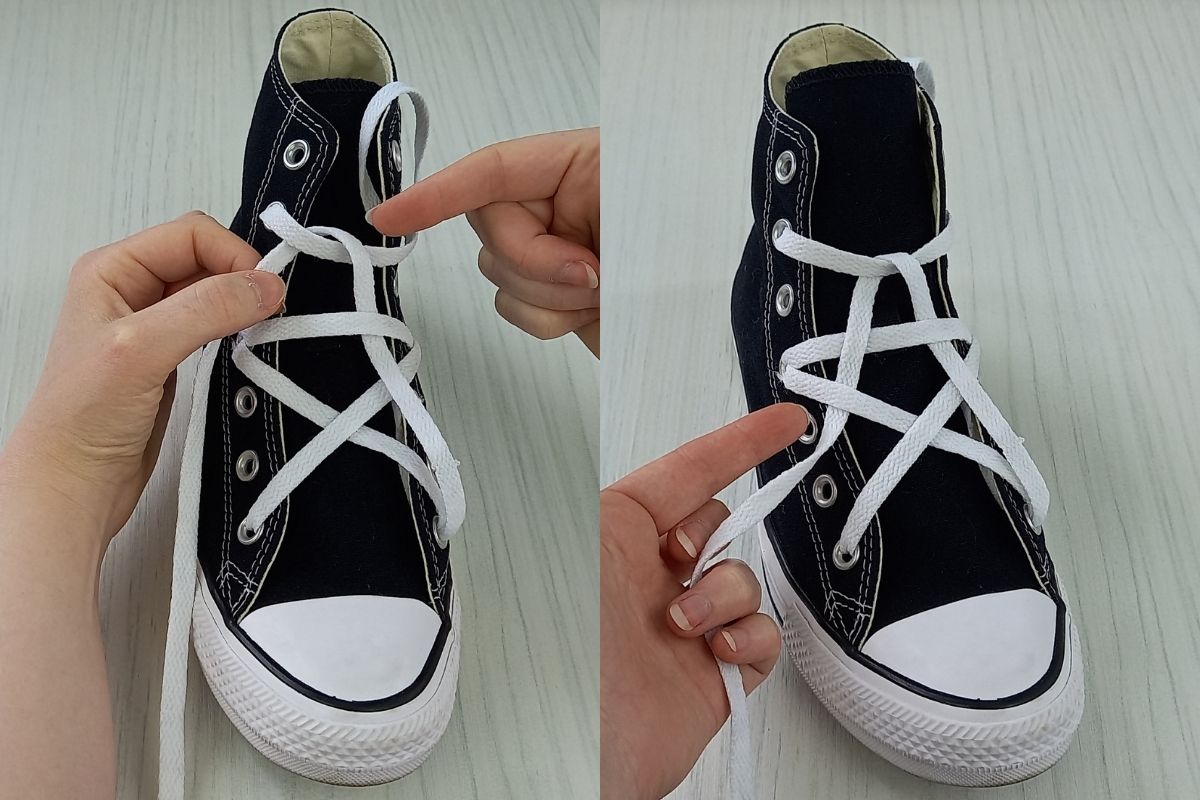
- Begin by threading your lace into the second eyelet from the top on the right hand side (with the shoe toe facing you, as pictured above). Make sure to thread the lace through the eyelet from underneath, as I have done.
- Next bring the lace over the sneaker tongue to the left hand side, and feed it down into the second eyelet on that side, from above this time. You should have a nice crisp bar looking effect. Double check your result against mine, in the image above.
Step 2.
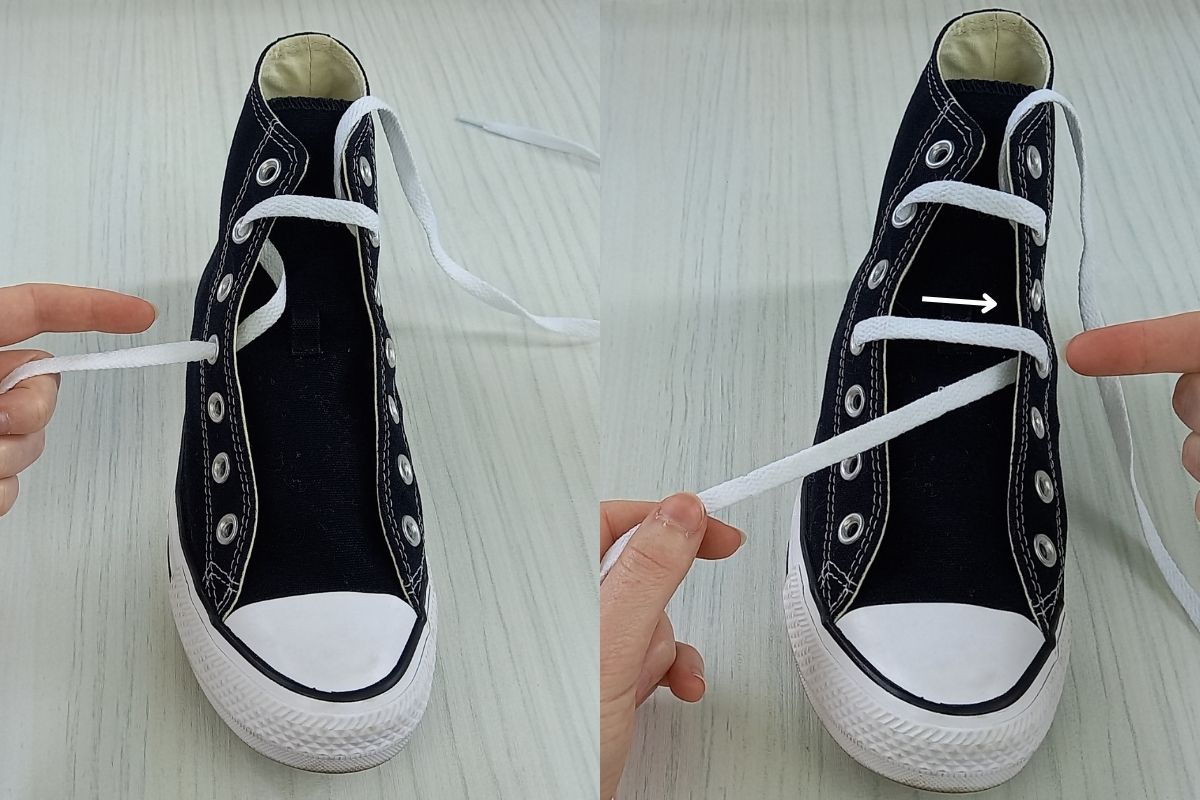
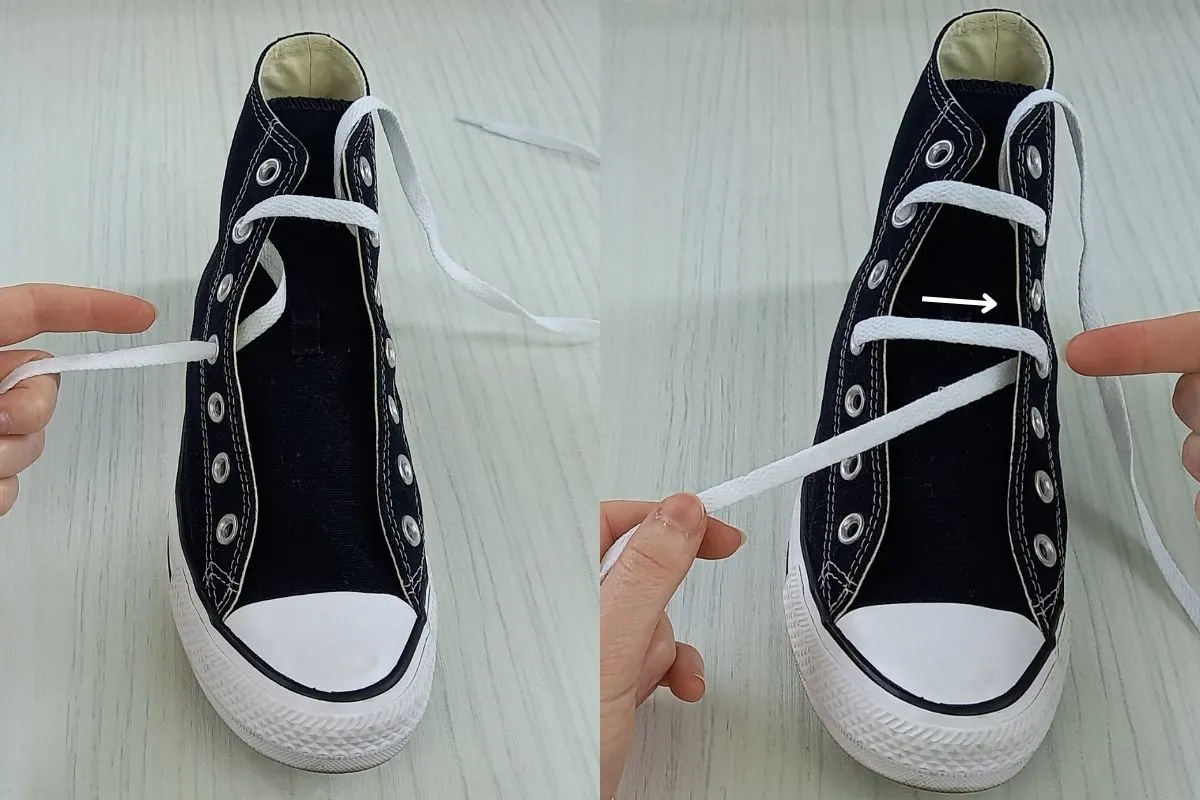
- Take the lace and thread it up and through the fourth eyelet from the top on the left hand side, as pictured above. Make sure it’s the fourth eyelet and not the third. The lace should be coming up through it from underneath.
- Bring the lace over to the right hand side and feed it down into the fourth eyelet from the top on that side, to create a second bar like effect.
Step 3.


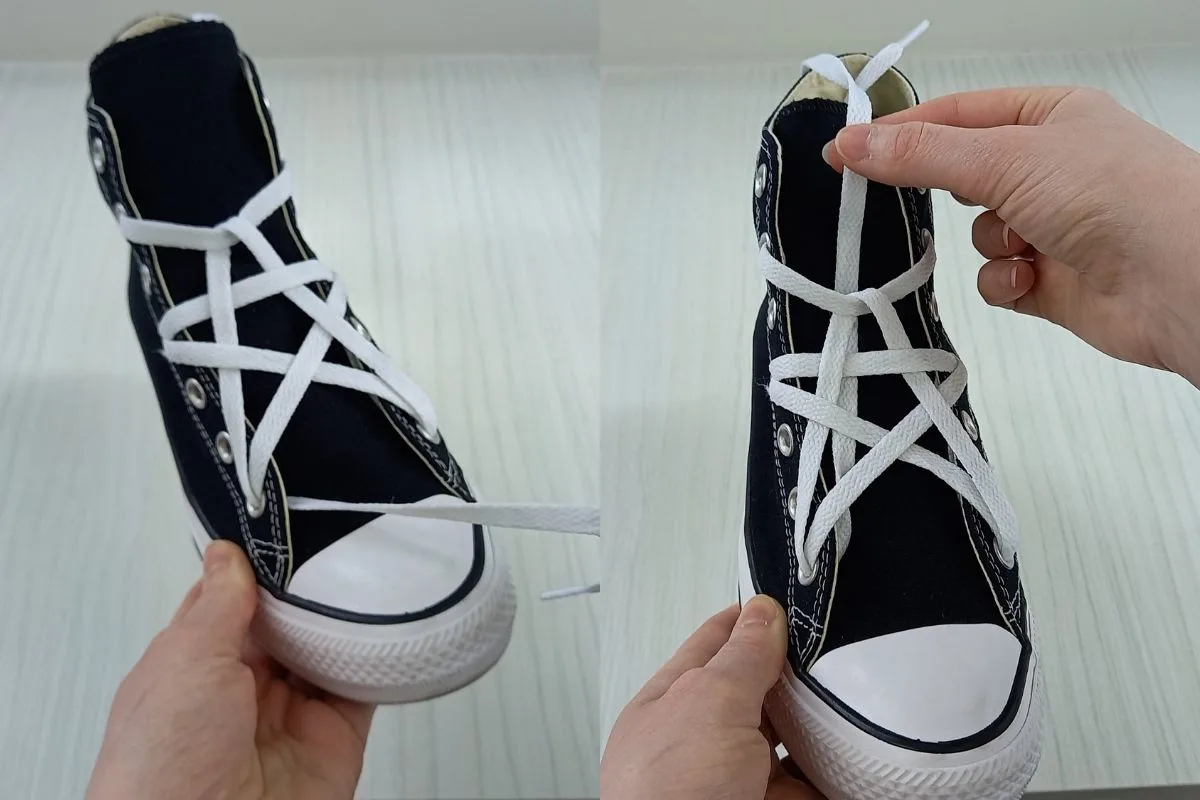
- Take the lace and bring it up and through the very bottom eyelet on the right hand side as pictured above. Make sure it’s coming up through the eyelet from underneath, and the excess lace is hidden by the canvas side.
- Bring the lace back over to the left hand side and thread it into the fourth eyelet from the top from above. This eyelet should now have two lots of lace through it, as pictured above.
If you like this article share me to Pinterest to save for later! –
Step 4.
- Bring the lace down and up into the very bottom eyelet on the left hand side, as I have done in the above image. Make sure it’s coming up through the eyelet from underneath, not feeding down into it from above. Take your time here and check over the pattern to make sure it looks right so far.
- Next bring the lace over to the fourth eyelet from the top on the right hand side and feed it into it from above. If done correctly, there should be another lace in there already.
- Then bring the lace down and up into the very bottom eyelet on the right hand side, as I have done above. You should see the arms of the star pattern beginning to form.
Step 5.

- Bring the lace over the sneaker tongue, making sure to thread it under the top cross section of the star, then then hook it over the bar anchor we created earlier. Double check the above image, to make sure your result looks like mine.
- Then bring the lace over then under the arms of the star pattern, to match mine as pictured above. Take time to pause here and ensure the pattern looks correct. If something doesn’t look right, read back over the steps and make sure you followed them correctly. You can always refer to the video earlier in the article, if you are stuck.
Step 6.

- Next thread the lace down into the very bottom eyelet on the left hand side from above, as pictured.
- Bring the lace underneath the entire pattern, as I have done in the above image. Make sure it sits underneath the star and feeds out to the very top of the shoe tongue.
Step 7.
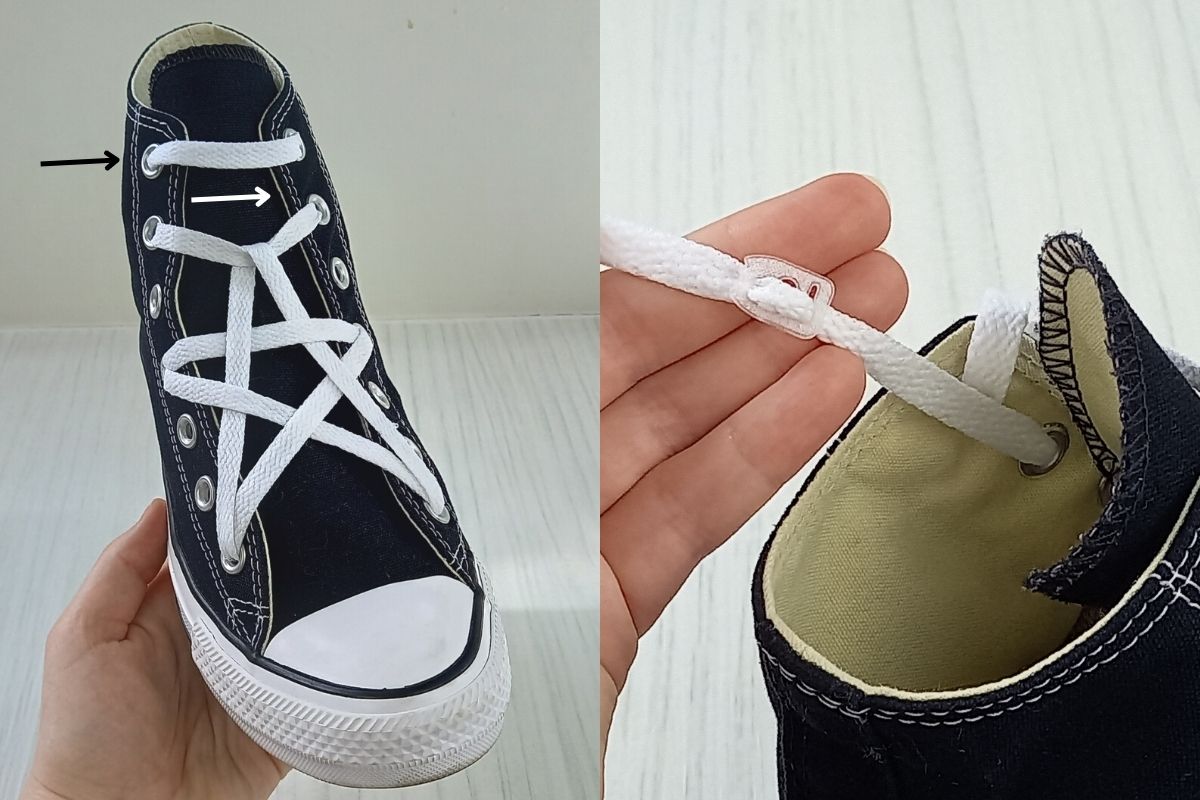
- Next feed the lace into the very top eyelet on the left hand side, from underneath.
- Bring it across and down into the very top eyelet on the right hand side as pictured above. This should create a nice crisp bar like effect and finish of the pattern in a neat way.
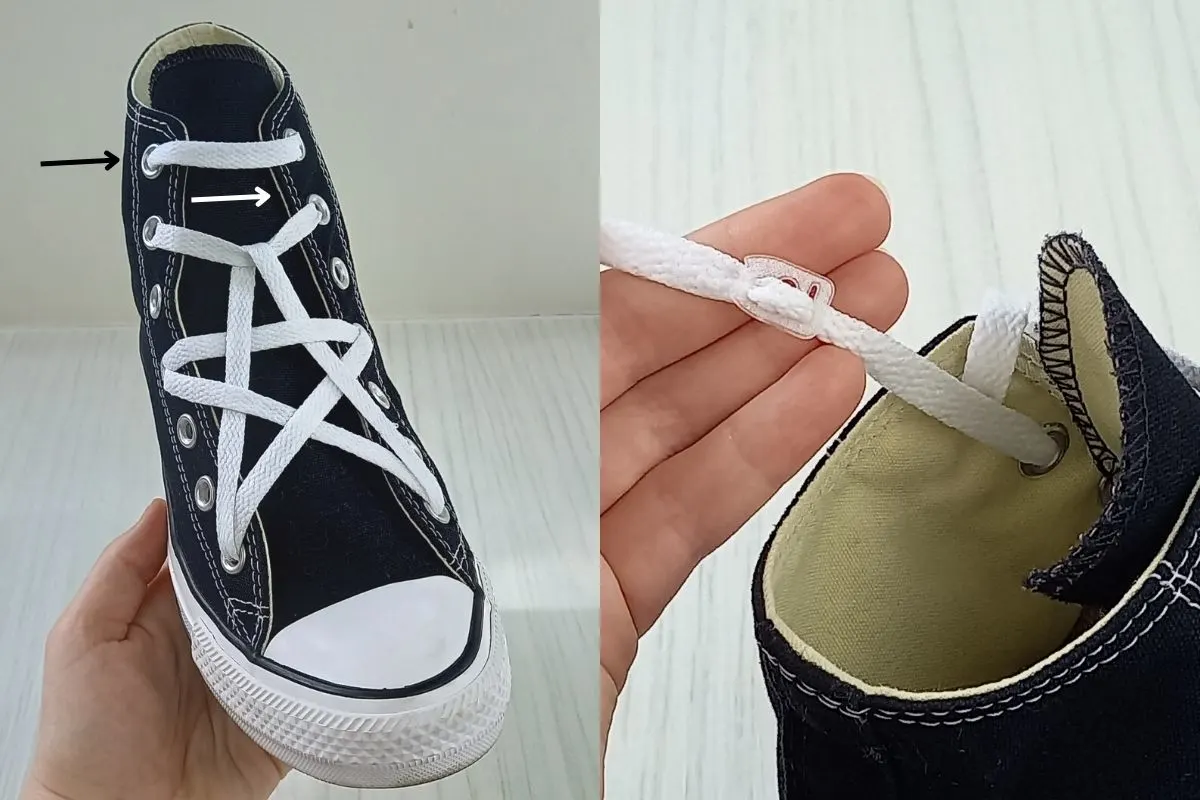
Now we need to deal with the excess laces that are coming through the top two eyelets on the right hand side. There are two ways we can finish this off nicely:
- Simply tie the two laces together in a knot. Make sure this isn’t too tight, and you are able to slip the shoe on and off.
- For a much better result use a lace anchor (as I have done in the above image). Lace anchors are a nifty little tool that slips down onto your laces and holds them in place. This stops the pattern coming loose and allows you to adjust the slack of the laces in order to slip your shoes on and off. Lace anchors are inexpensive and a handy tool to have if you enjoy cool lacing techniques. I recommend these lace anchors.
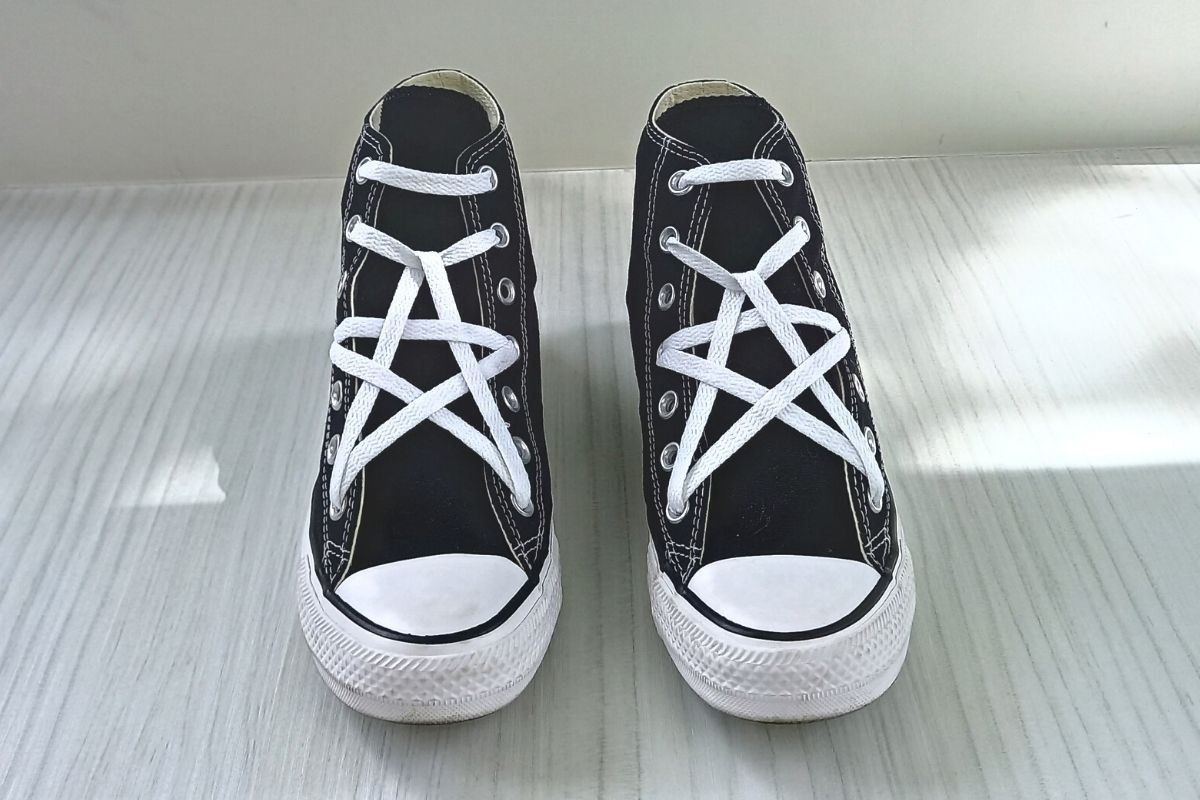
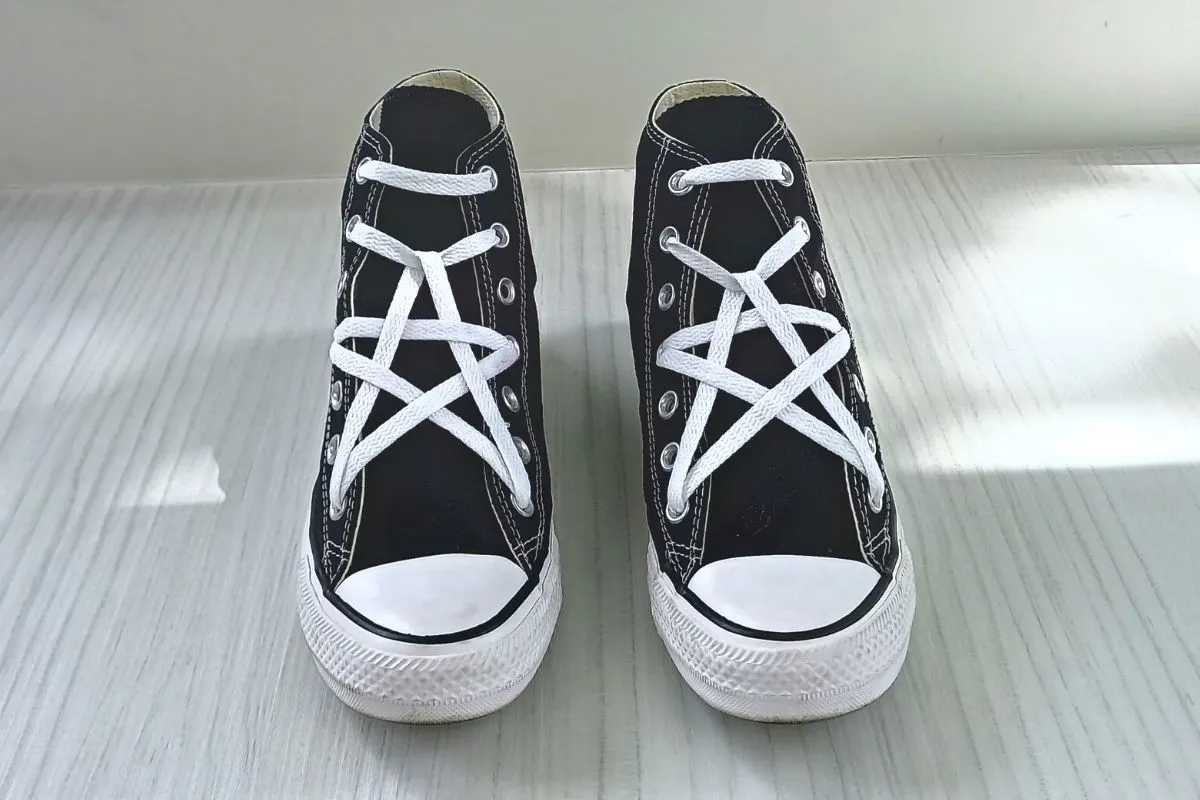
Once you have followed all of the above steps, repeat them on your other shoe. Your final result should look like the below:
You may also like: How To Lace Converse – 9 EASY Ways
Best Shoelace Length For Star Laces
Depending on the number of eyelets your shoes have, you will need a different shoelace lengths to achieve the lacing pattern. Please note a minimum of 6 eyelets pairs are needed for this lacing technique.
| Number of eyelets (pairs) | Ideal shoelace length (inches) |
|---|---|
| 6 | 40 |
| 7 | 45 |
| 8 | 45 |
Extra Tips
Here are some extra tips to help you when star lacing your shoes:
- Start with fresh clean laces, that have a nice starchy feel to them. This will ensure the best turn out.
- Slip a balled up pair of socks underneath the shoe tongue before you begin star lacing. This will add resistance inside the shoe that mimics your foot, allowing for an even lacing pattern finish.
- Try this out with different colored laces for a fun twist!
- Be aware that star laces are often referred to as pentagram laces, which may be controversial depending on where you are from.
Related Posts
Thank you for reading this article on star lacing shoes. I hope you give the lacing pattern a go following my step by step instructions!
For more lacing content, check out:
How To Lace Shoes So They Slip On – 3 EASY Ways
How To Lace Vans – 7 Cool Ways (EASY guide)

Lorna is a footwear geek and the founder of Wearably Weird. She created a YouTube channel in 2021 for fellow footwear fanatics, dedicated to detail-rich footwear reviews and info. She has a fashion media qualification (awarded in 2011).