
Making polymer clay dangle earrings is simple, fun and inexpensive, as polymer clay is a low-cost jewellery crafting material, with a host of versatile uses. In this tutorial I’ll demonstrate how to make dangle earrings from polymer clay by creating a marbled dangle earring design.
Here’s a breakdown of the steps:
- Gather your supplies
- Prepare your workstation
- Cut and condition your clay
- Spiral your clay
- Form a marbled ball
- Roll out the clay and use cutters
- Create jewellery holes in the clay
- Bake the dangle earrings
- Varnish the dangle earrings
- Add the earring hooks and jump rings to your polymer clay dangle earrings
Read on to learn how to make these beautiful and lightweight earrings, in this simple step-by-step guide…
This post may link to online stores. If you click a link and buy something, I may get a commission. Learn more.
1. Gather your supplies
Here’s what you need to make the polymer clay dangle earrings:
- 3 polymer clay colours of your choice, I always use FIMO
- Two silver earring hooks
- Four silver jump rings
- Two circle shaped clay cutters, one that is 2cm wide and one that is 5cm wide
- An acrylic rolling pin
- A clay cutting tool
- A pointed tool
- A crafting mat
- Polymer clay varnish
- A good quality brush for varnishing
- An oven and a baking tray
- Baking paper
- Something to transfer the earrings to and from the oven (I used a plate)
- A clean workspace
If you need help with your shopping list I have a buyer’s guide here, which includes a breakdown of different clays, tools and cutters.
It’s really important that you research which clay to use, and go with the one that suits your project needs the best.
I like to use FIMO, as they are versatile and offer a full range of colours. For this tutorial I’m using two shades of pink and one white, but if you want something a bit more funky FIMO offer a range of pearlescent shades, metallic shades and more, it goes on and on. There’s a block of clay in just about any colour your can imagine!
Sculpey is also an excellent brand with a wide range, as are Pardo, Kato and Cernit. I personally prefer FIMO, but don’t let that stop you from going with the brand you like the look of.
You need to find a clay suitable for beginners and more experienced crafters, so it can hold up as your skills grow and you take on more difficult projects. Feel free to check out my buyer’s guide if you want some initial help, or have a browse online for yourself and take your time deciding.
2. Prepare your workstation
Preparing your workspace
There are a few things to keep in mind when preparing your workspace:
- The size of the table you will be using
- How clean is the room and is it carpeted?
- How far will you have to carry the earrings to the oven – sounds odd but trust me, it’s a factor
- How much light you have at your workspace
- Do you have somewhere to keep your storage boxes, at the workspace?
- Is the workspace used by anyone else – e.g. is it the family dining table?
The reason you want to keep these factors in mind is the space you will be crafting in needs to be very clean, free of dust, lint and animal fur, so a non-carpeted room is best. Also, if you are going to be batch making and crafting more regularly, if your workstation is located in the middle of the family home, like a busy dining table, you will need to move your supplies regularly so it can be used, which over time will become a pain.
A good source of light is essential when crafting, so you don’t strain your eyes and you can ensure you are seeing the true colour of the clay. For this reason I suggest crafting in the day time, using natural light, as electrical light can give off a yellowy hue, and you won’t be seeing the true colour.
If you’re crafting far from the oven, what will you have to carry your designs past in order to get them to the oven – pets, kids toys, a busy staircase? All of these things could cause an accident, and you may drop your designs – which I have done in the past! It’s best to keep the distance from the oven to a minimum.
You’ll also need some kind of storage solution nearby for your designs, if you are batch making. If not, and you’re making these earrings as a one-off, these factors shouldn’t be too much of an issue.
Top tip: carry your designs on a plate to the oven, not with your hands, as you want to avoid adding accidental fingerprints to them.
3. Cut and condition your clay

Cutting the clay
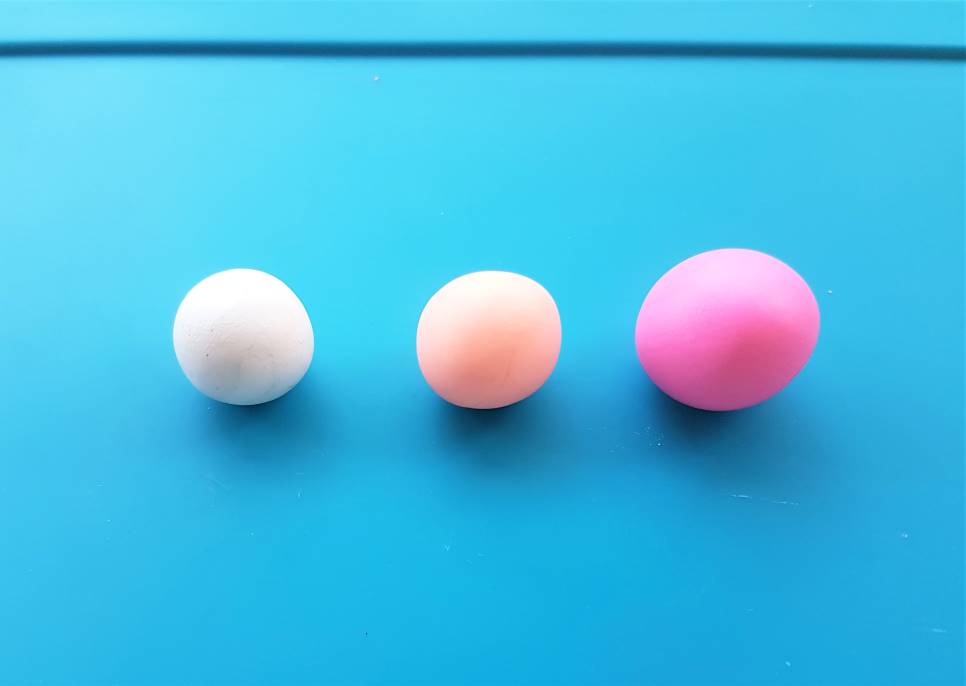
You can use three colours of your choice, or you can do the same as me and go for a white, dark pink and peachy pink.
For this project, we are making one pair of earrings, so the clay will need to fit into a 2cm and 5cm cutter twice.
We need to keep this in mind when deciding on how much clay to cut from our blocks.
If you are using 2oz blocks of clay, as I do, then you need to cut about 1/2 an inch from each, in a cube. I do suggest picking a base colour, which you will take slightly more of. In this case, I chose the darkest pink for my base colour, which you can see pictured above forms a slightly larger ball than the other two.
Please don’t worry too much about being overly precise with your measurements, if you go over that’s fine, just eyeball it and decide whether the clay you have cut will form a slab large enough for your earring cutters to go into twice.
I like to roll my slabs to a 1/4 inch thick, and I suggest you do the same for this tutorial, so just keep that in mind.
Now the clay is cut, let’s move on to conditioning the three colours, until they are ready to be worked with…
Conditioning
It’s really important to start by properly conditioning your polymer clay, so you will be able to create smooth designs with no cracks or flakes.
Conditioning polymer clay is easy, here’s how to do it:
- Take the piece of polymer clay between your hands and begin to warm it up with your body heat, by pressing on it gently.
- After a minute or so, begin to slowly roll the clay between your palms, until it starts to soften.
- Repeat this until your have created a smooth and malleable ball of clay, that is easy to mould.
Each brand of clay will take slightly different time to condition, and some colour transfer may occur onto your palms. Be sure to clean your hands in between colours to avoid mixing them up and spoiling the clay.
Depending on the brand of clay, the ball may be slightly sticky to the touch, or will remain quite firm. This is all down to the brand you chose, and is normal.
Now your clay is properly conditioned, it’s time to start the marbling process with a spiralling technique…
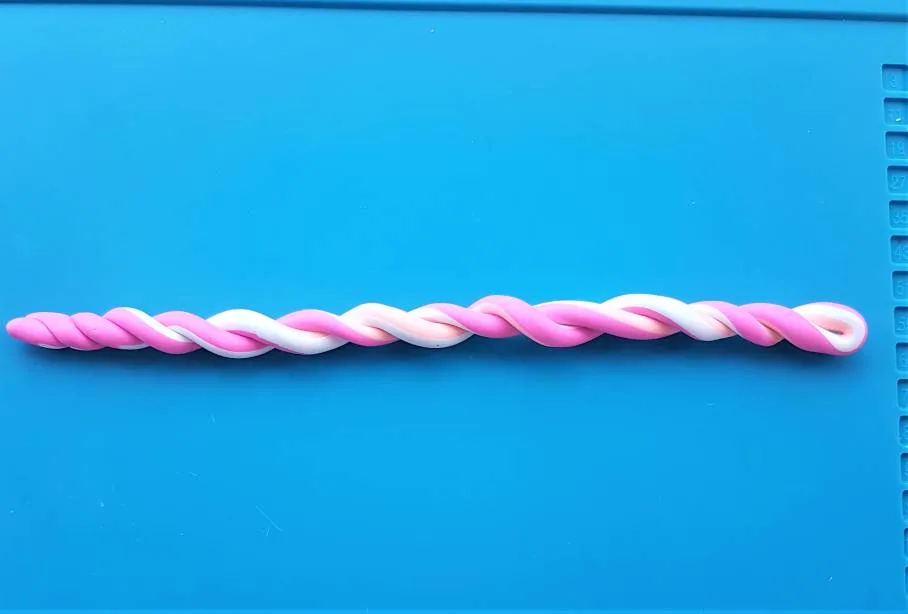
4. Spiral your clay
Spiralling the clay is how the initial marble effect will be formed, by properly combining the colours in a swirling pattern, before rolling them into one big ball.
Here’s how to do it:
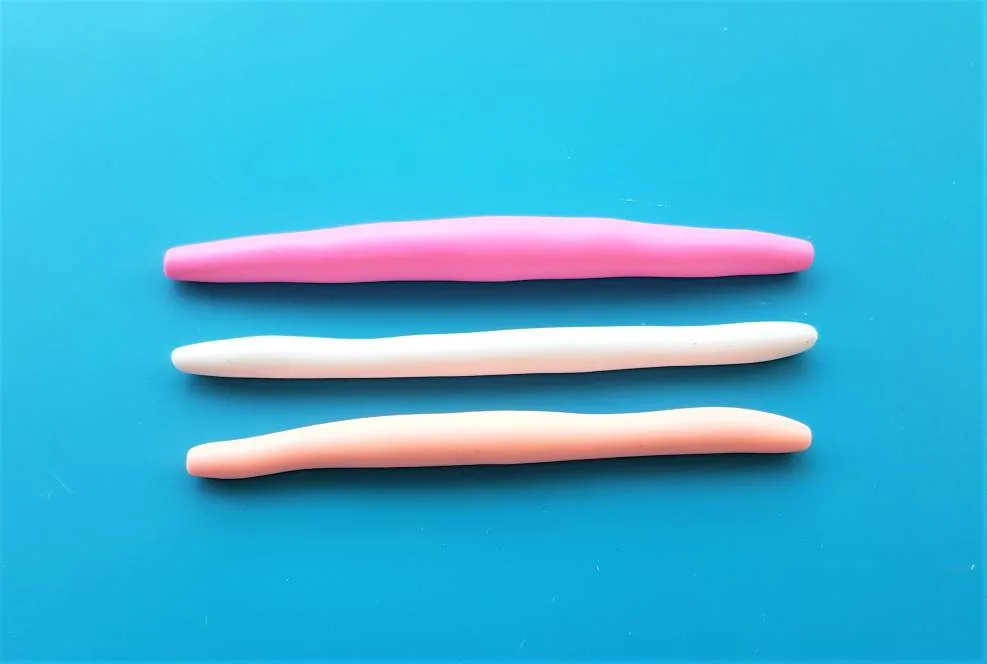
Prepare your strings
- Take each of your conditioned clay balls and begin to roll them onto your crafting mat.
- Ensure they are all rolled to similar lengths.
- The base clay string should be slightly thicker than the other two (dark pink, as pictured below).

Now your strings are ready, you want to begin combining them.
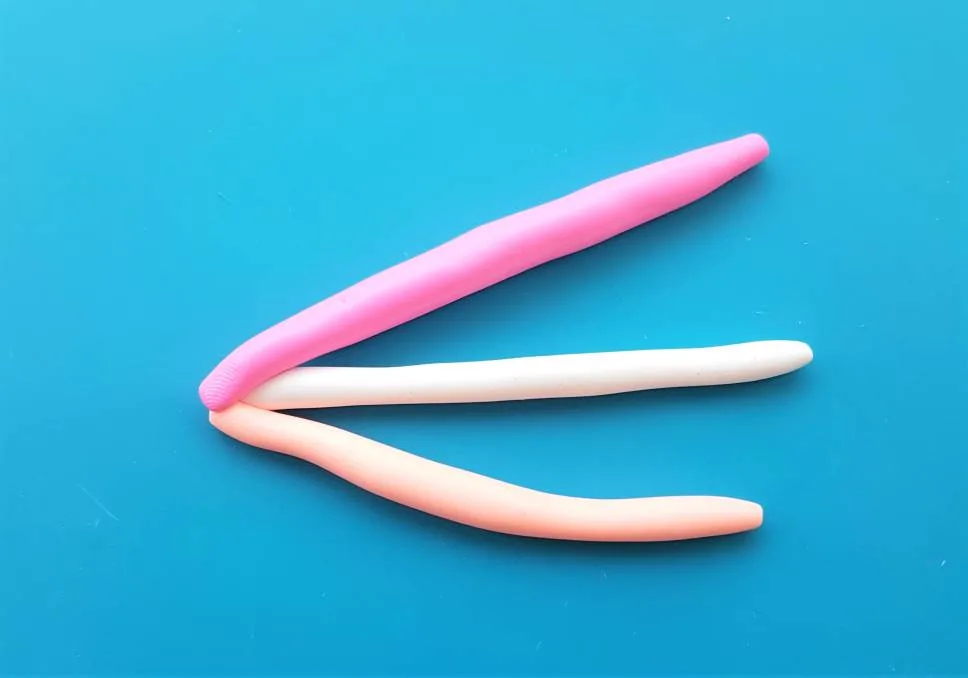
The easiest way to do this is to place one end of the strings on top of each other, and then to squeeze them together to form a hold, for the base of your spiral. You can see how I’ve done this pictured below.
It doesn’t matter which order you stack the ends of the strings in, as long as they are secured together firmly, and you can begin to spiral from there.

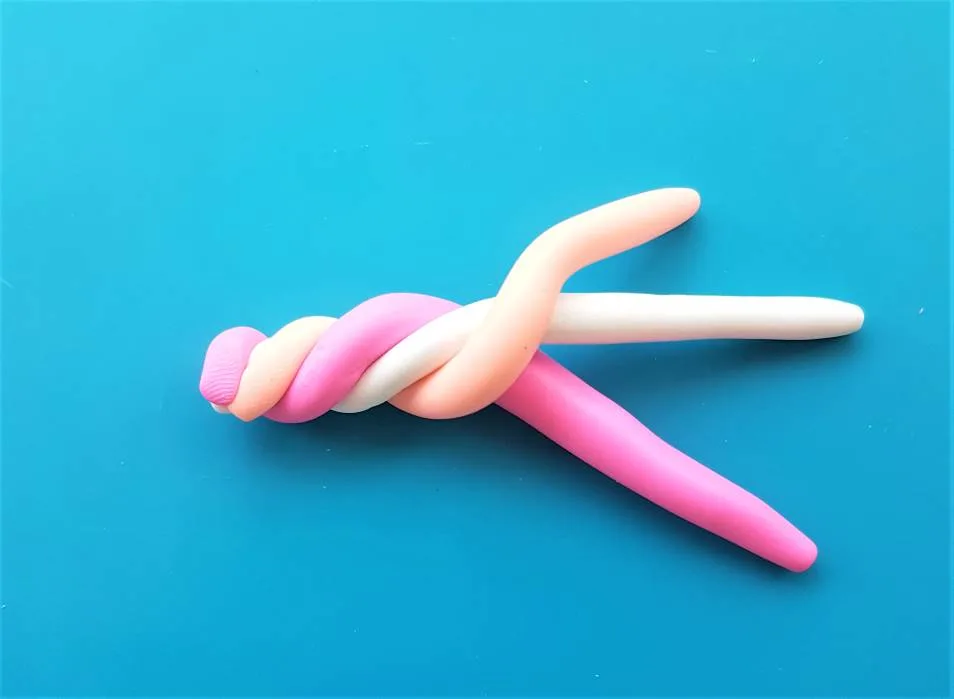
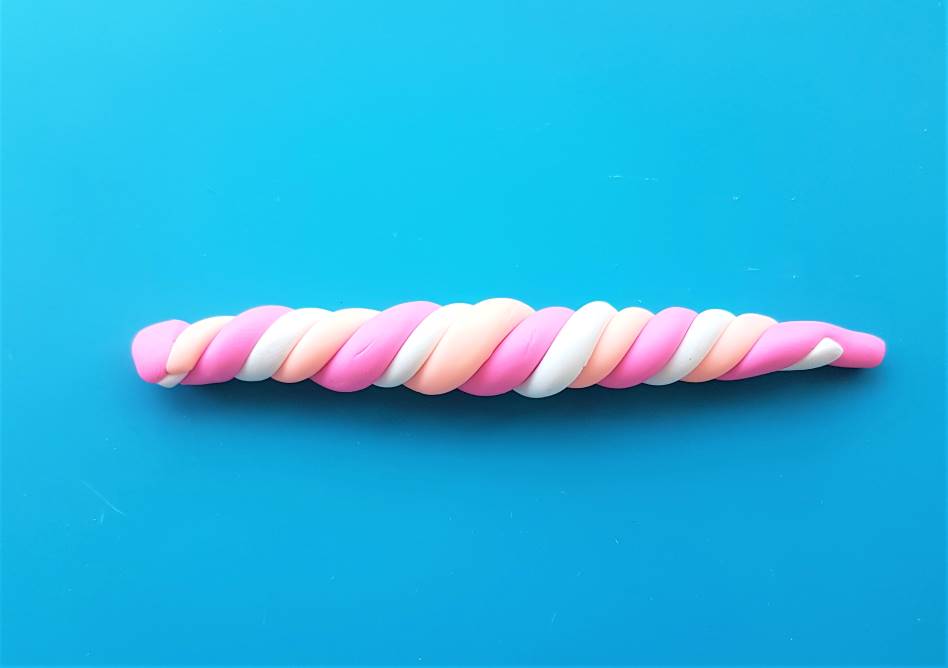
Next, take the attached strings and begin to twist them around each other, as pictured below.
I suggest you take your time with this, to ensure you get the technique right. Start by twisting your base colour around the other two. Then take each colour individually and do the same, until you have a pattern forming.
Continue this process until the full length of the spiral is complete.

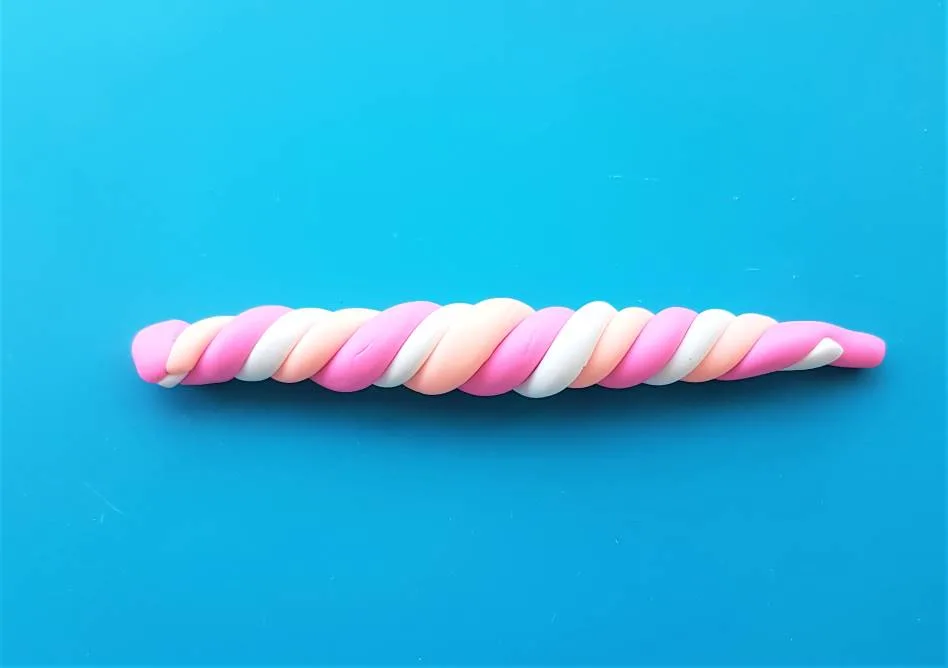
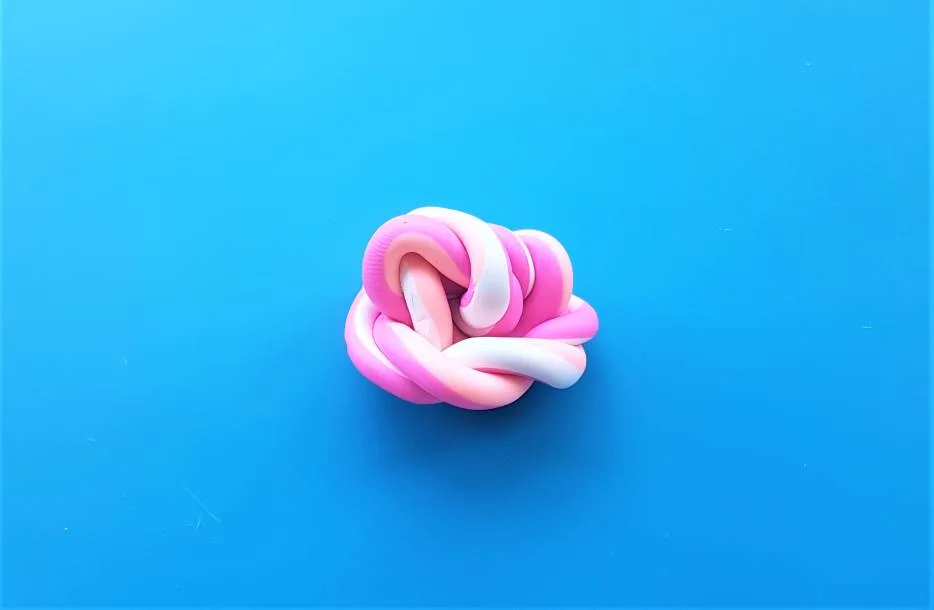
With the spiral complete, it’s time to flatten the clay and firmly blend it together, until the sides of the spiral are smooth.
Take the spiral underneath your palm and begin rolling it on your crafting mat. Take your time, and keep going until the spiral begins to look smooth as pictured below.
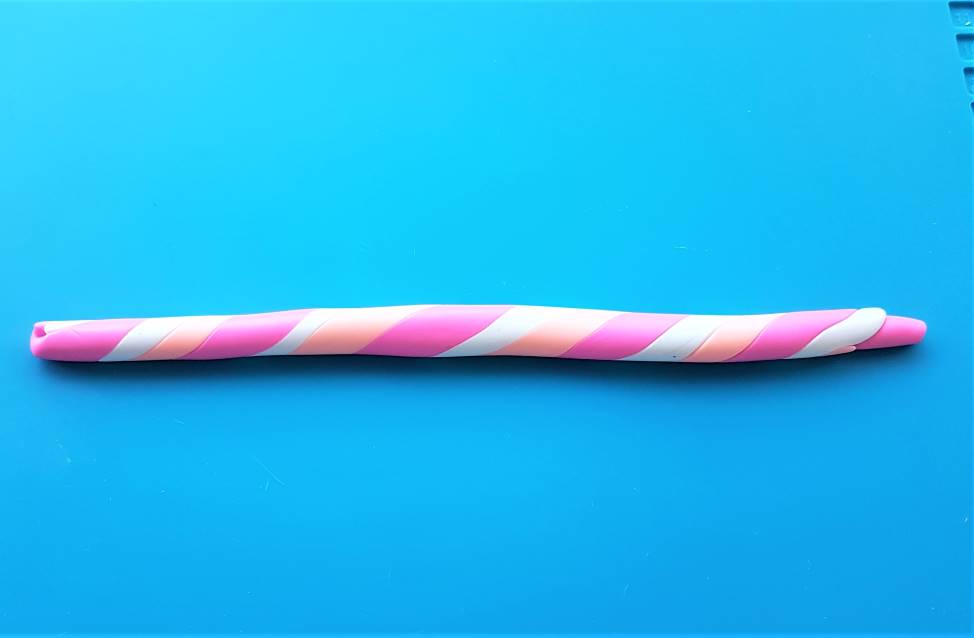

When the spiral is smooth begin to stretch it out until it doubles in length. You can do this by rolling it between your palm and the mat, or you can pinch each end of the spiral and pull it with your fingers.
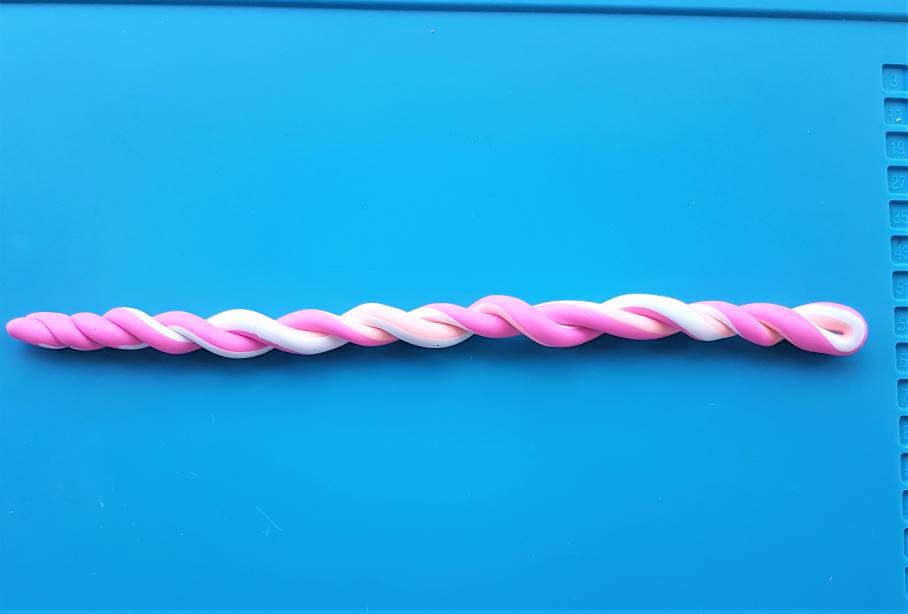
You’ll be surprised how easily it will stretch, and you’ll have doubled it in no time. Now it’s twice as long, fold it in half and begin to wrap it around itself, to form a second spiral effect as pictured below.
This will ensure all of the colours are properly blended and will make for a really pretty marbled effect. You could repeat the stretching and spiralling process as many times as you like, to get a finer and more detailed marble effect, but I like mine to be quite bold and large, so I only do this step once.
5. Form a marbled ball
The clay is now well spiralled, and is ready to be formed into a ball.
Roll the spiral up into a ball shape and begin to press it together between your palms. After it has formed a ball shape begin gently rolling it between your hands until it forms a smooth and malleable ball, similar to how you conditioned the clay in the first step.
After a while, it should begin to go from the first below picture to the second below picture.

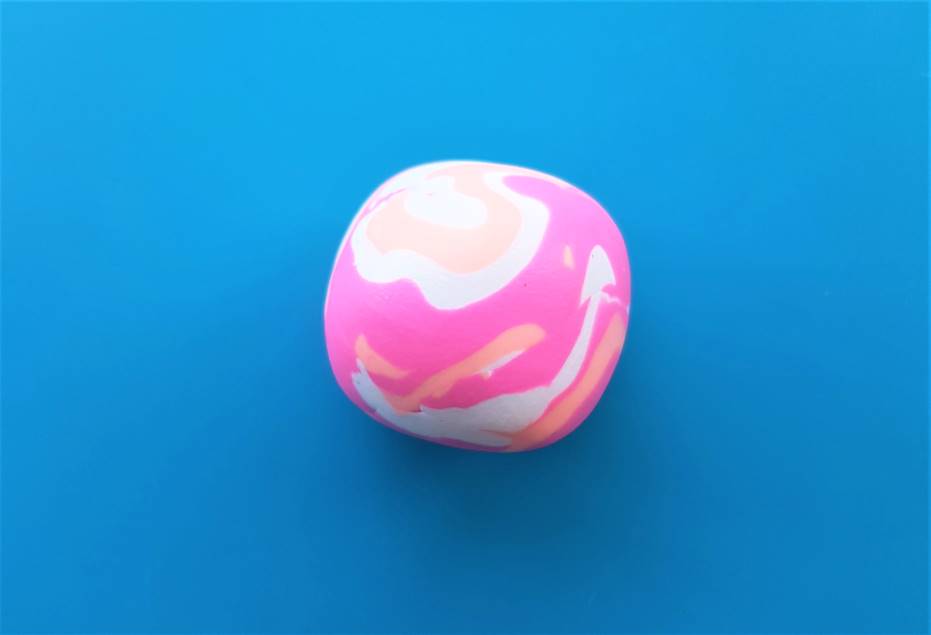
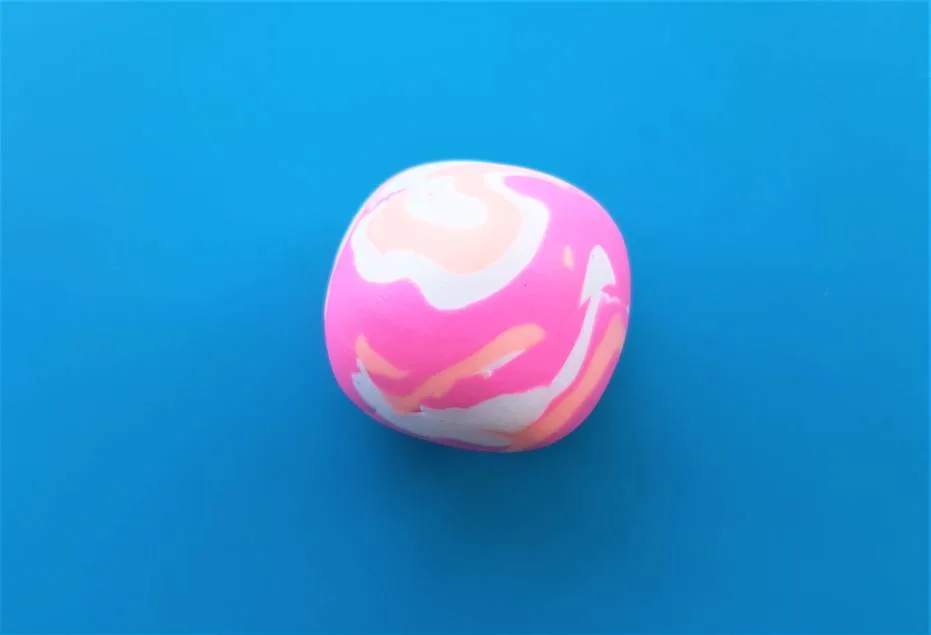
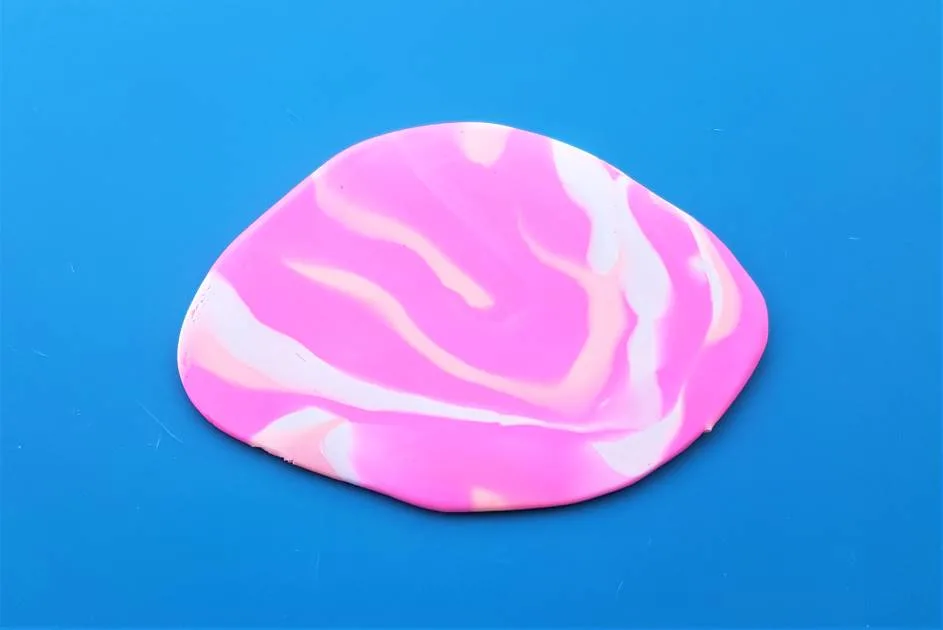
Your formed marbled ball should look something like the above – isn’t it cool?
6. Roll out the clay and use cutters
Take an acrylic rolling pin and press it against the marbled ball, and begin to roll until it forms a slab about 1/4 of an inch thick.
Top tip: always use an acrylic rolling pin, not a wooden one as it will leave wood grain imprints and stick to your clay.
Set your rolling pin aside and take a look at the marble slab. Flip it over and see if you like the way the clay has marbled better on the other side, before making the decision of which side you want to form the upright of your polymer clay dangle earring designs.
See the below two images and compare each side of the clay for yourself – see how different the marbled effect looks?


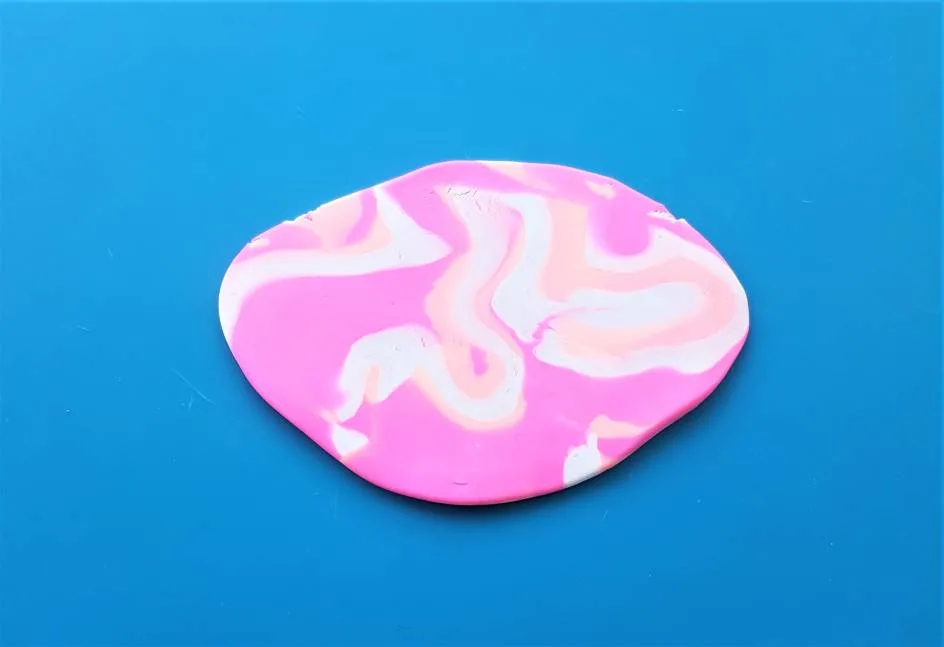
After comparing the two sides of the slab I decided to choose the second side for the design of my earrings, as I really liked how the snaked marbled effect looked, and it featured more of the white and peachy pink clay.
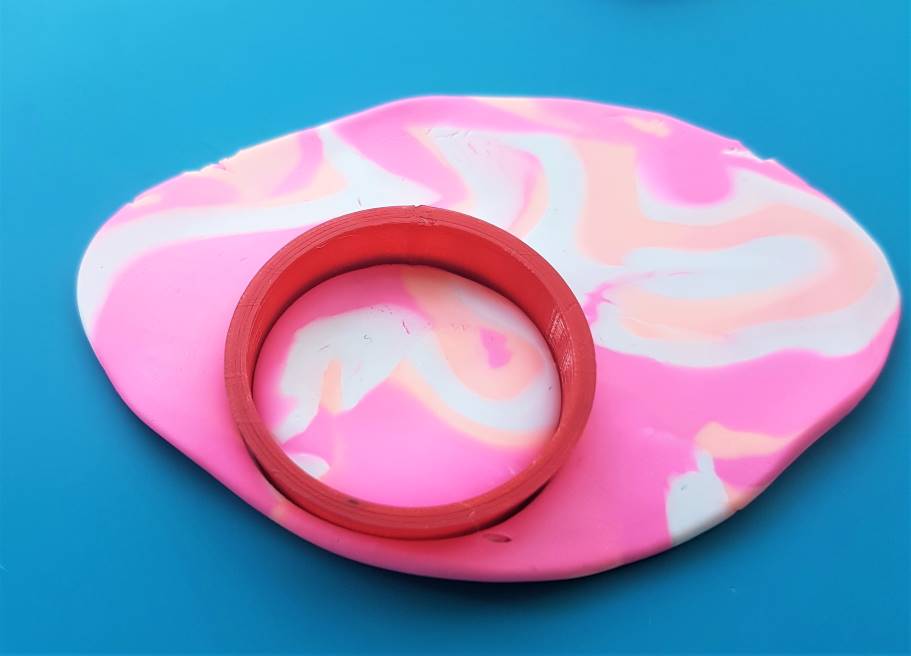
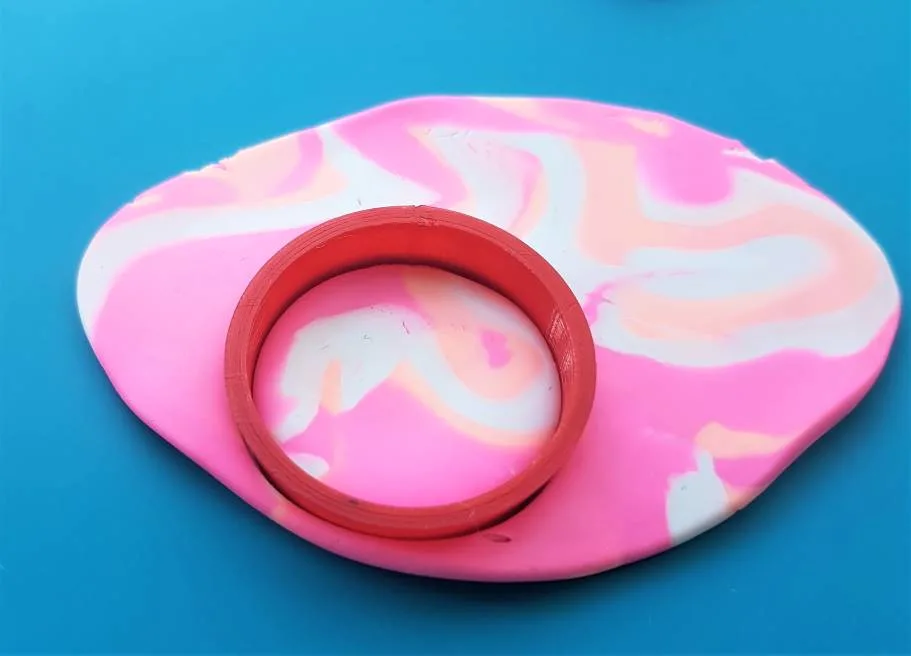
The next step is to take your cutters and place them on top of the slab, to ensure each will be able to fit into it twice. If the slab isn’t big enough, just roll it a little thinner, to make room for the cutters.
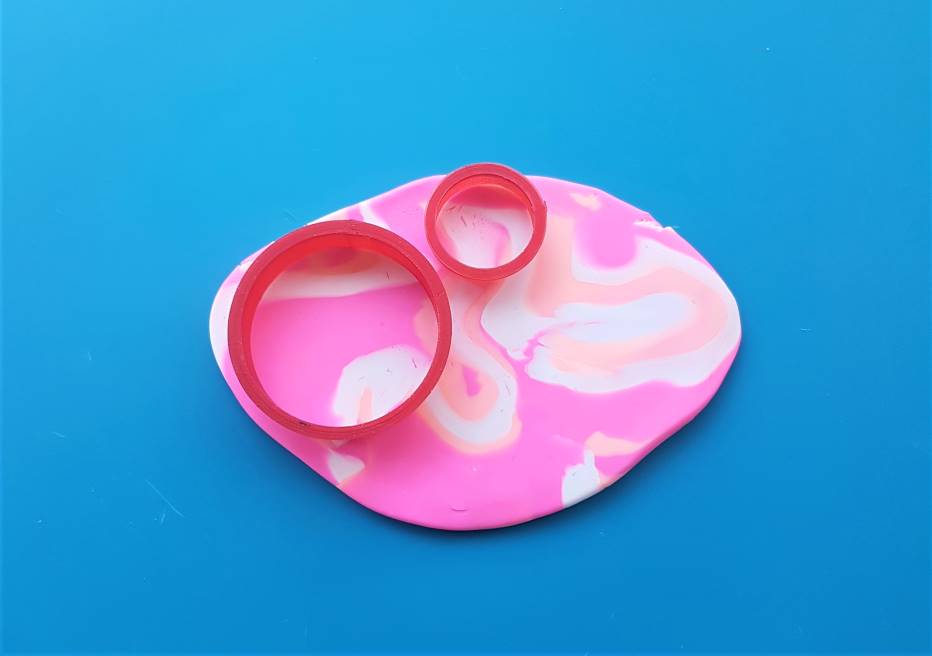
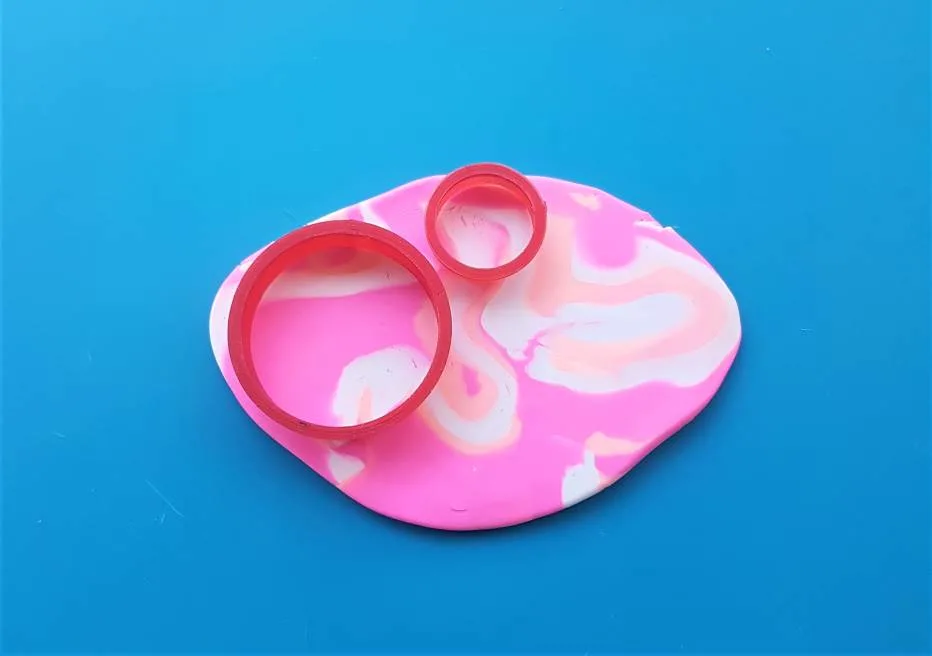
Move your cutters around on the slab until you are satisfied with the part of the marbled clay you will capture for your earring designs.
Then press the cutters into the clay and wiggle them around to create a little gap between the outside clay and the rim of the cutter. This will make it much easier to take the cutter from the clay without dragging the residual slab with it.
Once you have taken the cutter from the clay, if your cutters are like mine they will lift the clay inside them.
At this point I like to take a pointed clay cutting tool and run the edge of it along the base of the cutter, to remove any clay that may have stuck to the under-side.
This makes the outline of the clay smoother, and will save you sometime later on, if you don’t want to sand your pieces.
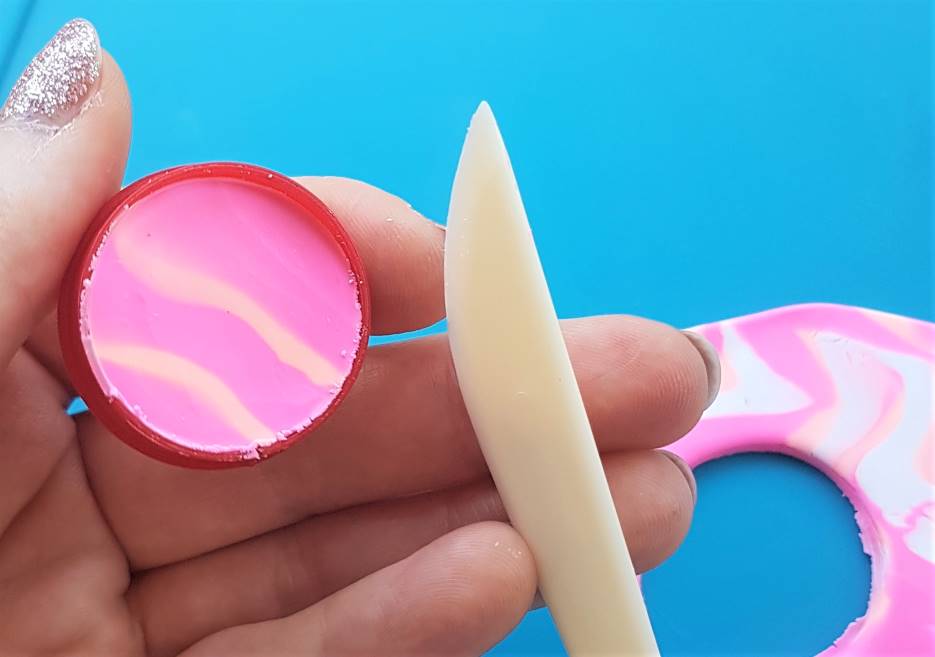

Now pop your clay out of your cutter by pushing it out with your fingertips or a tool, from the under-side, so it travels up through the cutter.
At this point you can assess the edges of the cutting, and smooth them out with your fingertips, or by carefully rolling them like a wheel over your crafting mat.
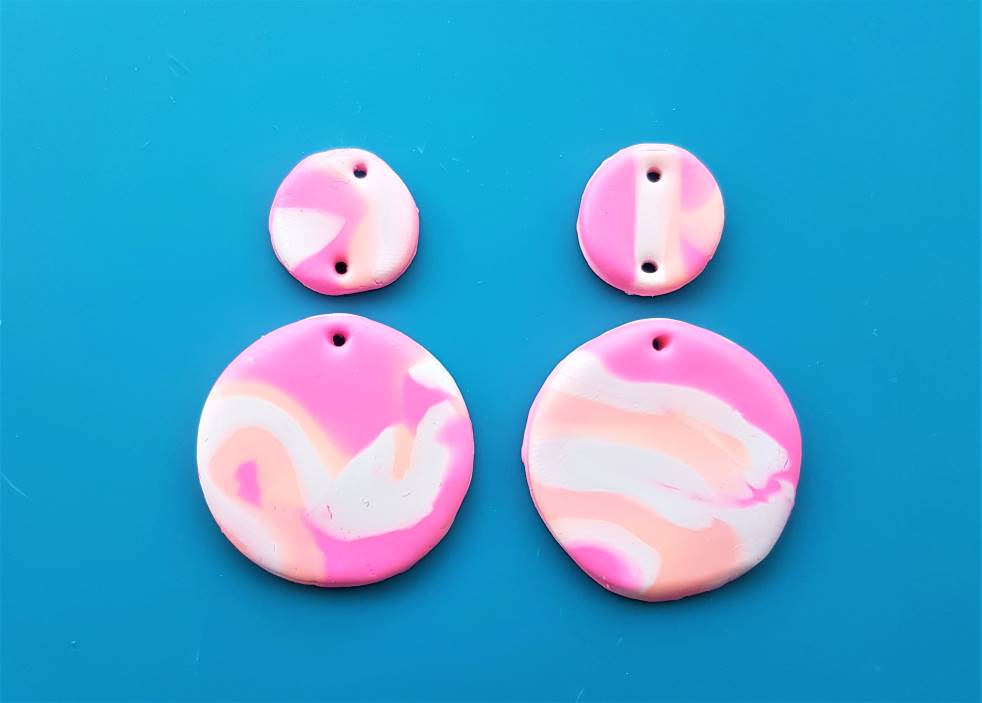
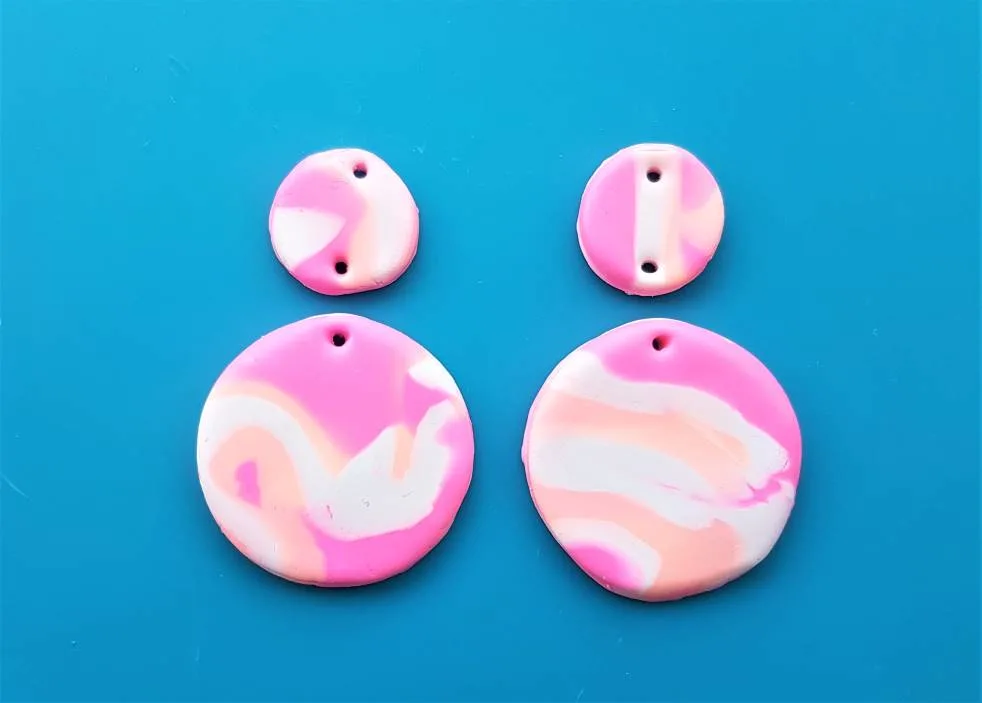
7. Create jewellery holes in the clay
Set your clay cuttings out on your crafting mat and move them around until you are happy with the marbling lay out of each piece. Once you have decided how you will set them out and what parts of the designs will form the top and bottom of the earrings, you can take your pointed tool and begin adding holes for the jump rings and earring hooks.
On the 2cm pieces you will need to add two holes, at the top and bottom. For the 5cm pieces, one hole at the top is needed, as pictured below.
The earrings are ready to go in the oven, for the next step…
8. Bake the polymer clay dangle earrings
It’s time to bake the earrings.
Here’s how to do it:
- Put your earrings onto a plate and carry them to the oven, to avoid last minute finger prints
- Set your oven temperature according to the packaging instructions of your chosen brand of clay
- Prepare a baking tray for your earrings to cure on – it’s best not to use the same tray for food, and to line it with a baking sheet
- Wait for the oven to heat to temperature, then put the earrings in
- Allow the earrings to bake to time and then remove them from the oven and place them back on the plate
- Allow the earrings to cool and sufficiently harden, before moving onto the next step
Be careful when baking the clay, as sometimes the side touching the baking paper can cure with a bit of a glossy finish. It’s no problem if you’re varnishing the designs for a shiny finish afterwards, as we are here, but for other projects keep this in mind.
A way to avoid the unwanted glossy finish from the baking sheet is to bake your design in a little mound of cornflour. Don’t worry, the cornflour brushes off easily when you remove it from the oven. This is also a great way of baking 3D designs, so one side doesn’t flatten against the baking sheet, and the whole thing is suspended in the mound, if that makes sense.
Here’s an A-Z break down of individual brands and their baking time, so you have a quick guide to hand:
Cernit: 30 minutes between 110 and 130°C (230-266°F)
Fimo: Maximum of 30 minutes at 110°C (230°F)
Kato Polyclay: 10-30 minutes at 150°C (300°F)
Original Sculpey: 15 minutes per quarter inch (6mm) of thickness at 130°C (275°F)
Pardo Art Clay: Min 30 minutes at 120 decrees (248 F)
Pardo Translucent Jewellery clay: Min 30 minutes at 120°C (248°F)
Premo: 30 minutes per quarter inch (6mm) of thickness. If thicker, initially bake for 15 minutes and then add another 5 minutes, another 5, and so on until done.
PVClay: 15-20 minutes at 130°C (275°F)
Sculpey III: 15 minutes per quarter inch (6mm) of thickness at 130°C (275°F)
Sculpey Souffle: 30 minutes per quarter inch (6mm) of thickness at 130°C (275°F)
Super sculpey: 15 minutes per quarter inch (6mm) of thickness at 130°C (275°F)
Once baked, you can tell if the earring piece is done if it’s still bendy, but not brittle. It’s fine if it’s bendy, don’t worry, it will cool and harden after some time.
It’s best to create a test piece to bake alongside your earrings in the oven, that you can bend and mess around after baking with to ensure your earrings are done.
Different brands of clay will react differently in each oven, so running test pieces are a great way to get to know how your clay behaves with your appliance. It’s also great to use an oven thermometer, to double check you have the temperature setting right (sometimes the oven dial can be a little unreliable, and if you’re batch making earrings you want everything to be precise, to ensure they properly cured).
Now your clay earrings have cooled (I do suggest waiting a few hours), it’s time to varnish the designs…
9. Varnish the polymer clay dangle earrings
Varnishing the designs will add a great shiny touch to the polymer clay dangle earrings, allowing them to stand out with a pretty finish.
Varnishing also adds a hardened layer to the design, which can serve as a protective barrier, adding strength and a waterproof finish.
Please note, varnishing won’t completely waterproof your designs, and they shouldn’t ever be submerged in water.
Here are my tips for varnishing, along with a step-by-step guide:
- First, ensure you have your polymer clay varnish to hand
- Ensure you have a good quality brush to apply your varnish with, that won’t shed it’s bristles or leave streaks over your design
For help choosing a varnish brand, and for more tips, I have a guide here.
- Next apply two to three layers of varnish to your design – don’t do too many as the varnish may end up looking cloudy
- Place your earrings somewhere they can dry, without allowing the varnish to touch any surface
- Allow the varnish to fully dry, according to the packaging instructions of your chosen brand of varnish
Now the varnish has dried, let’s move on to adding the earring jewellery…
10. Add the earring hooks and jump rings to your polymer clay dangle earrings
Once the earrings have been varnished and have dried, it’s time to add the jump rings and earring hooks.
Take the four jump rings and open them with a pair of jewellery pliers. Start by attaching the first jump ring between the two pieces of clay, to form the body of the earring, and then carefully close the rings with your pliers.
Then add the top jump rings, and hook on the loop at the base of your jewellery hooks, before closing them up with your jewellery pliers. Before closing them, just double check the earring hooks will hang the right way around – I’ve made this mistake too many times!. Repeatedly opening and closing your jump rings will weaken the metal, and the rings may be more susceptible to snapping over time, so you want to keep this to a minimum and get the hook position right the first time.
Now you have added the silverware, your polymer clay dangle earrings should look something like this:
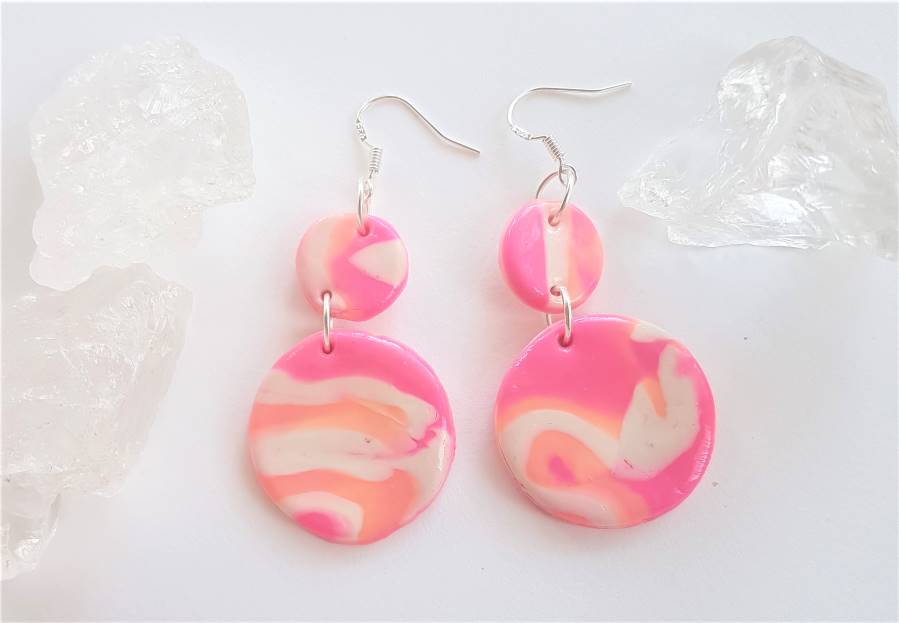
They are done and ready to wear – I’ve got mine in as I’m typing this. Enjoy!
Related articles
I hope you found this ‘polymer clay dangle earrings’ tutorial helpful and you now feel confident and excited to head to your crafting table and give making these lovely earrings a go.
For more tutorials, check out:
5 Polymer Clay STUD Earring Ideas – Tutorial
5 FOOD Polymer Clay Earring Designs
5 FLOWER Polymer Clay Earrings Designs
5 FRUIT Polymer Clay Earring Designs

Lorna is a footwear geek and the founder of Wearably Weird. She created a YouTube channel in 2021 for fellow footwear fanatics, dedicated to detail-rich footwear reviews and info. She has a fashion media qualification (awarded in 2011).