
Polymer clay earrings are super popular right now, and the slab making technique is helping crafters push their creativity and come up with some truly beautiful patterns. But many beginners are asking how they can make polymer clay slabs themselves?
Here’s the short answer-
How to make a polymer clay slab:
- Roll out your base colour of clay at about 1/4 inch (6.4mm) thick for cutting
- Add details to the base layer with the other coloured clay you have available
- Use glue or a rolling pin, if the detail is intended to lie flat, to secure the clay details to your slab
- Use clay cutters or a cutting tool to cut out your designs and bake accordingly
Now you’ve got the basics, read on for a slab making tutorial, design ideas and top tips to get you started…
This post may link to online stores. If you click a link and buy something, I may get a commission. Learn more.
What is a Polymer Clay Slab?
A polymer clay slab is a rolled out slab of clay (typically to 1/4 inch in thickness), that is often decorated with other coloured clay to create unique patterns for cutting. It is a particularly popular technique for polymer clay jewellery making.
Polymer clay slabs are great for jewellery making, as it makes pattern making simpler with one large piece of clay, as opposed to cutting your clay jewellery first and then adding patterns onto the pieces. Slabs are a beautiful way to get creative with polymer clay, as the results can be stunning!
There are some basic slab designs I would suggest you master if you are a beginner to the polymer clay craft, such as simple prints like cow print, leopard, and easy patterns like multicoloured grids. But really slabs are only limited to your creativity, and many talented polymer clay crafters have produced some gorgeous designs on Instagram and Pinterest for you to browse for inspiration.
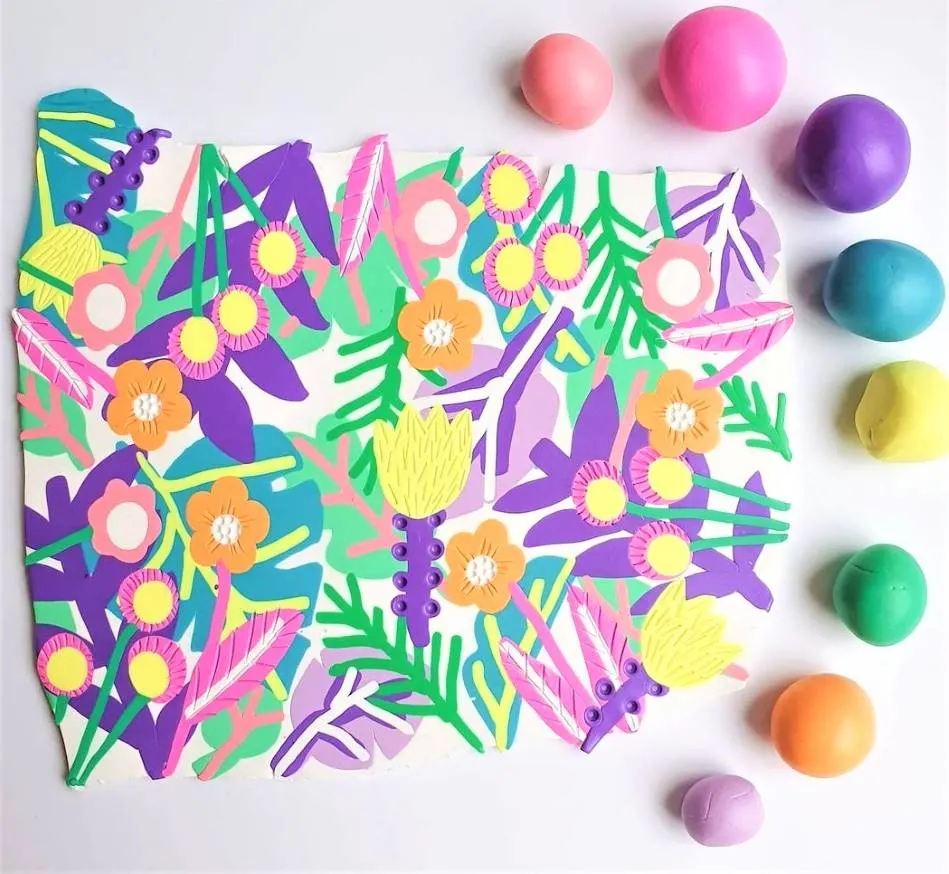
Here’s a great example from my friend Cat and Clay who creates truly stand-out polymer clay earrings from the advanced kind of slabs I’m talking about:

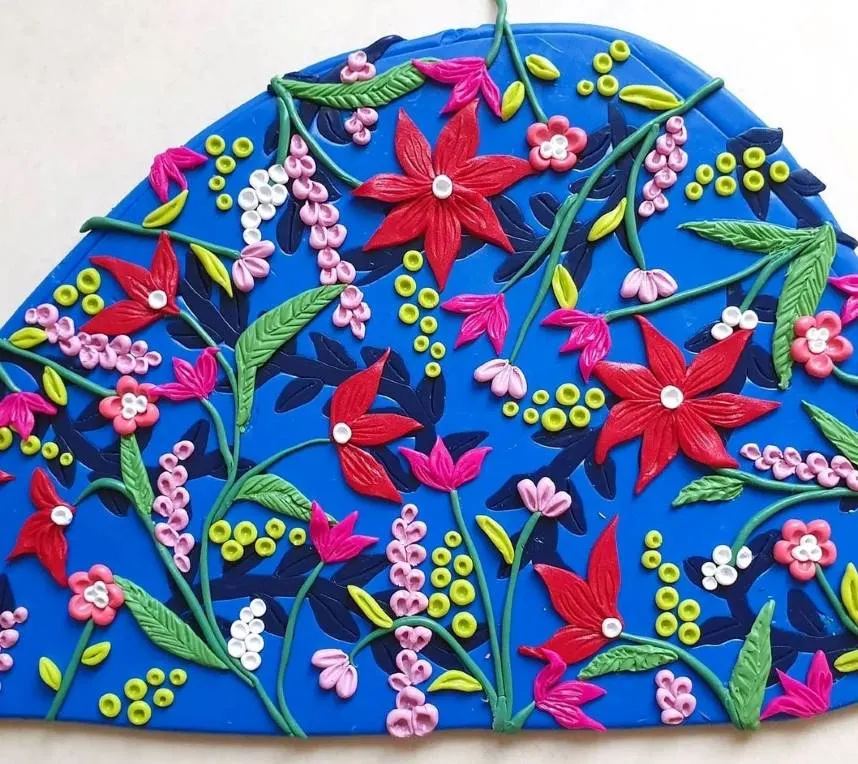

Beautiful right?
Now lets move on to a simple polymer clay slab tutorial that is perfect for beginners…
How to Make a Polymer Clay Slab for Earrings Tutorial
To make a slab roll out a layer of your base clay colour, and then add little designs to it. Once your slab is ready, figure out how many cuttings you will be able to make from it using your cutter shapes of choice, and plan accordingly so you can use as much of the clay up as possible. If there are scraps left over, take smaller cuttings from it for you use in other earring projects.
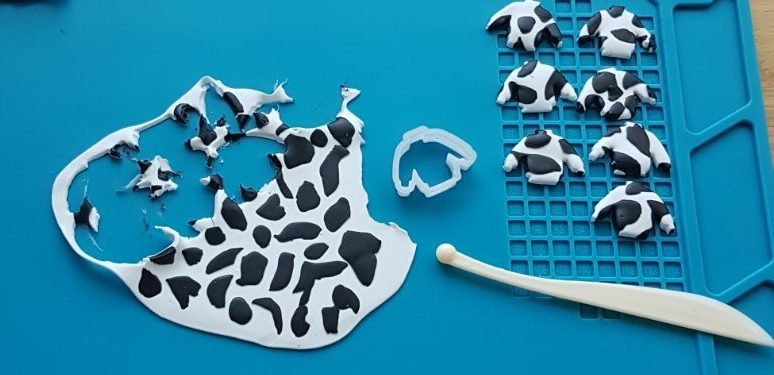
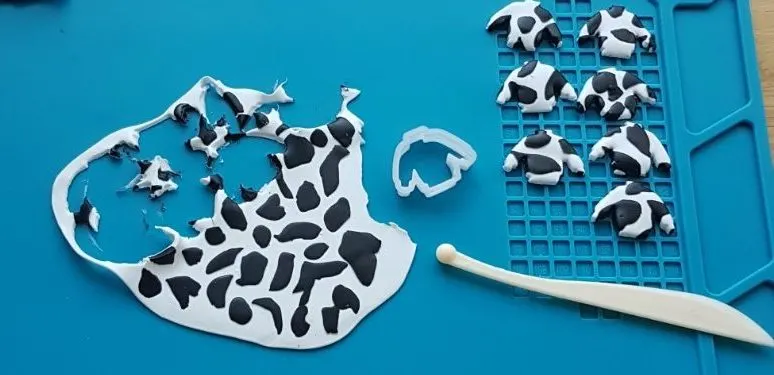
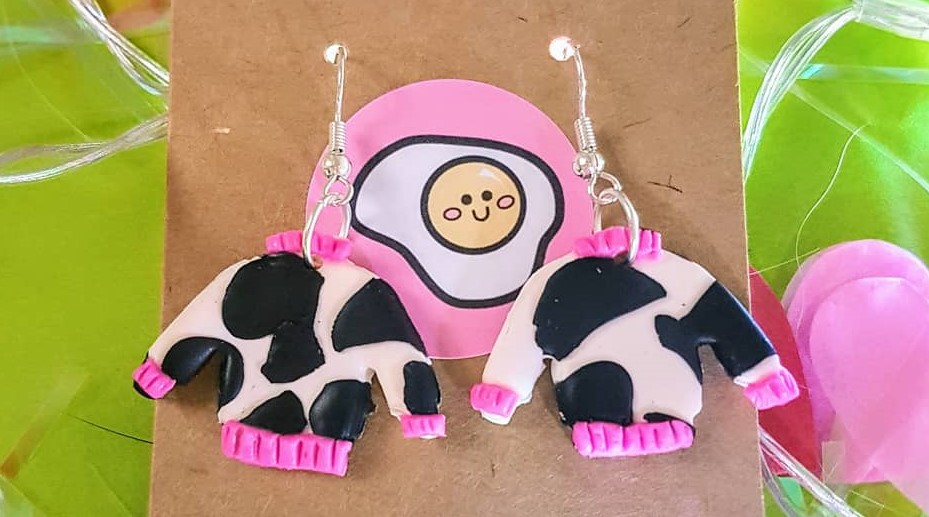
In the above image I decided to make some lovely little cow printed jumper earrings, which were really easy to do.
Here’s How I Made a Cow Print Polymer Clay Slab:
What you will need:
- Black polymer clay – I recommend Fimo
- White Polymer clay – again, Fimo is my favourite
- A silicone mat or a ceramic tile for cutting on
- An acrylic rolling pin
- A clay cutting tool
- Clay cutters for your earring design – I chose a jumper cutter
- A clean working space free of dust and lint
- A baking sheet lined plate to place your designs on afterwards
For help with tools, cutters and clay check out my recommended polymer clay products page.
Top tip: Use an acrylic or glass rolling pin instead of a wooden one, as wooden tools will leave grain imprints in your clay.
Method:
- First I rolled out an even slab of white at around 0.5cm thick – make sure you really take your time to get the base even, as uneven clay will bake at different times, and isn’t ideal for a batch that you want to be uniform.
- Then I rolled out a much thinner slab of black clay, at about 0.2cm thick, and hand cut little cow print patterns from it with my clay tool (pictured).
- Once I was happy with my cow prints I positioned them over the white clay, and lightly pressed my rolling pin over them to seal the clay together. You could use glue here if you wanted to, but I find a bit of pressure from the rolling pin does the trick.
- Then I prepared my little jumper cutter, by making sure it was clean, and pressed it into the clay as many times as I could to get the highest yield from the slab.
Baking:
Before baking your masterpieces, start with a couple of experimental pieces from your slab to test bake in the oven. Each brand of clay will have slightly different baking requirements, so check the packet of yours and make sure you get it right.
Carry your designs to the oven on a plate lined with baking paper instead of with your hands, otherwise you may run the risk of leaving unwanted last-minute fingerprints on your designs – not good!
If your designs are still bendy when they come out of the oven this is normal, depending on thickness and brand, but many beginner crafters take this as a sign the clay is not done.
For more info on baking polymer clay check out:
Here are the earrings I created using the cow print slab:

If you’re interested in more simple slab tutorials, check out my tutorial on making marbled polymer clay slabs – super easy and they look so great!
Polymer Clay Slab Design Ideas
Now you know the slab making method and you’re excited to get started making a slab, here are some design ideas to help get the creative juices flowing.
Seasonal slabs
Seasonal earrings are EXTREMELY POPULAR on Etsy, and make for great sales – if you’re selling that is!
If you’re creating earrings for yourself or as gifts for loved ones, seasonal slabs are always a win, if you can make some inspired by Christmas, Easter, and Halloween.
Seasonal polymer clay earrings sell really well, so grabbing a basic set of seasonal cutters to use on your slabs is also great place to start if you’re looking to start a small business.
If you would like to know more about cutters, check out my guide here:
Here are some ideas for slabs to get your brain going-
Christmas slabs: Christmas trees, candy canes, gingerbread men, Christmas jumpers, snowmen, Christmas puddings, scarf, hats, gloves, snowballs, tree stars, presents, Santas, Mrs Claus, reindeers, sleighs, fireplaces, stockings, nutcrackers, Santa’s boots, mistletoe, holly, wreaths, fairy tree toppers, baubles, gingerbread houses, Christmas cookies, angels, drummer boys, Santa hats, Polar bears, Elves, etc…
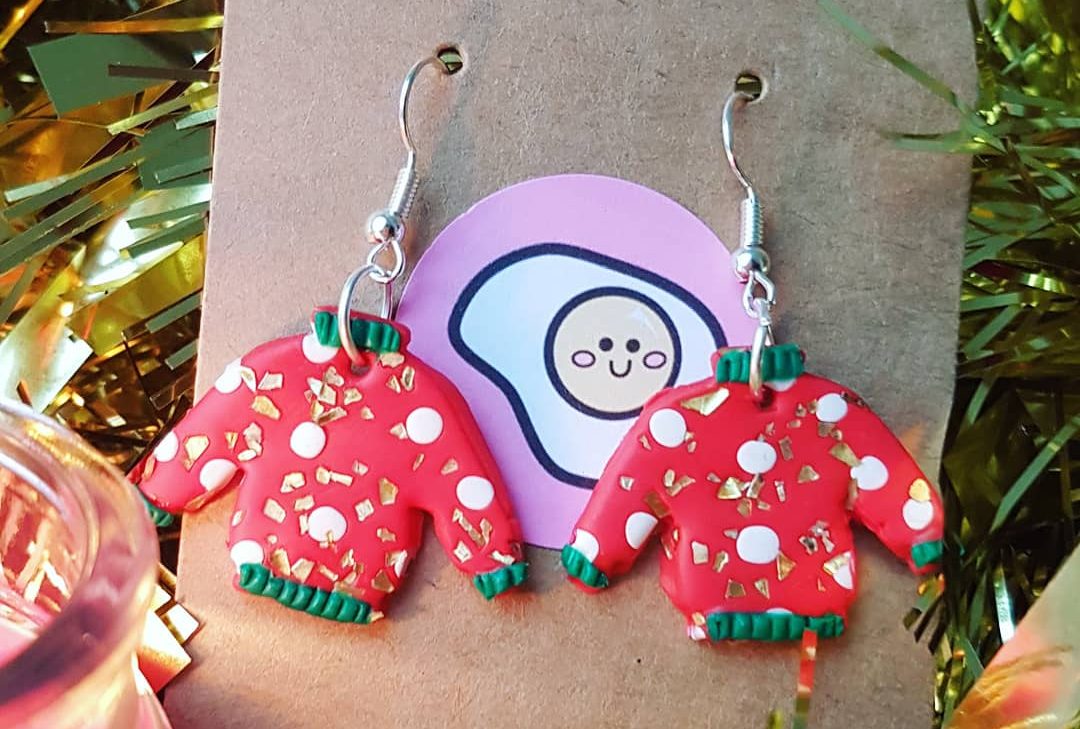
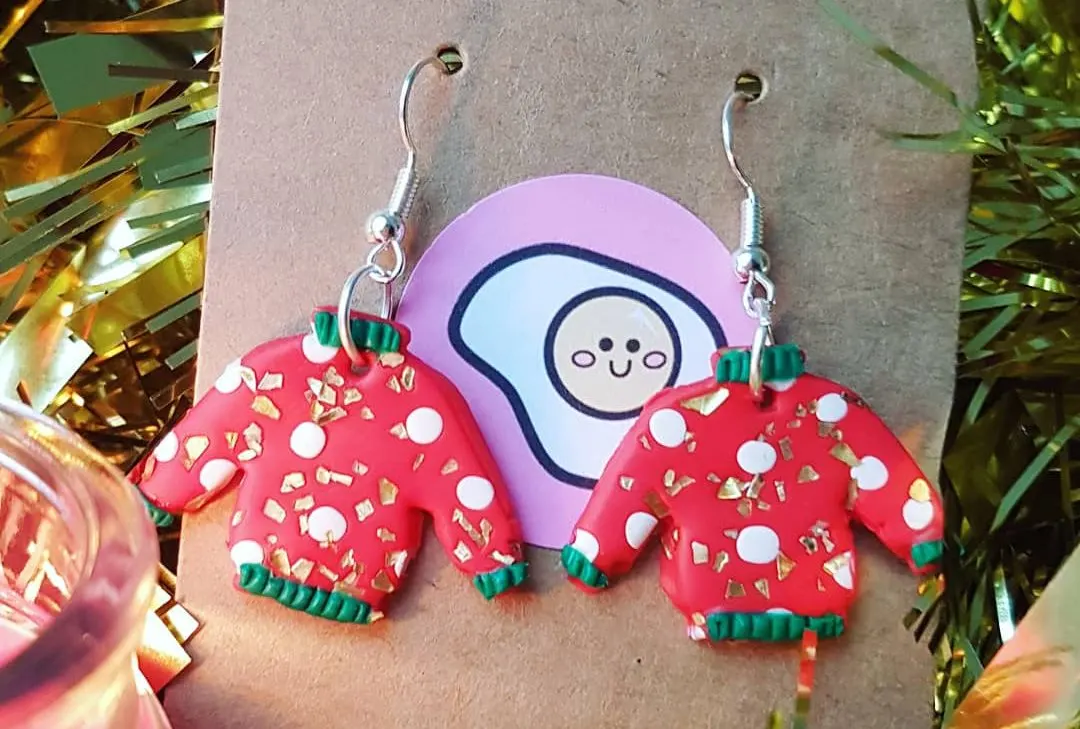
Here’s an example – I created these Christmas jumper earrings out of a glittery, Christmas coloured slab I made using red clay for my base, tiny balls of white clay and glitter for details, which I pressed into my slab with a rolling pin:
Halloween slabs: Pumpkins, candy, witches, skeletons, vampires, mummies, Frankenstein’s monsters, body parts, spider webs, ghosts, bats, black cats, skulls, witches hats, spiders, tomb stones, broomsticks, haunted house, the word ‘boo’, vampire teeth, Casper the ghost, etc…
Easter slabs: bunnies, chicks, Easter eggs, carrots, spring bouquet, chocolates, Sunday dinner, Sunday breakfast, bows, baskets, etc…
Valentines day slabs: Chocolate box, roses, cards, love letter, hearts, lips, kisses, ‘I love you’, etc…
Floral and plant style slabs
Flowers and plants patterns might be my favourite types of polymer clay slabs, because there is just something so simple and beautiful about tiny flora!
Here are some ideas for flowers: bluebells, snowbells, freesia, lilies, roses, sunflowers, carnations, orchid, chrysanthemums, baby’s breath, daises, forget-me-nots, fox gloves
Here are some ideas for plants: ivy, ferns, four leaf clover, palm, monstera, maple tree, oak tree, willow tree, ash tree, bay tree, cactus, succulents
Textile print inspired slabs
Ideas for pattern/detail designs here:
Paisley pattern, floral patterns, leopard print, cow print, snake print, zebra print, polka dot, zig zag, basket weave, chevron, honeycomb, trellis, diamonds, flamestitch, houndstooth, dogs tooth
Patterned slabs
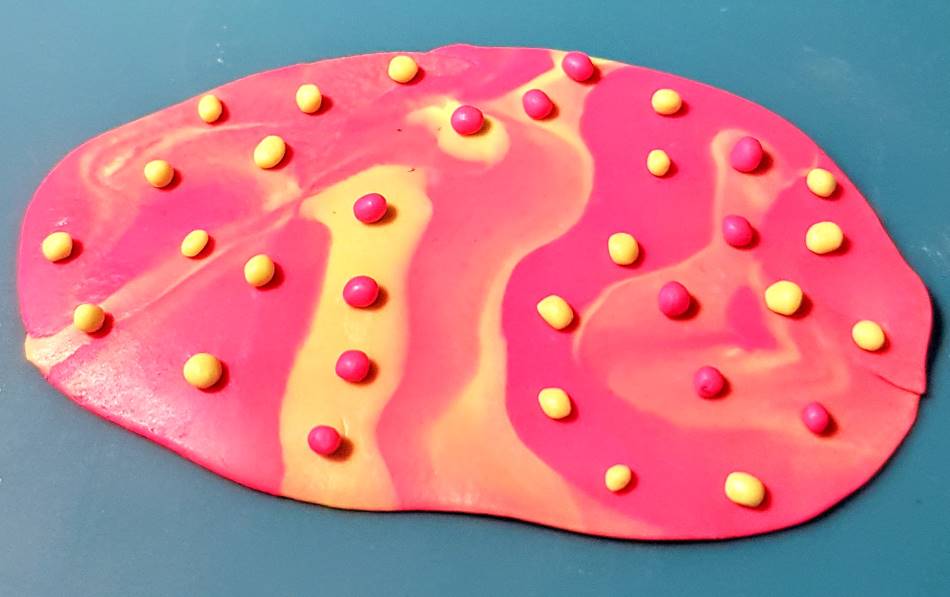
Pinstripes, barcode, abstract, little happy/sad/funny faces, body parts, lips, eyes, hands, letters and words, marbled slabs – as below:

Experimental slabs
Mix colours you wouldn’t usually choose and push your designs out of your comfort zone – a lot of the best things in life come from happy accidents!
Playing around with ideas for polymer clay slabs and getting practice is the best thing your can do for your developing earring skills; coming up with new ideas and pushing yourself creatively will help you develop a habit of coming up with great ideas, until it’s like second nature.

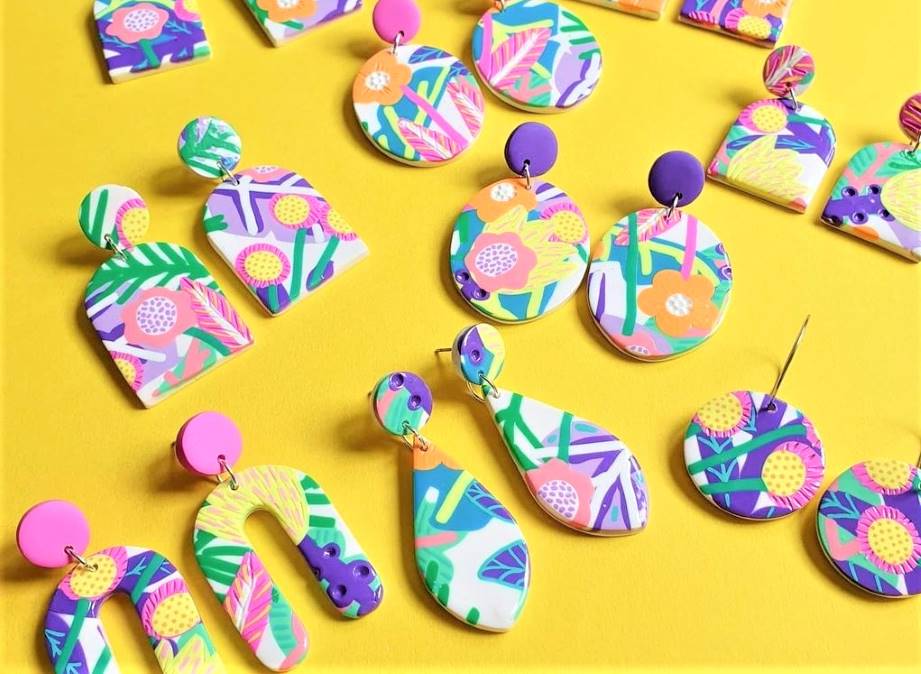

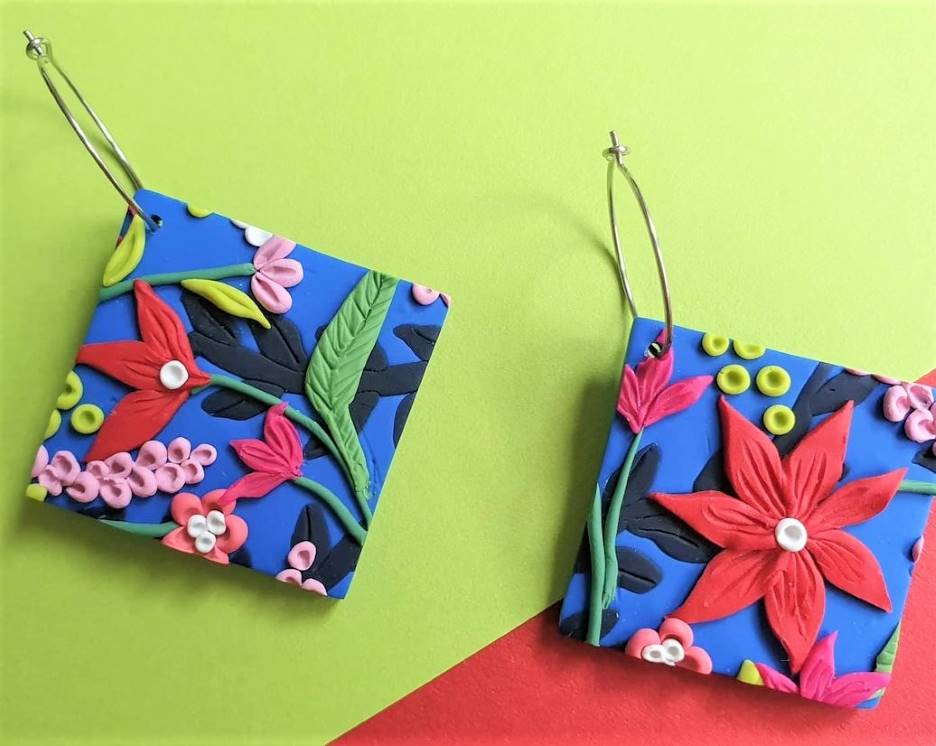
Stunning slabs from @catandclayjewellery and the earrings she made from them – available on etsy!
Related questions
What other polymer clay techniques are there?
Caning is a popular polymer clay technique that involves creating a cane of clay similar to a candy cane, or canes of glass used in traditional glass working. The cane of clay features a central design, that runs throughout the entire stick, that when cut into pieces will feature an identical pattern. Canes are particularly useful for polymer clay jewellery making, as they make uniformed designs easier to achieve.
Slicing designs from a cane of clay is a quick way of mass producing earring designs, such as studs, as one long stick has a high yield. The concept of caning is used in many other crafts, such as glasswork or candy making, as a beautiful way of creating mass uniformed designs.
There are countless designs of polymer clay canes that can be bought or made at home; the caning technique will really elevate your polymer clay jewellery game, and is also useful for model making and other polymer clay crafts. Some of the most beautiful polymer clay earrings I’ve come across have been made using the caning technique, and some of the designs are simply breath-taking – there are a lot of talented people out there!
Read on for my guide to polymer clay canes, including some design ideas and tips to help you get going if you want to make your own, or recommendations if you would like to buy ready-made canes online…
Is polymer clay safe?
Polymer clay is non-toxic, making it safe to use around children and pets, as it has been tested and certified. Polymer Clay only becomes toxic when baked at extremely high temperatures, for prolonged periods of time. If baked according to the packaging instructions, it’s perfectly safe.
Which is the best polymer clay for making earrings and other jewellery?
Answer –
⦁ 1. Fimo – best all rounder
⦁ 2. Sculpey III – good for simple designs and beginners
⦁ 3. Pardo Jewellery Clay/Art Clay – great for more advanced crafters
How do you bake Polymer Clay?
Now, there is no standard baking temperature and time across the board for all polymer clay; this definitely depends on the brand, and each clay should be baked to it’s proper instructions.
I have compiled an A-Z list of popular brands and their baking times for you below, so you can’t go wrong!
Baking instructions by brand:
Cernit: 30 minutes between 110 and 130°C (230-266°F)
Fimo: Maximum of 30 minutes at 110°C (230°F)
Kato Polyclay: 10-30 minutes at 150°C (300°F)
Original Sculpey: 15 minutes per quarter inch (6mm) of thickness at 130°C (275°F)
Pardo Art Clay: Min 30 minutes at 120 decrees (248 F)
Pardo Translucent Jewellery clay: Min 30 minutes at 120°C (248°F)
Premo: 30 minutes per quarter inch (6mm) of thickness. If thicker, initially bake for 15 minutes and then add another 5 minutes, another 5, and so on until done.
PVClay: 15-20 minutes at 130°C (275°F)
Sculpey III: 15 minutes per quarter inch (6mm) of thickness at 130°C (275°F)
Sculpey Souffle: 30 minutes per quarter inch (6mm) of thickness at 130°C (275°F)
For more baking tips, check out: How Long to Bake Polymer Clay Earrings – Quick Guide
Conclusion
Thanks for reading my guide on polymer clay slab making for earrings and I hope you found the information helpful! Polymer clay slabs are a great way to achieve some really cool earring designs, and can make adding details to your creations much faster.
Slab making is also very therapeutic, so take your time making them and see what wonderful designs you can come up with.
My goal is to make the world of polymer clay earring making as easy and fun as possible for everyone who wants to get started, so I have created a bunch of guides filled with advice on various topics that you may enjoy reading. Check out the below for more:
I also provide articles on: a How-to Guide for beginners, a Sales Guide for selling polymer clay earrings on Etsy, a comprehensive Cost Guide, and a bumper list of earring Design Ideas, so you’re never stumped by clay-makers block!
For more information on getting started with polymer clay earrings, check out:
How Much does it Cost to Make Polymer Clay Earrings?
Can You Paint Polymer Clay Earrings? A How-to Guide
How Long to Bake Polymer Clay Earrings – Quick Guide
How to Sell Polymer Clay Earrings on Etsy
How to Make Polymer Clay Earrings: the Basics
Design Ideas for Polymer Clay Earrings
Top Tips for Making Polymer Clay Earrings
Why Polymer Clay Breaks and How to Fix it
The Best Polymer Clay for Earrings and Other Jewellery

Lorna is a footwear geek and the founder of Wearably Weird. She created a YouTube channel in 2021 for fellow footwear fanatics, dedicated to detail-rich footwear reviews and info. She has a fashion media qualification (awarded in 2011).