
Polymer Clay Earrings are a hot trend right now, taking over the handmade and small business world by storm. If you’re looking to get started with your own Etsy shop, or looking to simply make some polymer clay earrings for yourself or for your loved ones, here are my top tips for making polymer clay earrings!
⦁ Buy fondant cutters
⦁ Use cling film when using your cutters
⦁ Make a ‘slab’ of your design
⦁ Leave to cool properly after the oven
⦁ Add cornflour to your baking paper if having trouble with sticking/unwanted flat edges
⦁ Keep a ‘clean up’ ball of clay
⦁ Make your clay one day, bake it the next
⦁ Rubbing alcohol will remove fingerprints from clay
⦁ Keep cleaning supplies nearby
⦁ The experimental piece
⦁ How to tell when polymer clay is baked – the bend and snap test
⦁ Store baked and unbaked polymer clay separately
⦁ Store unbaked polymer clay in plastic containers – not wood or metal
⦁ Use an acrylic rolling pin for rolling out your clay – not a wooden one
⦁ Use a Pasta Machine for rolling clay
⦁ Use a proper clay cutting tool, not a piece of kitchen cutlery
⦁ Cover your clay with baking paper
⦁ Use acrylic paint to add flare to your designs
⦁ Leave polymer clay to properly cool before painting
⦁ Use a nice quality brush when painting your clay – dont be cheap!
⦁ Varnish your designs for a hardened and waterproof finish
⦁ Broken or cracked clay can be fixed…AND MORE….
Read on for how to more tips and links to buy the items…
This post may link to online stores. If you click a link and buy something, I may get a commission. Learn more.
1. Buy fondant cutters
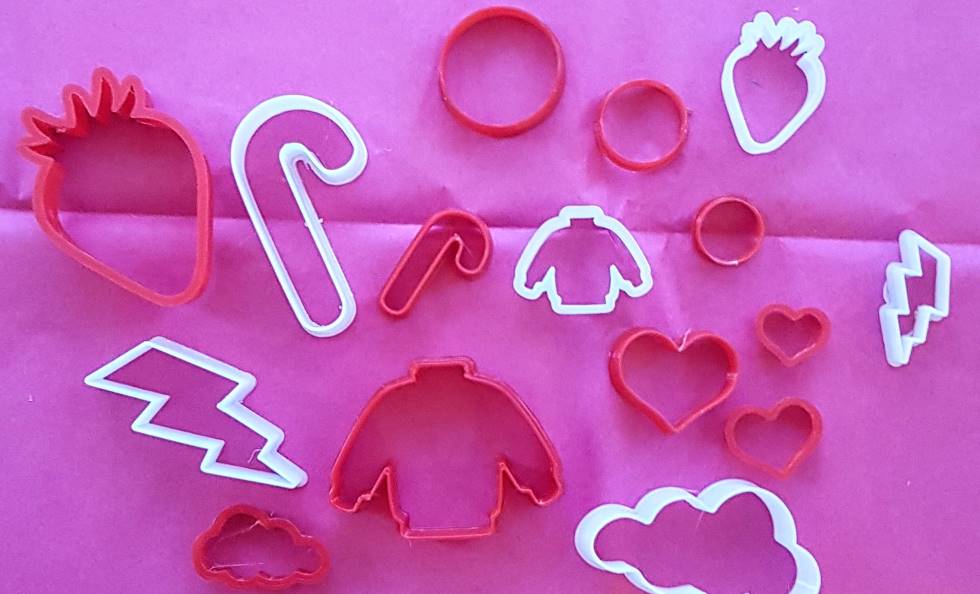

When I started making polymer clay earrings I was surprised that it was a little tough to find teeny tiny earring-sized clay cutters out there on the web.
When I discovered the massive range of fondant cake cutters I was overjoyed! So many cute styles to choose from, and all the perfect size for dangly earrings.
Luckily polymer clay is super light-weight, so even if you did want to use the large regular clay cutters, they shouldn’t be too heavy for your lobes.
Browse my recommended fondant cutters here: Polymer Clay Accessories Buyers Guide
Clay supplies: Best Polymer Clay for Earrings Buyers Guide
2. Use cling film when using your cutters
Place a strip of cling film over your clay before pressing your cutter into the slab, for smoother edges and no need for sanding after baking.
Just tear off a strip and place it securely over your design, and make sure their are no air bubbles or loose bits. Then press your cutter into the clingfilm layer and through the clay.
Simply peel off the clay afterwards for a perfect result!
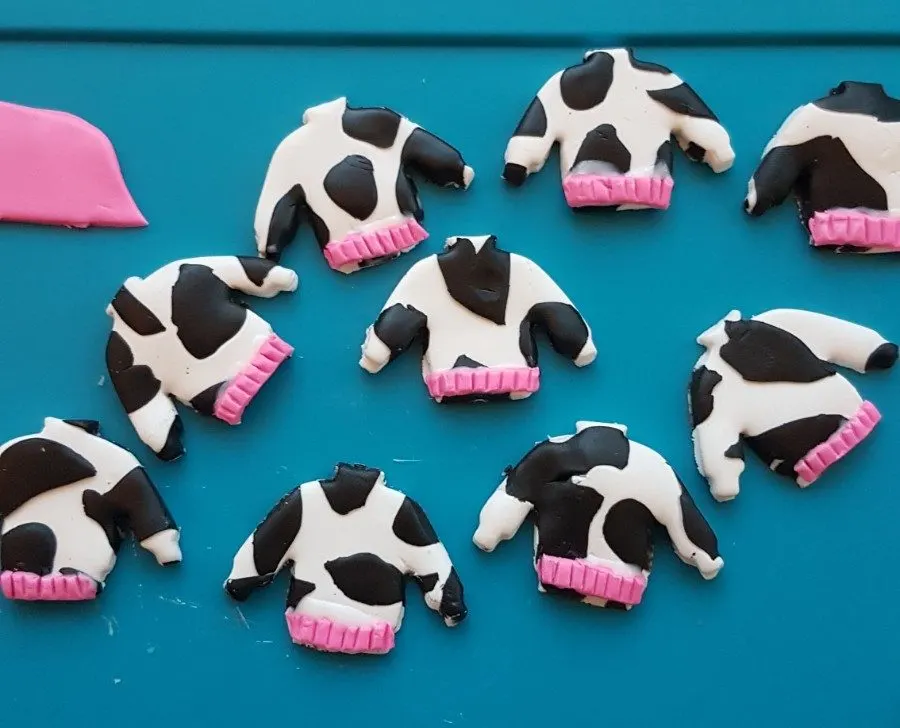
3. Make a ‘slab’ of your design
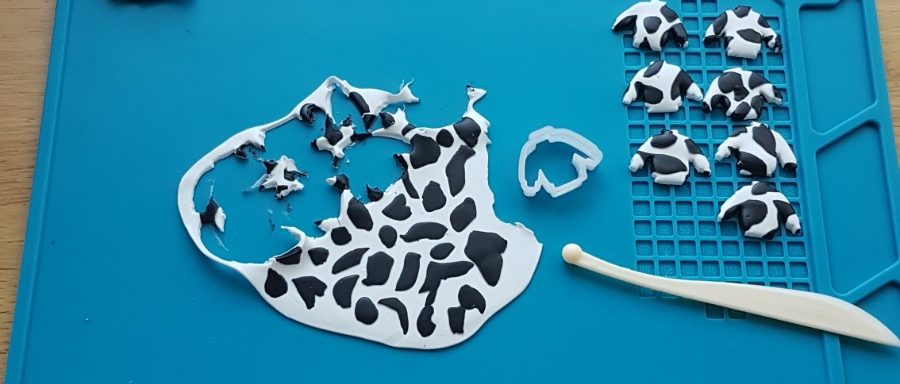
This is much easier than making individual pieces, and will save you a lot of time. Plus creating a large slab of your design is so satisfying!
To make a slab roll out a layer of your base clay colour, and then add little designs to it. Once your slab is ready, figure out how many cuttings you will be able to make from it and plan accordingly so you can use as much of the clay up as possible. If there are scraps left over, take smaller cuttings from it for you use in other earring projects.
ABOVE EXAMPLE: roll out a slab of white and make sure the thickness is even throughout, then cut out little black cow prints and place them onto the slab. Run your rolling pin gently over the slab to press the black firmly against the white.
4. Leave to cool properly after the oven
The clay needs to harden, so don’t drill through your holes until this has been achieved. I typically leave my pieces for a couple of hours, so they are sufficiently solid before messing with them.
Making sure your clay has cured and hardened properly is key in creating a sturdy earring piece. Keep your earrings in a place they wont gather dust and lint whilst cooling, and ensure they wont be knocked or damaged – the family dining table isnt very safe!
5. Add cornflour to your baking paper if having trouble with sticking/unwanted flat edges
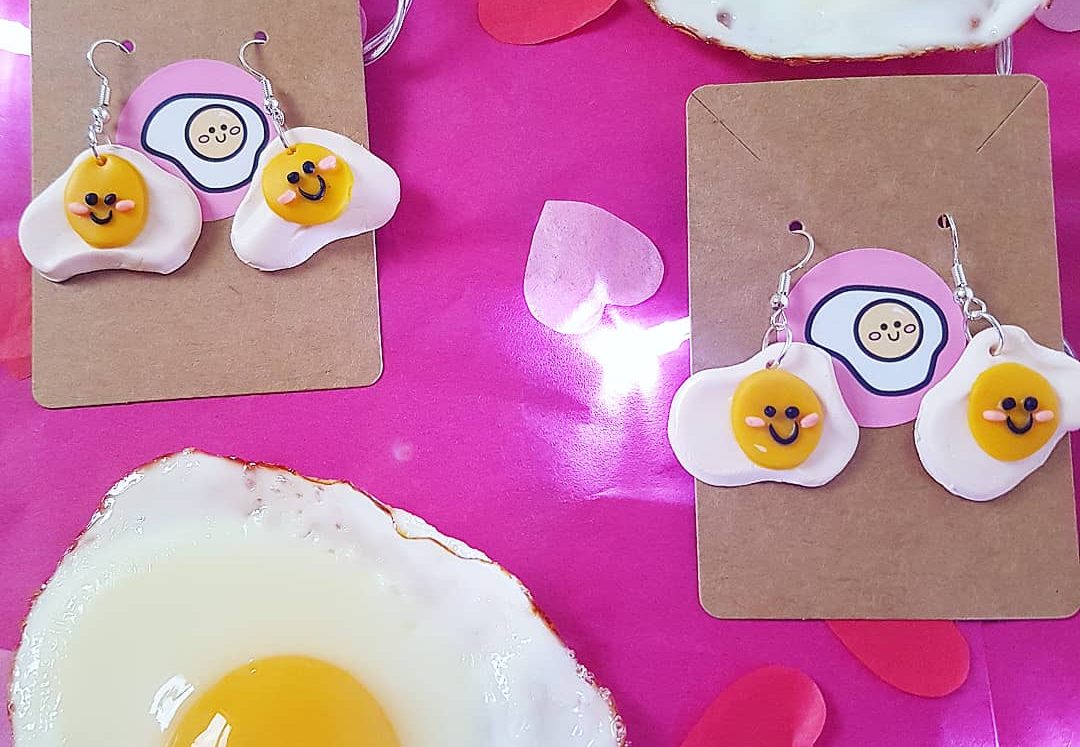
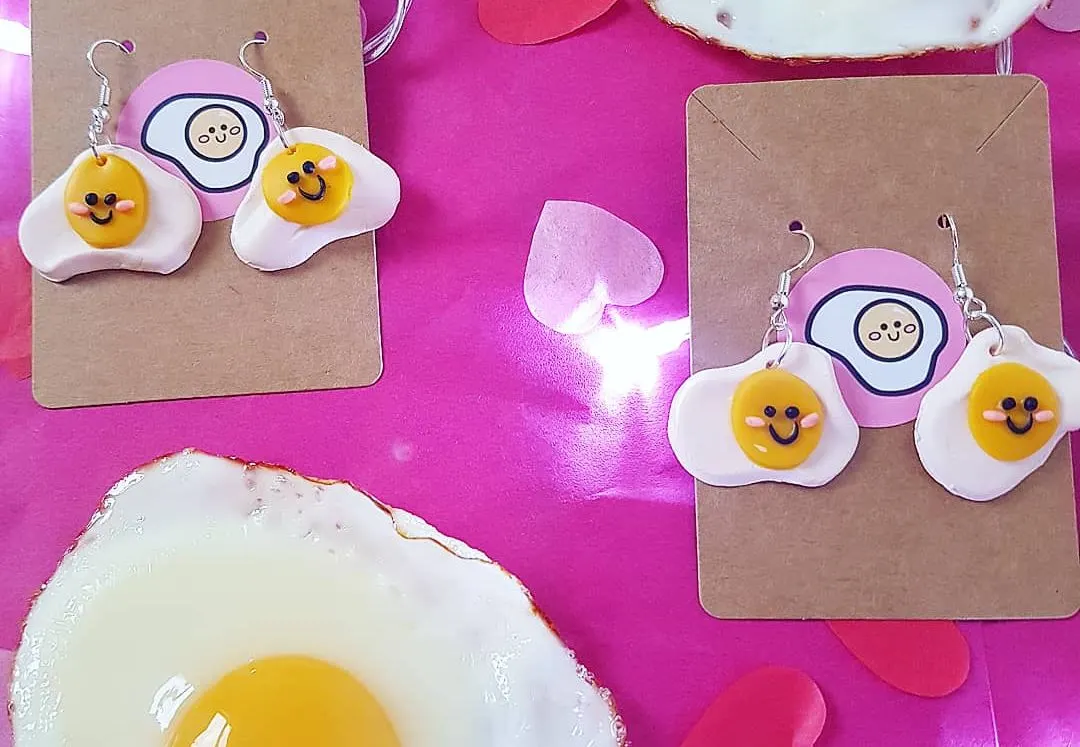
I placed my little EGGY designs (above) in cornflour, to keep them safe whilst baking! A little mound of cornflour protects the piece, if you’re making 3D models for your earrings.
Pop your design in a nest of cornflour on your baking paper and bake as normal. The flour will easily dust off afterwards.
Cornflour is inexpensive and can be found in most supermarkets, so grab a box next time you’re doing your shopping and make baking your polymer clay earrings much easier.
6. Keep a ‘clean up’ ball of clay
A clean up ball of spare clay will pick up dirt and fibres from your mat when you need a quick tidy up in between rolling.
I like to keep a ball of miscellaneous clay in my kit, and I place it on my mat each time I start creating – you know the odds and ends from blocks that you roll together to make a mushy, colourless ball? You’d be surprised how much muck your ball can pick up!
Polymer clay is actually a great cleaning tool as it’s so effective at gathering dirt; many use it for cleaning keyboards and other nooks.
If you are enjoying this article you might like: Instagram Polymer Clay Earrings: The Rise of Independent Brands
7. Make your clay one day, bake it the next
If you like you can make your clay one day and then save it for as long as you want, because it doesn’t dry out – there’s no need to rush. The bonus here is you can tweak your designs if any afterthoughts come to you.
It’s best to store your unbaked clay properly, in a dry place away from direct sunlight, until you are ready to bake it. The perfect solution is plastic storage drawers as they keep the moisture out and prevent any fibres floating on the air from sticking to your designs.
For more baking tips check out: How Long to Bake Polymer Clay Earrings – Quick Guide
8. Rubbing alcohol will remove fingerprints from clay
This was a great tip I learnt when hand moulding clay. Banish those pesky fingerprints from your designs with a swift wipe of rubbing alcohol over the surface of your clay before baking – you only need a little bit!
Keep a bottle in your supplies kit and have it ready to grab when those inevitable fingerprints appear.
One great thing to do is keep a plate with a sheet of baking paper next to your crafting table, so you can place your finished designs straight onto there instead of carrying them to the oven, and accidentally adding last minute fingerprints.
9. Keep cleaning supplies nearby
For wiping down cutters, tools, rolling pin and your mat in-between colours. You’ll be surprised how often you need to grab these as you go.
I like to clean my rolling pin and mat in between rolling out slabs of colour, because there are often small traces of clay left on the items, that can easily transfer to a fresh clock, spoiling the colour.
10. The experimental piece

Before creating your masterpieces, start with a couple of experimental pieces to test bake in the oven. Each brand of clay will have slightly different baking requirements, so check the packet and make sure you get it right.
It’s best to make a range of test pieces, with varying thickness and to keep notes on their baking times by running the tests under a close watch. This way, you’ll have a tailored guide to you oven and your brand of clay, so you get baking right every time!
This is my favourite tip by far, as it really does go with the saying ‘practice makes perfect’. Running test pieces and including one in each batch you make is a great way to tell if your clay is properly baked, how your finished designs will look, and whether your pieces stand the test of becoming earrings.
I hope you’re enjoying these tips for making polymer clay earrings! For more, check out my related articles: how-to guide on making polymer clay earrings, Check out: Design Ideas for Polymer Clay Earrings
11. How to tell when polymer clay is baked – the bend and snap test
If your polymer clay earrings designs are still bendy when they come out of the oven this is normal, depending on thickness and brand, but many beginner crafters take this as a sign the clay is not done.
Even properly baked pieces can still be bendy because of what Polymer Clay is made out of; it’s vinyl (plastic), so when still warm it will bend slightly, unless the design is super thick. This is the reason why clay that isn’t baked properly can be brittle and break, because it hasn’t been exposed to heat long enough for the plastic component of the clay, the dye, the stabilizers etc to properly fuse.
So if you can’t tell by feel (bending the already bendy clay), the proper way to tell is trying to break a piece – sounds crazy right? Why would you break one of your new lovely little designs, just to tell if it’s properly done?
The answer is to add a ‘test piece’ to your batch, that you don’t mind breaking in order to check if the whole lot is done!
Make sure your test piece is of the same thickness, and if you want, you can go into as much detail with your test piece as your main batch, if you want the test to be super accurate. But I find that as long as the test piece is a similar shape and thickness to your design, it should be a good enough indicator.
Here’s the TEST: If it bends BEFORE it breaks, then it’s done. If it’s not fully done it will SNAP in two because it’s still brittle. Unbaked clay will also chip when drilled.
But please note, some brands of clay are quite brittle by nature and might still break even if they are properly done – for example the Sculpey brand. I would suggest you really get to know your clay, and perhaps opt for stronger brands.
12. Store baked and unbaked polymer clay separately
It’s not advised that you store baked and unbaked clay together, as the uncured components of the unbaked clay may actually weaken the baked clay over time, through exposure to it’s oily residue.
This is due to what the clay is made of and how it responds to baking; the clay is made up of plastics, stabilizers, fibres and colouring components, that can be quite greasy before baking. Once exposed to the proper temperature for the allotted time, the clay hardens up and the oily residue solidifies. If you then place that hardened clay next to unbaked clay, the residue in the unbaked clay can draw back into the porous baked clay and start to make it brittle.
13. Store unbaked polymer clay in plastic containers – not wood or metal
Avoid storing your clay in wooden or metal boxes, as the wooden boxes can dry out the clay’s oil residue, which is essential for keeping the clay pliable. The wood is more porous than the clay, so it will draw moisture into it, ruining the box and your block of clay. Metal boxes can be an issue in warm rooms, as they are a heat conductor and will melt your clay.
Plastic or glass is best in this case! Also, the containers don’t need to be completely air tight, as clay won’t air dry or dry out, which is one of the reasons it’s so easy to keep and use.
Top tip: to tell if something is the correct plastic, flip it over and look for the markings on the bottom. There should be the number five in a triangle on the underside.
Polymer clay should be stored in a cool and dry place, as heat will cause it to bake prematurely. For best results you can opt to store your clay in the fridge or freezer – many crafters keep blocks of clay in their freezers for years at a time. Room temperature should be fine however, as long as you’re in a cooler climate and the clay is kept away from radiators.
The biggest issue with unbaked clay is exposure to heat, as this will start the curing process, and exposure to sunlight (two fold!) as the light will cause the clay’s vibrancy to fade, leaving you with a washed out, sun-bleached block of unusable material.
14. Use an acrylic rolling pin for rolling out your clay – not a wooden one
You’ll need a reliable and sturdy rolling pin for rolling out your slabs of clay, and getting them perfectly even for cutting. It’s best to use an acrylic or glass rolling pin, as a wooden one will sick to your clay or leave imprints of it’s grain in the clay – not good!
What you should look for in a rolling pin:
⦁ Not too large, 30cm rolling pin or under is enough
⦁ Easy to clean
⦁ Of a good quality with a smooth finish – not lumps or dips in the acrylic that will leave marks in your clay
15. Use a Pasta Machine for rolling clay
A pasta machine is a wonderfully easy way of rolling out your clay, if you don’t want to use the rolling pin method. This is a great way of levelling up your clay rolling and is favoured by pro crafters and jewellery makers, as it will roll out your block of clay to a perfectly even slab, making sure all of your cut pieces are a uniformed width.
Plus it saves you the arm workout 😉 This is one of the best polymer clay tools for beginners hacks!
What you should look for in a pasta machine:
⦁ Width of rolling segment
⦁ Any attachments, like a spaghetti maker – great if you want to cut ribbons of clay for weaving or details
⦁ Sturdy with a good weight to it, so it doesn’t wobble when you roll the clay through
⦁ Easy to clean, to get the clay out of the mechanisms
16. Use a proper clay cutting tool, not a piece of kitchen cutlery
This is an essential part of any clay maker’s kit for chopping up blocks of clay, tracing over stencils, custom pattern cutting and general precision work. A good cutting tool will go a long way, staying in your tool kit for years to come.
Why not just use something from your cutlery drawer you ask? Cutlery is not sharp enough for precise lines, and it’s also not a fine enough edge – it often has serrated edges too, which will leave jagged imprints in your clay, instead of nice clean lines. You need a dedicated cutting tool, designed for clay cutting, for best results.
What you should look for in a cutting tool:
⦁ A sturdy handle, with good grip
⦁ Lightweight for excessive use
⦁ A sharp enough edge for precise cutting, so the clay doesn’t drag
⦁ Easy to clean and store
⦁ A rubber grip for ease of use
Browse my recommended tools here: Polymer Clay Tools Buyers Guide
17. Cover your clay with baking paper
Cover your clay with baking paper before you put it in the oven, to trap heat around the design for even baking! You can pick up baking paper at your local supermarket, or online – add some to your basket the next time you are shopping.
Even baking is crucial for thicker designs, as often the bottom of uncovered designs will cook faster, creating an uneven bake throughout – which can lead to some parts of the design becoming more brittle than others.
18. Use acrylic paint to add flare to your designs
Add acrylic paint to your polymer clay designs – it’s cheap, simple and fun to do so, and painting your polymer clay earrings can save you loads of time with tricky little details or more intricate patterns. This is one of my favourite tips for making polymer clay earrings, because it can make such a difference to your designs.
Why it’s a great idea:
⦁ Adding paint to your polymer clay earrings can totally change your designs for the better, with more unique and interesting patterns!
⦁ Not only will your amazing earrings be handmade but hand painted too! Double the wow-factor for your Etsy listing by one-upping your competition with this method, and watch the interest in your products increase.
⦁ Plus, with hand painting it’s hard to replicate the EXACT same pattern each time, which only adds to the magic; each design will be slightly different which provides yet another compelling creative touch to your pieces from a sales perspective.
19. Leave polymer clay to properly cool before painting
Your clay needs to be properly baked and completely dry before you wield your paint brush before it!
This is so no moisture/oil comes out from the clay and disturbs the acrylic paint when it’s swept across the surface of the design, causing that pesky mottled/bubbling effect.
The clay could also have not cured properly and the water may have made it weak and more susceptible to snapping, so make sure it’s properly baked and cooled.
Top tip: Leave the clay for 24hrs after baking to properly cool and harden, before painting.
You technically could paint it before baking, and some brands may say that you can do so, but the above is why I won’t and never will; I don’t want to risk the structural integrity of my little master-pieces! 😉
20. Use a nice quality brush when painting your clay – dont be cheap!
The reason you want a nice brush is so the brush hairs don’t shed onto your design and stick in unwanted places.
Secondly, the smoother and better quality brush hairs, the nicer your paint strokes will come out – think of a cheap brush like an old toothbrush, with the bristles bent out of shape – not the best tool for delicate intricate painting!
A more expensive brush will create lovely smooth and even strokes, with no rough bristle marks.
21. Varnish your designs for a hardened and waterproof finish
Varnishing (or acrylic sealing) will make your design stronger and less susceptible to brittleness from moisture absorption over time – widely available in craft stores, DIY stores, online, you should have no trouble getting your hands on some.
The sealer (or varnish) is super easy to use: simply wait for your paint to dry and then seal your design with a thin layer, and leave to dry – acrylic sealer and varnish take take between 4-12 hours to dry, so be patient and avoid touching your designs.
You should keep your designs stored somewhere safe, so they won’t get damaged out and about, and little bits of dust and fluff on the air in your home won’t stick to the varnish and mess up your designs in this final stage.
Once fully dried your designs will be scuff, chip and scratch proof and will benefit from an extra layer of hardening – win win!
22. Broken or cracked clay can be fixed
Tiny hairline cracks or breaks after baking? oh no 🙁 but wait…
If one of your master pieces is already broken – fear not! There are several ways to fix broken or cracked polymer clay.
Rule number 1.
Don’t just add new clay to your pieces and re-bake them – the clays won’t adhere to each other properly and the originally baked clay can be over baked, causing browning or burning.
Sometimes stuffing the breakages with new clay can actually make the problem worse, by growing the cracks as the clay expands very slightly when baking.
DO THIS instead
Instead adding clay shavings (like a dust) to baked pieces, can fill in the tiny hairlines.
Make the clay dust by rolling or shaving very fine pieces of clay from the same colour block you created your design from – using a grater is easiest.
Once this is done add glue to your tiny clay shavings and mix it up, creating a paste to carefully apply to your design’s cracks.
Use a super fine painting brush to do this, so you can get really precise.
The second way is to use plumbers putty on the cracks to fill them in, sand down and paint over them.
Once you’ve applied the putty, wait 10 – 30 minutes for it to harden naturally (no need to bake, just leave out to air dry), and then you can use super fine sanding paper over the cracks to smooth out any jagged edges the putty may have created.
Once this is done, apply acrylic paint in a colour match over the cracks to seal everything up.
Conclusion
I hope my ‘Top Tips for Making Polymer Clay Earrings – time saving!’ article was helpful for you and you now feel confident to head to your craft table with your craft table and have a go with your polymer clay earring designs!
My goal is to make it as easy as possible for you to understand the world of polymer clay earring making, so you can go into your new hobby or small business venture with estimates, tips and facts under your belt for a smooth and rewarding start in this craft.
I also provide articles on: a How-to Guide for beginners, a Sales Guide for selling polymer clay earrings on Etsy, a comprehensive Cost Guide, and a bumper list of earring Design Ideas, so you’re never stumped by clay-makers block!
For more information on getting started with polymer clay earrings, check out:
How Much does it Cost to Make Polymer Clay Earrings?
Can You Paint Polymer Clay Earrings? A How-to Guide
How Long to Bake Polymer Clay Earrings – Quick Guide
How to Sell Polymer Clay Earrings on Etsy
How to Make Polymer Clay Earrings: the Basics
Design Ideas for Polymer Clay Earrings
Top Tips for Making Polymer Clay Earrings
Why Polymer Clay Breaks and How to Fix it

Lorna is a footwear geek and the founder of Wearably Weird. She created a YouTube channel in 2021 for fellow footwear fanatics, dedicated to detail-rich footwear reviews and info. She has a fashion media qualification (awarded in 2011).