
How to make polymer clay earrings; the question on every crafty and creative person’s lips these days. Polymer clay earrings are an exciting new trend in the small-business and handmade world, taking over our Instagram feeds and YouTube recommendations alike.
For those of you who want to get involved, here’s the answer:
How to make polymer clay earrings?
⦁ Get your clay and tools supplies ready
⦁ Get your earring supplies ready
⦁ Create a clean and organised work space
⦁ Do an experimental test piece
⦁ Make the earrings
⦁ Correctly store your earrings
Add a sprinkle of creative flare and you’ve got some amazing designs popping up like whack-a-moles in Etsy shops around the world – there one minute, sold the next! Why not join in on the fun (and the profit) by giving this new and exciting business venture a go for yourself.
Read on for my comprehensive guide to the basics on how to make polymer clay earrings…
This post may link to online stores. If you click a link and buy something, I may get a commission. Learn more.
1. Get your clay and tools supplies ready
You can never be too prepared, so here’s a starter-pack shopping list:
Clay
Clay glue
Clay or fondant shaped cutters
Tweezers or jewellery pliers
Clay knife
A needle
Silicone board
Rolling pin – avoid wood because of the grain
Baking paper
Pasta maker – if you’re getting fancy
Drill – if you don’t want to poke hook holes in your unbaked clay
Storage boxes/organisers
Optional – rubbing alcohol (to remove fingerprints from clay)
Browse my recommended polymer clay products, if you need help with your shopping:
A starter kit is also a great option if you want to get some tools, clay and accessories in one place – I would suggest buying some earring hooks separately in 925 silver, if you plan on selling your creations. The below starter kit is my current top pick – amazing value for money for the price:
2. Get your earring supplies ready
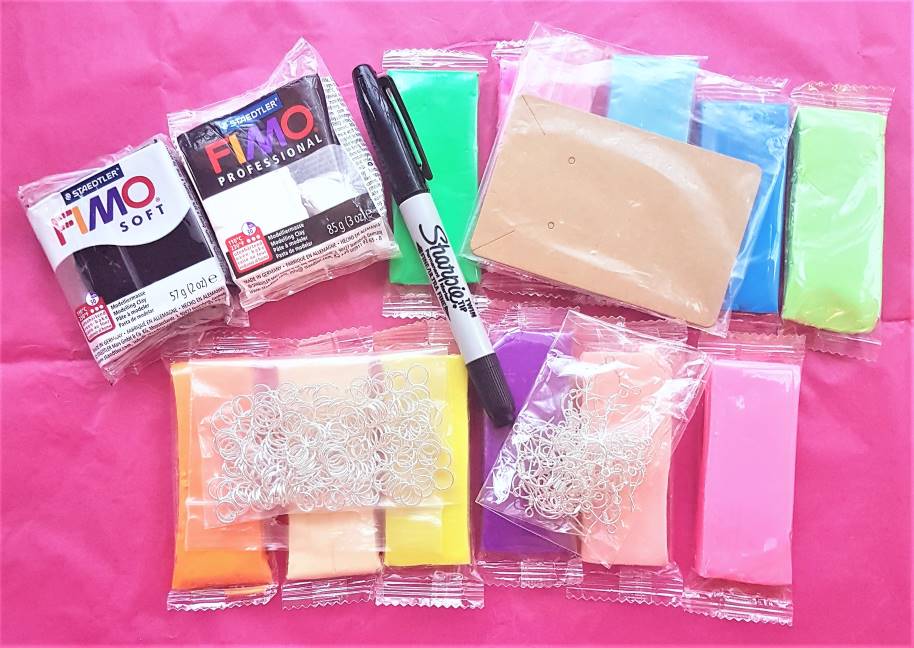

Here’s a shopping list:
Earring hoops
Jump hoops
Earring cards
Gift bags (if selling)
Tissue paper (if selling)
Postage boxes (if selling)
Sharpie or label printer (if selling)
3. Create a clean and organised work space
Make sure your creative space is spotless, so no tiny fibres or dust particles floating on the air and table will stick to your clay – this is of paramount importance! If possible create yourself a permanent workstation in a room away from pets – (fur is the worst) and dust gatherings items – non-carpeted rooms are best, but not essential.
Organise your space with storage boxes or drawers, so there are places for your clay creations to live – baked and unbaked.
Avoid storing your clay in wooden or metal boxes, as the wooden boxes can dry out the clay’s oil residue, which is essential for keeping the clay pliable. The wood is more porous than the clay, so it will draw moisture into it, ruining the box and your block of clay. Metal boxes can be an issue in warm rooms, as they are a heat conductor and will melt your clay.
Plastic or glass is best in this case! Also, the containers don’t need to be completely air tight, as clay won’t air dry or dry out, which is one of the reasons it’s so easy to keep and use.
Top tip: to tell if something is the correct plastic, flip it over and look for the markings on the bottom. There should be the number five in a triangle on the underside.
Check out my guide on how to store polymer clay for more info:
Make sure you have your method of carrying your designs to the oven ready – even a simple baking sheet on a plate is better than your hands and will save unwanted last-minute fingerprints marking your design.
Keep your tools in your ‘grab zone’ in an organised fashion – you never know when you’ll need the emergency tweezers! It’s best to have a little tool box or even better a tool rack attached to your workspace or wall that you can easily take tools from.
Keep cleaning supplies nearby for wiping down your cutters and tools in between colours. It’s nice to be able to grab your sprays and tissues without having to move away from your table. Make sure if you’re using tissues these are high quality so they don’t leave a ’tissue dust’ on your gear.
4. Sketch out your design or keep a photo in front of you and prepare your clay


A visual image is a great way to keep your ideas on track when creating a design for the first time. I like to mock up my designs on Inkscape (a free graphic design program), so I have a clear image to refer to when creating (see ‘The Moomper earrings’ and ‘The Eggy earrings’ designs above). But a sketchpad will work just a well, if you have some paper and coloured pens lying around the house.
Take your time with your designs, and sit on them for a couple of days; that way you’ll be 100% sure of what you are doing when you start reaching for your clay (you’re less likely to waste any clay that way!)
If you need ideas for designs, check out this article: Ideas for Polymer Clay Earrings
Get all of the colours you’ll need ready, and cut the amounts you’ll need from the clay blocks before hand – make sure to clean your knife in between colours! I’ve made that mistake one too many times; there nothing worse than specks of black in your fresh pack of white.
5. An experimental test piece
Before creating your masterpieces, start with a couple of experimental pieces to test bake in the oven. Each brand of clay will have slightly different baking requirements, so check the packet and make sure you get it right. I’ve included an A-Z breakdown of brands and their baking instructions here for you, so you can’t go wrong:
Cernit: 30 minutes between 110 and 130°C (230-266°F)
Fimo: Maximum of 30 minutes at 110°C (230°F)
Kato Polyclay: 10-30 minutes at 150°C (300°F)
Original Sculpey: 15 minutes per quarter inch (6mm) of thickness at 130°C (275°F)
Pardo Art Clay: Min 30 minutes at 120 decrees (248 F)
Pardo Translucent Jewellery clay: Min 30 minutes at 120°C (248°F)
Premo: 30 minutes per quarter inch (6mm) of thickness. If thicker, initially bake for 15 minutes and then add another 5 minutes, another 5, and so on until done.
PVClay: 15-20 minutes at 130°C (275°F)
Sculpey III: 15 minutes per quarter inch (6mm) of thickness at 130°C (275°F)
Sculpey Souffle: 30 minutes per quarter inch (6mm) of thickness at 130°C (275°F)
Super sculpey: 15 minutes per quarter inch (6mm) of thickness at 130°C (275°F)
An experimental piece has many benefits:
⦁ You’ll learn how long it takes for the brand of glue you’re using to set in the oven and the time it takes to sufficiently bake the clay
⦁ How long it takes for your to warm up your clay between your hands (or cool down in the fridge if too squishy) when you start moulding
⦁ How thick to make your designs
⦁ And an idea of the precise amounts of clay needed for each earring, for easier batch-making
Once you’ve practice with your experimental test piece, there’s one more test you can apply to make sure you’re getting things right –
If your designs are still bendy when they come out of the oven this is normal, depending on thickness and brand, but many beginner crafters take this as a sign the clay is not done.
Even properly baked pieces can still be bendy because of what Polymer Clay is made out of; it’s vinyl (plastic), so when still warm it will bend slightly, unless the design is super thick. This is the reason why clay that isn’t baked properly can be brittle and break, because it hasn’t been exposed to heat long enough for the plastic component of the clay, the dye, the stabilizers etc to properly fuse.
So if you can’t tell by feel (bending the already bendy clay), the proper way to tell is trying to break a piece – sounds crazy right? Why would you break one of your new lovely little designs, just to tell if it’s properly done? But that’s what the experimental test piece is for!
Here’s the TEST: If it bends BEFORE it breaks, then it’s done. If it’s not fully done it will SNAP in two because it’s still brittle. Unbaked clay will also chip when drilled.
More top tips here: Ten Tips for Making Polymer Clay Earrings
6. Making the earrings
You’re finally ready to start with your first batch – great! There are a few ways you can go about this, but I’ll outline my preferred method for you, as it’s easy, quick and basically fool-proof.
Condition your clay
How to condition polymer clay?
Condition polymer clay by warming it up between your hands to make it malleable, and to press out any air bubbles from the clay. Roll the clay into balls or sausages until soft, and no longer flaky.
Here’s what two conditioned balls of polymer clay should look like:
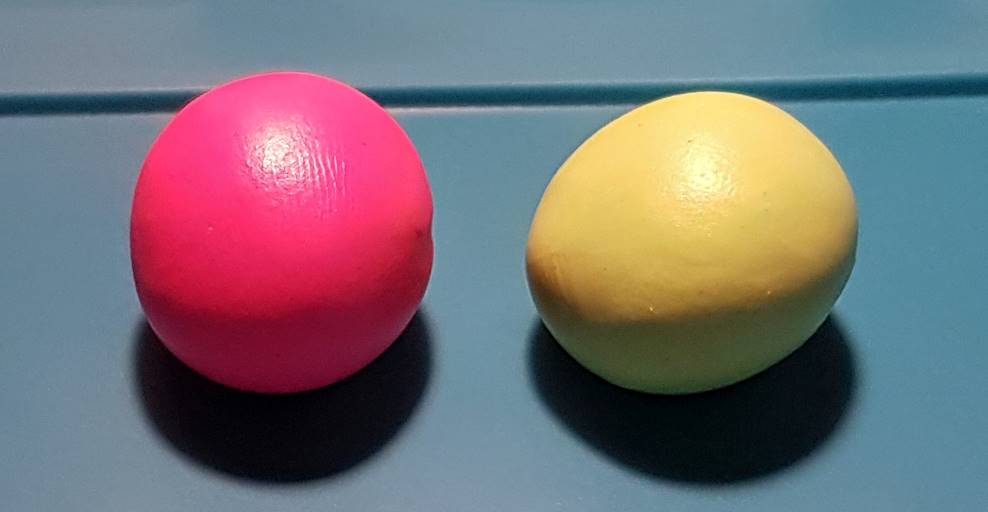
Notice how they are smooth and warmed up, with no cracks in the clay? That’s how they should look!
Next, make a slab and prepare your chosen cutters!
Moulding and cutting
Make a slab of your design –
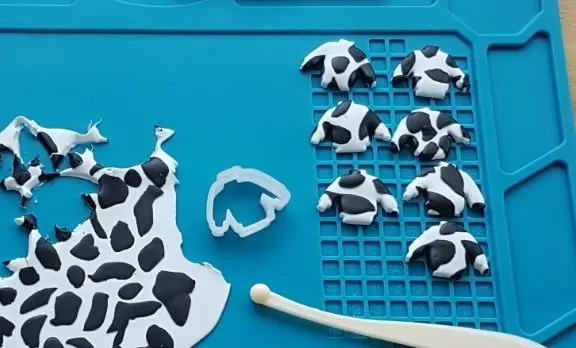
Here’s an example of a cow print slab I made recently:

This is much easier than making individual pieces, and will save you a lot of time. Plus creating a large slab of your design is so satisfying!
To make a slab roll out a layer of your base clay colour, and then add little designs to it. Once your slab is ready, figure out how many cuttings you will be able to make from it using your cutter shapes of choice, and plan accordingly so you can use as much of the clay up as possible. If there are scraps left over, take smaller cuttings from it for you use in other earring projects.
In the above image I decided to make some lovely little cow printed jumpers, which we’re really easy to do. Here’s how I did it:
- First I rolled out an even slab of white at around 0.5cm thick – make sure you really take your time to get the base even, as uneven clay will bake at different times, and isn’t ideal for a batch that you want to be uniform.
- Then I rolled out a much thinner slab of black clay, at about 0.2cm thick, and hand cut little cow print patterns from it with my clay tool (pictured)
- Once I was happy with my cow prints I positioned them over the white clay, and lightly pressed my rolling pin over them to seal the clay together. You could use glue here if you wanted to, but I find a bit of pressure from the rolling pin does the trick.
- Then I prepared my little jumper cutter, by making sure it was clean.
Cutters –
Cutters make everything easier, and come in a whole range of cute designs – from seasonal items, to food designs to your standard basics. I have an entire beginners guide to cutters, which is a handy read if you’re not familiar with them:
When I started making polymer clay earrings I was surprised that it was a little tough to find teeny tiny earring-sized clay cutters out there on the web.
When I discovered the massive range of fondant cake cutters I was overjoyed! So many cute styles to choose from, and all the perfect size for dangly earrings.
Luckily polymer clay is super light-weight, so even if you did want to use the large regular clay cutters, they shouldn’t be too heavy for your lobes.
Browse my recommended fondant cutters here: Polymer Clay Accessories Buyers Guide
Clay supplies: Best Polymer Clay for Earrings Buyers Guide
Cling film –
Place a strip of cling film over your clay before pressing your cutter into the slab, for smoother edges and no need for sanding after baking.
Just tear off a strip and place it securely over your design, and make sure their are no air bubbles or loose bits. Then press your cutter into the clingfilm layer and through the clay.
Simply peel off the clay afterwards for a perfect result!
Baking
First of all make sure you have either poked a hole in your unbaked design for the hooks or you have a drill to add the holes after baking.
Also make sure you have a way of carrying your lovely batch of designs over to the oven – it’s best to avoid doing this with your hands as you can leave accidental last-minute fingerprints in your clay.
Top tip: to remove fingerprints from polymer clay wipe a thin layer of rubbing alcohol over the design, to smooth out the surface.
Cover your clay with baking paper before you put it in the oven, to trap heat around the design for even baking! You can pick up baking paper at your local supermarket, or online – add some to your basket the next time you are shopping.
Even baking is crucial for thicker designs, as often the bottom of uncovered designs will cook faster, creating an uneven bake throughout – which can lead to some parts of the design becoming more brittle than others.
After baking, wait a few hours, or even a whole day for the earrings to cool and sufficiently harden before messing with them.
Painting (optional)
Add acrylic paint to your polymer clay designs – it’s cheap, simple and fun to do so, and painting your polymer clay earrings can save you loads of time with tricky little details or more intricate patterns. This is one of my favourite tips for making polymer clay earrings, because it can make such a difference to your designs.
Why it’s a great idea:
⦁ Adding paint to your polymer clay earrings can totally change your designs for the better, with more unique and interesting patterns!
⦁ Not only will your amazing earrings be handmade but hand painted too! Double the wow-factor for your Etsy listing by one-upping your competition with this method, and watch the interest in your products increase.
⦁ Plus, with hand painting it’s hard to replicate the EXACT same pattern each time, which only adds to the magic; each design will be slightly different which provides yet another compelling creative touch to your pieces from a sales perspective.
Your clay needs to be properly baked and completely dry before you wield your paint brush before it!
This is so no moisture/oil comes out from the clay and disturbs the acrylic paint when it’s swept across the surface of the design, causing that pesky mottled/bubbling effect.
The clay could also have not cured properly and the water may have made it weak and more susceptible to snapping, so make sure it’s properly baked and cooled.
Top tip: Leave the clay for 24hrs after baking to properly cool and harden, before painting.
You technically could paint it before baking, and some brands may say that you can do so, but the above is why I won’t and never will; I don’t want to risk the structural integrity of my little master-pieces! 😉
Invest in a Good Quality Paint Brush
The reason you want a nice brush is so the brush hairs don’t shed onto your design and stick in unwanted places.
Secondly, the smoother and better quality brush hairs, the nicer your paint strokes will come out – think of a cheap brush like an old toothbrush, with the bristles bent out of shape – not the best tool for delicate intricate painting!
A more expensive brush will create lovely smooth and even strokes, with no rough bristle marks.
Varnishing
Varnishing (or acrylic sealing) will make your design stronger and less susceptible to brittleness from moisture absorption over time – widely available in craft stores, DIY stores, online, you should have no trouble getting your hands on some.
The sealer (or varnish) is super easy to use: simply wait for your paint to dry and then seal your design with a thin layer, and leave to dry – acrylic sealer and varnish take take between 4-12 hours to dry, so be patient and avoid touching your designs.
You should keep your designs stored somewhere safe, so they won’t get damaged out and about, and little bits of dust and fluff on the air in your home won’t stick to the varnish and mess up your designs in this final stage.
Once fully dried your designs will be scuff, chip and scratch proof and will benefit from an extra layer of hardening – win win!
Adding the hooks
After varnishing you can add your jump rings and hooks!
If you have some strong tweezers or jewellery pliers, this is a great way of unbending the jump rings and fastening them back closed.
If you want a more professional finish you can use a jewellery soldering iron to completely seal the jump rings for a snag-proof, sturdy finish that will keep the jump rings from catching on clothing garments or coming loose over time.
7. Storing your earrings

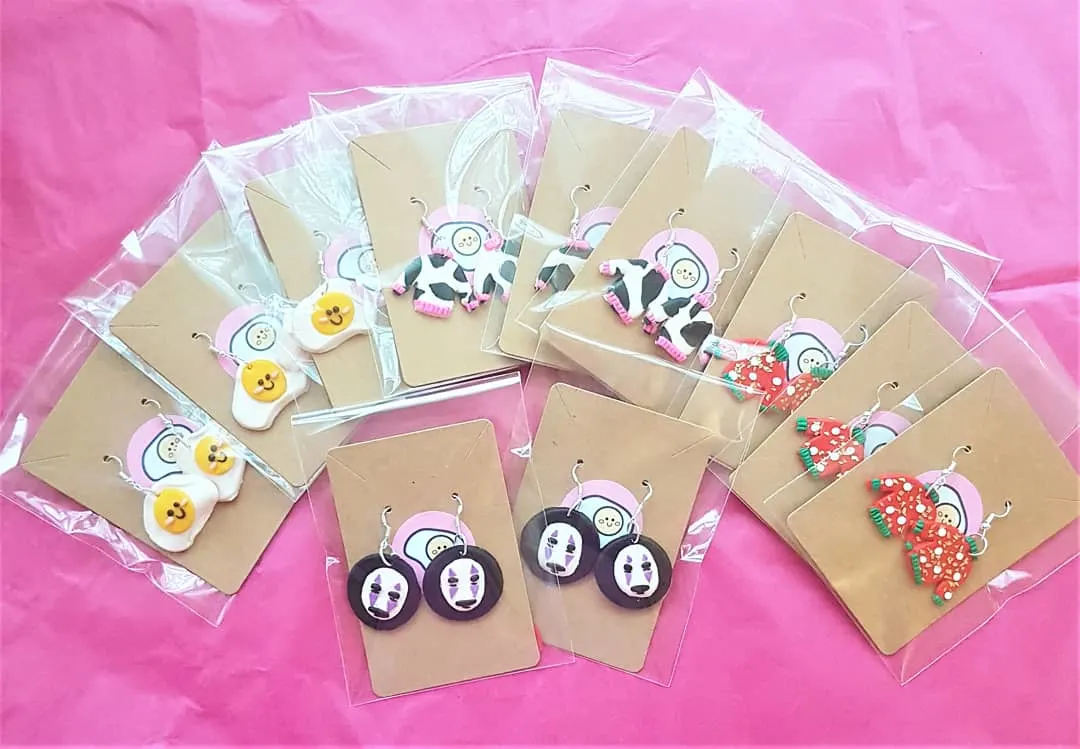
Make sure you keep your earrings on earrings cards and in packets or gift bags to keep the earrings pristine for sale.
Store them somewhere they won’t get damaged, in organised rows so it’s easy to see your stock amount and keep a note of the pairs you made for inventory purposes. Store away from sunlight, as prolonged exposure to the sun will eventually bleach the colours of your clay, causing your vibrant jewellery to fade. Also, it’s less likely to get damaged if it’s stored properly – polymer clay jewellery may be very strong after proper curing, but it isn’t indestructible!
If you’re keeping them in storage drawers add a little label to the drawer so you don’t need to open it to remind yourself of what’s inside. You’ll be surprised once you get going how these tips make it much easier to keep track of stock in the long run!
It’s not advised that you store baked and unbaked clay together, as the uncured components of the unbaked clay may actually weaken the baked clay over time, through exposure to it’s oily residue.
This is due to what the clay is made of and how it responds to baking; the clay is made up of plastics, stabilizers, fibres and colouring components, that can be quite greasy before baking. Once exposed to the proper temperature for the allotted time, the clay hardens up and the oily residue solidifies. If you then place that hardened clay next to unbaked clay, the residue in the unbaked clay can draw back into the porous baked clay and start to make it brittle.
** Sidenote – avoid storing your unbaked clay in wooden or metal boxes, as the wooden boxes can dry out the clay’s oil residue, which is essential for keeping the clay pliable. The wood is more porous than the clay, so it will draw moisture into it, ruining the box and your block of clay. Metal boxes can be an issue in warm rooms, as they are a heat conductor and will melt your clay.
Plastic or glass is best in this case! Also, the containers don’t need to be completely air tight, as clay won’t air dry or dry out, which is one of the reasons it’s so easy to keep and use.
Top tip: to tell if something is the correct plastic, flip it over and look for the markings on the bottom. There should be the number five in a triangle on the underside.
Related questions
Where to store polymer clay tools?
Store Polymer Clay tools in a safe place, i.e. a storage container away from children in case of accidents. Keep them organised, in labelled storage drawers.
Where to store polymer clay?
Unbaked polymer clay should be stored in either it’s plastic wrappings, cling film, a zip-clocked or sandwich bag, a plastic storage box or storage drawers made from polypropylene (PP) plastic. Glass storage solutions also work well.
How to clean polymer clay tools?
Warm water and dish soap/washing up liquid is an ideal way to clean tools, however make sure you do not submerge plastic tools in boiling water, as this may cause them to melt.
Are polymer clay tools safe?
Polymer clay tools should be stored in a safe place away from children, and adult supervision should be given during all instances of use in case of accidents.
Is polymer clay safe?
Polymer clay is non-toxic, making it safe to use around children and pets, as it has been tested and certified. Polymer Clay only becomes toxic when baked at extremely high temperatures, for prolonged periods of time. If baked according to the packaging instructions, it’s perfectly safe.
Can Polymer Clay Air Dry?
Polymer Clay cannot air dry, it needs to be oven baked at the correct temperature for the brand you are using; instructions are found on the packaging of each clay block. Oven baking allows the clay to sufficiently cure (harden) which cannot be achieved at room temperature with air drying.
Can Polymer Clay Dry Out?
Polymer will not dry out at room temperature. Polymer clay requires oven baking in order to properly dry and harden, at the temperature suggested on the packaging of each individual brand, and so will not dry out in a normal room, in normal conditions.
Can Polymer Clay get wet?
Both baked and unbaked polymer clay is waterproof as the material is oil based (made with plastics), so it cannot get wet.
What do I paint my Polymer Clay with?
You should be painting your designs with acrylic paint, because it’s:
⦁ Wonderfully cheap
⦁ Versatile
⦁ Non-toxic
⦁ Comes in all the colours you can think of
⦁ It’s very easy to use for beginners and pros alike
Good luck and have fun!
More from Wearably Weird:
- Top Tips for Making Polymer Clay Earrings – time saving!
- Design Ideas for Polymer Clay Earrings – A Guide
- How to Make Polymer Clay Earrings: the Basics
- How to Sell Polymer Clay Earrings on Etsy – Quick Guide
- How Long to Bake Polymer Clay Earrings – Quick Guide

Lorna is a footwear geek and the founder of Wearably Weird. She created a YouTube channel in 2021 for fellow footwear fanatics, dedicated to detail-rich footwear reviews and info. She has a fashion media qualification (awarded in 2011).