
Learning how to spot fake Vans is key to making sure you don’t waste your money on counterfeit sneakers. It’s best to make sure you are taking care of your feet by enjoying genuine Vans quality, and not a poor, unsupportive knockoff.
In this guide I’ll be covering 15 different ways to identify real Vans vs fake Vans, including pictures and a video side by side comparison of my own real pair of Vans and a fake pair of Vans I purchased by mistake. I learned the hard way, so you don’t have to!
*This post may link to online stores. If you click a link and buy something, I may get a commission. Learn more.
1. Check the packaging
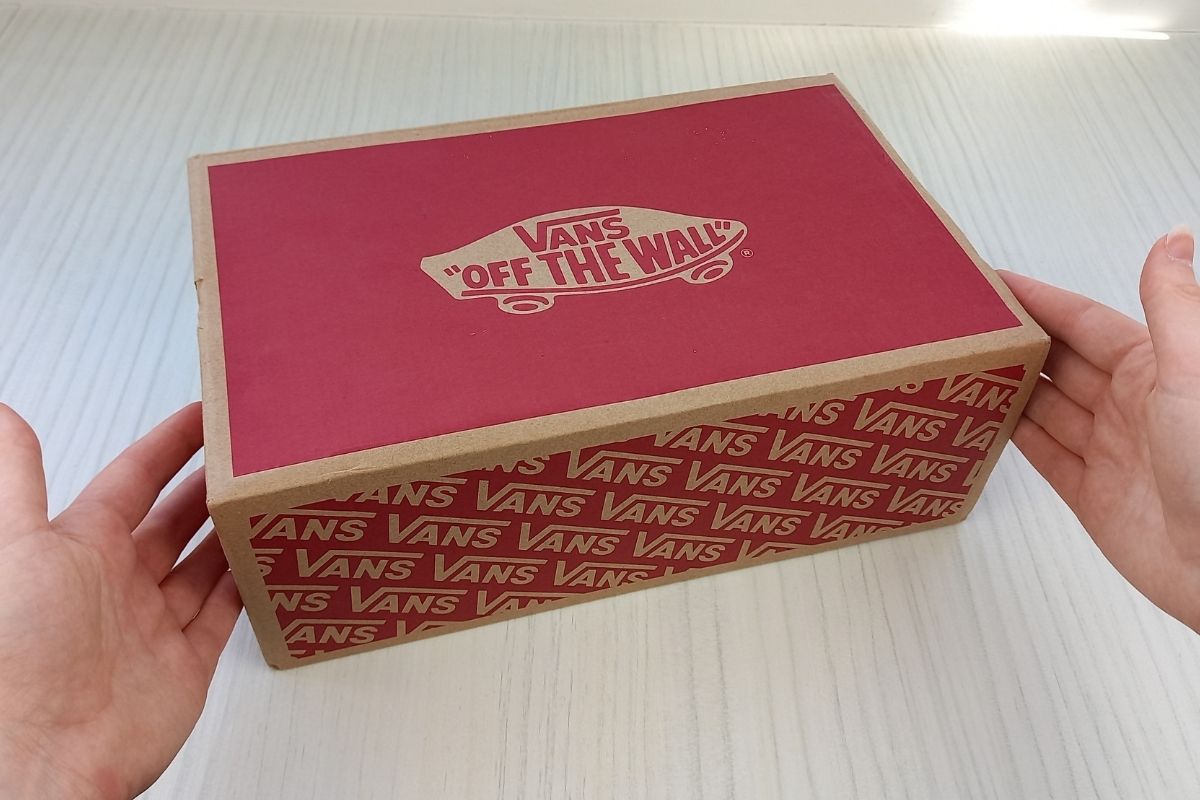

Authentic Vans that you order online (from vans.com is best) or purchase in store should come in good quality packaging.
The packing should include:
- A thick cardboard shoebox that is nicely branded. See the above image of my own Vans shoebox. The shoebox should not have any spelling mistakes, should come with a sticker including the barcode, country of production code and the sizing, model and color of the sneaker.
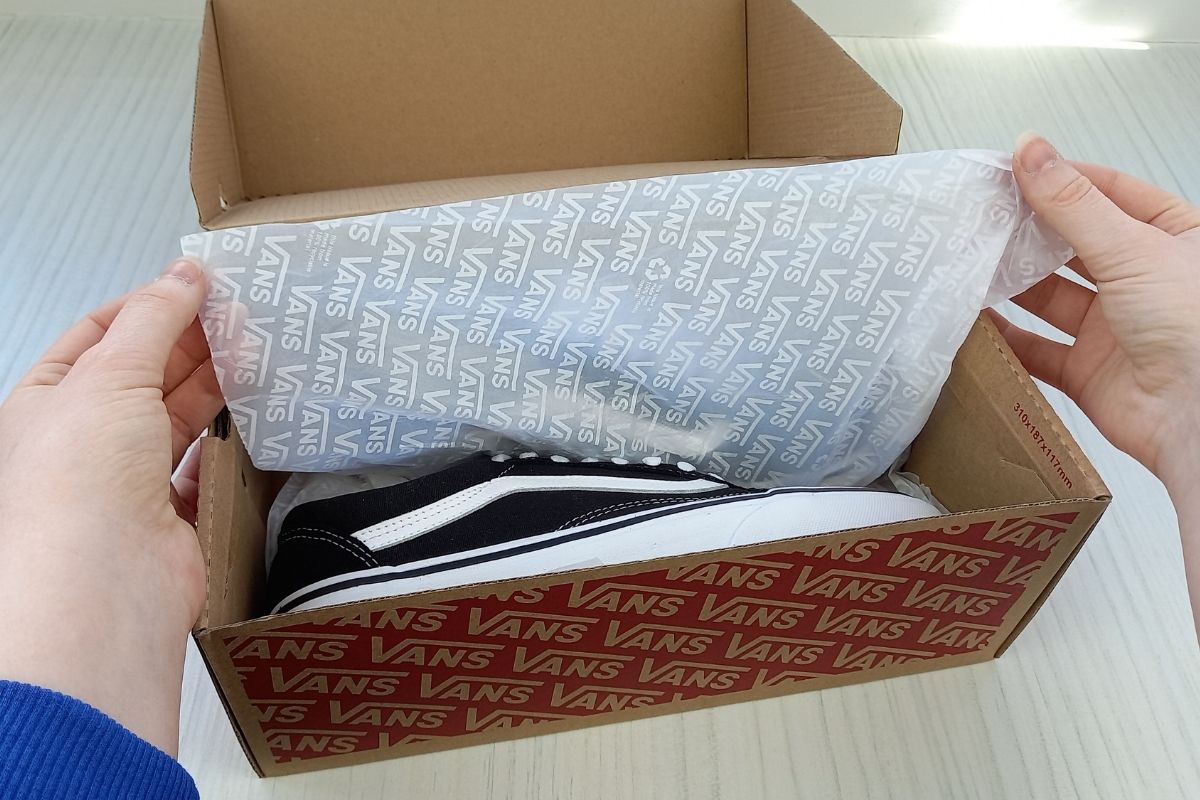
- High quality Vans tissue paper lining the box. The tissue paper should be nicely branded as you can see in the below image.

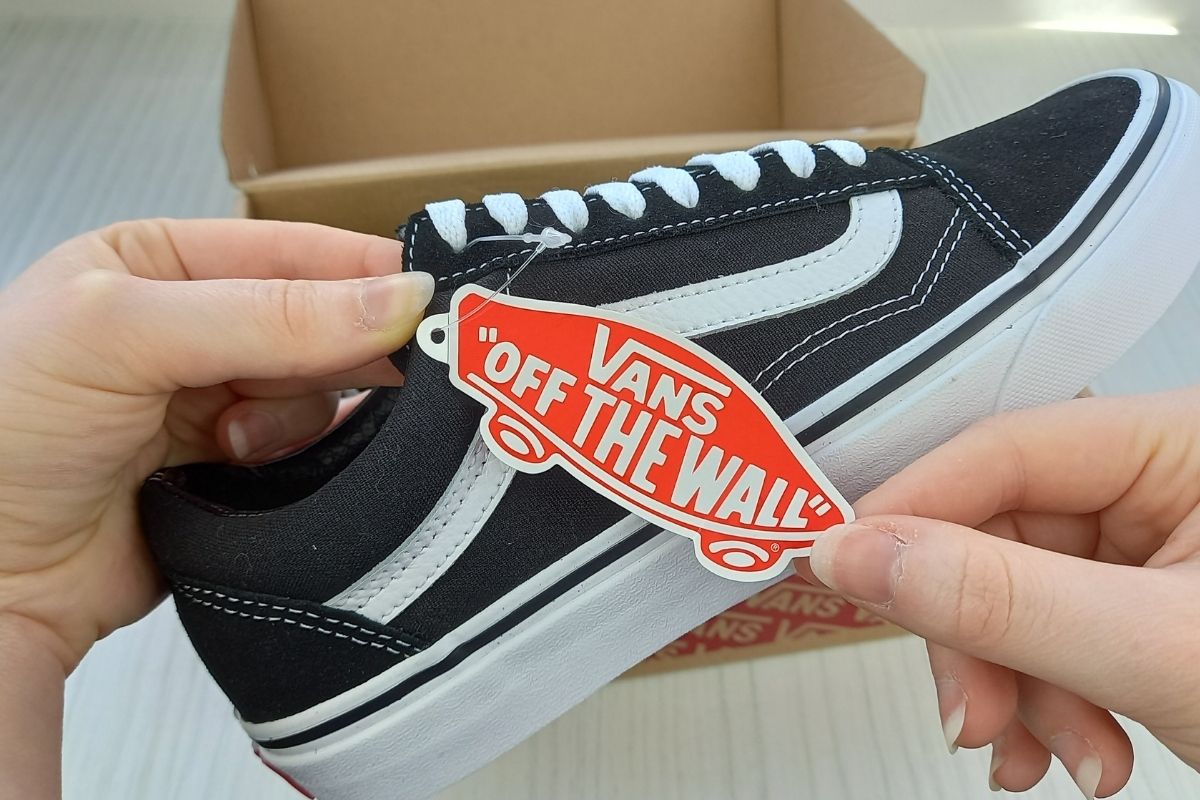
- A Vans trademarked ‘off the wall’ label. The label should be nice feeling, shiny and be attached to the sneaker through the top eyelet. The design of the label should exactly match the Vans trademark rubber tab on the back of the sneaker with no spelling mistakes or defects.

Make sure your Vans come with all of these features.
2. Inspect the Vans rubber trademark tab
An easy giveaway of a counterfeit pair of Vans is how the rubber trademark tab on the back heels of the sneaker is presented.


Look for errors on this rubber tab. Everything should be spelled correctly and the Vans ‘v’ should have a long line that extends all the way to the end of the ‘s’.
The logo should feature the ‘off the wall’ slogan, with quotation marks on either side, above a skateboard.
The rubber tab itself should be a muted, dark red color. As you can see in the above image the fake pair of Vans has a bright red tag, that is much too bright. It is also missing one of the quotation mark dashes from the logo, at the end of the ‘off the wall’ slogan.
Above it the foxing tape (vans made their outsoles with three layers of foxing tape) should be folded over in an overlapped way. Fakes will be neatly molded together.
If you want a closer look at how to spot fake Vans, here is a YouTube video I made on the Wearably Weird YouTube Channel:
3. Check the Vans insole and stamp
Checking the Vans insole and the stamp printed on the insole is a quick way to spot a fake pair of Vans.
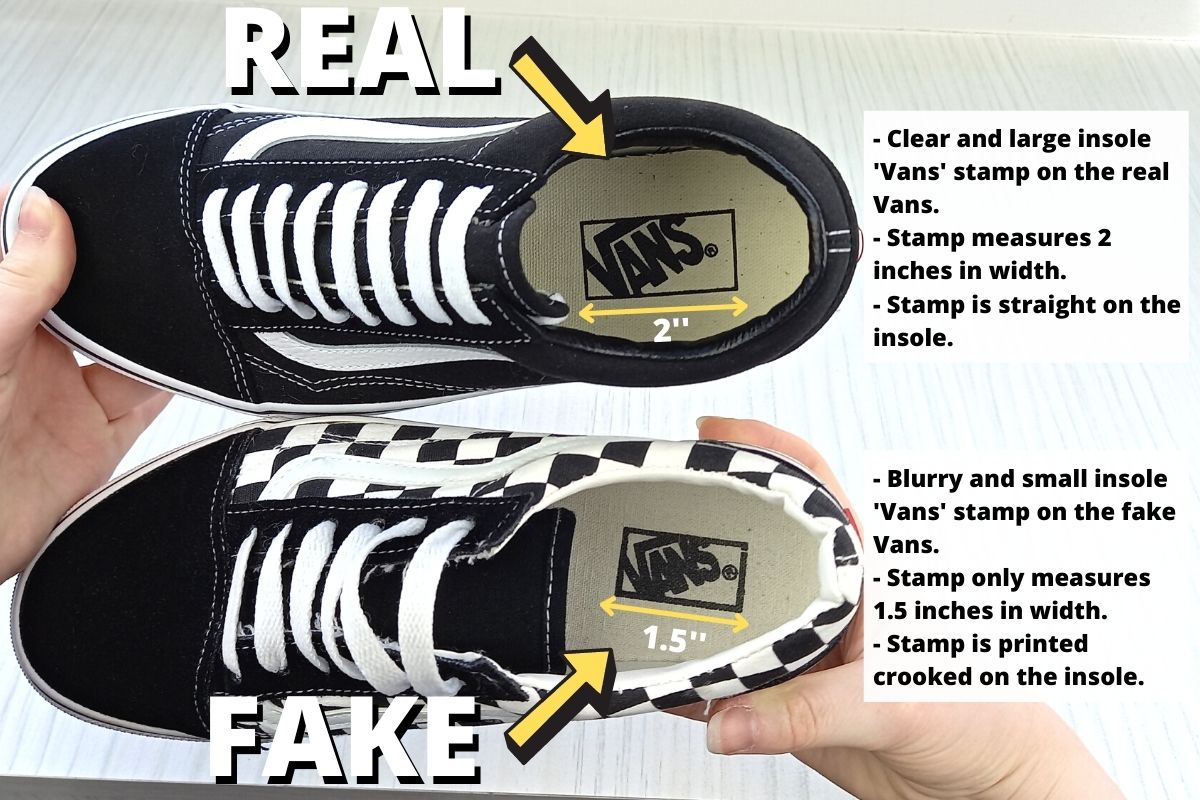
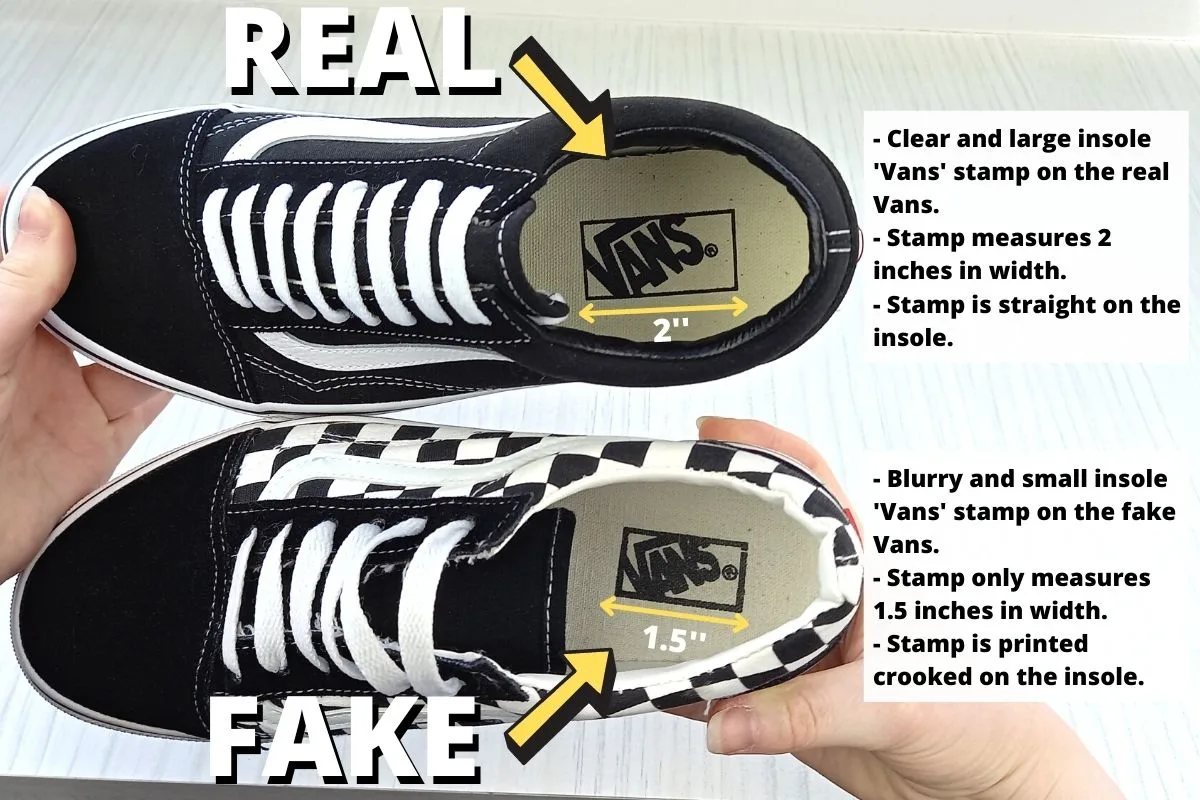
First, I’d recommend checking the ‘Vans’ logo stamp on the insole. Here’s what to look for in a genuine stamp:
- The stamp should be 2 inches long, as you can see in the above image. On the insole of my pair of real Vans you can see the stamp looks quite large when compared to the fake stamp (which is only 1.5 inches long).
- The stamp should be printed clearly, with no blurring. In the above image you can see how clear and crisp the real Vans stamp looks, when compared with the faded blurry fake.
- There should be a small amount of space between the end of the box surrounding the stamp logo and the ‘Vans’ wording. In the fake you can see how the word is pressed right up to the edge of the box, for a messy result.
- The stamp should appear nice and straight when printed on the insole. A crooked stamp placement is an indicator of a fake.
The insole itself should be securely glued in. With fakes the EVA foot bed may be removable which is a bad sign.
If you like the look of how I lace my Vans, check out the lacing guide I have here: How To Lace Vans – 7 Cool Ways (EASY guide)
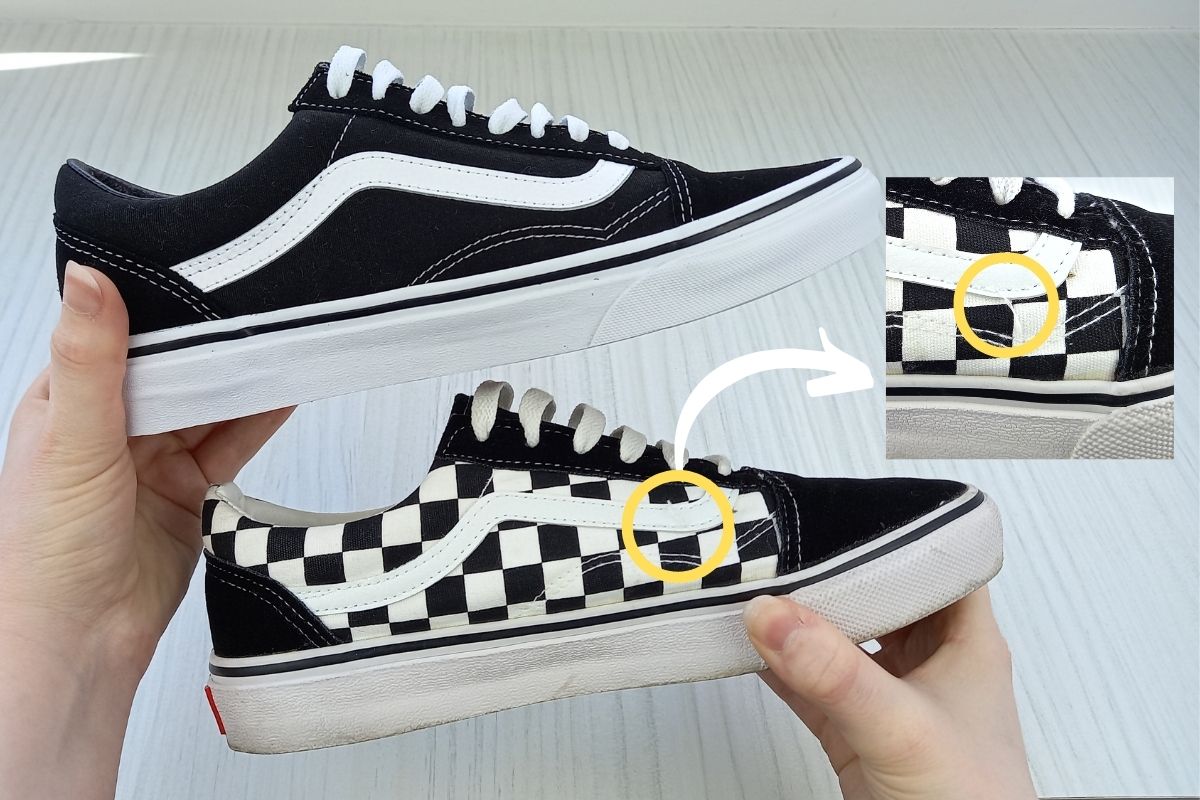
4. Look for a little label on the side of the Vans
Some Vans models feature a label on the outside of the upper, as pictured below.

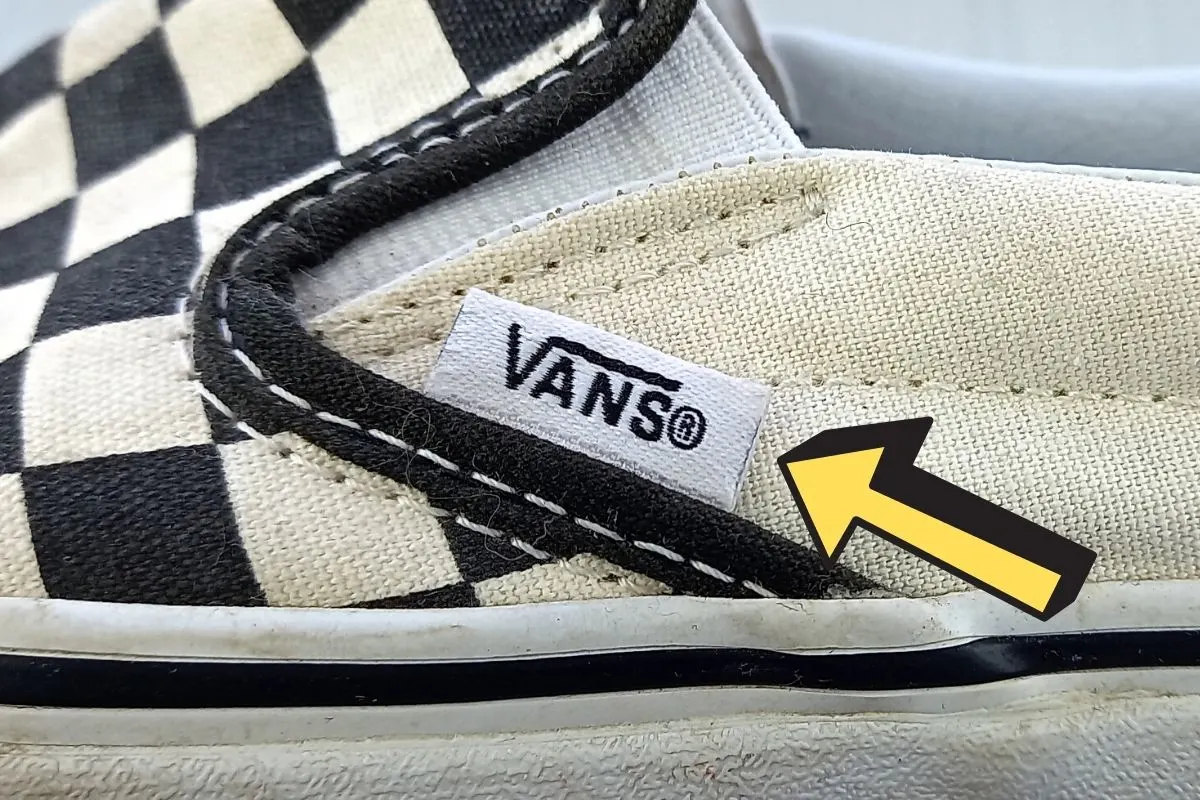
Making sure to check for this label is a good way to check if your pair are fake or not. Please note Vans Old Skools do not have this feature.
5. Buy from a reputable source
When purchasing a pair of Vans it’s best to go to a reputable retailer, online or in person. Purchasing a pair from eBay or from a market stall may result in a counterfeit purchase.
You can’t go wrong with buying from the official site vans.com.
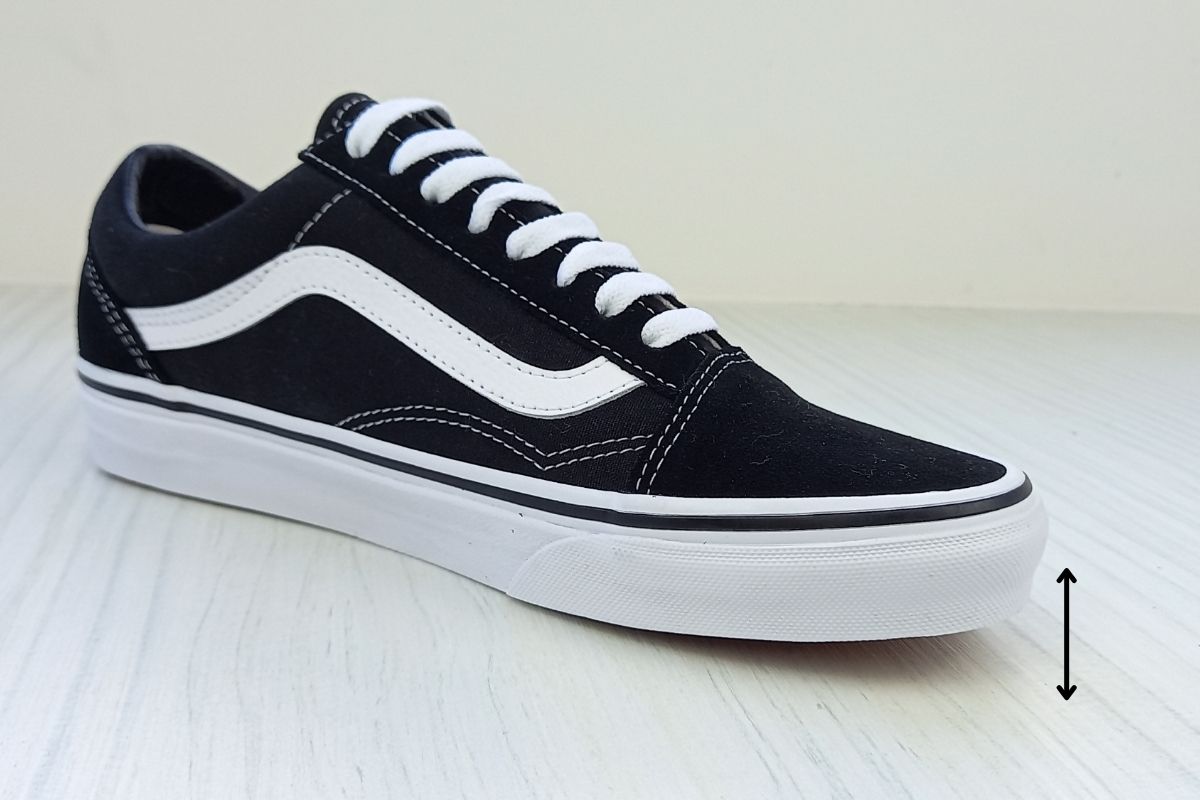
6. Make sure the rubber toe caps are of good quality
Checking the rubber edges and toe caps are made nicely and appear sturdy is a great way to tell if your Vans are real or fake.
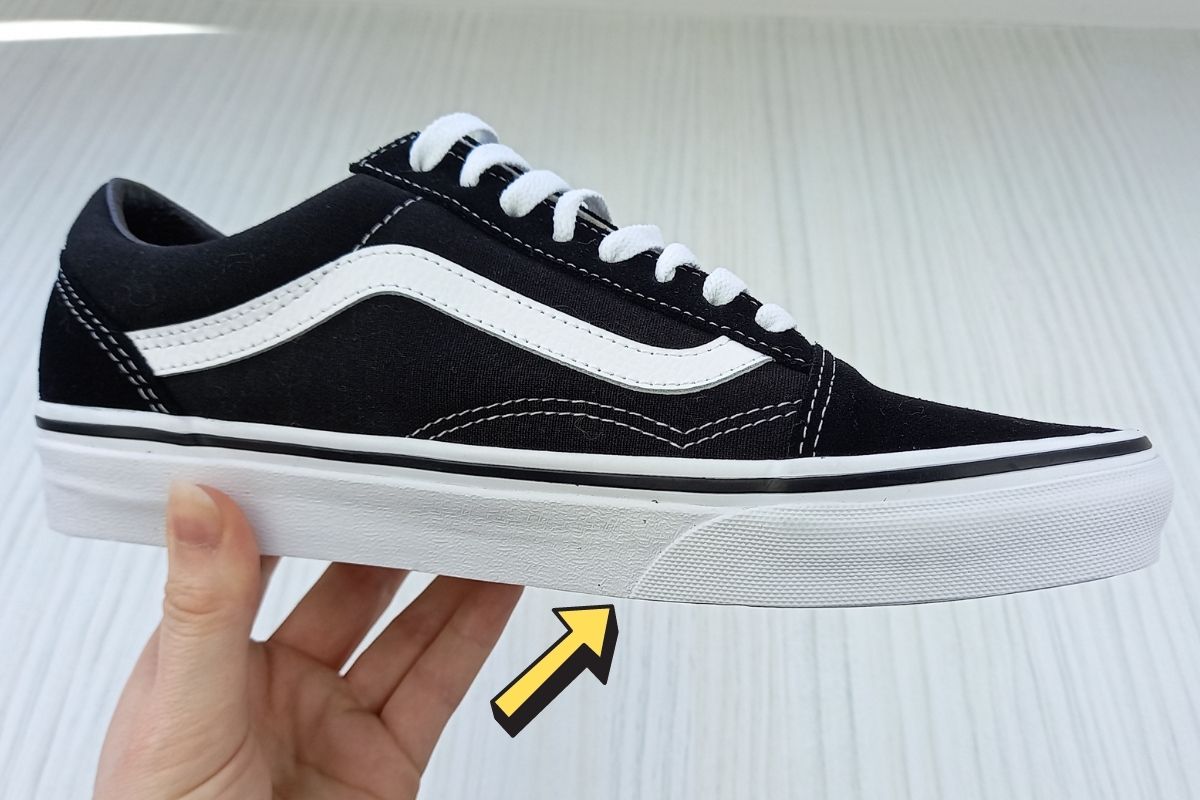

The toe foxing should be glued and not molded on. Real Vans glue three layers of foxing together to create their edges, whereas cheap fakes just use heat to mold a layer of foxing together.
In the above image I have used an arrow to point to the area of the toe foxing you should be looking at. The line there should appear glued and not heat molded to the foxing.
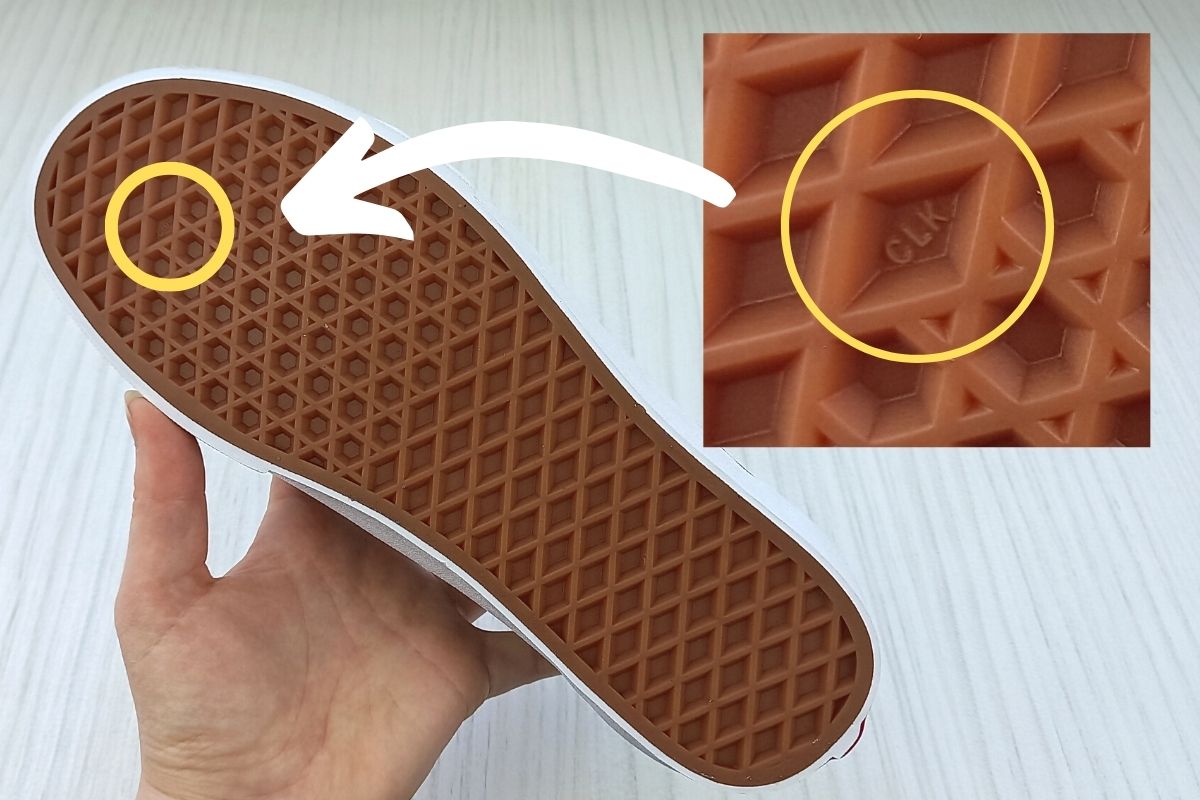
7. Check the outsole
Take a look at the outsole of your Vans. They should feature an intricate looking pattern made up of diamonds and rhomboids.
There should be a 3 letter code printed into the pattern that says ‘CLK’, towards the top in the centre of a diamond. The three letter code should match the country code on a sticker inside the Vans shoe box.
Here’s a photo of the bottom of my authentic Vans, so you can see the code printed there:

See the below sticker on the inside of my Vans shoebox, that indicates a matching ‘CLK’ code.
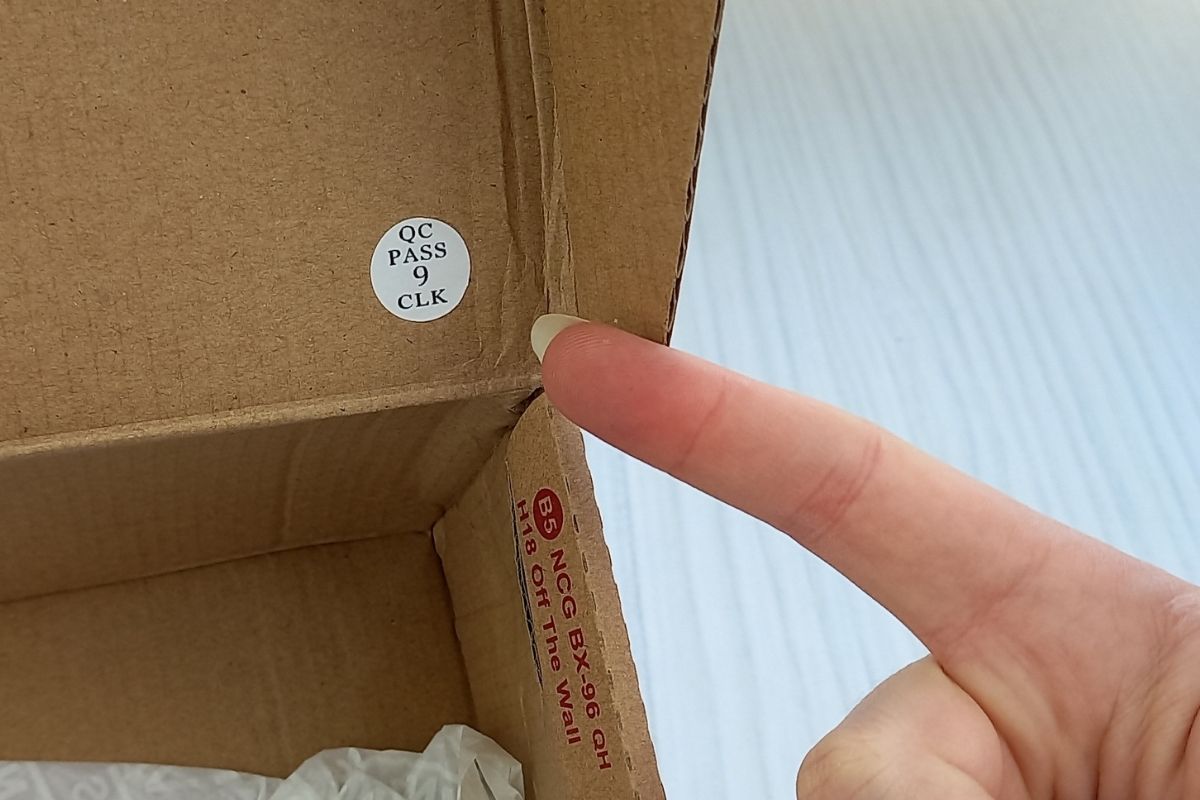

If your sneakers don’t have the diamond and rhomboid pattern, and are missing the three letter code then they are fake.
8. Inspect the stitching
Inspecting the stitching is another clear way to identify a fake pair of Vans. Even, well done stitching, that looks neat indicates a high quality production line, and real Vans.
Any double stiches, defects or loose stiches indicate a fake. Everything should look straight and evenly done, with a uniform woven pattern.

As you can see in the above image comparing my real and fake Vans, the stitching on the fake Vans has loose threads. Unsightly stitching like this is a sign of bad workmanship.
The Vans upper should be smoothly cut, without bumps. Bumps indicate a cheap production line without quality checks, which is a giveaway for counterfeit products.
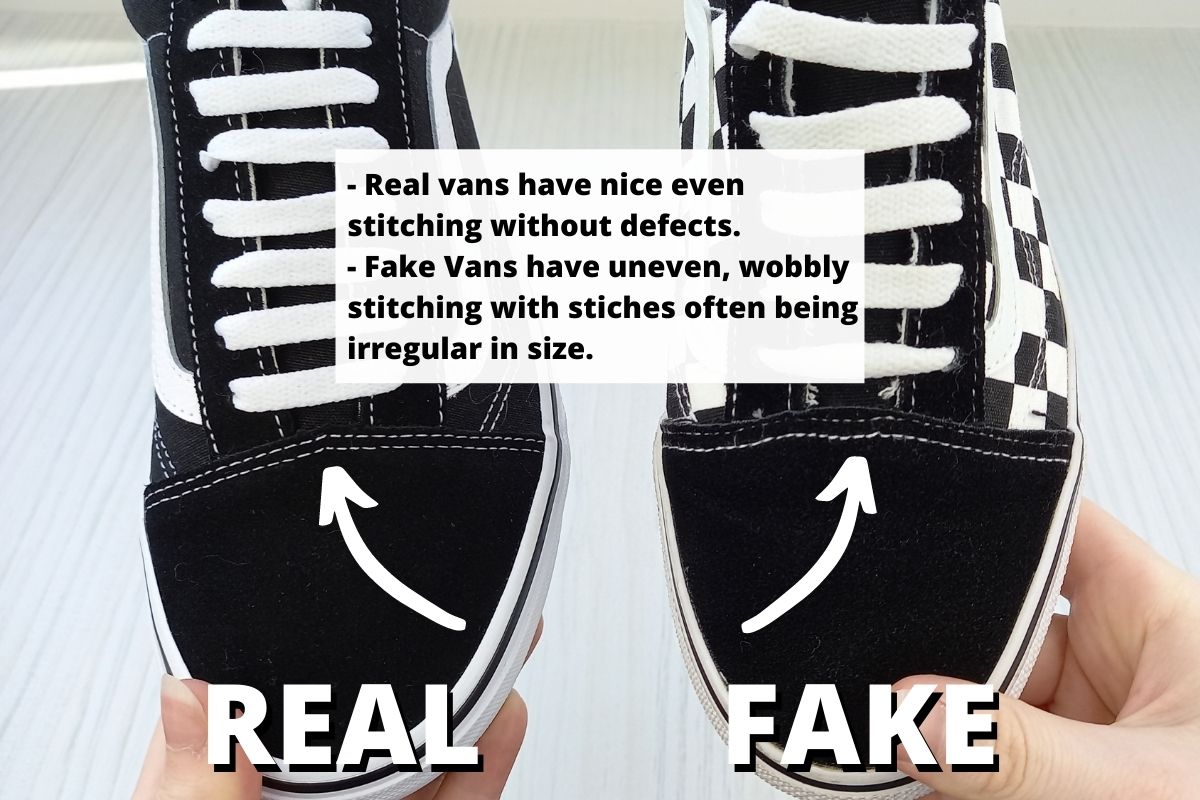

In the above image you can see how uneven the stitching is on the upper of the fake Vans. The upper is bumpy and not smooth, unlike the real Vans upper which is neatly cut.
9. Compare the weight
Checking the weight of your Vans is a clear way to identify a fake pair.
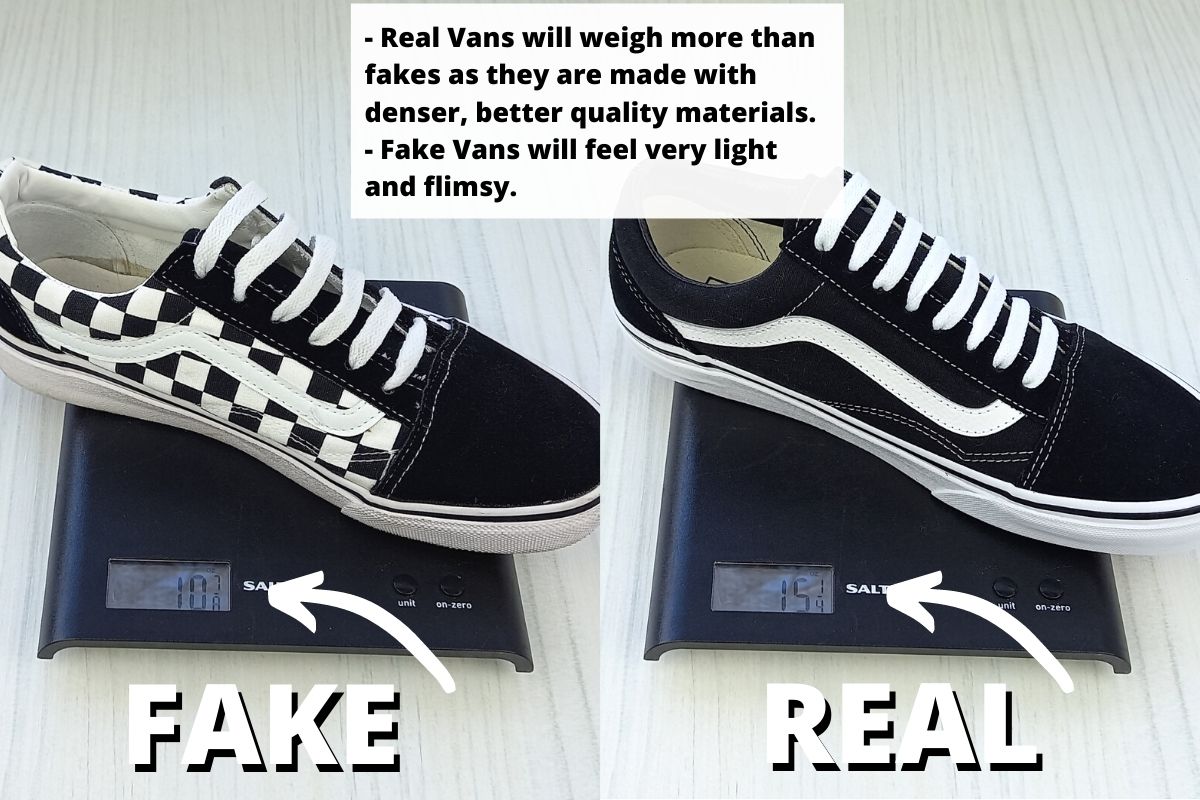

Fakes are made with low quality materials and will feel light on the feet. In the above image you can see I compare the weight of my real and fake Vans. Both pairs are a UK women’s size 6 (US women’s size 8).
The fake Vans weigh in at 10 oz, whereas the real thing are over 15 oz.
Overall the fakes feel quite flimsy, and it’s obvious they aren’t dense enough when held to be the real thing.
10. Look for high quality materials and padding
Checking your Vans for plush padding and nice quality materials is a easy way to check if they are real or fake.
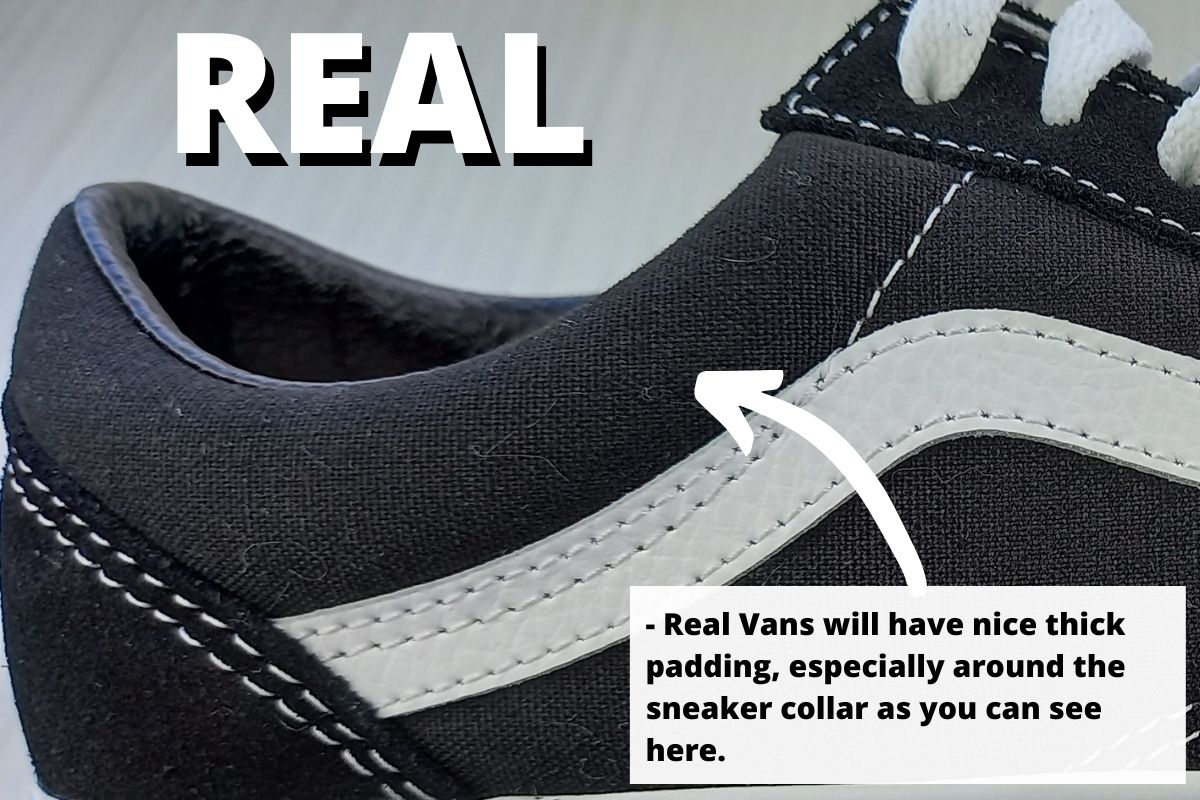
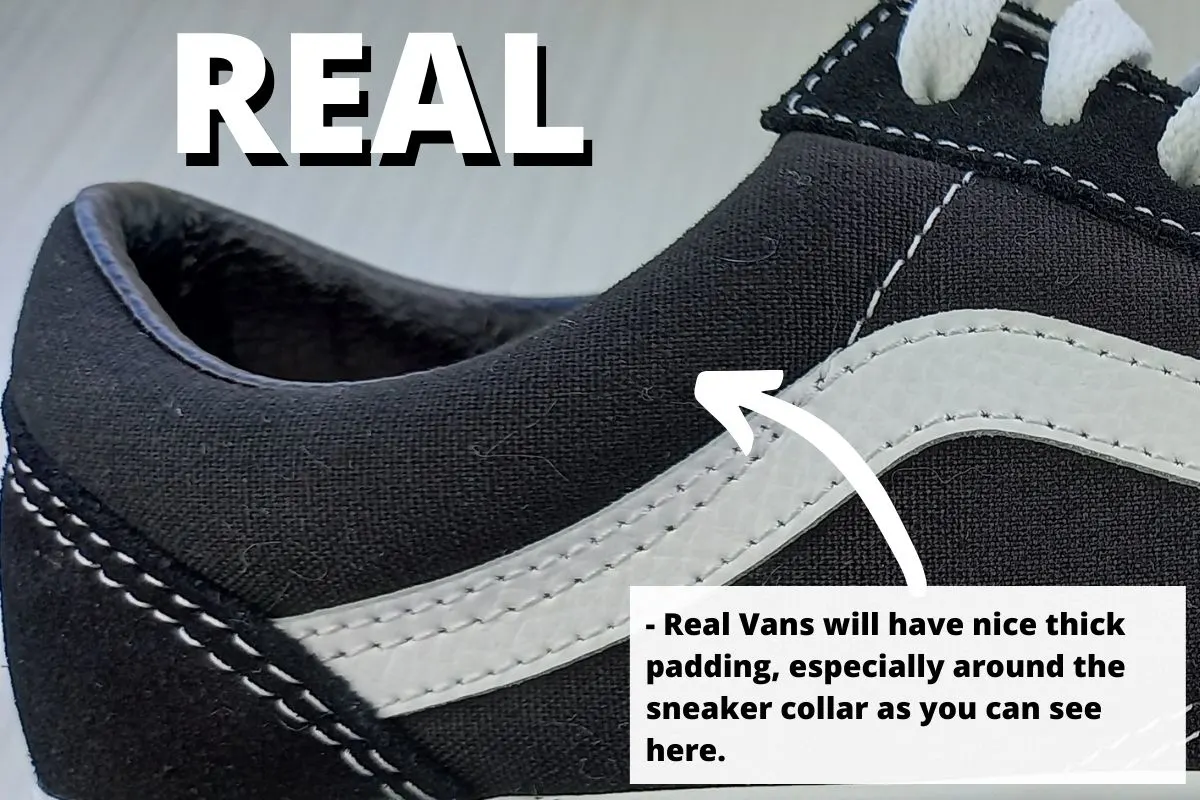
The sneaker collar in particular should be nicely padded and quite thick feeling. If your Vans don’t feel plush in the collar, they are fake. Vans are known for their comfort, so it should be immediately apparent if they aren’t up to par.
The soles should feel squishy, with nice support and the upper should be soft yet hardwearing. If any of the material is patchy, fading or coming away from the shoe that’s a sign of a fake.
11. Compare the laces
You can compare the laces of real Vans to those you suspect of being fake to help determine the authenticity.
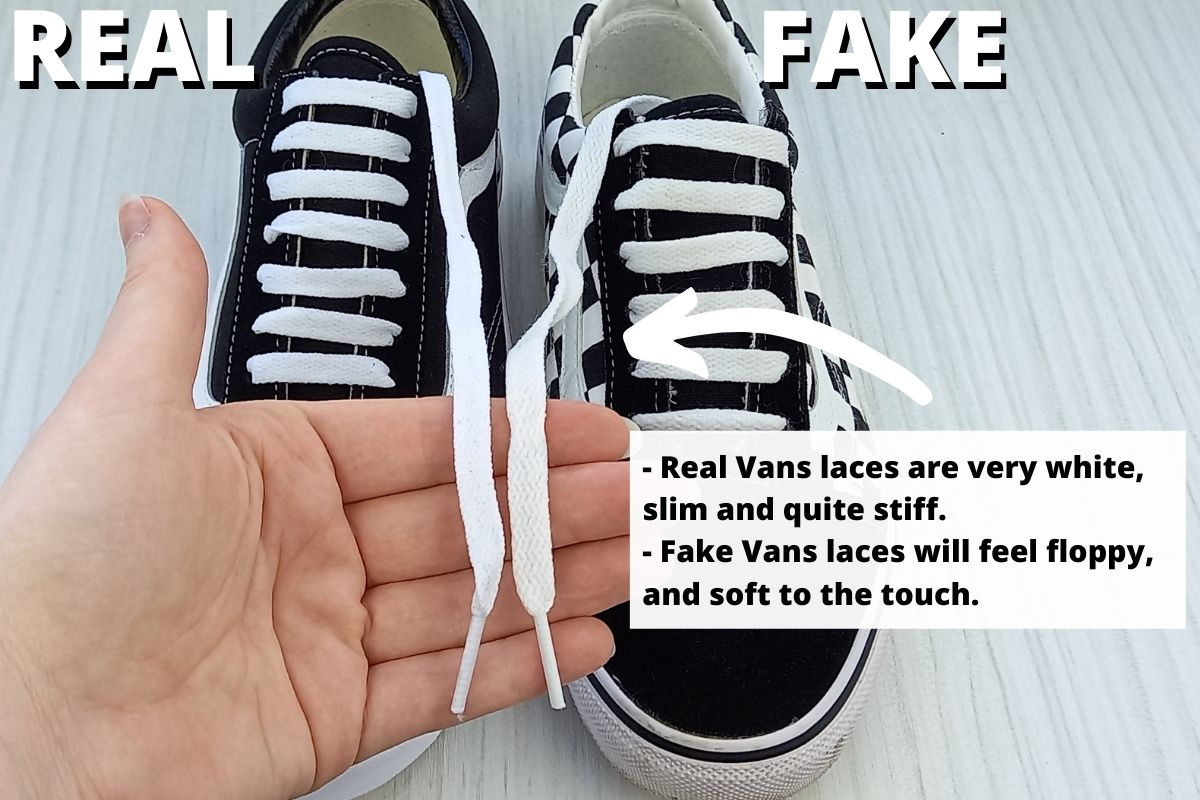
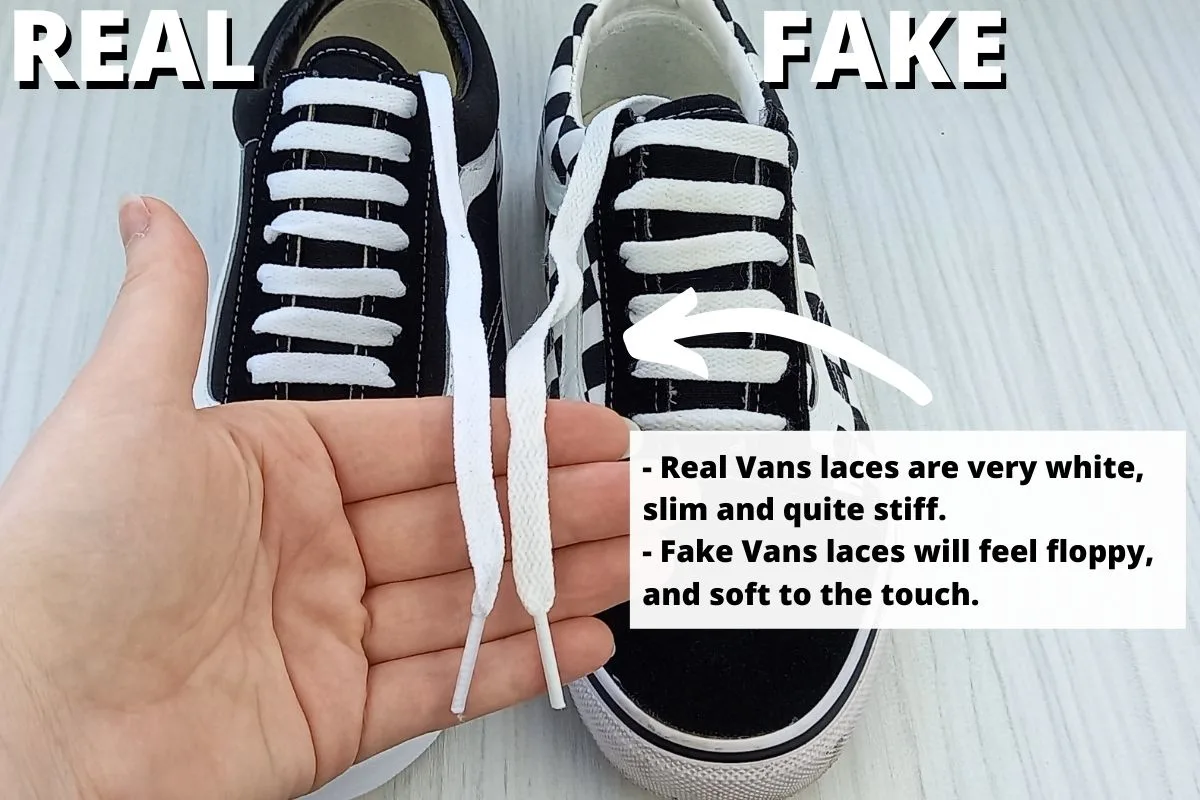
Here’s what to look for in a pair of authentic Vans laces:
- The laces should arrive not done all the way up the Vans. They should be threaded through the bottom two eyelets of the Vans only.
- Real Vans laces can feel quite starchy and stiff. Fakes will feel super soft.
- Real Vans laces are somewhat thin. In the above picture you can see they look slimmer than the fakes.
- The laces will be very white and pristine looking.
12. Check the stick on label under the sneaker tongue
On the inside of the sneaker tongue there should be a little stick on label indicating the sizing of the Vans.
On real Vans this label is quite small as you can see in the below image.


As you can see the fake label looks quite large and features different information to the real one. Double check the label on your Vans and make sure it looks like the above real one.
13. Run the barcode on the shoebox
A great way to differentiate fake vans vs real vans is to run the barcode on the box. You can use an online barcode checker to verify the authenticity.
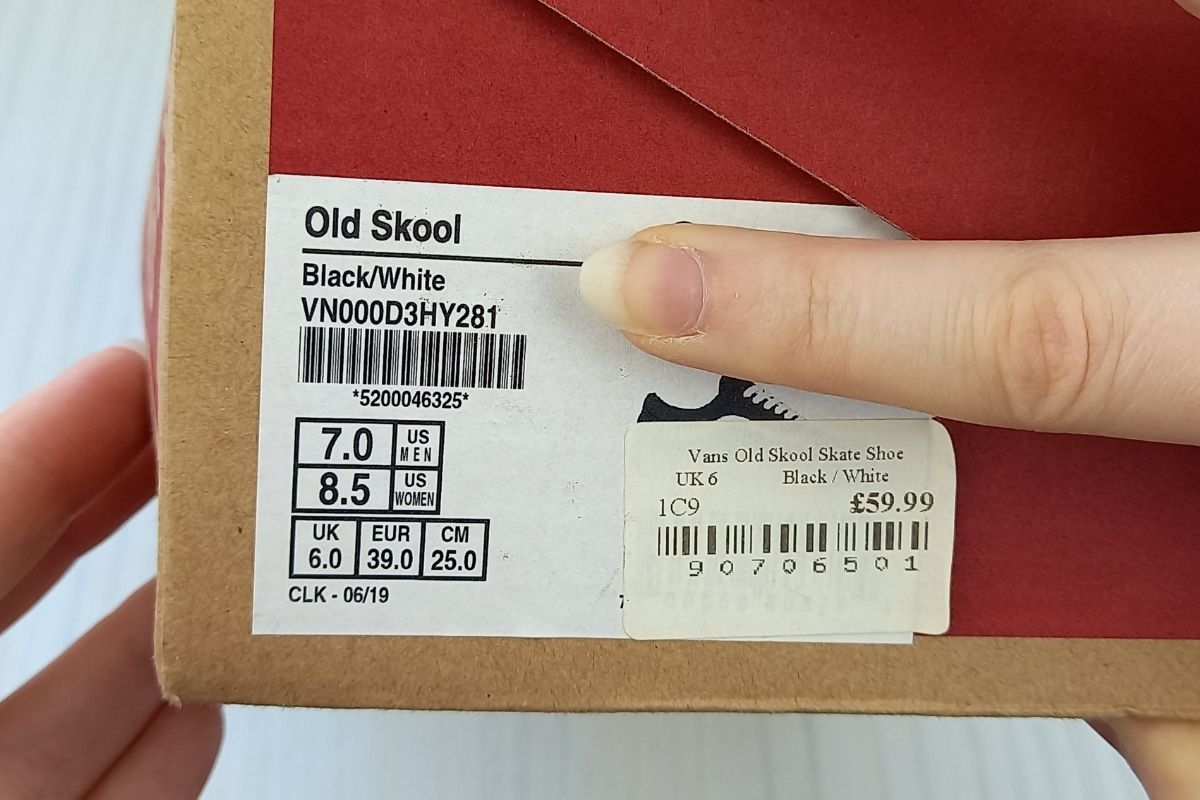

Alternatively you can download a barcode checker app on your phone and use your phone camera to scan it.
If there isn’t a barcode to scan like the one I have pictured above it’s likely your Vans are fake.
14. Double check the price
An easy way to check if Vans are real or fake is to make sure the price seems reasonable.
Real Vans range between $70 to $100 as a rule. Of course if they are on sale they’ll be cheaper. But if you find a pair of Vans online that are super cheap (like $15 or so), then they are likely fake.
If it’s too good to be true, it probably is.
15. The toes should have an upward tilt
The toes of real Vans tend to have an upward tilt when placed flat on the ground.
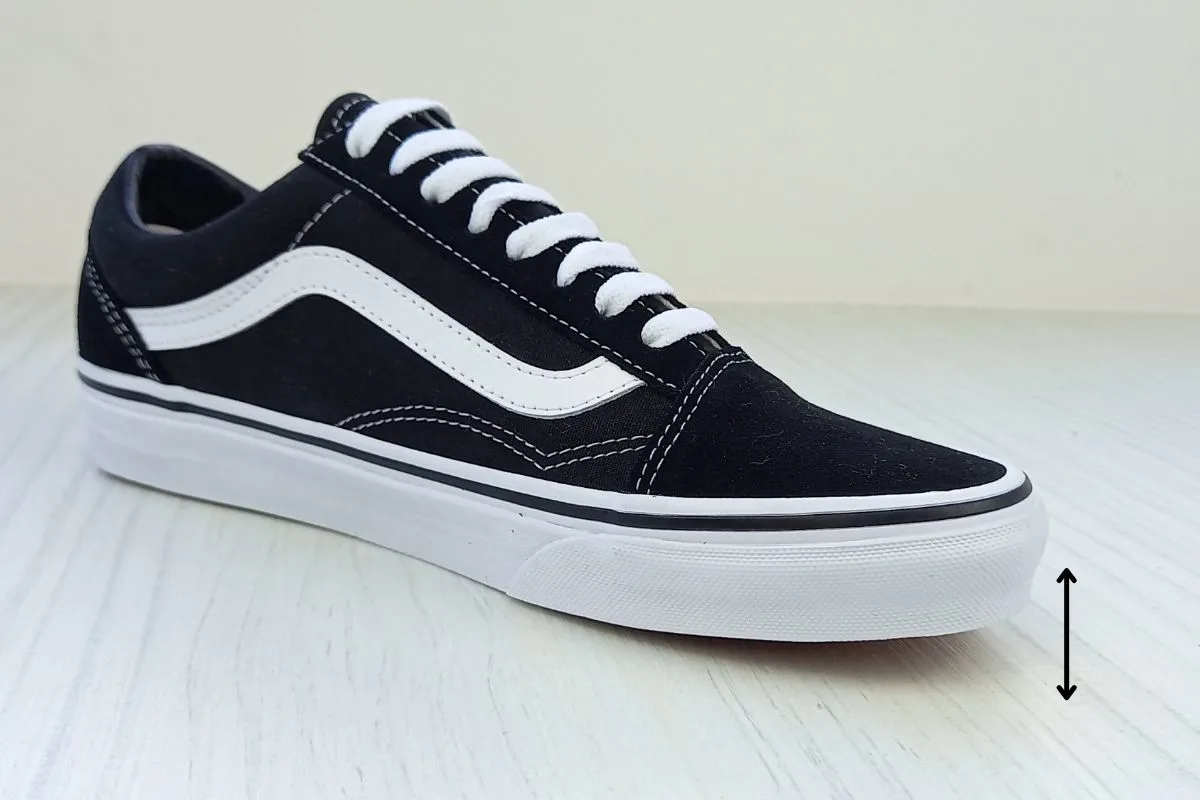
In the above image you can see how the toe box of my real Vans tilts upwards slightly. Fakes without proper arch support may not have this lift.
If you are struggling to determine whether your Vans are real or fake place them on the ground and see if they have the lift, or if they are flat.
Overall the toe box should feel roomy and not pinch your toes. The feet should feel nicely supported when walking, with a springy sole feeling. The upward tilt forms nicely to the natural shaping of the foot, for comfort purposes.
Fakes will not be made with this degree of consideration.
Related articles
Thank you for reading this post on ‘fake Vans vs real Vans’. I hope you now feel well informed on how to spot a pair of fakes.
Double check Vans against these tips before making your purchase and you can’t go wrong!
For more footwear content check out:
How To Spot Fake Crocs – 10 Differences (Photos)
Real Converse vs Fake: 15 Ways To Spot Fake Converse
Fake Vs. Real Nike Air Force 1s (10 Differences & PHOTOS)

Lorna is a footwear geek and the founder of Wearably Weird. She created a YouTube channel in 2021 for fellow footwear fanatics, dedicated to detail-rich footwear reviews and info. She has a fashion media qualification (awarded in 2011).